asio 调度器实现 - timer 实现详解


前面我们讲了基本的任务调度支持, 实际业务使用中, 还会有很多跟时间相关的任务, 所以一般的调度器也会包含定时器的支持, 我们先整体性的了解一下asio这部分的实现:
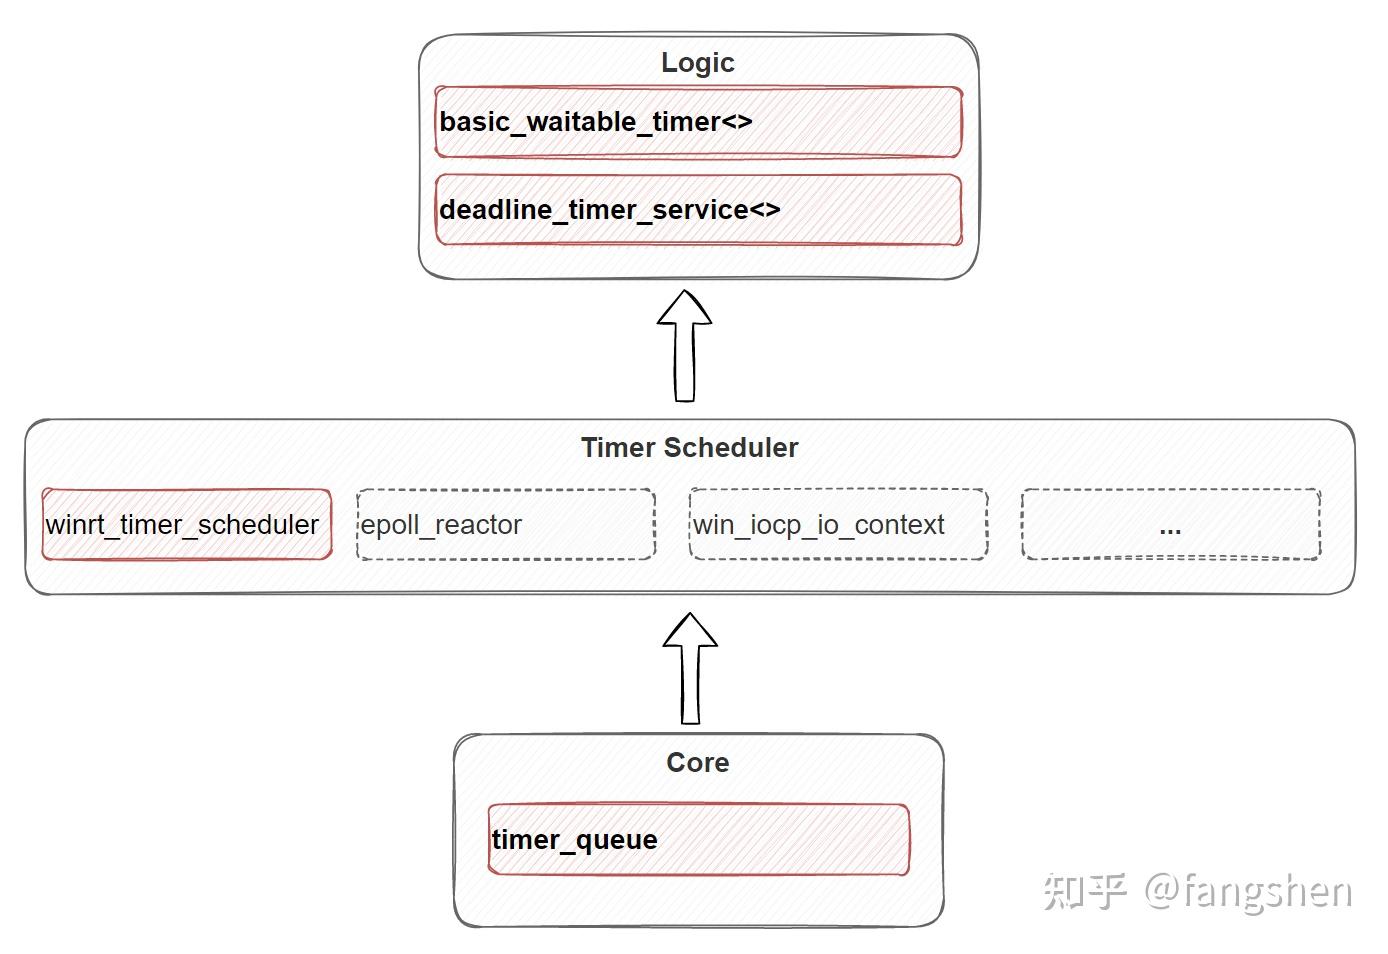
暗红色部分是我们主要关注的部分, timer调度器部分有比较多特定操作系统专有的实现, 这个地方我们直接选可以跨平台的winrt_timer_scheduler实现来讲述.
整体结构分为三层: 从下到上依次是: 1. Core部分的timer_queue实现 2. 中间的timer调度器实现(多选一) 3. 业务层使用的service和timer实现 下文我们将逐层展开, 讲述相关的实现.
1. Core部分 - timer_queue的实现
asio的timer_queue实现与libevent一样, 使用了min-heap(小根堆)的实现.
1.1 min-heap 实现简述
首先, 因为min-heap是一个完全二叉树, 所以我们可以直接使用数组来对其进行表示, 因为结构的特殊性, 我们很容易知道, 对于任意非0节点i: - 其父节点为(i-1)/2 - 左儿子为 2(i+1) - 1 - 右儿子为 2(i+1) 这样对于任意索引的节点, 我们都可以很好的利用以上规律定位其父节点, 以及左, 右儿子, 完成想要的操作. 另外min-heap的实现会保证根节点就是最小元, 用于定时器, 则是最近需要被执行的节点了, 利用这点, 我们能够很快的找出已经超时的节点进行后续的处理. 另外对于一个容器, 我们也需要了解 它的增删操作是如何完成的. 增加节点: 1. 在队列尾部先加入相关元素. 2. 根据当前元素的大小, 逐步执行shift-up操作, 直到找到一个合适的位置(满足min-heap约束) 举例来说:
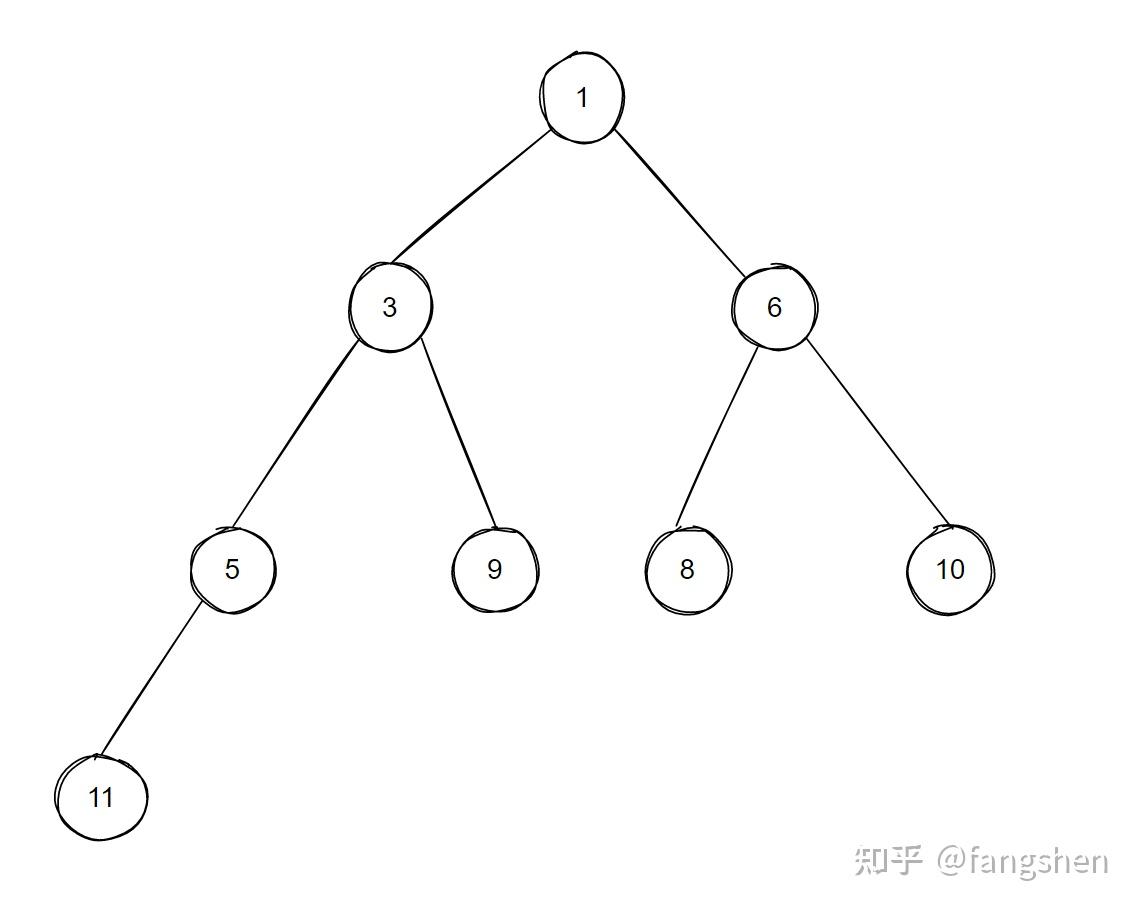
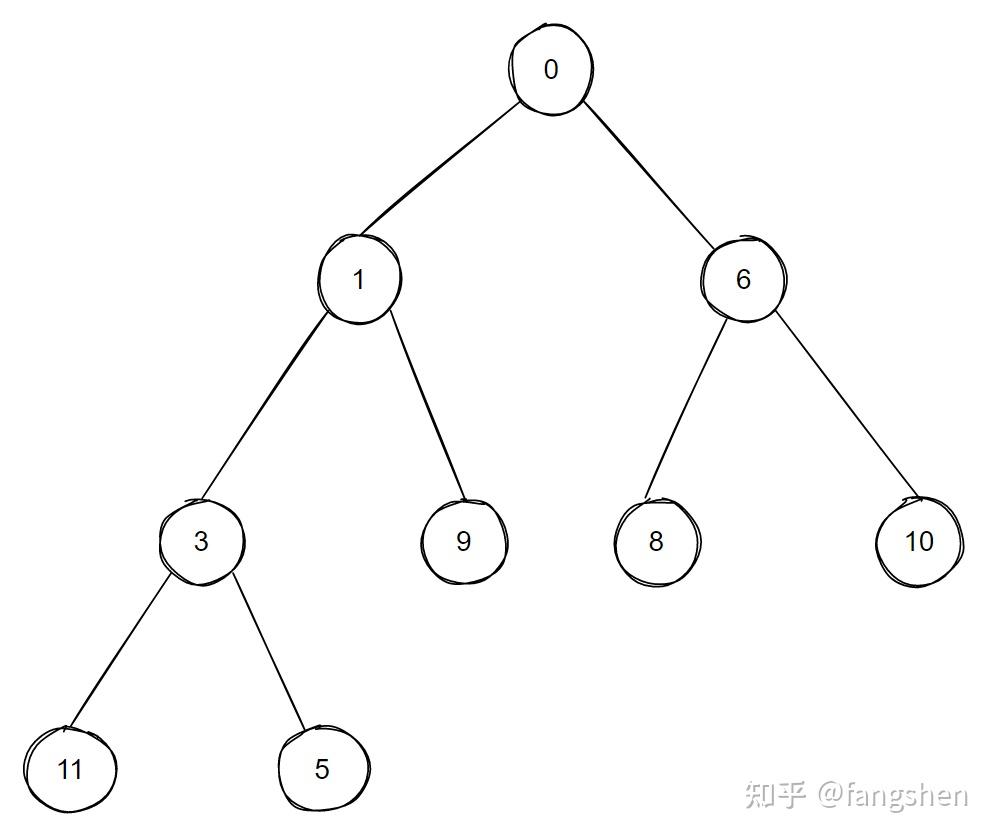
对于上图这样一个已有的min-heap, 当我们插入一个新的值为0的节点时, 整个min-heap的调整过程是:

最后得到的min-heap如下:
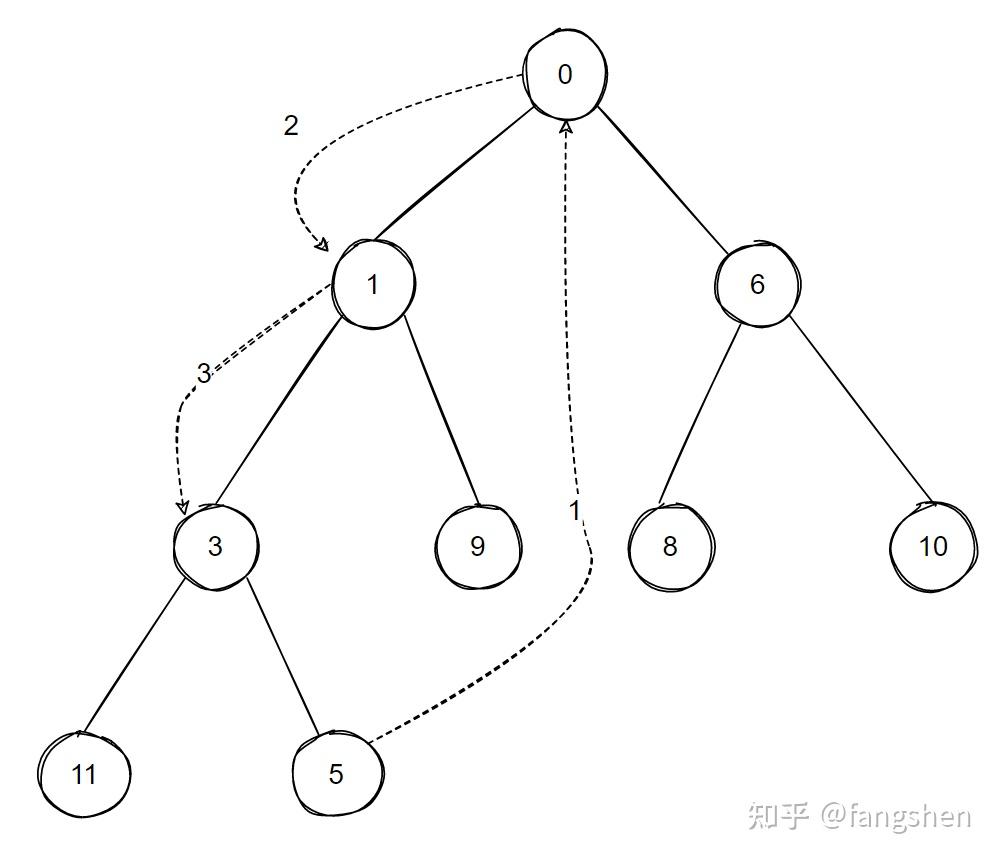
删除节点(以根节点为例): 1. 先将队尾元素与根节点交换 2. 然后执行shift-down操作, 直到找到合适的位置
接上面的例子, 我们删除0号节点, 则有如下的情况 :
最后形成的小根堆为:

图画的比较简单, 大家纸上画一下整体过程效果更佳.
1.2 asio相关的代码实现
template <typename Time_Traits>
class timer_queue
  : public timer_queue_base
{
public:
  // The time type.
  using time_type = typename Time_Traits::time_type;

  // The duration type.
  using duration_type = typename Time_Traits::duration_type;

  // Per-timer data.
  class per_timer_data
  {
  public:
    per_timer_data() :
      heap_index_((std::numeric_limits<std::size_t>::max)()),
      next_(0), prev_(0)
    {
    }
  private:
    friend class timer_queue;

    // The operations waiting on the timer.
    op_queue<wait_op> op_queue_;

    // The index of the timer in the heap.
    std::size_t heap_index_;

    // Pointers to adjacent timers in a linked list.
    per_timer_data* next_;
    per_timer_data* prev_;
  };


private:
  // The head of a linked list of all active timers.
  per_timer_data* timers_;

  struct heap_entry
  {
    // The time when the timer should fire.
    time_type time_;

    // The associated timer with enqueued operations.
    per_timer_data* timer_;
  };

  // The heap of timers, with the earliest timer at the front.
  std::vector<heap_entry> heap_;
};整个timer_queue的成员还是比较好理解的, 需要注意的是heap_entry内部持有的只是per_timer_data的指针, 另外per_timer_data本身是以链表结构来组织的, 这样在小根堆排序的过程中数据交换量比较少, 另外就是小根堆重构后, 不需要反向外部持有per_timer_data的地方进行调整, 两级结构的封装会带来一定的便利性. 另外就是增删用到的内部函数:
// Move the item at the given index up the heap to its correct position.
  void up_heap(std::size_t index)
  {
    while (index > 0)
    {
      std::size_t parent = (index - 1) / 2;
      if (!Time_Traits::less_than(heap_[index].time_, heap_[parent].time_))
        break;
      swap_heap(index, parent);
      index = parent;
    }
  }

  // Move the item at the given index down the heap to its correct position.
  void down_heap(std::size_t index)
  {
    std::size_t child = index * 2 + 1;
    while (child < heap_.size())
    {
      std::size_t min_child = (child + 1 == heap_.size()
          || Time_Traits::less_than(
            heap_[child].time_, heap_[child + 1].time_))
        ? child : child + 1;
      if (Time_Traits::less_than(heap_[index].time_, heap_[min_child].time_))
        break;
      swap_heap(index, min_child);
      index = min_child;
      child = index * 2 + 1;
    }
  }

  // Swap two entries in the heap.
  void swap_heap(std::size_t index1, std::size_t index2)
  {
    heap_entry tmp = heap_[index1];
    heap_[index1] = heap_[index2];
    heap_[index2] = tmp;
    heap_[index1].timer_->heap_index_ = index1;
    heap_[index2].timer_->heap_index_ = index2;
  }
通过这几个函数, 我们就能很简单的实现timer的新增删除等功能了, 比如对于新增timer:
// Add a new timer to the queue. Returns true if this is the timer that is
 // earliest in the queue, in which case the reactor's event demultiplexing
 // function call may need to be interrupted and restarted.
 bool enqueue_timer(const time_type& time, per_timer_data& timer, wait_op* op)
 {
 // Enqueue the timer object.
 if (timer.prev_ == 0 && &timer != timers_)
 {
  if (this->is_positive_infinity(time))
  {
    // No heap entry is required for timers that never expire.
    timer.heap_index_ = (std::numeric_limits<std::size_t>::max)();
  }
  else
  {
    // Put the new timer at the correct position in the heap. This is done
    // first since push_back() can throw due to allocation failure.
    timer.heap_index_ = heap_.size();
    heap_entry entry = { time, &timer };
    heap_.push_back(entry);
    up_heap(heap_.size() - 1);
  }

  // Insert the new timer into the linked list of active timers.
  timer.next_ = timers_;
  timer.prev_ = 0;
  if (timers_)
    timers_->prev_ = &timer;
  timers_ = &timer;
 }

 // Enqueue the individual timer operation.
 timer.op_queue_.push(op);

 // Interrupt reactor only if newly added timer is first to expire.
 return timer.heap_index_ == 0 && timer.op_queue_.front() == op;
 }
这段代码功能还是挺好理解的: 1. time为positive_infinity的情况 , 直接不创建heap_entry, 仅将heap_index_设置为最大的size_t 2. 正常情况则如前面示例中提到的, 创建新的heap_entry并加入到数组尾部 3. 使用up_heap()调整heap_entry到合适的位置 4. timer链表的处理 5. 返回新的timer是否是根节点(如果是根节点, 则表示整个timer_queue的最小expired时间有调整, 外围的Timer Scheduler需要做额外的处理)
其他的cancel_timer() 与 move_timer()的实现也比较简单, 这里就不一一列出了, 感兴趣的读者可以自行翻阅, 理解min-heap的原理的话, 这部分代码基本没有什么理解难度. 当然, 只依赖timer_queue, 肯定是不够的, 我们还得有地方驱动timer_queue的执行, 对应的operation超时后才会得到处理. 这就是下一部分Timer Scheduler涉及的内容.
2. Timer Scheduler - winrt_timer_scheduler 实现
前面的图中:

我们能看到, asio自带的timer scheduler实现有很多, 我们直接打开timer_scheduler.h 文件也能看到:
#if defined(ASIO_WINDOWS_RUNTIME)
# include "asio/detail/winrt_timer_schedupp"
#elif defined(ASIO_HAS_EPOLL)
# include "asio/detail/epoll_reactor.hpp"
#elif defined(ASIO_HAS_KQUEUE)
# include "asio/detail/kqueue_reactor.hpp"
#elif defined(ASIO_HAS_DEV_POLL)
# include "asio/detail/dev_poll_reactor.hpp"
#else
# include "asio/detail/select_reactor.hpp"
#endif
我们可以根据内容简单的推断: 1. Windows下一般是直接使用iocp context作为timer scheduler 2. linux下是使用epoll_reactor作为timer scheduler 3. mac和ios下一般是kqueue_reactor 4. 其他情况是select_reactor 5. winrt_timer_scheduler其实是个cross platform的实现, 不依赖任何特定平台的特性
2.1 选择 winrt_timer_scheduler 的原因
如上节提到的, asio默认有好些timer scheduler实现, 那我们为什么偏好于使用比较冷门的winrt_timer_scheduler呢? 主要是以下几个原因: 1. 跨平台实现, 不依赖特定平台的特殊Api, 所有平台表现一致 2. 定制性. 像游戏类的业务, 一般都会有自己的虚拟时间, 直接选择绑定系统时间的操作系统级实现, 不一定是好的选择. 3. 如果我们仅用asio scheduler部分的能力, 与reactor等实现共用Api并不是一个很好的选择. 当然, 使用平台无关的winrt_timer_scheduler也会存在一点额外的开销, 区别于系统Api直接通知, winrt_timer_scheduler需要额外的线程来完成从timer_queue中取出超时的任务, 并投递operation回io_context执行它们.
2.2 winrt_timer_scheduler 实现
winrt_timer_scheduler对应的核心实现其实就是它的线程工作函数:
void winrt_timer_scheduler::run_thread()
{
  asio::detail::mutex::scoped_lock lock(mutex_);
  while (!stop_thread_)
  {
    const long max_wait_duration = 5 * 60 * 1000000;
    long wait_duration = timer_queues_.wait_duration_usec(max_wait_duration);
    event_.wait_for_usec(lock, wait_duration);
    event_.clear(lock);
    op_queue<operation> ops;
    timer_queues_.get_ready_timers(ops);
    if (!ops.empty())
    {
      lock.unlock();
      scheduler_.post_deferred_completions(ops);
      lock.lock();
    }
  }
}winrt_timer_scheduler创建的时候就会创建一个独立的线程来执行run_thread()函数, 相关的实现也很简单, 从timer_queues_上收集所有已经超时的operation, 并将这些operation再通过前面提到的通用scheduler上, 这样在io_context::run()执行的时候, 这些已经超时的operation就会得到执行. 需要注意的是以下几点: 1. operation最终是回归context::run()的线程进行执行的 2. 此处的timer_queues是一个timer_queue_set, 仅仅是一个多timer_queue的容器, 存在的作用是外围多个特化的deadline_timer_service时, 每个service会创建一个timer_queue. 3. 循环开始处的等待, 我们前面已经知道min-heap根节点的特性, 所以此处取出根节点就能知道最大的等待时间, 大部分时候都能保证这个专有的timer线程不会空耗cpu 关于第3点, 有一种情况, 我们新插入的定时任务是需要马上被执行的, 这种情况winrt_time_scheduler也是有相关的处理的:
template <typename Time_Traits>
void winrt_timer_scheduler::schedule_timer(timer_queue<Time_Traits>& queue, const typename Time_Traits::time_type& time, typename timer_queue<Time_Traits>::per_timer_data& timer, wait_op* op) {
  asio::detail::mutex::scoped_lock lock(mutex_);

  if (shutdown_) {
    scheduler_.post_immediate_completion(op, false);
    return;
  }

  bool earliest = queue.enqueue_timer(time, timer, op);
  scheduler_.work_started();
  if (earliest) event_.signal(lock);
}enque_timer()时我们之前也提到过, 会 通过返回值告知调用者对应新建的节点是不是根节点, 也就是此处的earliest, 如果是根节点, 测会执行event_.signal(), 这样线程就会被强制唤醒, 不会出现原有的等待值不合理, 导致新加入的定时任务不会被及时调度到的问题. 这里也能体现出min-heap实现对定时器场合的适用性, 操作和获取根节点的成本都比较低, 这样就为我们在外围实现高效的timer scheduler提供了便利.
2.3 epoll_reactor timer部分支持浅析
我们虽然没有使用依赖操作依赖实现的定时调度来进行讲解, 不过这里列举epoll_reactor相关的实现, 方便大家了解这些平台专有实现与winrt_timer_scheduler之间的差异, 加深对两者优缺点的理解. 当我们使用epoll_reactor作为timer scheduler的时候, 整体系统的工作流程图如下:

图引用自 参考3: 深入学习定时器
timer_fd是linux2.6.25加入的功能, 这样定时任务也能像其它handler一样接受epoll的调度了. 区别于winrt_timer_scheduler使用一个额外的线程, 使用timer_fd的话, 我们则可以利用reactor本身来完成相关的超时等待, 不需要额外的线程. 另外, 我们肯定也只需要关注最近超时的那个任务(如果最近超时的任务都没超时, 其他任务肯定都没超时了), 所以timer_fd也只需要一个:
// Add the timer descriptor to epoll.
 if (timer_fd_ != -1)
 {
 ev.events = EPOLLIN | EPOLLERR;
 ev.data.ptr = &timer_fd_;
 epoll_ctl(epoll_fd_, EPOLL_CTL_ADD, timer_fd_, &ev);
}接下来我们来看一下简化的epoll_reactor::run()实现
void epoll_reactor::run(long usec, op_queue<operation>& ops)
{
 int timeout;
 if (usec == 0)
   timeout = 0;
 else
 {
   timeout = (usec < 0) ? -1 : ((usec - 1) / 1000 + 1);
 }

 bool check_timers = false
 // Block on the epoll descriptor.
 epoll_event events[128];
 int num_events = epoll_wait(epoll_fd_, events, 128, timeout);

 // Dispatch the waiting events.
 for (int i = 0; i < num_events; ++i)
 {
   void* ptr = events[i].data.ptr;
   if (ptr == &timer_fd_)
   {
     check_timers = true;
   }
 }

 if (check_timers)
 {
   mutex::scoped_lock common_lock(mutex_);
   timer_queues_.get_ready_timers(ops);

   itimerspec new_timeout;
   itimerspec old_timeout;
   int flags = get_timeout(new_timeout);
   timerfd_settime(timer_fd_, flags, &new_timeout, &old_timeout);
 }
} 最后我们还是利用timer_queue来获取所有已经超时的任务, 但相比较独立的线程驱动, 此处共用io_context内部持有的reactor即可完成所有操作了, 另外因为只是多出一个timer_fd, 对应的开销基本也是可以忽略的. 需要注意的是每次timer_fd触发后, 我们需要重新对timer_fd设置超时时间. 使用像epoll_reactor这种来驱动超时, 优缺点都很明显: 优点: 高性能. 缺点: 1. 特定系统专供实现. 2. 定制性差,时间强行跟系统进行绑定了, 不方便支持虚拟时间等概念.
3. deadline_timer_service与basic_waitable_timer
这部分是业务使用时直接能接触到的部分, 内部实现主要是处理operation的传递, , 以及对上面介绍的Time Scheduler的一层Wrapper, 这部分我们在前面展开的已经比较多了, 大量实现是比较类同的, 感兴趣的读者可以自行阅读相关代码, 有前面的基础, 这部分代码理解起来也是比较快的, 我们这里就不逐一展开讲述了. asio预定义的几种定时器:
using system_timer = basic_waitable_timer<std::chrono::system_clock>;
using steady_timer = basic_waitable_timer<std::chrono::steady_clock>;
using high_resolution_timer = basic_waitable_timer<
std::chrono::high_resolution_clock>;都是利用std::chrono就能很好的支持的定时器, 同时也能看出模板化clock后带来的好处, 我们可以很好的支持各种不同类型的时间了. asio默认还有一个deadline_timer的实现, 区别于上面介绍的三种, deadline_timer本身是依赖boost的datetime库来实现的, 功能与上面介绍的几种定时器都大同小异, 我们就不再介绍了. 定时器的使用也是很简单的:
asio::steady_timer t(ctx);
  t.expires_after(1s);
  t.async_wait([](asio::error_code ec) {
    std::cout << "timeout!" << std::endl;
  });
除了上面的异步等待模式, 定时器同样也支持同步的wait(), 同步的wait()就比较简单了, 内部是一个sleep()循环, 直到定时器超时. 新版本的asio其实定时器也支持协程模式, 这部分内容比较独立, 考虑在单独的文章中进行分析, 本篇先不展开了.
4. timer小结
对比libunifex的实现, asio对timer的实现处理的非常通用, timer本身也能跟各种逻辑很好的搭配, 同时对各类时间体系也有非常好的适配性, 这些都体现了它本身工业级库的实现水平, 很多设计确实还是可圈可点, 值得学习借鉴的.
本文参与 腾讯云自媒体同步曝光计划,分享自作者个人站点/博客。
原始发表:2023-05-10,如有侵权请联系 cloudcommunity@tencent.com 删除
评论
登录后参与评论
推荐阅读
目录
腾讯云开发者

Copyright © 2013 - 2026 Tencent Cloud. All Rights Reserved. 腾讯云 版权所有
深圳市腾讯计算机系统有限公司 ICP备案/许可证号:粤B2-20090059 ![]() 粤公网安备44030502008569号
粤公网安备44030502008569号
腾讯云计算(北京)有限责任公司 京ICP证150476号 | 京ICP备11018762号