asio 调度器实现 - operation 调度详解

asio 调度器实现 - operation 调度详解

fangfang
发布于 2023-05-23 10:34:49
发布于 2023-05-23 10:34:49
作为一个 lambda post 类型的调度器实现, 首先要打理的, 肯定是的函数对象如何投递, 如何保存, 如何执行了. 我们先来回顾一下上一篇中的调度概览图:
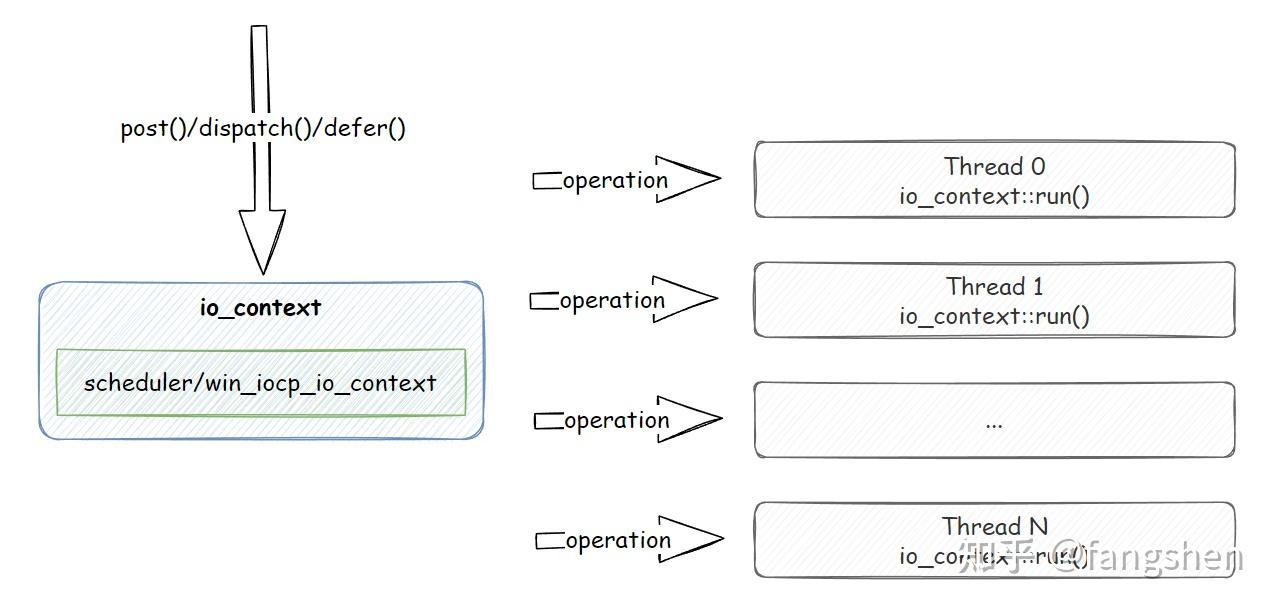
如上图所示, ASIO 调度的核心对象是 io_context, 作为通用任务调度器的时候, 我们也可以直接把 io_context 看作是 execution_context, 它基本只被我们用于通用任务调度相关的场景. 一个业务传入的 lambda 函数被处理的流程大致如下: 1. 业务利用post(), dispatch(), defer() 三者之一向 io_context 投递 lambda 2. io_context 将 lambda 存储为 operation 并放入自己内部组织的 operation 队列中. 3. 对应工作线程在执行 io_context::run() 时, 对应的 operation 会被取出, 相关的 lambda 函数在执行 io_context::run() 的线程上被执行.
post(), dispatch(), defer() 三者的实现差异很小, 我们挑选其中的 post(), 来了解一个 lambda 函数, 是如何从 post() 开始, 被 asio 存储起来的.
1 函数对象的投递 - post()过程
我们先以一个代码片断的执行过程来看一下整个post()的过程:
asio::io_context ctx{};
  auto wg = asio::make_work_guard(ctx);
  std::thread tmp_thread([&ctx] { ctx.run(); });

  std::allocator<void> alloc;
  ctx.get_executor().post([] {
    std::cout << "task run!" << std::endl;
    }, alloc);

  std::this_thread::sleep_for(1s);
上面的代码片断中, 我们简单构建了一个io_context的执行环境, 并向其post()了一个简单的lambda到其上执行. 我们以此为基础, 来分析一下具体的post()过程, 主要包含以下步骤:
1.1 io_context -> scheduler的传递过程
template <typename Function, typename Allocator>
void io_context::executor_type::post(Function&& f, const Allocator& a) const
{
  typedef typename std::decay<Function>::type function_type;

  // Allocate and construct an operation to wrap the function.
  typedef detail::executor_op<function_type, Allocator, detail::operation> op;
  typename op::ptr p = { detail::addressof(a), op::ptr::allocate(a), 0 };
  p.p = new (p.v) op(static_cast<Function&&>(f), a);

  ASIO_HANDLER_CREATION((this->context(), *p.p,
        "io_context", &this->context(), 0, "post"));

  io_context_.impl_.post_immediate_completion(p.p, false);
  p.v = p.p = 0;
}
中间的ASIO_HANDLER_CREATION() 宏是用于辅助handler调试的, 对代码的实际执行没有任何影响, 我们直接忽略.
1.1.1 op::ptr - operation 的内存分配与释放
这部分代码比较晦涩的是op::ptr相关的使用, ptr本身其实是asio通过宏生成的一个用于定制allocator的辅助结构体, 我们直接展开宏来看下它的定义:
struct ptr
  {
    const Alloc* a;
    void* v;
    op* p;
    ~ptr()
    {
      reset();
    }
    static op* allocate(const Alloc& a)
    {
      typedef typename ::asio::detail::get_recycling_allocator<
        Alloc, purpose>::type recycling_allocator_type;
      ASIO_REBIND_ALLOC(recycling_allocator_type, op) a1(
            ::asio::detail::get_recycling_allocator<
              Alloc, purpose>::get(a));
      return a1.allocate(1);
    }
    void reset()
    {
      if (p)
      {
        p->~op();
        p = 0;
      }
      if (v)
      {
        typedef typename ::asio::detail::get_recycling_allocator<
          Alloc, purpose>::type recycling_allocator_type;
        ASIO_REBIND_ALLOC(recycling_allocator_type, op) a1(
              ::asio::detail::get_recycling_allocator<
                Alloc, purpose>::get(*a));
        a1.deallocate(static_cast<op*>(v), 1);
        v = 0;
      }
    }
}这个地方的recycling_allocator我们就不具体展开了, 主要的作用是asio自己写了一个recycling_allocator, 如果外面传入的分配器是std::allocate<>, 则自动将分配器替换为asio内部实现的recycling_allocator. ASIO_REBIND_ALLOC是用于编译期判断分配器是否包含 rebind_alloc<T>的类型, 如果有, 则使用这个作为分配器, 否则还是直接使用传入的分配器, 感兴趣的可以自行了解: 1. std::allocator_traits 2. 以及它的member alias templates : rebind_alloc<T>
所以对于op::ptr来说, 它实现了特定对象(这里就是我们的executor_op)的内存申请, 以及reset()时对特定对象调用析构函数并进行内存释放操作.
[!info] 库作者都比较喜欢写内存分配器, 但一般位于业务层之下的库, 实际特征都容易接近通用分配器能够有效覆盖的范围, 并没有太多"银弹"可供库作者摘取, 正常来说, 通用型的内存分配器, 哪怕简单实现, 大概也会有数千行的代码量, 不是在非常特定的业务使用场景下, 没有太多取巧的方法. 相关复杂度的引入感觉对于库本身不一定是好事. 对于asio来说, allocator用户层可定制, 基本已经就提供了业务层所有需要的内容了, 再扩展自己的
recycling_allocator其实不一定是一个好的方式.
理解了op::ptr的类型定义, 再来看post的主体代码, 就比较好理解了:
typedef typename std::decay<Function>::type function_type;

 // Allocate and construct an operation to wrap the function.
 typedef detail::executor_op<function_type, Allocator, detail::operation> op;
 typename op::ptr p = { detail::addressof(a), op::ptr::allocate(a), 0 };
 p.p = new (p.v) op(static_cast<Function&&>(f), a);

 io_context_.impl_.post_immediate_completion(p.p, false);
p.v = p.p = 0;一开始我们在类型为op::ptr的临时变量p初始化的时候, 传入了分配器的指针, 分配好的一段内存到其中, 然后我们再利用replacement new对它进行初始化, 注意这个地方不要被实现绕晕了, p.p的类型就是executor_op的指针, 然后executor_op负责持有函数对象, 这样定制了executor_op的内存分配, 就间接的把包含其中的函数对象的内存分配也一并处理了. 剩下的部分就是将executor_op的指针丢给io_context_.impl_, 其实就是scheduler, 因为我们并不希望相关scope结束的时候, 刚申请的executor_op被马上释放, 所以这里需要将p.v和p.p都置成空. 到目前为止, executor_op的定义和scheduler::post_immediate_completion()的实现我们尚未展开, 我们接下来继续展开相关的实现.
1.2 executor_op
template <typename Handler, typename Alloc,
    typename Operation = scheduler_operation>
class executor_op : public Operation
{
public:
  ASIO_DEFINE_HANDLER_ALLOCATOR_PTR(executor_op);

  template <typename H>
  executor_op(H&& h, const Alloc& allocator)
    : Operation(&executor_op::do_complete),
      handler_(static_cast<H&&>(h)),
      allocator_(allocator)
  {
  }

  static void do_complete(void* owner, Operation* base,
      const asio::error_code& /*ec*/,
      std::size_t /*bytes_transferred*/)
  {
    // Take ownership of the handler object.
    executor_op* o(static_cast<executor_op*>(base));
    Alloc allocator(o->allocator_);
    ptr p = { detail::addressof(allocator), o, o };

    ASIO_HANDLER_COMPLETION((*o));

    // Make a copy of the handler so that the memory can be deallocated before
    // the upcall is made. Even if we're not about to make an upcall, a
    // sub-object of the handler may be the true owner of the memory associated
    // with the handler. Consequently, a local copy of the handler is required
    // to ensure that any owning sub-object remains valid until after we have
    // deallocated the memory here.
    Handler handler(static_cast<Handler&&>(o->handler_));
    p.reset();

    // Make the upcall if required.
    if (owner)
    {
      fenced_block b(fenced_block::half);
      ASIO_HANDLER_INVOCATION_BEGIN(());
      ////asio_handler_invoke_helpers::invoke(handler, handler);
      std::invoke(handler);
      ASIO_HANDLER_INVOCATION_END;
    }
  }

private:
  Handler handler_;
  Alloc allocator_;
};当我们使用scheduler的时候继承的scheduler_operation代码如下:
// Base class for all operations. A function pointer is used instead of virtual
// functions to avoid the associated overhead.
class scheduler_operation ASIO_INHERIT_TRACKED_HANDLER
{
public:
  using operation_type = scheduler_operation;

  void complete(void* owner, const asio::error_code& ec,
      std::size_t bytes_transferred)
  {
    func_(owner, this, ec, bytes_transferred);
  }

  void destroy()
  {
    func_(nullptr, this, asio::error_code(), 0);
  }

protected:
  using func_type = void (*)(void*, scheduler_operation*, const asio::error_code&, std::size_t);

  scheduler_operation(func_type func)
    : next_(nullptr),
      func_(func),
      task_result_(0)
  {
  }

  // Prevents deletion through this type.
  ~scheduler_operation()
  {
  }

private:
  friend class op_queue_access;
  scheduler_operation* next_;
  func_type func_;
protected:
  friend class scheduler;
  unsigned int task_result_; // Passed into bytes transferred.
};
这个多层设计, 一圈圈的代码, 我们可以来看下他做的事情, 他做的最重要的事情就是完成了对原始函数的类型统一, 对于原始的Func, 包装之后, 调度器侧看到的所有函数都是:
using func_type = void (*)(void*, scheduler_operation*, const asio::error_code&, std::size_t);这个类型, 也就是executor_op::do_complete()的类型, 这样对于scheduler层面, 把相应的任务看成都是scheduler_operation, 并且都可以按照func_type的形式来调用就好了. 执行的细节我们暂且先搁下, 聊到operation的执行的时候再一并来解析.
1.3 scheduler::post_immediate_completion()
void scheduler::post_immediate_completion(
    scheduler::operation* op, bool is_continuation)
{
#if defined(ASIO_HAS_THREADS)
  if (one_thread_ || is_continuation)
  {
    if (thread_info_base* this_thread = thread_call_stack::contains(this))
    {
      ++static_cast<thread_info*>(this_thread)->private_outstanding_work;
      static_cast<thread_info*>(this_thread)->private_op_queue.push(op);
      return;
    }
  }
#else // defined(ASIO_HAS_THREADS)
  (void)is_continuation;
#endif // defined(ASIO_HAS_THREADS)

  work_started();
  mutex::scoped_lock lock(mutex_);
  op_queue_.push(op);
  wake_one_thread_and_unlock(lock);
}
这部分就比较简单了, 主要是将对应的 operation 存储到scheduler上的op_queue_中, op_queue_是一个operation的链表实现, 用作一个FIFO队列, 相关的代码也比较简单, 大家可以自己查阅. 比较特殊的是is_continuation参数, 如果为true, 或者scheduler工作在单线程run()模式下 , 则会判断当前正在执行scheudler::run()的线程是不是当前线程, 如果是当前线程, 则直接无锁方式将任务推送到线程的op_queue上, 算是一个Fast Path实现了.
1.4 post()过程小结
post()的过程, 总结来看, 是将外部传入的函数对象做类型擦除后, 利用统一的scheduler_operation类型, 以及辅助的op_queue, 以链表的形式存放到scheduler中, 等待后续调用的一系列操作. 因为涉及到allocator, 线程安全等, 整体的实现会稍显复杂, 但仔细理解, 还是比较好将整体的实现理解掌握的.
2 run() 过程分析
我们一般是通过run(), 或者run_one()来驱动, 内部都是调用的scheduler::do_run_one(), 我们先来看一下这个函数的实现:
2.1 scheduler::do_run_one()
std::size_t scheduler::do_run_one(mutex::scoped_lock& lock,
    scheduler::thread_info& this_thread,
    const asio::error_code& ec)
{
  while (!stopped_)
  {
    if (!op_queue_.empty())
    {
         // Prepare to execute first handler from queue.
         operation* o = op_queue_.front();
         op_queue_.pop();
         bool more_handlers = (!op_queue_.empty());

        std::size_t task_result = o->task_result_;

        if (more_handlers && !one_thread_)
          wake_one_thread_and_unlock(lock);
        else
          lock.unlock();

        // Ensure the count of outstanding work is decremented on block exit.
        work_cleanup on_exit = { this, &lock, &this_thread };
        (void)on_exit;

        // Complete the operation. May throw an exception. Deletes the object.
        o->complete(this, ec, task_result);

        return 1;
    }
    else
    {
         wakeup_event_.clear(lock);
         wakeup_event_.wait(lock);
    }
  }

  return 0;
}
[!tip] 因为仅关注scheduler部分, 为了方便理解, 针对
reactor的task_处理, 此处已经删除了, 在asio的实现中, 这些task也会被当成operation, 并且加入到op_queue_中, 在do_run_one()的时候会对其执行特定的逻辑. 这部分感兴趣的可以自行翻阅scheduler::init_task()相关的实现.
整体的实现还是比较简单的, 此处我们可以看到, 针对任务队列还有其他待执行项的情况, asio也做了一定的优化, 会尝试马上唤醒可用线程执行后续的任务. 另外一点是如果队列为空, 则会利用wakeup_event_执行wait()操作, 避免线程空转导致的Cpu浪费. 对于scheduler_operation::complete()的执行, 前面我们也贴出了相关的代码, 这是一个类型擦除后的统一函数格式, 真正调用的其实是:
static void do_complete(void* owner, Operation* base,
      const asio::error_code& /*ec*/,
      std::size_t /*bytes_transferred*/)
  {
    // Take ownership of the handler object.
    executor_op* o(static_cast<executor_op*>(base));
    Alloc allocator(o->allocator_);
    ptr p = { detail::addressof(allocator), o, o };

    ASIO_HANDLER_COMPLETION((*o));

    // Make a copy of the handler so that the memory can be deallocated before
    // the upcall is made. Even if we're not about to make an upcall, a
    // sub-object of the handler may be the true owner of the memory associated
    // with the handler. Consequently, a local copy of the handler is required
    // to ensure that any owning sub-object remains valid until after we have
    // deallocated the memory here.
    Handler handler(static_cast<Handler&&>(o->handler_));
    p.reset();

    // Make the upcall if required.
    if (owner)
    {
      fenced_block b(fenced_block::half);
      ASIO_HANDLER_INVOCATION_BEGIN(());
      ////asio_handler_invoke_helpers::invoke(handler, handler);
      std::invoke(handler);
      ASIO_HANDLER_INVOCATION_END;
    }
}这个地方又再一次使用了前文提到过的ptr结构, 和它的reset(), 注意对于ptr, 每次使用到它的场合都是将它作为一个临时变量来使用的. 对于Handler本身来说, 也是有一个从operation还原成栈变量, 在operation析构后, 再利用std::invoke()来执行的一个过程. 另外利用左值, 如果Handler本身支持左值构造, 这个地方也会相应的节约一次copy开销. 整体的实现还是比较优质的.
2.2 scheduler::run()
std::size_t scheduler::run(asio::error_code& ec)
{
    ec = asio::error_code();
    if (outstanding_work_ == 0)
    {
        stop();
        return 0;
    }

    thread_info this_thread;
    this_thread.private_outstanding_work = 0;
    thread_call_stack::context ctx(this, this_thread);

    mutex::scoped_lock lock(mutex_);

    std::size_t n = 0;
    for (; do_run_one(lock, this_thread, ec); lock.lock())
    if (n != (std::numeric_limits<std::size_t>::max)())
        ++n;
    return n;
}
注意开始处对outstanding_work_数量的判断, 如果为0, 则run会马上执行scheduler的stop(), 并退出, 这也是为什么我们之前的测试代码中会创建一个work_guard对象的原因, 这样保证outstanding_work_至少是1, 不会在op_queue_为空的情况下就结束scheduler的执行. 一般开启独立的工作线程, 如下所示:
std::thread tmp_thread([&ctx] { ctx.run(); });我们会让线程执行scheduler::run(), 这样在外围有work_guard的情况下, 通过run()内部的for()循环, 推送到 scheduler::op_queue_ 上的所有operation会被依次执行, 从而正确驱动整个调度器的工作. 这也是scheduler框架实现的时候剥离线程带来的好处, 在外围我们可以根据业务的实际需要安排合适数量的线程执行scheduler::run().
2.3 scheduler::run_one()
std::size_t scheduler::run_one(asio::error_code& ec)
{
  ec = asio::error_code();
  if (outstanding_work_ == 0)
  {
    stop();
    return 0;
  }

  thread_info this_thread;
  this_thread.private_outstanding_work = 0;
  thread_call_stack::context ctx(this, this_thread);

  mutex::scoped_lock lock(mutex_);

  return do_run_one(lock, this_thread, ec);
}
与run()的区别是run()在有work_guard存在的情况下会一直循环执行到来的任务, 而run_one()在执行完一个operation后即会退出.
2.4 其他的运行模式
除了上面说到的run()和run_one(), asio还有其他的几种运行模式, 这里仅简单列出, 不再展开, 具体的核心执行过程与do_run_one()类同, 作用稍有差异, 这里直接列出: poll(): 非阻塞的执行当前op_queue_已有的任务, 执行完退出 poll_one(): 尝试非阻塞的执行一个任务 wait_one(): 与run_one()类似, 只是多了一个对time_out的判断 一般来说, 前面几者都比较适合于与当前线程除了调度器的任务执行外, 还有其他逻辑的情况. 这也是比较常见的情况 , 比如对于游戏来说, 主线程一般除了调度器的执行, 还包含其他逻辑的执行, 这个时候, 就比较适合使用上面的几种情况来组织主循环了, 下面给出一个简单的示例:
while(!stop_) {
    //Add some logic jobs here
    //...

     ctx.poll();
     std::this_thread::sleep(1ms);
}
这样我们可以在外围更好的组织整个线程的任务执行, 这就是有了run(), 我们为什么还会需要其他的运行模式的原因, 这样整个调度器的执行有更高的自由度, 可以与其他代码更好的组合协同工作.
2.5 run()过程总结
整个run()过程都是围绕调度器的任务队列(op_queue_)来进行的,通过阅读asio相关的代码, 我们可以看到, asio对锁的使用非常注意, 尽可能保证锁的粒度足够的小, 只在有需要的地方才添加同步原语, 这与当前并发编程的主流思路是契合的, 非必要不上锁, 上锁则需要考虑锁的粒度是否足够小, 这样才能够保证性能是足够优的.
本文参与 腾讯云自媒体同步曝光计划,分享自作者个人站点/博客。
原始发表:2023-05-10,如有侵权请联系 cloudcommunity@tencent.com 删除
评论
登录后参与评论
推荐阅读
目录
腾讯云开发者

Copyright © 2013 - 2026 Tencent Cloud. All Rights Reserved. 腾讯云 版权所有
深圳市腾讯计算机系统有限公司 ICP备案/许可证号:粤B2-20090059 ![]() 粤公网安备44030502008569号
粤公网安备44030502008569号
腾讯云计算(北京)有限责任公司 京ICP证150476号 | 京ICP备11018762号