基于腾讯云API调用多个接口实现类似Packer打包镜像的效果
原创
基于腾讯云API调用多个接口实现类似Packer打包镜像的效果
原创
Windows技术交流
修改于 2024-12-01 07:55:49
修改于 2024-12-01 07:55:49
11月是个有期待的月份,双十一活动入口:https://cloud.tencent.com/act/pro/double11-2024。
我想基于云API调用多个接口来实现类似Packer打包镜像的效果,为业务自动化提供便利,这样通过活动购买的多台机器,我就可以基于同一个自定义镜像来批量重装一次性完成所有机器的业务初始化。
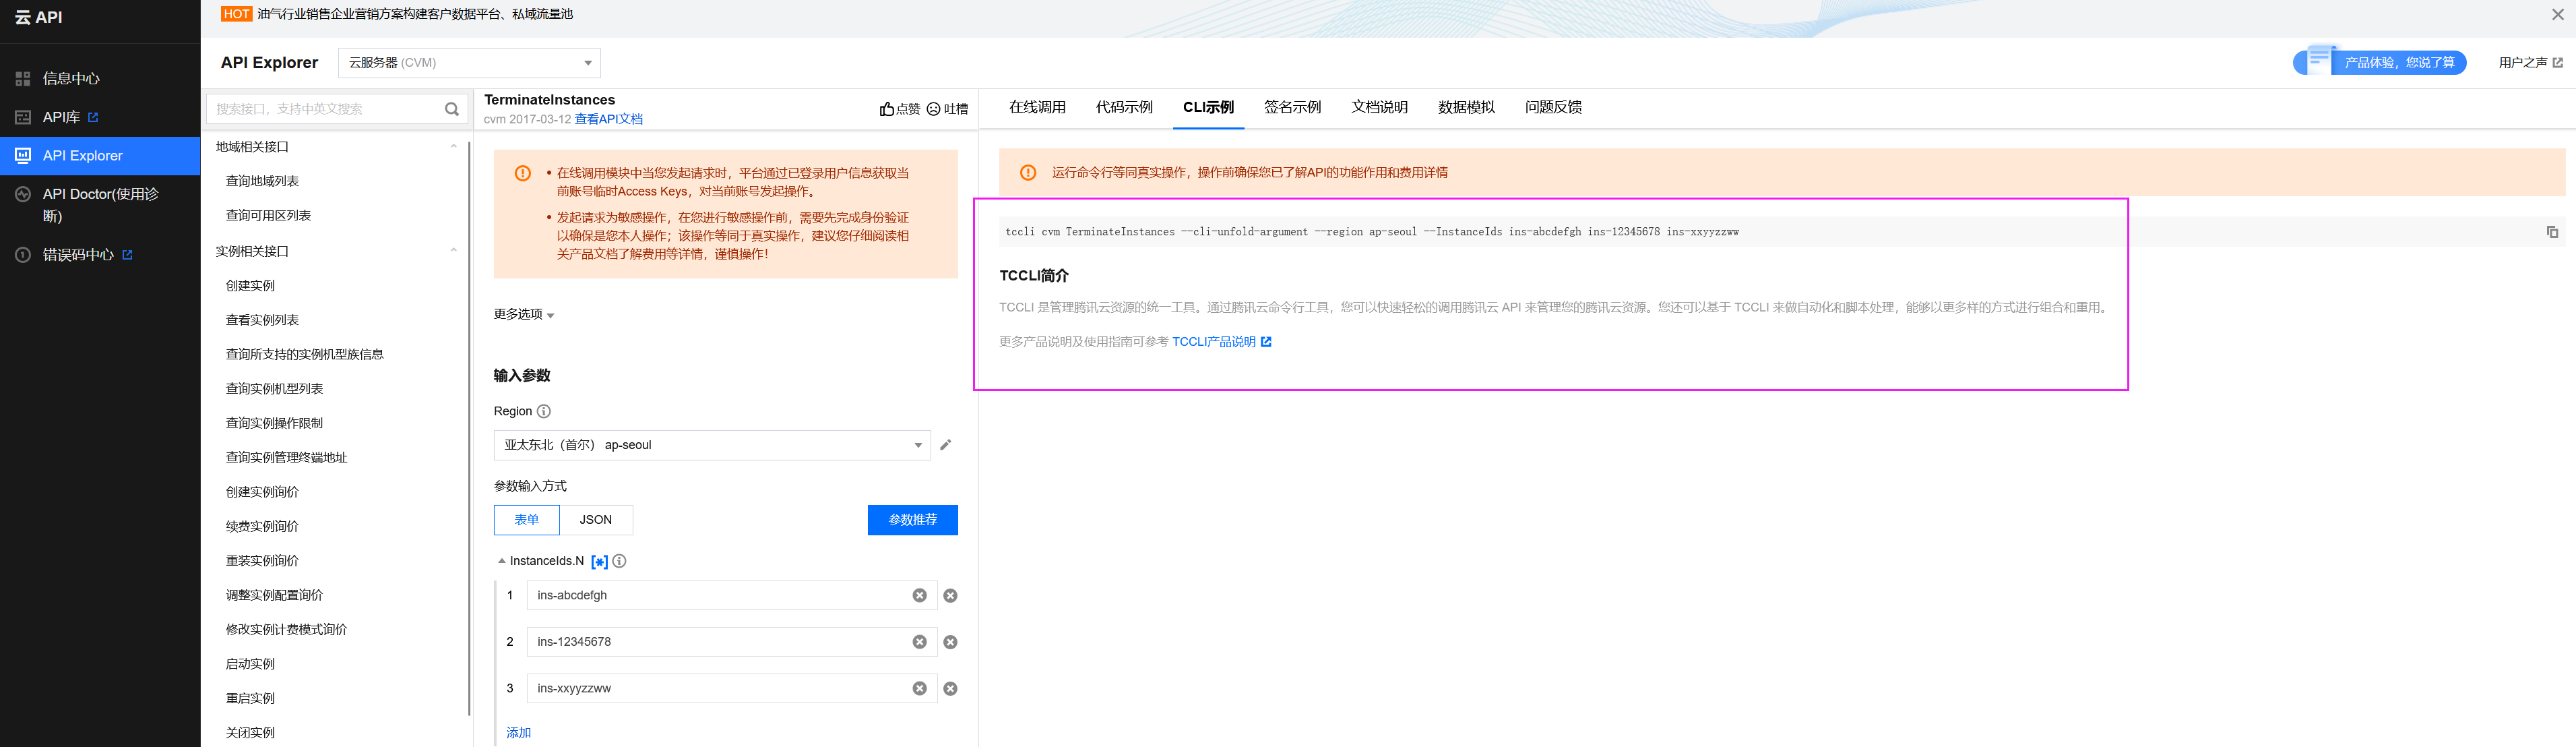
用到了腾讯云Python SDK和tccli,其中tccli的命令我是从腾讯云api explorer获取的,如下图
https://console.cloud.tencent.com/api/explorer?Product=cvm&Version=2017-03-12&Action=RunInstances

https://console.cloud.tencent.com/api/explorer?Product=cvm&Version=2017-03-12&Action=DescribeInstances

https://console.cloud.tencent.com/api/explorer?Product=cvm&Version=2017-03-12&Action=CreateImage

https://console.cloud.tencent.com/api/explorer?Product=cvm&Version=2017-03-12&Action=DescribeImages

https://console.cloud.tencent.com/api/explorer?Product=cvm&Version=2017-03-12&Action=TerminateInstances
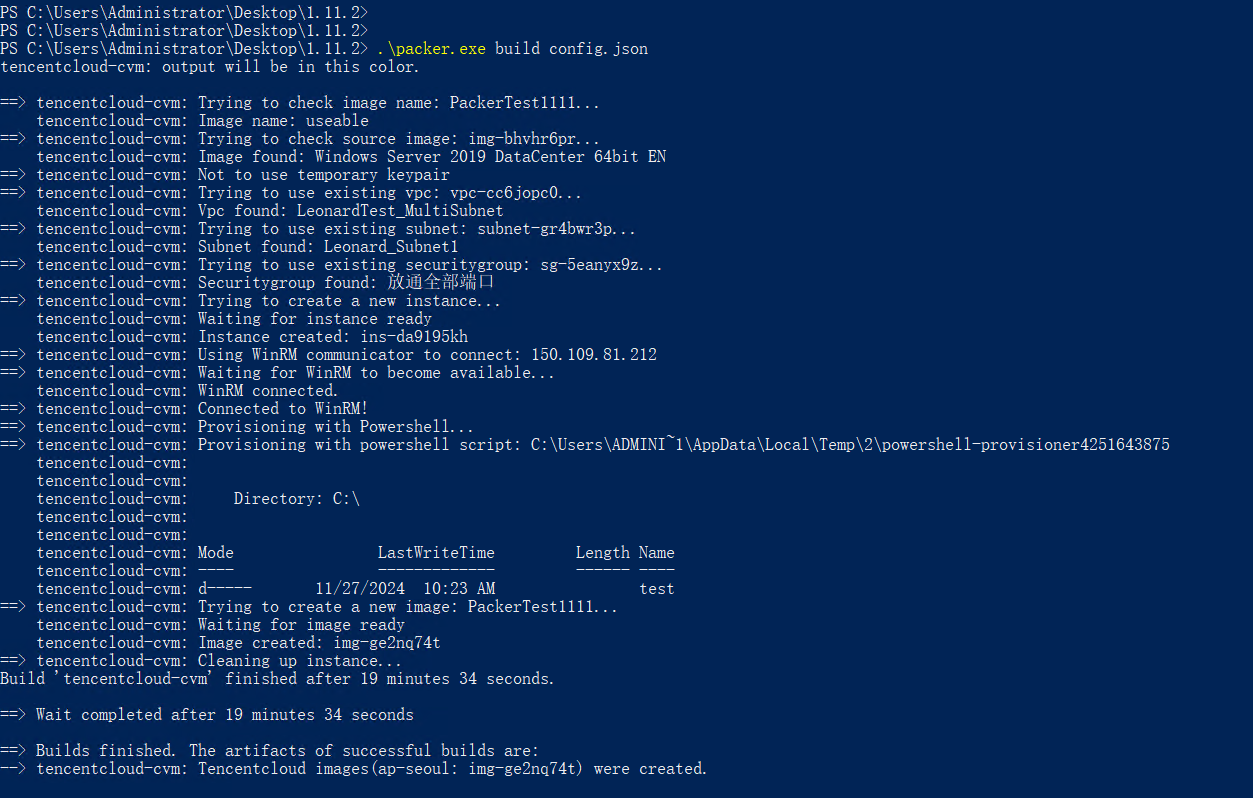
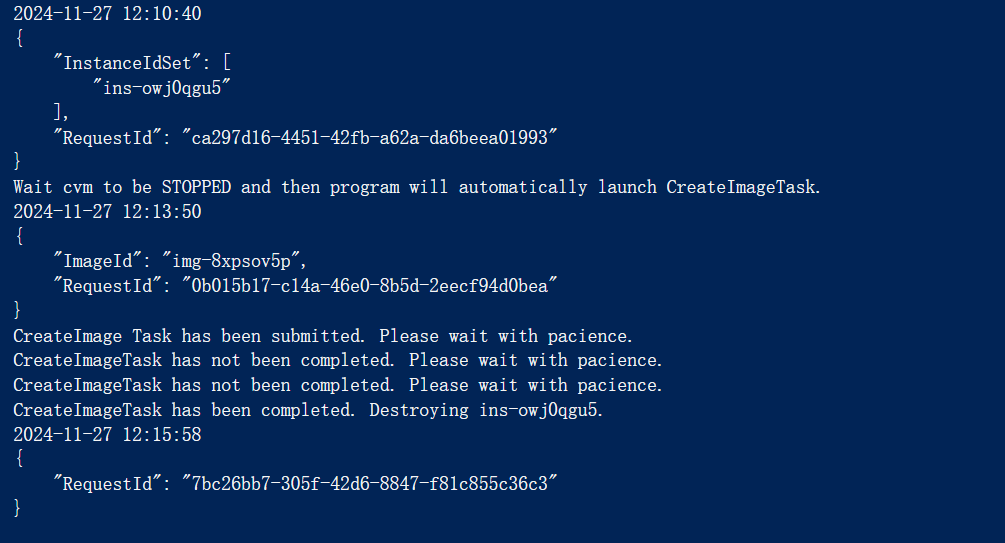
自动创建CVM、自动在UserData中实现业务逻辑后关机、自动检查机器状态已关机然后做镜像、自动检查镜像状态从CREATING变成NORMAL然后销毁用于创建镜像的机器。
RunInstances 创建用于打包的CVM,给UserData参数传入业务环境初始化的代码
DescribeInstances 查询CVM状态
CreateImage 等待STOPPED状态时制作镜像(我是在UserData业务代码末尾加了关机动作的,大致就是通过UserData完成业务环境初始化后关机,然后做镜像)
DescribeImages 等待镜像完成的过程中查询镜像状态从CREATING变成NORMAL
TerminateInstances 镜像制作完成后销毁机器
具体步骤如下:
(1)配置Python环境,安装配置腾讯云Python SDK和tccli
a.下载python windows安装文件:https://www.python.org/ftp/python/3.13.0/python-3.13.0-amd64.exe
双击安装,安装过程中勾选添加环境变量
b.安装腾讯云Python SDK和tccli
python -m pip install --upgrade pip
pip install --upgrade tencentcloud-sdk-python
pip install -i https://mirrors.tencent.com/pypi/simple/ --upgrade tencentcloud-sdk-python
pip install tccli -i https://mirrors.tencent.com/pypi/simple --trusted-host mirrors.tencent.com
c.配置tccli
需提前准备云api密钥secretId、secretKey,注意做好保密,不能提供云api密钥给外人
tccli configure set secretId "xxxxxxxx" secretKey "yyyyyyyy" output "json" --profile test(2) 创建镜像
上述工作准备好之后,后续创建镜像只需要执行以下ps脚本即可
#powershell
#创建机器并过滤instanceid,韩语sysprep在UserData中实现
write-host $(Get-Date -Format "yyyy-MM-dd HH:mm:ss")
$launchcvm=tccli cvm RunInstances --cli-unfold-argument --region ap-seoul --Placement.Zone ap-seoul-1 --ImageId img-bhvhr6pr --InternetAccessible.InternetMaxBandwidthOut 5 --InternetAccessible.PublicIpAssigned True --UserData I3BzMQojeW91ciBjb2RlCnNodXRkb3duIC1zIC10IDA= --profile test
$launchcvm
$output=$launchcvm|findstr ins-
$PackerInstanceId = ($output.split('"'))[1]
$imgId=""
#查询机器状态,待机器状态为STOPPED后调用CreateImage创建镜像
write-host "Wait cvm to be STOPPED and then program will automatically launch CreateImageTask."
while(1){
$PackerCVMState=(tccli cvm DescribeInstances --cli-unfold-argument --region ap-seoul --InstanceIds $PackerInstanceId --profile test|findstr InstanceState).split('"')[-2]
if($PackerCVMState -match "STOPPED"){
#write-host "stopped"
$currentDateTime = Get-Date -Format "yyyy-MM-dd_HH_mm"
$imageName = $currentDateTime + "_ko-kr"
write-host $(Get-Date -Format "yyyy-MM-dd HH:mm:ss")
$createimg=tccli cvm CreateImage --cli-unfold-argument --region ap-seoul --ImageName $imageName --InstanceId $PackerInstanceId --profile test
$createimg
$imgId=($createimg|findstr ImageId).split('"')[-2]
write-host "CreateImage Task has been submitted. Please wait with pacience."
break
}else{
#write-host "running"
}
}

while(1){
$PackerImgState=(tccli cvm DescribeImages --cli-unfold-argument --region ap-seoul --ImageIds $imgId --profile test|findstr ImageState).split('"')[-2]
if($PackerImgState -match "NORMAL"){
break
}elseif($PackerImgState -match "CREATING"){
write-host "CreateImageTask has not been completed. Please wait with pacience."
start-sleep 60
}
}

write-host "CreateImageTask has been completed. Destroying $PackerInstanceId."
write-host $(Get-Date -Format "yyyy-MM-dd HH:mm:ss")
tccli cvm TerminateInstances --cli-unfold-argument --region ap-seoul --InstanceIds $PackerInstanceId --profile test
注意:base64之类尽量别用在线工具,有些在线工具会记录你的信息
--UserData I3BzMQojeW91ciBjb2RlCnNodXRkb3duIC1zIC10IDA=
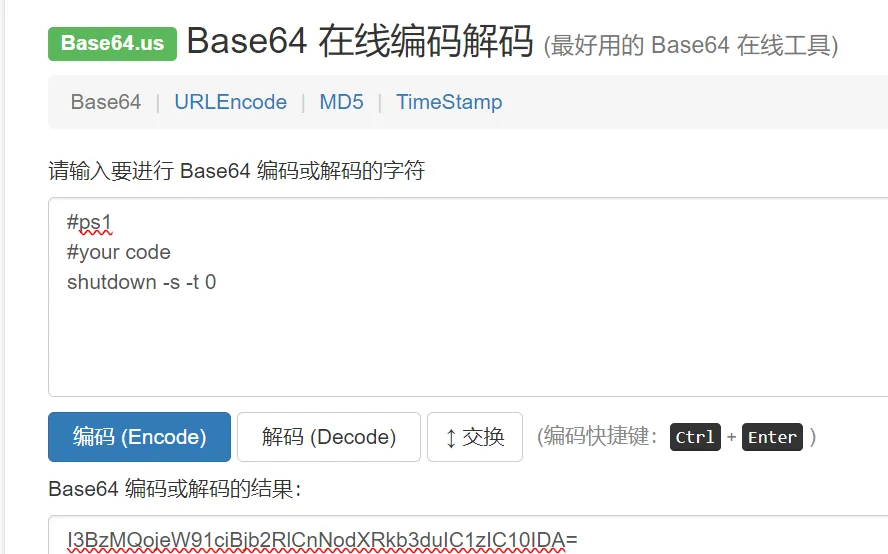
用命令行base64挺方便的,例如
$originalString=@"
#ps1
#your code
shutdown -s -t 0
"@
[System.Convert]::ToBase64String([System.Text.Encoding]::UTF8.GetBytes($originalString))
整体效果图如下

原创声明:本文系作者授权腾讯云开发者社区发表,未经许可,不得转载。
如有侵权,请联系 cloudcommunity@tencent.com 删除。
原创声明:本文系作者授权腾讯云开发者社区发表,未经许可,不得转载。
如有侵权,请联系 cloudcommunity@tencent.com 删除。
评论
登录后参与评论
推荐阅读
腾讯云开发者

Copyright © 2013 - 2026 Tencent Cloud. All Rights Reserved. 腾讯云 版权所有
深圳市腾讯计算机系统有限公司 ICP备案/许可证号:粤B2-20090059 ![]() 粤公网安备44030502008569号
粤公网安备44030502008569号
腾讯云计算(北京)有限责任公司 京ICP证150476号 | 京ICP备11018762号