Kubernetes 部署 Compute storage coupled 模式 Doris 高可用集群实战指南
原创
Kubernetes 部署 Compute storage coupled 模式 Doris 高可用集群实战指南
原创
术哥
发布于 2024-11-29 12:59:56
发布于 2024-11-29 12:59:56
KubeSphere 最佳实战:Kubernetes 部署 Compute storage coupled 模式 Doris 高可用集群实战指南
2024 年云原生运维实战文档 99 篇原创计划 第 056 篇 |KubeSphere 最佳实战「2024」系列 第 028 篇
你好,欢迎来到运维有术。
今天分享的主题是:如何在 k8s 集群上部署 Compute storage coupled(存算耦合) 模式的 Doris 高可用集群?
本文,我将为您提供一份全面的实战指南,逐步引导您完成以下关键任务:
- 配置 Doris ConfigMap:实现自定义配置文件
- 配置 Doris Secret:管理特殊密码
- 配置 Doris Service:使用 NodePort 对外发布 Doris 服务
- 部署 Doris FE
- 部署 Doris BE
- Doris 用户初始化
- Doris 图形化管理概览
通过本文的指导,您将掌握在 Kubernetes 上部署 Compute storage coupled 模式 Doris 集群的必备技能。
实战服务器配置(架构1:1复刻小规模生产环境,配置略有不同)
主机名 | IP | CPU | 内存 | 系统盘 | 数据盘 | 用途 |
|---|---|---|---|---|---|---|
ksp-registry | 192.168.9.90 | 4 | 8 | 40 | 200 | Harbor 镜像仓库 |
ksp-control-1 | 192.168.9.91 | 4 | 8 | 40 | 100 | KubeSphere/k8s-control-plane |
ksp-control-2 | 192.168.9.92 | 4 | 8 | 40 | 100 | KubeSphere/k8s-control-plane |
ksp-control-3 | 192.168.9.93 | 4 | 8 | 40 | 100 | KubeSphere/k8s-control-plane |
ksp-worker-1 | 192.168.9.94 | 8 | 16 | 40 | 100 | k8s-worker/CI |
ksp-worker-2 | 192.168.9.95 | 8 | 16 | 40 | 100 | k8s-worker |
ksp-worker-3 | 192.168.9.96 | 8 | 16 | 40 | 100 | k8s-worker |
ksp-storage-1 | 192.168.9.97 | 4 | 8 | 40 | 400+ | ElasticSearch/Longhorn/Ceph/NFS |
ksp-storage-2 | 192.168.9.98 | 4 | 8 | 40 | 300+ | ElasticSearch/Longhorn/Ceph |
ksp-storage-3 | 192.168.9.99 | 4 | 8 | 40 | 300+ | ElasticSearch/Longhorn/Ceph |
ksp-gpu-worker-1 | 192.168.9.101 | 4 | 16 | 40 | 100 | k8s-worker(GPU NVIDIA Tesla M40 24G) |
ksp-gpu-worker-2 | 192.168.9.102 | 4 | 16 | 40 | 100 | k8s-worker(GPU NVIDIA Tesla P100 16G) |
ksp-gateway-1 | 192.168.9.103 | 2 | 4 | 40 | 自建应用服务代理网关/VIP:192.168.9.100 | |
ksp-gateway-2 | 192.168.9.104 | 2 | 4 | 40 | 自建应用服务代理网关/VIP:192.168.9.100 | |
ksp-mid | 192.168.9.105 | 4 | 8 | 40 | 100 | 部署在 k8s 集群之外的服务节点(Gitlab 等) |
合计 | 15 | 68 | 152 | 600 | 2100+ |
实战环境涉及软件版本信息
- 操作系统:openEuler 22.03 LTS SP3 x86_64
- KubeSphere:v3.4.1
- Kubernetes:v1.28.8
- KubeKey: v3.1.1
- Doris: 3.0.2
1. 部署方案规划
Doris 官方提供了 Doris Operator 工具,用于在 Kubernetes 集群中部署和管理 Doris 集群,详细信息可以查阅Doris 快速部署文档 。
一些特殊环境或是运维人员自身能力、喜好等原因,不适合使用 Doris Operator。这就需要我们使用 Kubectl 利用自定义资源清单,部署 Doris 集群。
本文基于资源清单实现了 Doris 集群的部署,生产环境建议使用 Doris Operator,部署方法也更加简单。
在 Kubernetes 上部署 Doris 集群有两种架构方案:
- Compute storage coupled(存算耦合)
- Compute storage decoupled(存算分离)
本文选择了适用于中小规模场景的 Compute storage coupled 方案。Compute storage decoupled 的部署和维护更加复杂,更多细节请查阅官方文档。
1.1 部署架构图
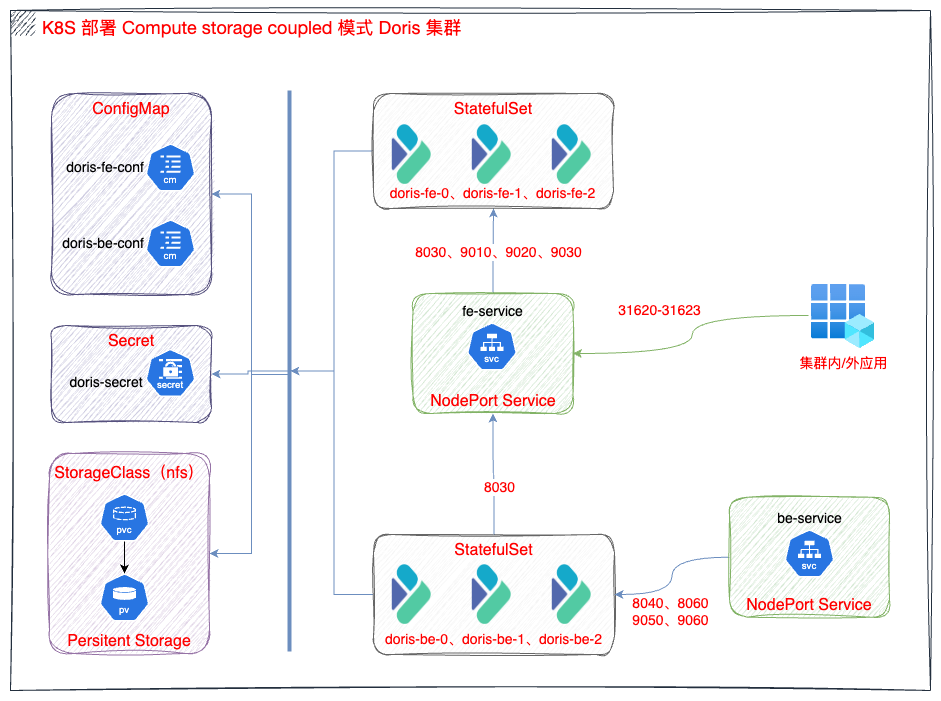
ksp-doris-cluster-arch
1.2 准备持久化存储
本实战环境使用 NFS 作为 k8s 集群的持久化存储,新集群可以参考探索 Kubernetes 持久化存储之 NFS 终极实战指南 部署 NFS 存储。
1.3 命名空间
Doris 集群所有资源部署在命名空间 opsxlab内。
1.4 前提准备
- 准备 root 密码
编写 Python 脚本 hm.py,生成 2 阶段 SHA-1 加密的密码。
#!/bin/python

import hashlib

# 原始密码
original_password = "PleaseChangeMe"

# 第一次SHA-1哈希运算
first_hash = hashlib.sha1(original_password.encode('utf-8')).hexdigest()

# 第二次SHA-1哈希运算
first_hash_bytes = bytes.fromhex(first_hash)
second_hash = hashlib.sha1(first_hash_bytes).hexdigest()

# 输出两阶段加密后的密码
print("*" + second_hash)
生成密码,记录备用。
$ python3 hm.py
*aa7530f7c48740e92a4c0d2138324611e314d397
2. 部署 Doris 集群
2.1 创建 ConfigMap
- 创建 Doris FE 配置文件
请使用 vi 编辑器,创建资源清单文件 doris-cluster-fe-conf.yaml,并输入以下内容:
apiVersion: v1
kind: ConfigMap
metadata:
  name: doris-cluster-fe-conf
  labels:
    app.kubernetes.io/component: fe
data:
  fe.conf: |
    #####################################################################
    ## The uppercase properties are read and exported by bin/start_fe.sh.
    ## To see all Frontend configurations,
    ## see fe/src/org/apache/doris/common/Config.java
    #####################################################################

    CUR_DATE=`date +%Y%m%d-%H%M%S`

    # Log dir
    LOG_DIR = ${DORIS_HOME}/log

    # For jdk 8
    JAVA_OPTS="-Dfile.encoding=UTF-8 -Djavax.security.auth.useSubjectCredsOnly=false -Xss4m -Xmx8192m -XX:+UnlockExperimentalVMOptions -XX:+UseG1GC -XX:MaxGCPauseMillis=200 -XX:+PrintGCDateStamps -XX:+PrintGCDetails -Xloggc:$LOG_DIR/log/fe.gc.log.$CUR_DATE -XX:+UseGCLogFileRotation -XX:NumberOfGCLogFiles=10 -XX:GCLogFileSize=50M -Dlog4j2.formatMsgNoLookups=true"

    # For jdk 17, this JAVA_OPTS will be used as default JVM options
    JAVA_OPTS_FOR_JDK_17="-Dfile.encoding=UTF-8 -Djavax.security.auth.useSubjectCredsOnly=false -Xmx8192m -Xms8192m -XX:+HeapDumpOnOutOfMemoryError -XX:HeapDumpPath=$LOG_DIR -Xlog:gc*:$LOG_DIR/fe.gc.log.$CUR_DATE:time,uptime:filecount=10,filesize=50M --add-opens=java.base/java.nio=ALL-UNNAMED --add-opens java.base/jdk.internal.ref=ALL-UNNAMED"

    # Set your own JAVA_HOME
    # JAVA_HOME=/path/to/jdk/

    ##
    ## the lowercase properties are read by main program.
    ##

    # store metadata, must be created before start FE.
    # Default value is ${DORIS_HOME}/doris-meta
    # meta_dir = ${DORIS_HOME}/doris-meta

    # Default dirs to put jdbc drivers,default value is ${DORIS_HOME}/jdbc_drivers
    # jdbc_drivers_dir = ${DORIS_HOME}/jdbc_drivers

    http_port = 8030
    rpc_port = 9020
    query_port = 9030
    edit_log_port = 9010
    arrow_flight_sql_port = -1

    # Choose one if there are more than one ip except loopback address.
    # Note that there should at most one ip match this list.
    # If no ip match this rule, will choose one randomly.
    # use CIDR format, e.g. 10.10.10.0/24 or IP format, e.g. 10.10.10.1
    # Default value is empty.
    # priority_networks = 10.10.10.0/24;192.168.0.0/16

    # Advanced configurations
    # log_roll_size_mb = 1024
    # INFO, WARN, ERROR, FATAL
    sys_log_level = INFO
    # NORMAL, BRIEF, ASYNC
    sys_log_mode = ASYNC
    # sys_log_roll_num = 10
    # sys_log_verbose_modules = org.apache.doris
    # audit_log_dir = $LOG_DIR
    # audit_log_modules = slow_query, query
    # audit_log_roll_num = 10
    # meta_delay_toleration_second = 10
    # qe_max_connection = 1024
    # qe_query_timeout_second = 300
    # qe_slow_log_ms = 5000
    enable_fqdn_mode = true
    initial_root_password = *aa7530f7c48740e92a4c0d2138324611e314d397
说明: 配置文件在 FE 默认配置基础上,增加了 initial_root_password 配置项,值是前面用 Python 生成的2段加密的密码,生产环境请根据需要调整。
- 创建 Doris BE 配置文件
请使用 vi 编辑器,创建资源清单文件 doris-cluster-be-conf.yaml,并输入以下内容:
kind: ConfigMap
apiVersion: v1
metadata:
  name: doris-cluster-be-conf
  labels:
    app.kubernetes.io/component: be
data:
  be.conf: >
    CUR_DATE=`date +%Y%m%d-%H%M%S`

    # Log dir
    LOG_DIR="${DORIS_HOME}/log/"

    # For jdk 8
    JAVA_OPTS="-Dfile.encoding=UTF-8 -Xmx2048m -DlogPath=$LOG_DIR/jni.log -Xloggc:$LOG_DIR/be.gc.log.$CUR_DATE -XX:+UseGCLogFileRotation -XX:NumberOfGCLogFiles=10 -XX:GCLogFileSize=50M -Djavax.security.auth.useSubjectCredsOnly=false -Dsun.security.krb5.debug=true -Dsun.java.command=DorisBE -XX:-CriticalJNINatives"

    # For jdk 17, this JAVA_OPTS will be used as default JVM options
    JAVA_OPTS_FOR_JDK_17="-Dfile.encoding=UTF-8 -Xmx2048m -DlogPath=$LOG_DIR/jni.log -Xlog:gc*:$LOG_DIR/be.gc.log.$CUR_DATE:time,uptime:filecount=10,filesize=50M -Djavax.security.auth.useSubjectCredsOnly=false -Dsun.security.krb5.debug=true -Dsun.java.command=DorisBE -XX:-CriticalJNINatives -XX:+IgnoreUnrecognizedVMOptions --add-opens=java.base/java.lang=ALL-UNNAMED --add-opens=java.base/java.lang.invoke=ALL-UNNAMED --add-opens=java.base/java.lang.reflect=ALL-UNNAMED --add-opens=java.base/java.io=ALL-UNNAMED --add-opens=java.base/java.net=ALL-UNNAMED --add-opens=java.base/java.nio=ALL-UNNAMED --add-opens=java.base/java.util=ALL-UNNAMED --add-opens=java.base/java.util.concurrent=ALL-UNNAMED --add-opens=java.base/java.util.concurrent.atomic=ALL-UNNAMED --add-opens=java.base/sun.nio.ch=ALL-UNNAMED --add-opens=java.base/sun.nio.cs=ALL-UNNAMED --add-opens=java.base/sun.security.action=ALL-UNNAMED --add-opens=java.base/sun.util.calendar=ALL-UNNAMED --add-opens=java.security.jgss/sun.security.krb5=ALL-UNNAMED --add-opens=java.management/sun.management=ALL-UNNAMED"

    # Set your own JAVA_HOME
    # JAVA_HOME=/path/to/jdk/

    # https://github.com/apache/doris/blob/master/docs/zh-CN/community/developer-guide/debug-tool.md#jemalloc-heap-profile
    # https://jemalloc.net/jemalloc.3.html
    JEMALLOC_CONF="percpu_arena:percpu,background_thread:true,metadata_thp:auto,muzzy_decay_ms:15000,dirty_decay_ms:15000,oversize_threshold:0,prof:false,lg_prof_interval:32,lg_prof_sample:19,prof_gdump:false,prof_accum:false,prof_leak:false,prof_final:false"
    JEMALLOC_PROF_PRFIX=""

    # ports for admin, web, heartbeat service
    be_port = 9060
    webserver_port = 8040
    heartbeat_service_port = 9050
    brpc_port = 8060
    arrow_flight_sql_port = -1

    # HTTPS configures
    enable_https = false
    # path of certificate in PEM format.
    ssl_certificate_path = "$DORIS_HOME/conf/cert.pem"
    # path of private key in PEM format.
    ssl_private_key_path = "$DORIS_HOME/conf/key.pem"

    # Choose one if there are more than one ip except loopback address.
    # Note that there should at most one ip match this list.
    # If no ip match this rule, will choose one randomly.
    # use CIDR format, e.g. 10.10.10.0/24 or IP format, e.g. 10.10.10.1
    # Default value is empty.
    # priority_networks = 10.10.10.0/24;192.168.0.0/16

    # data root path, separate by ';'
    # You can specify the storage type for each root path, HDD (cold data) or SSD (hot data)
    # eg:
    # storage_root_path = /home/disk1/doris;/home/disk2/doris;/home/disk2/doris
    # storage_root_path = /home/disk1/doris,medium:SSD;/home/disk2/doris,medium:SSD;/home/disk2/doris,medium:HDD
    # /home/disk2/doris,medium:HDD(default)
    #
    # you also can specify the properties by setting '<property>:<value>', separate by ','
    # property 'medium' has a higher priority than the extension of path
    #
    # Default value is ${DORIS_HOME}/storage, you should create it by hand.
    # storage_root_path = ${DORIS_HOME}/storage

    # Default dirs to put jdbc drivers,default value is ${DORIS_HOME}/jdbc_drivers
    # jdbc_drivers_dir = ${DORIS_HOME}/jdbc_drivers

    # Advanced configurations
    # INFO, WARNING, ERROR, FATAL
    sys_log_level = INFO
    # sys_log_roll_mode = SIZE-MB-1024
    # sys_log_roll_num = 10
    # sys_log_verbose_modules = *
    # log_buffer_level = -1

    # aws sdk log level
    #    Off = 0,
    #    Fatal = 1,
    #    Error = 2,
    #    Warn = 3,
    #    Info = 4,
    #    Debug = 5,
    #    Trace = 6
    # Default to turn off aws sdk log, because aws sdk errors that need to be cared will be output through Doris logs
    aws_log_level=0
    ## If you are not running in aws cloud, you can disable EC2 metadata
    AWS_EC2_METADATA_DISABLED=true
说明: 配置文件使用了 BE 的默认配置,生产环境请根据需要调整。
- 创建资源
执行下面的命令,创建资源。
kubectl apply -f doris-cluster-fe-conf.yaml -n opsxlab
kubectl apply -f doris-cluster-be-conf.yaml -n opsxlab- 验证资源
执行下面的命令,查看创建结果。
$ kubectl get cm -n opsxlab
NAME                    DATA   AGE
doris-cluster-be-conf   1      34s
doris-cluster-fe-conf   1      20s
2.2 创建 Secret
- 创建管理 Doris 集群节点所需的用户名、密码的保密字典
请使用 vi 编辑器,创建资源清单文件 doris-cluster-secret.yaml,并输入以下内容:
kind: Secret
apiVersion: v1
metadata:
  name: doris-cluster-secret
stringData:
  username: root
  password: PleaseChangeMe
type: kubernetes.io/basic-auth
提示: 密码使用明文 PleaseChangeMe,生产环境请务必替换。
- 创建资源
执行下面的命令,创建资源。
kubectl apply -f doris-cluster-secret.yaml -n opsxlab- 验证资源
执行下面的命令,查看创建结果。
$ kubectl get secret -n opsxlab
NAME                   TYPE                       DATA   AGE
doris-cluster-secret   kubernetes.io/basic-auth   2      22s
2.3 创建服务
我们采用 NodePort 方式在 Kubernetes 集群外发布 Doris 服务。
1、 FE 服务
请使用 vi 编辑器,创建资源清单文件 doris-cluster-fe-service.yaml,并输入以下内容:
kind: Service
apiVersion: v1
metadata:
  name: doris-cluster-fe-service
  labels:
    app.kubernetes.io/component: doris-cluster-fe
spec:
  ports:
    - name: http-port
      protocol: TCP
      port: 8030
      targetPort: 8030
      nodePort: 31620
    - name: rpc-port
      protocol: TCP
      port: 9020
      targetPort: 9020
      nodePort: 31621
    - name: query-port
      protocol: TCP
      port: 9030
      targetPort: 9030
      nodePort: 31622
    - name: edit-log-port
      protocol: TCP
      port: 9010
      targetPort: 9010
      nodePort: 31623
  selector:
    app.kubernetes.io/component: doris-cluster-fe
type: NodePort- BE 服务
请使用 vi 编辑器,创建资源清单文件 doris-cluster-be-service.yaml,并输入以下内容:
kind: Service
apiVersion: v1
metadata:
  name: doris-cluster-be-service
  labels:
    app.kubernetes.io/component: doris-cluster-be
spec:
  ports:
    - name: be-port
      protocol: TCP
      port: 9060
      targetPort: 9060
      nodePort: 32189
    - name: webserver-port
      protocol: TCP
      port: 8040
      targetPort: 8040
      nodePort: 31624
    - name: heartbeat-port
      protocol: TCP
      port: 9050
      targetPort: 9050
      nodePort: 31625
    - name: brpc-port
      protocol: TCP
      port: 8060
      targetPort: 8060
      nodePort: 31627
  selector:
    app.kubernetes.io/component: doris-cluster-be
type: NodePort- 创建资源
执行下面的命令,创建资源。
kubectl apply -f doris-cluster-fe-service.yaml -n opsxlab
kubectl apply -f doris-cluster-be-service.yaml -n opsxlab- 验证资源
执行下面的命令,查看创建结果。
$ kubectl get svc -o wide -n opsxlab
NAME                        TYPE        CLUSTER-IP      EXTERNAL-IP   PORT(S)                                                       AGE   SELECTOR
doris-cluster-be-service    NodePort    10.233.11.255   <none>        9060:32189/TCP,8040:31624/TCP,9050:31625/TCP,8060:31627/TCP   12s   app.kubernetes.io/component=doris-cluster-be
doris-cluster-fe-service    NodePort    10.233.60.147   <none>        8030:31620/TCP,9020:31621/TCP,9030:31622/TCP,9010:31623/TCP   12s   app.kubernetes.io/component=doris-cluster-fe
2.4 创建 Doris FE
使用 StatefulSet 部署 Doris FE 服务,需要创建 StatefulSet 和 HeadLess 两种资源。
- 创建资源清单
请使用 vi 编辑器,创建资源清单文件 doris-cluster-fe-sts.yaml,并输入以下内容:
kind: StatefulSet
apiVersion: apps/v1
metadata:
  name: doris-cluster-fe
  labels:
    app.kubernetes.io/component: doris-cluster-fe
spec:
  replicas: 3
  selector:
    matchLabels:
      app.kubernetes.io/component: doris-cluster-fe
  template:
    metadata:
      name: doris-cluster-fe
      labels:
        app.kubernetes.io/component: doris-cluster-fe
    spec:
      volumes:
        - name: meta
          persistentVolumeClaim:
            claimName: meta
        - name: podinfo
          downwardAPI:
            items:
              - path: labels
                fieldRef:
                  apiVersion: v1
                  fieldPath: metadata.labels
              - path: annotations
                fieldRef:
                  apiVersion: v1
                  fieldPath: metadata.annotations
            defaultMode: 420
        - name: basic-auth
          secret:
            secretName: doris-cluster-secret
            defaultMode: 420
        - name: doris-cluster-fe-conf
          configMap:
            name: doris-cluster-fe-conf
            defaultMode: 420
      containers:
        - name: doris-cluster-fe
          image: 'selectdb/doris.fe-ubuntu:3.0.2'
          command:
            - /opt/apache-doris/fe_entrypoint.sh
          args:
            - $(ENV_FE_ADDR)
          ports:
            - name: http-port
              containerPort: 8030
              protocol: TCP
            - name: rpc-port
              containerPort: 9020
              protocol: TCP
            - name: query-port
              containerPort: 9030
              protocol: TCP
            - name: edit-log-port
              containerPort: 9010
              protocol: TCP
          env:
            - name: POD_NAME
              valueFrom:
                fieldRef:
                  apiVersion: v1
                  fieldPath: metadata.name
            - name: POD_IP
              valueFrom:
                fieldRef:
                  apiVersion: v1
                  fieldPath: status.podIP
            - name: HOST_IP
              valueFrom:
                fieldRef:
                  apiVersion: v1
                  fieldPath: status.hostIP
            - name: POD_NAMESPACE
              valueFrom:
                fieldRef:
                  apiVersion: v1
                  fieldPath: metadata.namespace
            - name: CONFIGMAP_MOUNT_PATH
              value: /etc/doris
            - name: USER
              value: root
            - name: DORIS_ROOT
              value: /opt/apache-doris
            - name: ENV_FE_ADDR
              value: doris-cluster-fe-service
            - name: FE_QUERY_PORT
              value: '9030'
            - name: ELECT_NUMBER
              value: '3'
          resources:
            limits:
              cpu: '8'
              memory: 16Gi
            requests:
              cpu: '1'
              memory: 1Gi
          volumeMounts:
            - name: podinfo
              mountPath: /etc/podinfo
            - name: log
              mountPath: /opt/apache-doris/fe/log
            - name: meta
              mountPath: /opt/apache-doris/fe/doris-meta
            - name: doris-cluster-fe-conf
              mountPath: /etc/doris
            - name: basic-auth
              mountPath: /etc/basic_auth
          livenessProbe:
            tcpSocket:
              port: 9030
            initialDelaySeconds: 80
            timeoutSeconds: 180
            periodSeconds: 5
            successThreshold: 1
            failureThreshold: 3
          readinessProbe:
            httpGet:
              path: /api/health
              port: 8030
              scheme: HTTP
            timeoutSeconds: 1
            periodSeconds: 5
            successThreshold: 1
            failureThreshold: 3
          startupProbe:
            tcpSocket:
              port: 9030
            timeoutSeconds: 1
            periodSeconds: 5
            successThreshold: 1
            failureThreshold: 60
          lifecycle:
            preStop:
              exec:
                command:
                  - /opt/apache-doris/fe_prestop.sh
          terminationMessagePath: /dev/termination-log
          terminationMessagePolicy: File
          imagePullPolicy: IfNotPresent
      restartPolicy: Always
      terminationGracePeriodSeconds: 30
      dnsPolicy: ClusterFirst
      securityContext: {}
      affinity:
        podAntiAffinity:
          preferredDuringSchedulingIgnoredDuringExecution:
            - weight: 100
              podAffinityTerm:
                labelSelector:
                  matchExpressions:
                    - key: app.kubernetes.io/component
                      operator: In
                      values:
                        - doris-cluster-fe
                topologyKey: kubernetes.io/hostname
      schedulerName: default-scheduler
  volumeClaimTemplates:
    - kind: PersistentVolumeClaim
      apiVersion: v1
      metadata:
        name: meta
      spec:
        accessModes:
          - ReadWriteOnce
        resources:
          requests:
            storage: 10G
        storageClassName: nfs-sc
        volumeMode: Filesystem
    - kind: PersistentVolumeClaim
      apiVersion: v1
      metadata:
        name: log
      spec:
        accessModes:
          - ReadWriteOnce
        resources:
          requests:
            storage: '10'
        storageClassName: nfs-sc
        volumeMode: Filesystem
  serviceName: doris-cluster-fe-internal
  podManagementPolicy: Parallel

---
kind: Service
apiVersion: v1
metadata:
  name: doris-cluster-fe-internal
  labels:
    app.kubernetes.io/component: doris-cluster-fe
spec:
  ports:
    - name: query-port
      protocol: TCP
      port: 9030
      targetPort: 9030
  selector:
    app.kubernetes.io/component: doris-cluster-fe
  clusterIP: None
type: ClusterIP- 创建资源
执行下面的命令,创建资源。
kubectl apply -f doris-cluster-fe-sts.yaml -n opsxlab- 验证资源
执行下面的命令,查看创建结果(初次创建比较慢)。
$ kubectl get sts,pod -n opsxlab
NAME                                READY   AGE
statefulset.apps/doris-cluster-fe   3/3     117s

NAME                     READY   STATUS    RESTARTS   AGE
pod/doris-cluster-fe-0   1/1     Running   0          117s
pod/doris-cluster-fe-1   1/1     Running   0          96s
pod/doris-cluster-fe-2   1/1     Running   0          80s
2.5 创建 Doris BE
使用 StatefulSet 部署 Doris BE 服务,需要创建 StatefulSet 和 HeadLess 两种资源。
- 创建资源清单
请使用 vi 编辑器,创建资源清单文件 doris-cluster-be-sts.yaml,并输入以下内容:
kind: StatefulSet
apiVersion: apps/v1
metadata:
  name: doris-cluster-be
  labels:
    app.kubernetes.io/component: doris-cluster-be
spec:
  replicas: 3
  selector:
    matchLabels:
      app.kubernetes.io/component: doris-cluster-be
  template:
    metadata:
      name: doris-cluster-be
      labels:
        app.kubernetes.io/component: doris-cluster-be
    spec:
      volumes:
        - name: podinfo
          downwardAPI:
            items:
              - path: labels
                fieldRef:
                  apiVersion: v1
                  fieldPath: metadata.labels
              - path: annotations
                fieldRef:
                  apiVersion: v1
                  fieldPath: metadata.annotations
            defaultMode: 420
        - name: basic-auth
          secret:
            secretName: doris-cluster-secret
            defaultMode: 420
        - name: doris-cluster-be-conf
          configMap:
            name: doris-cluster-be-conf
            defaultMode: 420
      initContainers:
        - name: default-init
          image: 'selectdb/alpine:latest'
          command:
            - /bin/sh
          args:
            - '-c'
            - sysctl -w vm.max_map_count=2000000 && swapoff -a
          resources: {}
          terminationMessagePath: /dev/termination-log
          terminationMessagePolicy: File
          imagePullPolicy: IfNotPresent
          securityContext:
            privileged: true
      containers:
        - name: be
          image: 'selectdb/doris.be-ubuntu:3.0.2'
          command:
            - /opt/apache-doris/be_entrypoint.sh
          args:
            - $(ENV_FE_ADDR)
          ports:
            - name: be-port
              containerPort: 9060
              protocol: TCP
            - name: webserver-port
              containerPort: 8040
              protocol: TCP
            - name: heartbeat-port
              containerPort: 9050
              protocol: TCP
            - name: brpc-port
              containerPort: 8060
              protocol: TCP
          env:
            - name: POD_NAME
              valueFrom:
                fieldRef:
                  apiVersion: v1
                  fieldPath: metadata.name
            - name: POD_IP
              valueFrom:
                fieldRef:
                  apiVersion: v1
                  fieldPath: status.podIP
            - name: HOST_IP
              valueFrom:
                fieldRef:
                  apiVersion: v1
                  fieldPath: status.hostIP
            - name: POD_NAMESPACE
              valueFrom:
                fieldRef:
                  apiVersion: v1
                  fieldPath: metadata.namespace
            - name: CONFIGMAP_MOUNT_PATH
              value: /etc/doris
            - name: USER
              value: root
            - name: DORIS_ROOT
              value: /opt/apache-doris
            - name: ENV_FE_ADDR
              value: doris-cluster-fe-service
            - name: FE_QUERY_PORT
              value: '9030'
          resources:
            limits:
              cpu: '8'
              memory: 16Gi
            requests:
              cpu: '1'
              memory: 1Gi
          volumeMounts:
            - name: podinfo
              mountPath: /etc/podinfo
            - name: be-storage
              mountPath: /opt/apache-doris/be/storage
            - name: be-log
              mountPath: /opt/apache-doris/be/log
            - name: doris-cluster-be-conf
              mountPath: /etc/doris
            - name: basic-auth
              mountPath: /etc/basic_auth
          livenessProbe:
            tcpSocket:
              port: 9050
            initialDelaySeconds: 80
            timeoutSeconds: 180
            periodSeconds: 5
            successThreshold: 1
            failureThreshold: 3
          readinessProbe:
            httpGet:
              path: /api/health
              port: 8040
              scheme: HTTP
            timeoutSeconds: 1
            periodSeconds: 5
            successThreshold: 1
            failureThreshold: 3
          startupProbe:
            tcpSocket:
              port: 9050
            timeoutSeconds: 1
            periodSeconds: 5
            successThreshold: 1
            failureThreshold: 60
          lifecycle:
            preStop:
              exec:
                command:
                  - /opt/apache-doris/be_prestop.sh
          terminationMessagePath: /dev/termination-log
          terminationMessagePolicy: File
          imagePullPolicy: IfNotPresent
      restartPolicy: Always
      terminationGracePeriodSeconds: 30
      dnsPolicy: ClusterFirst
      securityContext: {}
      affinity:
        podAntiAffinity:
          preferredDuringSchedulingIgnoredDuringExecution:
            - weight: 100
              podAffinityTerm:
                labelSelector:
                  matchExpressions:
                    - key: app.kubernetes.io/component
                      operator: In
                      values:
                        - doris-cluster-be
                topologyKey: kubernetes.io/hostname
      schedulerName: default-scheduler
  volumeClaimTemplates:
    - kind: PersistentVolumeClaim
      apiVersion: v1
      metadata:
        name: be-storage
      spec:
        accessModes:
          - ReadWriteOnce
        resources:
          requests:
            storage: '10'
        storageClassName: nfs-sc
        volumeMode: Filesystem
    - kind: PersistentVolumeClaim
      apiVersion: v1
      metadata:
        name: be-log
      spec:
        accessModes:
          - ReadWriteOnce
        resources:
          requests:
            storage: '10'
        storageClassName: nfs-sc
        volumeMode: Filesystem
  serviceName: doris-cluster-be-internal
  podManagementPolicy: Parallel

---
kind: Service
apiVersion: v1
metadata:
  name: doris-cluster-be-internal
  labels:
    app.kubernetes.io/component: doris-cluster-be-internal
spec:
  ports:
    - name: heartbeat-port
      protocol: TCP
      port: 9050
      targetPort: 9050
  selector:
    app.kubernetes.io/component: doris-cluster-be
  clusterIP: None
type: ClusterIP- 创建资源
执行下面的命令,创建资源。
kubectl apply -f doris-cluster-be-sts.yaml -n opsxlab- 验证资源
执行下面的命令,查看创建结果。
$ kubectl get sts,pod -n opsxlab
NAME                                READY   AGE
statefulset.apps/doris-cluster-be   3/3     37s
statefulset.apps/doris-cluster-fe   3/3     12m

NAME                     READY   STATUS    RESTARTS      AGE
pod/doris-cluster-be-0   1/1     Running   0             37s
pod/doris-cluster-be-1   1/1     Running   0             37s
pod/doris-cluster-be-2   1/1     Running   0             37s
pod/doris-cluster-fe-0   1/1     Running   0             13m
pod/doris-cluster-fe-1   1/1     Running   0             13m
pod/doris-cluster-fe-2   1/1     Running   0             12m
3. 认证管理
登录 Doris 查看用户信息并设置密码。
- 执行下面的命令,进入 Pod
doris-fe-0的终端,连接 Doris 服务。
kubectl exec -n opsxlab -it doris-cluster-fe-0 -- /bin/bash- 在
doris-fe-0内,执行 mysql 命令,使用 root 用户访问 Doris 服务对应的 NodePort 端口(需要密码),并查看用户及权限。
root@doris-cluster-fe-0:/opt/apache-doris# mysql -uroot -P31622 -h192.168.9.91 -p
Enter password:
Welcome to the MySQL monitor.  Commands end with ; or \g.
Your MySQL connection id is 654
Server version: 5.7.99

Copyright (c) 2000, 2024, Oracle and/or its affiliates.

Oracle is a registered trademark of Oracle Corporation and/or its
affiliates. Other names may be trademarks of their respective
owners.

Type 'help;' or '\h' for help. Type '\c' to clear the current input statement.

mysql> SHOW ALL GRANTS\G;
*************************** 1. row ***************************
      UserIdentity: 'root'@'%'
           Comment: ROOT
          Password: Yes
             Roles: operator
       GlobalPrivs: Node_priv,Admin_priv
      CatalogPrivs: NULL
     DatabasePrivs: internal.information_schema: Select_priv; internal.mysql: Select_priv
        TablePrivs: NULL
          ColPrivs: NULL
     ResourcePrivs: NULL
 CloudClusterPrivs: NULL
   CloudStagePrivs: NULL
 StorageVaultPrivs: NULL
WorkloadGroupPrivs: normal: Usage_priv
 ComputeGroupPrivs: NULL
*************************** 2. row ***************************
      UserIdentity: 'admin'@'%'
           Comment: ADMIN
          Password: No
             Roles: admin
       GlobalPrivs: Admin_priv
      CatalogPrivs: NULL
     DatabasePrivs: internal.information_schema: Select_priv; internal.mysql: Select_priv
        TablePrivs: NULL
          ColPrivs: NULL
     ResourcePrivs: NULL
 CloudClusterPrivs: NULL
   CloudStagePrivs: NULL
 StorageVaultPrivs: NULL
WorkloadGroupPrivs: normal: Usage_priv
 ComputeGroupPrivs: NULL
2 rows in set (0.05 sec)

ERROR:
No query specified
提示:输出结果显示 root 用户设置了密码,admin 用户没有设置密码。
- 执行 mysql 命令,使用 admin 用户登录 Doris(无需密码)
root@doris-cluster-fe-0:/opt/apache-doris# mysql -uadmin -P31622 -h192.168.9.91
Welcome to the MySQL monitor.  Commands end with ; or \g.
Your MySQL connection id is 680
Server version: 5.7.99 Doris version doris-3.0.2-rc03-c21b9f5bce

Copyright (c) 2000, 2024, Oracle and/or its affiliates.

Oracle is a registered trademark of Oracle Corporation and/or its
affiliates. Other names may be trademarks of their respective
owners.

Type 'help;' or '\h' for help. Type '\c' to clear the current input statement.

mysql>- 请立即为管理员(admin)账户设置密码。
SET PASSWORD FOR 'admin'@'%' = PASSWORD('PleaseChangeMe');- 再次查看权限,admin 用户的 Password 项的值已经变成 Yes。
mysql> SHOW ALL GRANTS\G;
*************************** 2. row ***************************
      UserIdentity: 'admin'@'%'
           Comment: ADMIN
          Password: Yes
             Roles: admin
       GlobalPrivs: Admin_priv
      CatalogPrivs: NULL
     DatabasePrivs: internal.information_schema: Select_priv; internal.mysql: Select_priv
        TablePrivs: NULL
          ColPrivs: NULL
     ResourcePrivs: NULL
 CloudClusterPrivs: NULL
   CloudStagePrivs: NULL
 StorageVaultPrivs: NULL
WorkloadGroupPrivs: normal: Usage_priv
 ComputeGroupPrivs: NULL
2 rows in set (0.01 sec)
退出 MySQL 控制台,再次使用 admin 用户登录,不输入密码,提示权限拒绝。
root@doris-cluster-fe-0:/opt/apache-doris# mysql -uadmin -P31622 -h192.168.9.91
ERROR 1045 (28000): Access denied for user 'admin@10.233.93.0' (using password: NO)
再次使用 admin 用户登录,输入密码,可以登录 Doris 系统。
root@doris-cluster-fe-0:/opt/apache-doris# mysql -uadmin -P31622 -h192.168.9.91 -p
Enter password:
Welcome to the MySQL monitor.  Commands end with ; or \g.
Your MySQL connection id is 719
Server version: 5.7.99 Doris version doris-3.0.2-rc03-c21b9f5bce

Copyright (c) 2000, 2024, Oracle and/or its affiliates.

Oracle is a registered trademark of Oracle Corporation and/or its
affiliates. Other names may be trademarks of their respective
owners.

Type 'help;' or '\h' for help. Type '\c' to clear the current input statement.

mysql>
4. Doris 图形化功能概览
Doris FE 内置 Web UI。用户无须安装 MySQL 客户端,即可通过内置的 Web UI 进行 SQL 查询和其它相关信息的查看。
使用浏览器,打开 FE 服务 http-port 端口 8030 对应的 NodePort 31620,例如 http://192.168.9.91:31620,打开 Doris 内置的 Web 控制台。
- 登录页面
输入用户名 admin 及密码,点击「Login」登录系统。
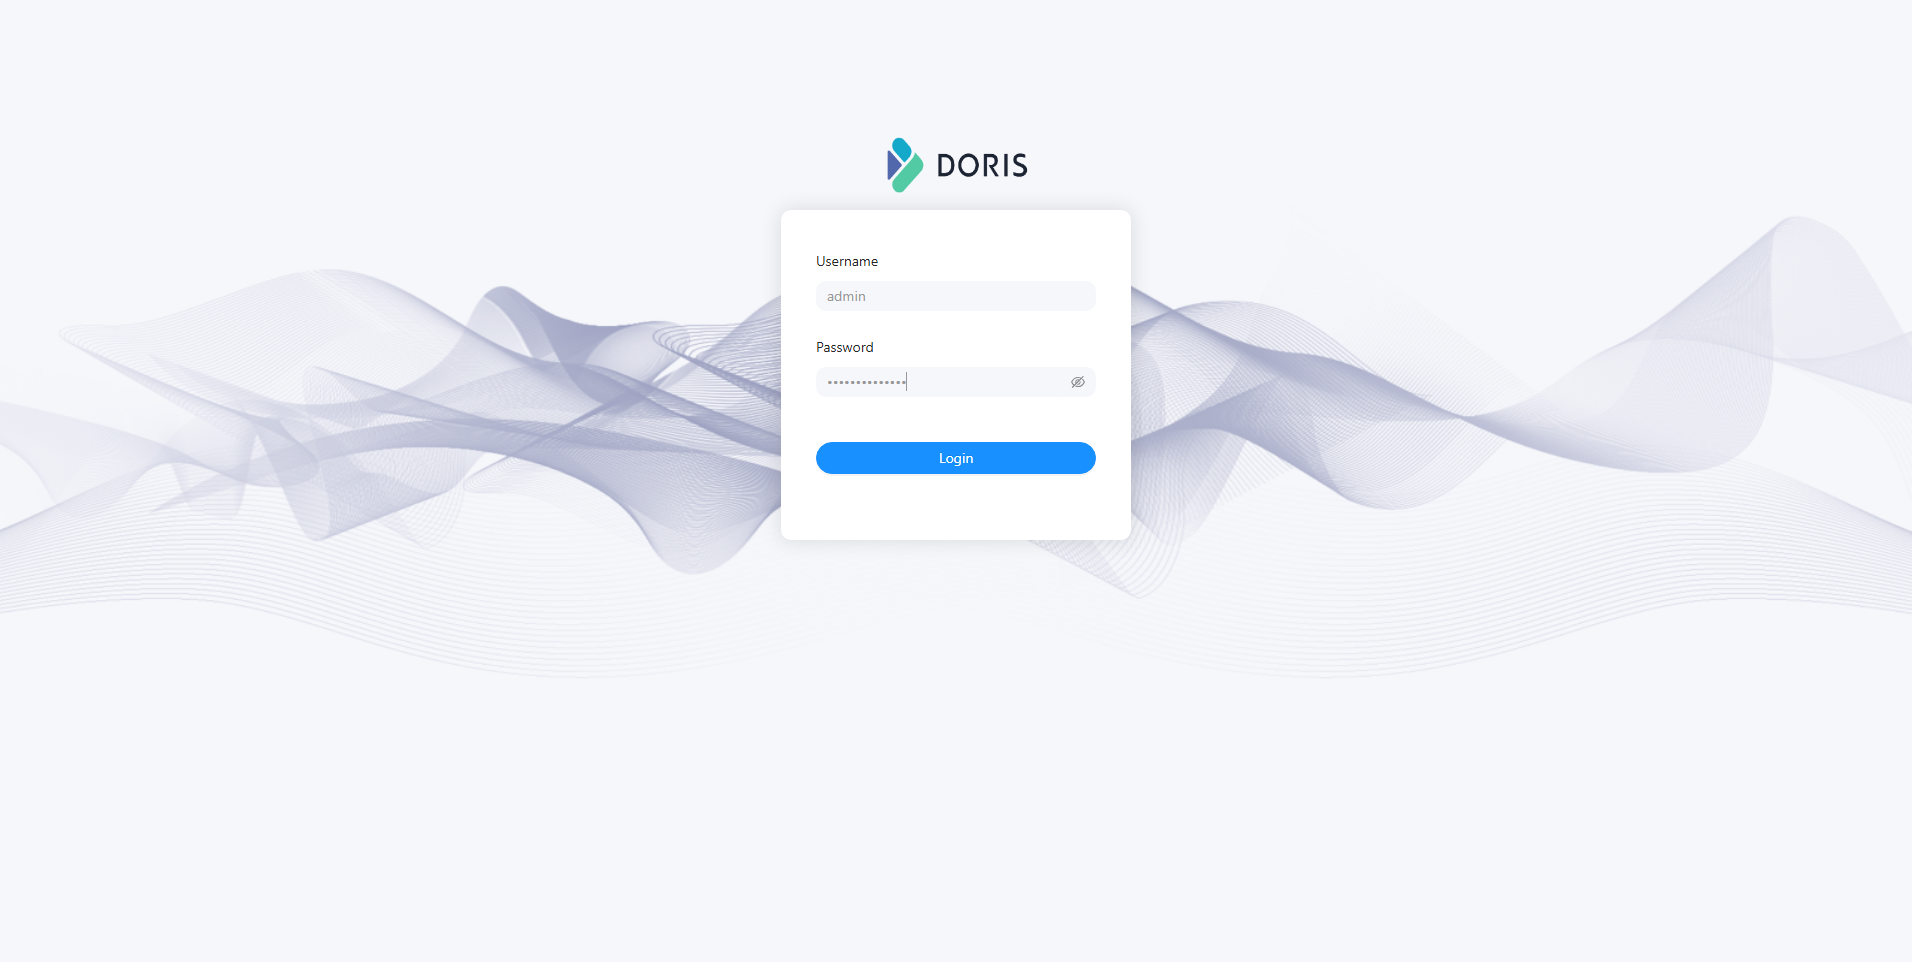
ksp-doris-login-v302
- Home
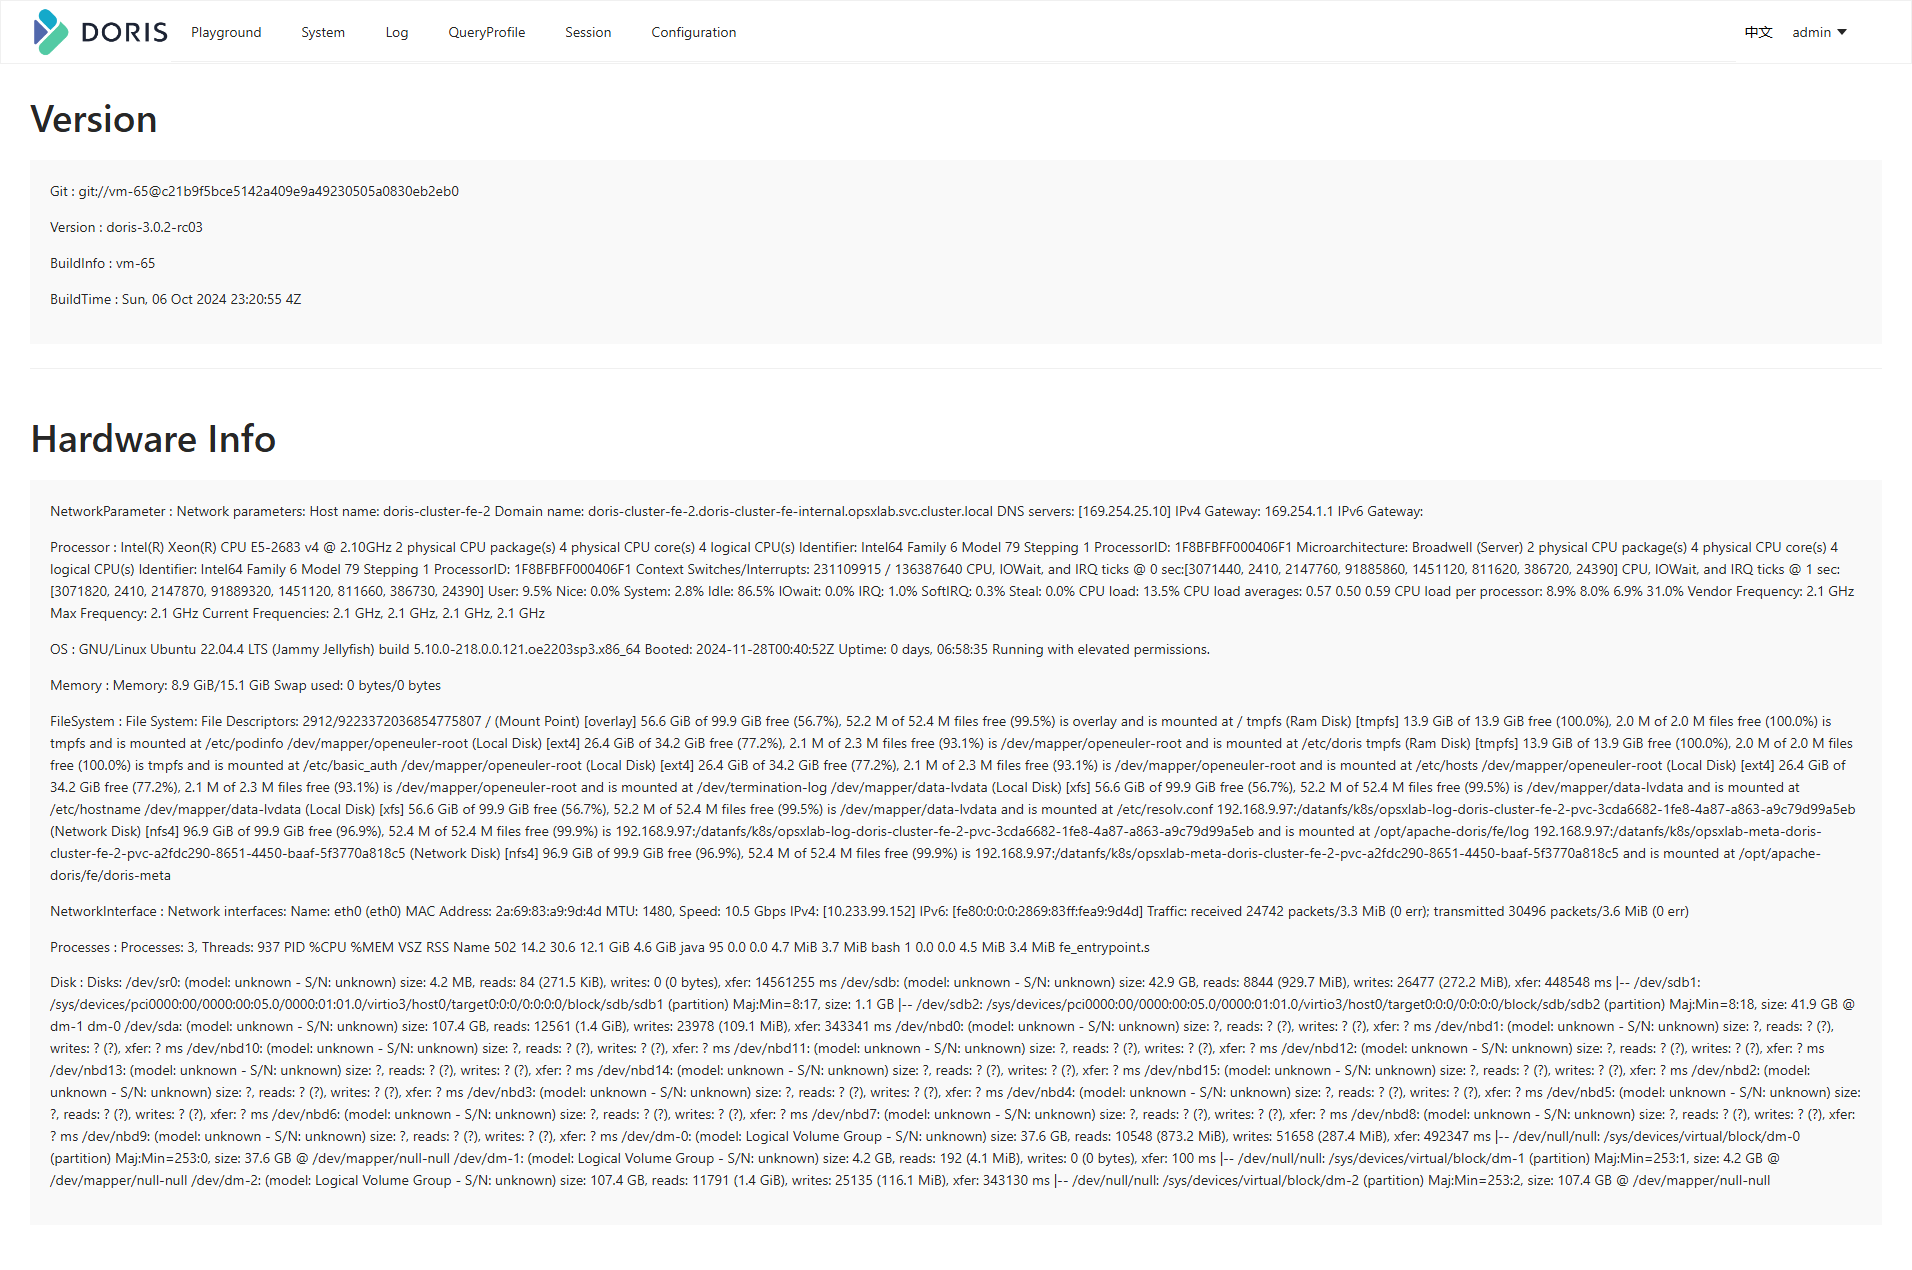
ksp-doris-home-v302
- Playground
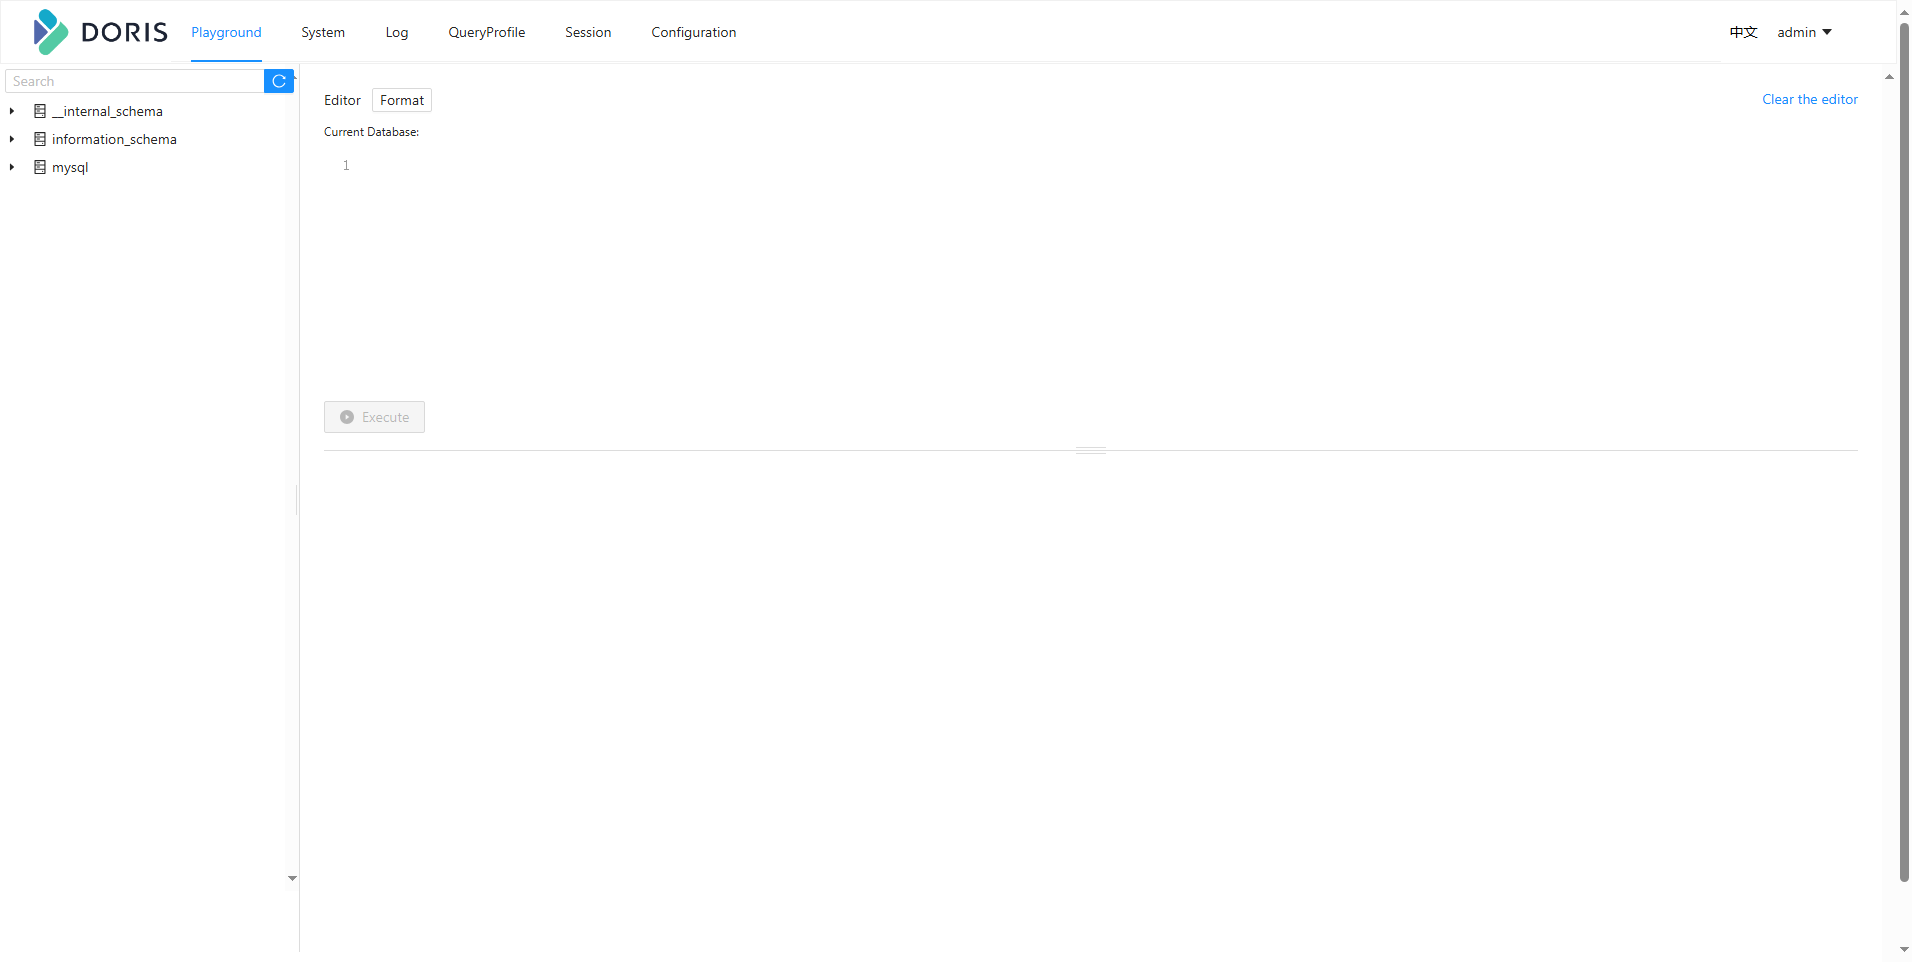
ksp-doris-playground-v302
- System
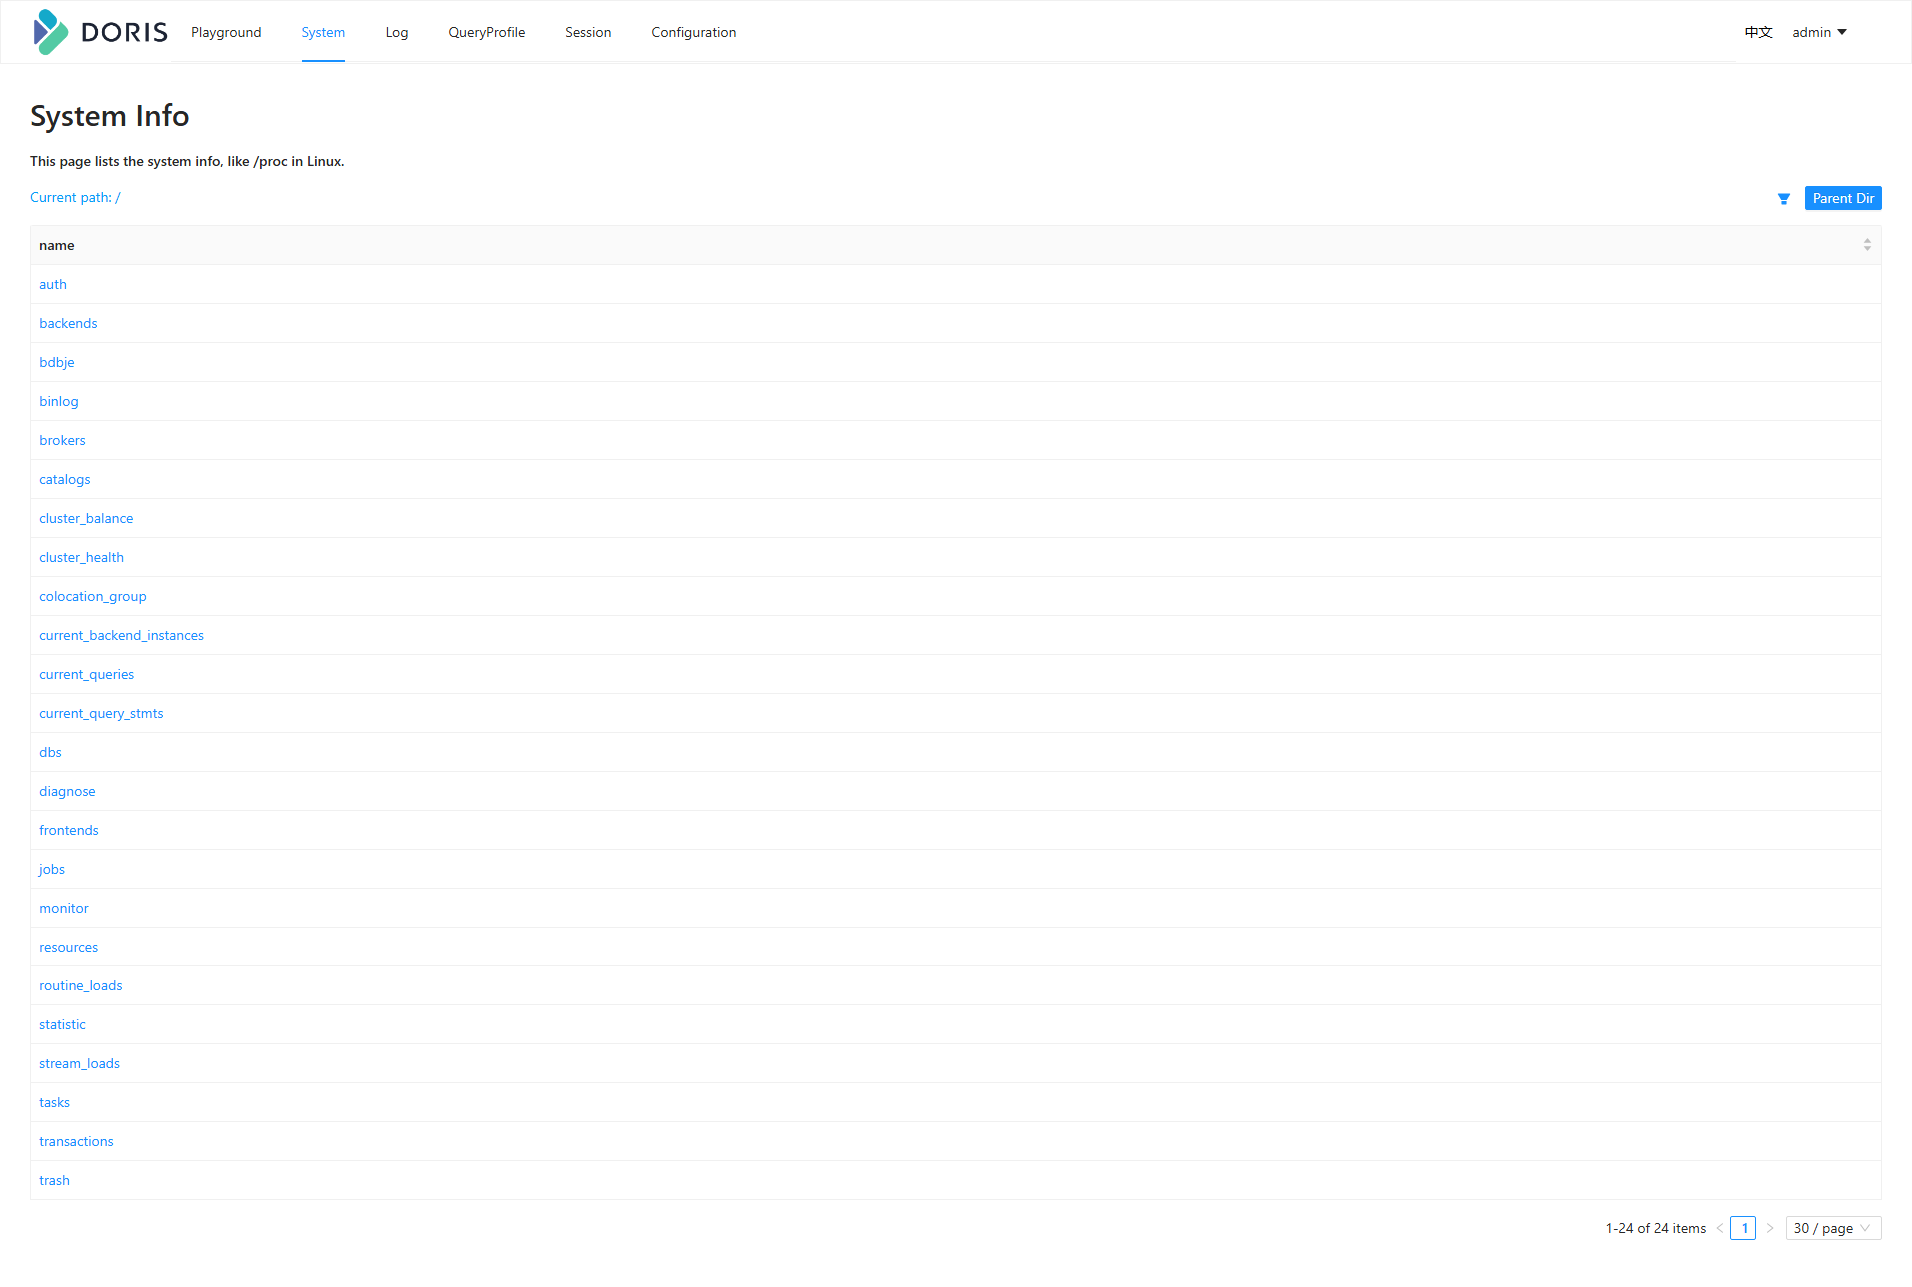
ksp-doris-system-v302
- Log
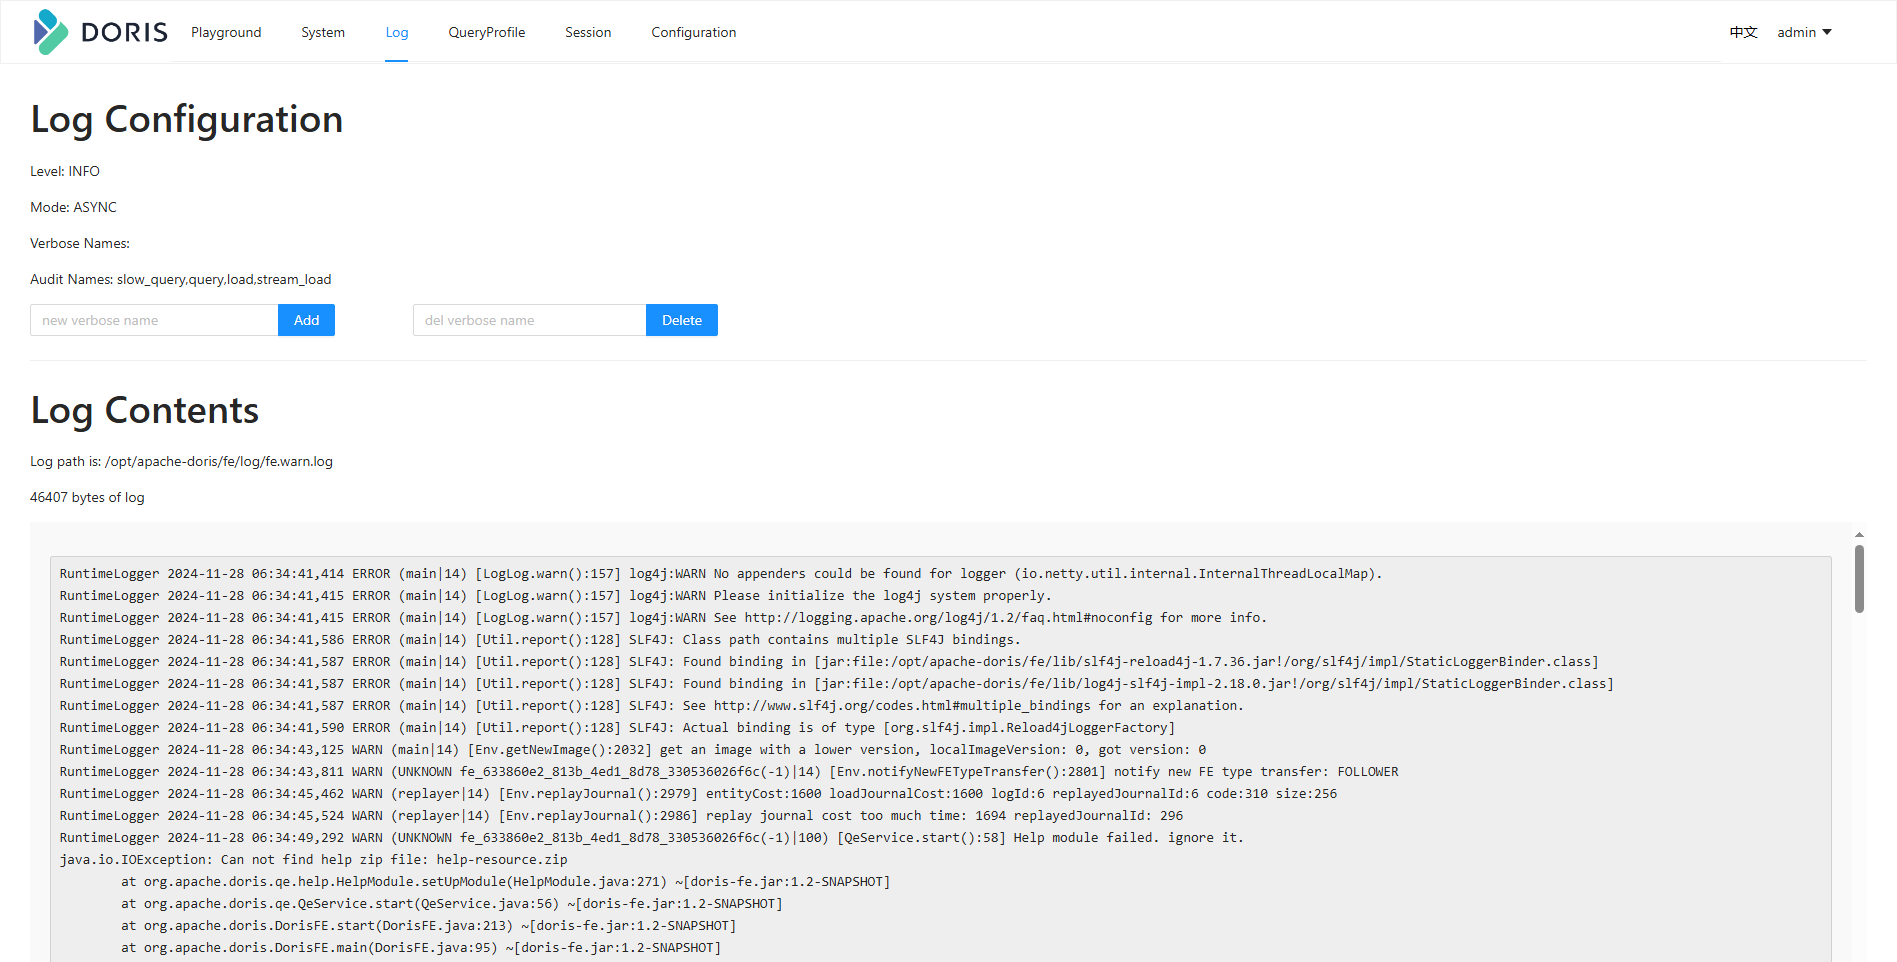
ksp-doris-log-v302
- QueryProfile
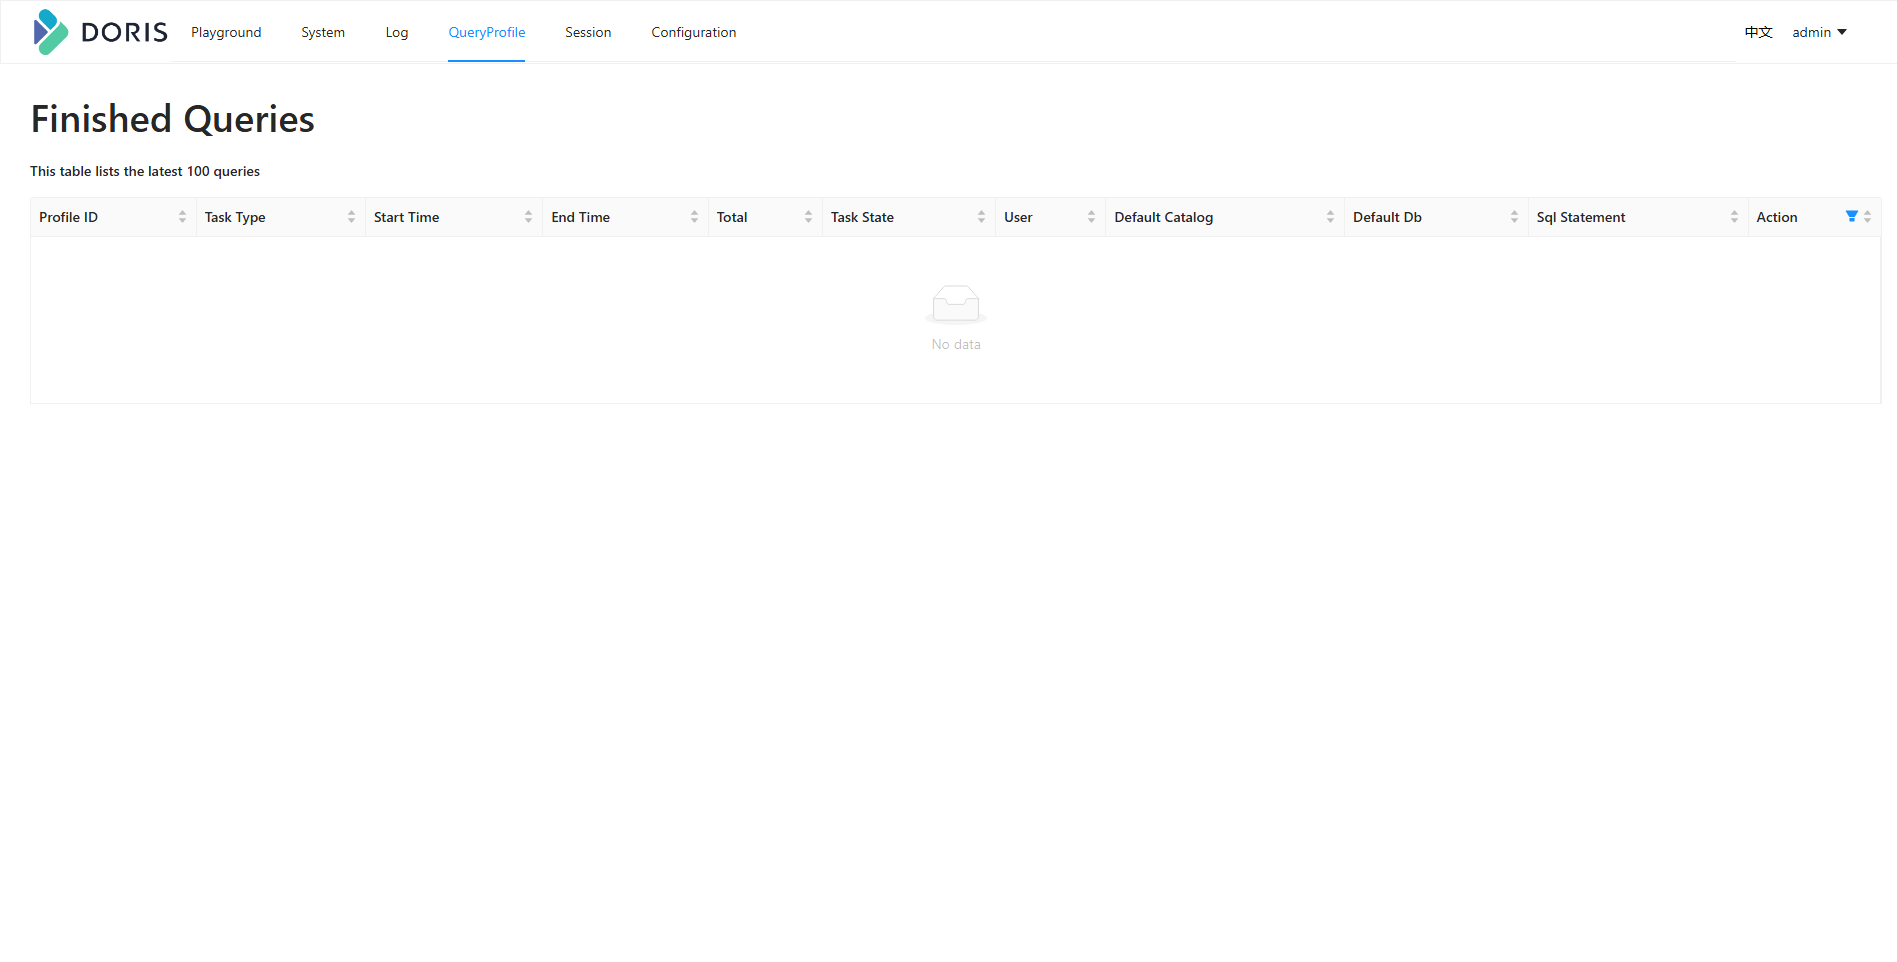
ksp-doris-query-profile-v302
- Session
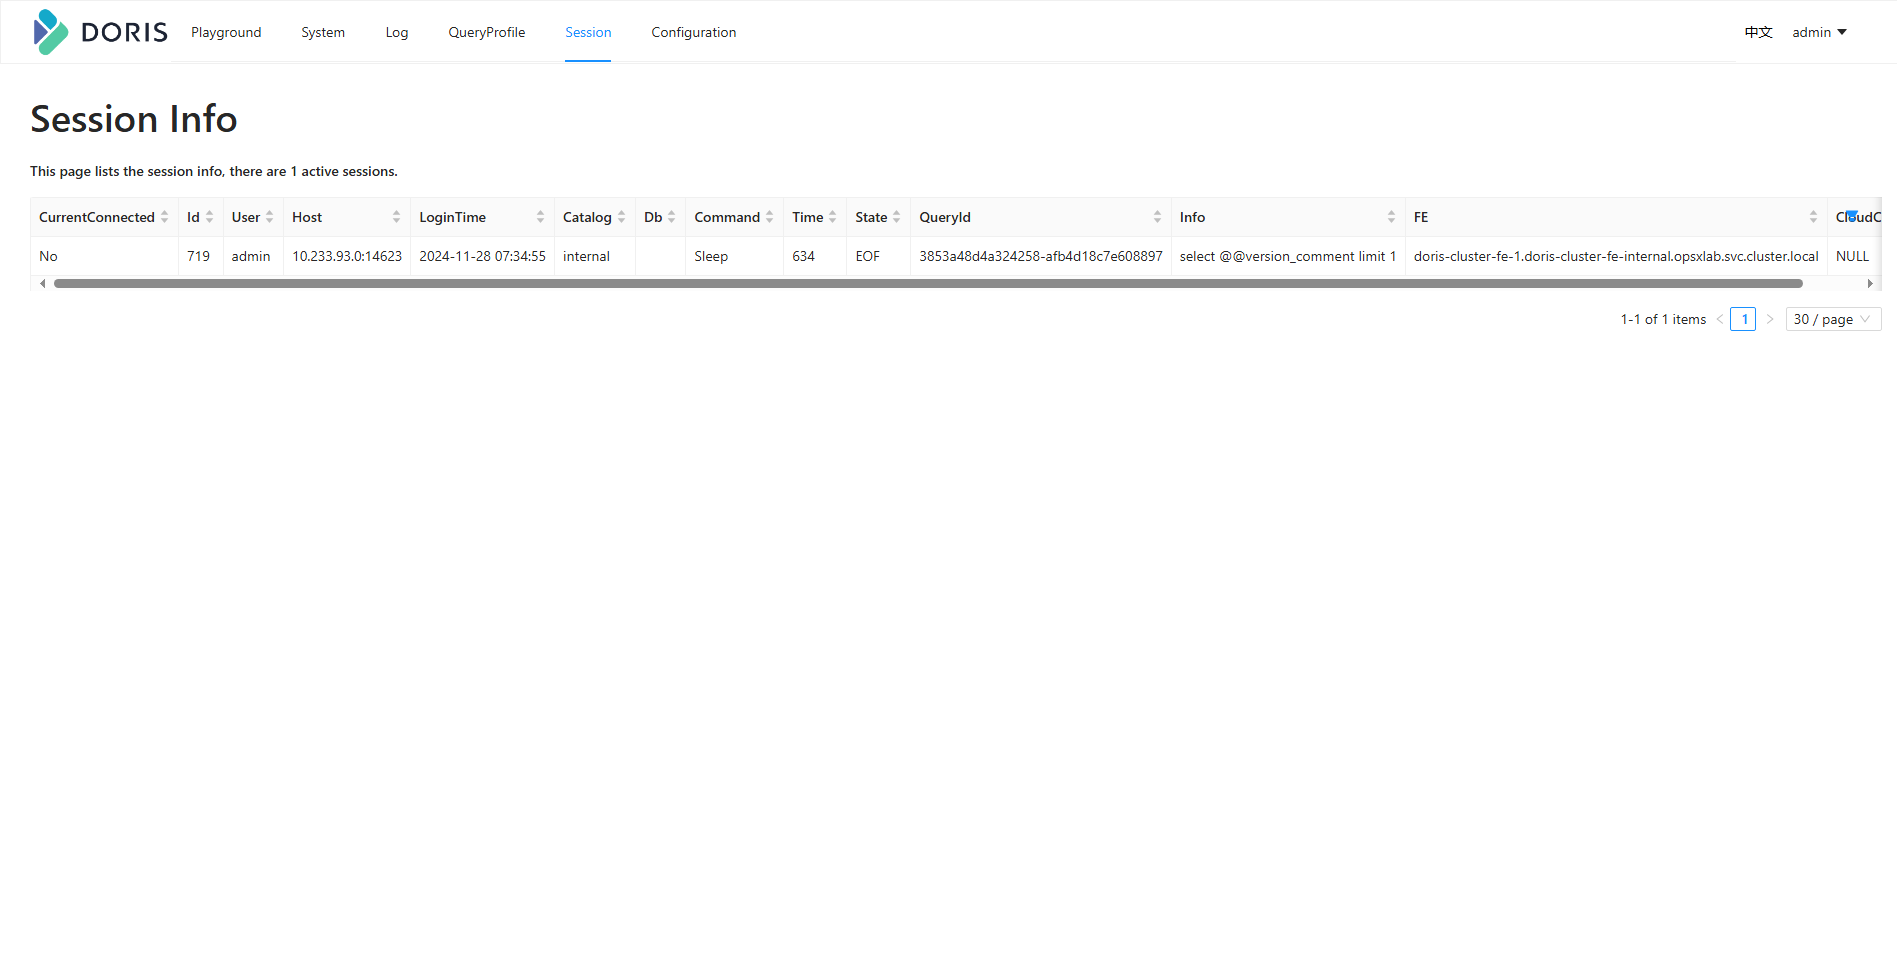
ksp-doris-session-v302
- Configuration
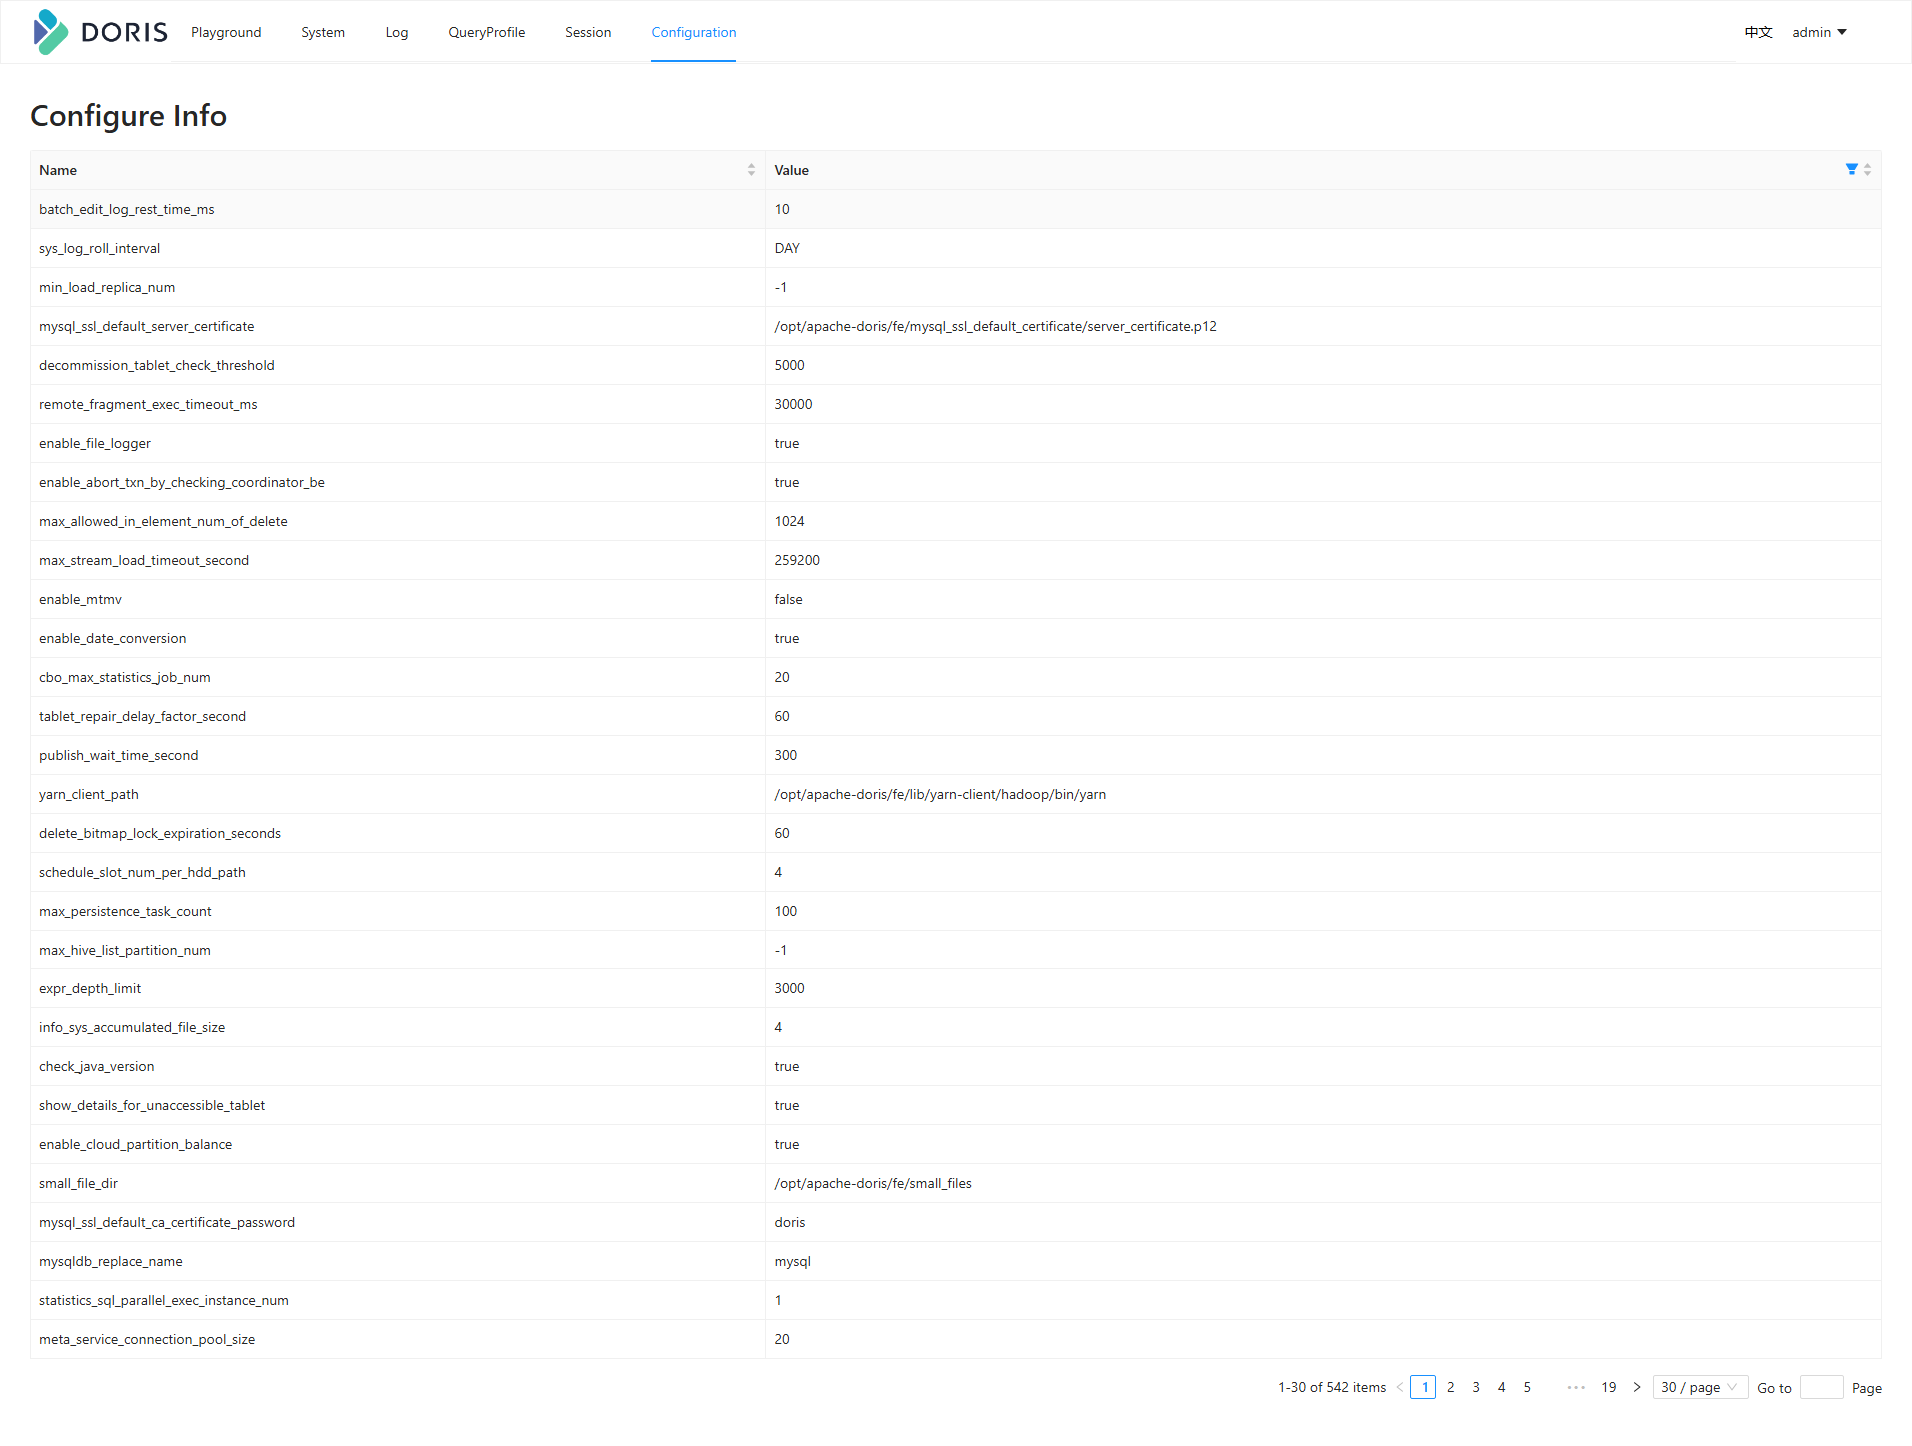
ksp-doris-configuration-v302
以上,就是我今天分享的全部内容。下一期分享的内容还没想好,敬请期待开盲盒。
如果你喜欢本文,请分享、收藏、点赞、评论! 请持续关注 @运维有术,及时收看更多好文!
欢迎加入 「知识星球|运维有术」 ,获取更多的 KubeSphere、Kubernetes、云原生运维、自动化运维、AI 大模型等实战技能。未来运维生涯始终有我坐在你的副驾。
免责声明:
- 笔者水平有限,尽管经过多次验证和检查,尽力确保内容的准确性,但仍可能存在疏漏之处。敬请业界专家大佬不吝指教。
- 本文所述内容仅通过实战环境验证测试,读者可学习、借鉴,但严禁直接用于生产环境。由此引发的任何问题,作者概不负责!
Get 本文实战视频(请注意,文档视频异步发行,请先关注)
版权声明
- 所有内容均属于原创,感谢阅读、收藏,转载请联系授权,未经授权不得转载。
原创声明:本文系作者授权腾讯云开发者社区发表,未经许可,不得转载。
如有侵权,请联系 cloudcommunity@tencent.com 删除。
原创声明:本文系作者授权腾讯云开发者社区发表,未经许可,不得转载。
如有侵权,请联系 cloudcommunity@tencent.com 删除。
评论
登录后参与评论
推荐阅读
目录
腾讯云开发者

Copyright © 2013 - 2026 Tencent Cloud. All Rights Reserved. 腾讯云 版权所有
深圳市腾讯计算机系统有限公司 ICP备案/许可证号:粤B2-20090059 ![]() 粤公网安备44030502008569号
粤公网安备44030502008569号
腾讯云计算(北京)有限责任公司 京ICP证150476号 | 京ICP备11018762号