【C++高潮——类与对象】:类的定义,访问限定符,类域,实例化,this指针,默认成员函数,构造,析构,拷贝构造,运算符重载,类型转换,static成员,友元,内部类,匿名对象,对象拷贝编译器优化

【C++高潮——类与对象】:类的定义,访问限定符,类域,实例化,this指针,默认成员函数,构造,析构,拷贝构造,运算符重载,类型转换,static成员,友元,内部类,匿名对象,对象拷贝编译器优化

用户11029137
发布于 2025-03-11 08:19:40
发布于 2025-03-11 08:19:40
一,类的基本认识
(一)类的定义
类是一种用户自定义的数据类型,它将数据(成员变量)和操作这些数据的函数(成员函数)封装在一起。在C++中,一般使用class关键字来定义类,其基本格式如下:
class 类名 {
public:
    // 成员函数声明
    void 函数名();
private:
    // 成员变量声明
    int 变量名;
};- 在上述代码中,
class是定义类的关键字,类名是你为这个类取的名字,{}中为类的主体。类体中内容称为类的成员,类中的变量称为类的属性或成员变量,类中的函数称为类的方法或者成员函数。 - 类定义结束时后面的**
;**不能省略。 - 为了区分成员变量,一般习惯上会在成员变量前面或后面加特殊标识,如
_或者以m开头,但这在C++中并不是强制的,主要是规范。 - 除了
class,C++中的struct也可以定义类。C++兼容C中struct的用法,并且对其进行了升级,struct中也可以定义函数。一般情况下推荐使用class来定义类。
下面是一个简单的类定义示例,以Stack类为例:
class Stack {
public:
    void Init(int n = 4) {
        array = (int*)malloc(sizeof(int) * n);
        if (nullptr == array) {
            perror("malloc申请空间失败");
            return;
        } // 成员函数
        capacity = n; // 成员变量
        top = 0;
    }
    void Push(int x) {
        // 扩容逻辑
        array[top++] = x;
    }
    int Top() {
        assert(top > 0);
        return array[top - 1];
    }
    void Destroy() {
        free(array);
        array = nullptr;
        top = capacity = 0;
    }
// public 到这都是公有的
private:
    int* array;
    size_t capacity;
    size_t top;
};在这个Stack类中,包含了初始化栈(Init)、入栈(Push)、获取栈顶元素(Top)和销毁栈(Destroy)等成员函数,以及表示栈的数组(array)、容量(capacity)和栈顶位置(top)等成员变量。
(二)访问限定符
C++通过访问限定符来实现封装,将对象的属性与方法结合在一起,并通过访问权限选择性地将接口提供给外部用户使用。C++中有三种访问限定符:public、protected和private 。
public修饰的成员在类外可以直接被访问;protected和private修饰的成员在类外不能直接被访问- 使用
class定义成员时,如果没有被访问限定符修饰,默认为private,而struct默认为public。 - 定义在类⾯的成员函数默认为
inline
一般情况下,我们会将成员变量限制为private或protected,以保护数据的安全性,而将需要给外部使用的成员函数设置为public。
(三)类域
类定义了一个新的作用域,类的所有成员都在类的作用域中。在类体外定义成员时,需要使用::作用域操作符指明成员属于哪个类域。例如:
class Stack {
public:
    void Init(int n);
private:
    int* array;
    size_t capacity;
    size_t top;
};
void Stack::Init(int n) {
    array = (int*)malloc(sizeof(int) * n);
    if (nullptr == array) {
        perror("malloc申请空间失败");
        return;
    }
    capacity = n;
    top = 0;
}在上述代码中,Stack::Init表示Init函数属于Stack类域。如果不指定类域,编译器会把Init当成全局函数,那么编译时,在局部、全局找不到array等成员的声明/定义在哪⾥,就会编译错误。指定类域Stack,编译器就是知道Init是成员函数,当前域找不到的array等成员,就会到类域中去查找。
(四)实例化
4.1 实例化概念
用类类型在物理内存中创建对象的过程,称为类实例化出对象。类是对对象的一种抽象描述,它就像一个模型,限定了类有哪些成员变量,但这些成员变量只是声明,并没有分配空间(就像int类型)。只有用类实例化出对象时,才会为成员变量分配空间(就像int a;,a是实例化)。一个类可以实例化出多个对象,这些对象占用实际的物理空间,用于存储类成员变量。(简单来说,类就是用户自定义的数据类型)
下面是一个Date类的实例化示例:
class Date {
public:
    void Init(int year, int month, int day) {
        _year = year;
        _month = month;
        _day = day;
    }
    void Print() {
        cout << _year << "/" << _month << "/" << _day << endl;
    }
private:
    int _year;
    int _month;
    int _day;
};
int main() {
    Date d1;
    Date d2;
    d1.Init(2024, 3, 31);
    d1.Print();
    d2.Init(2024, 7, 5);
    d2.Print();
    return 0;
}在上述代码中,Date类实例化出了d1和d2两个对象,每个对象都有自己独立的成员变量,用于存储不同的日期数据。
4.2 对象大小
对象大小中包含成员变量,但不包含成员函数。因为成员函数被编译后是一段指令,存储在代码段中,对象中无法存储这些指令。
C++规定类实例化的对象也要符合内存对齐的规则(和C语言结构体内存对齐相同),如有不懂可看这篇文章C语言——结构体类型(二)【结构体内存对齐,结构体数组】
例如:
class A {
public:
    void Print() {
        cout << _ch << endl;
    }
private:
    char _ch;
    int _i;
};
int main() {
    A a;
    cout << sizeof(a) << endl;
    return 0;
}在上述代码中,A类的对象a的大小,根据内存对齐规则计算,char类型占1字节,int类型占4字节,默认对齐数为8,所以_ch的对齐数为1,_i的对齐数为4,A类对象的总大小为8字节(因为总大小要满足成员最大对齐数4的整数倍)。
(五)this指针
我们都知道,因为类里面的成员函数的实现是固定的,当不同对象调用类里面同一个成员方法的时候,成员函数是如何知道应该访问哪个对象的成员变量呢(如初始化,即给哪一个对象的成员变量赋值)?这就要靠C++提供的隐含的**this**指针。
编译器编译后,类的成员函数默认都会在形参第一个位置增加一个当前类类型的指针,叫做this指针。例如,Date**类的**Init**函数的真实原型为*`void Init(Date const this, int year, int month, int day)`。
在类的成员函数中访问成员变量,本质都是通过this指针访问的。例如,Init函数中给_year赋值,实际上是this->_year = year 。虽然C++规定不能在实参和形参的位置显示地写**this**指针,但可以在函数体内,或者函数返回显示使用this指针。
下面通过两个示例来理解this指针的作用:
class Date {
public:
    void Init(int year, int month, int day) {
        this->_year = year;
        this->_month = month;
        this->_day = day;
    }
    void Print() {
        cout << this->_year << "/" << this->_month << "/" << this->_day << endl;
    }
private:
    int _year;
    int _month;
    int _day;
};
int main() {
    Date d1;
    Date d2;
    d1.Init(2024, 3, 31);
    d1.Print();
    d2.Init(2024, 7, 5);
    d2.Print();
    return 0;
}在上述代码中,d1和d2调用Init和Print函数时,this指针会分别指向d1和d2,从而确保成员函数能够正确访问相应对象的成员变量。
二,类的成员函数
(一)类的默认成员函数
隐式成员函数:当用户没有显式实现时,编译器自动生成的成员函数
一个类,我们不写的情况下,编译器会默认生成以下6个成员函数(常见的,前4比较重要)
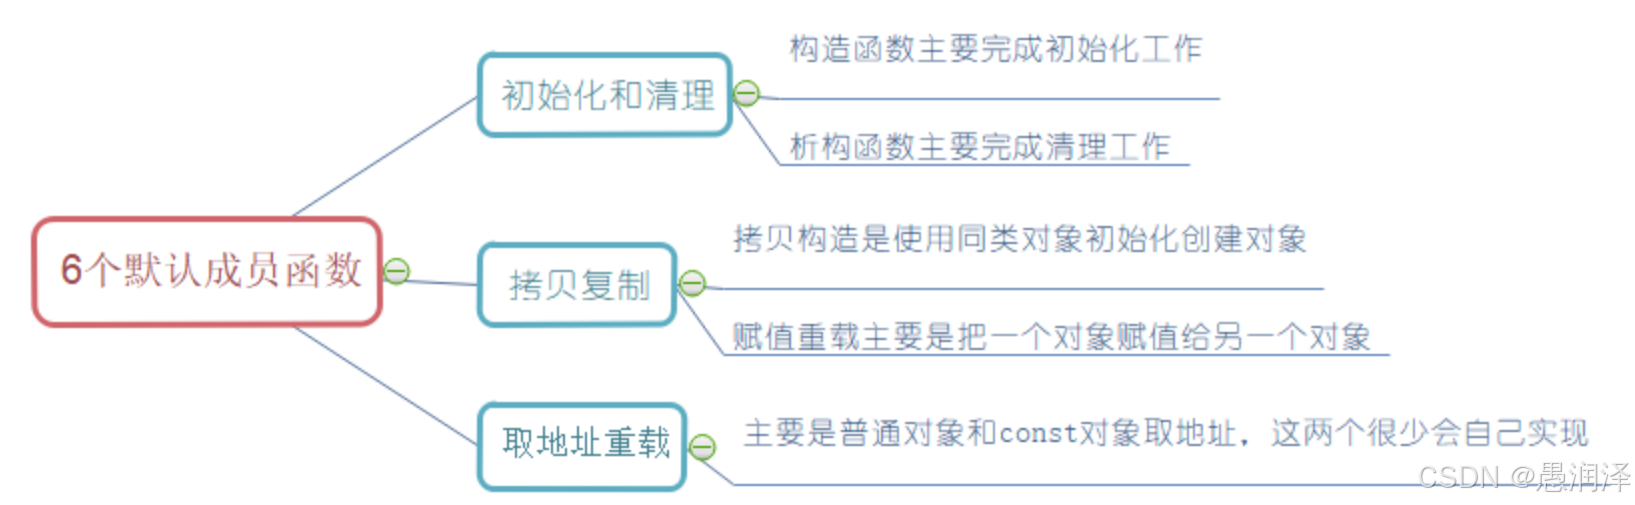
在学习成员函数时,我们应该关注:
- 默认生成的成员函数的行为是什么,能否满足需求
- 如果不能满足需求,我们如何实现(即:要清楚这些函数的实现要求)
(二)构造函数
构造函数:用于在对象实例化时对其进行初始化。
构造函数的特点:
- 函数名与类名相同
- 没有返回值,连
void也不需要写 - 对象实例化时,系统会自动调用对应的构造函数
- 支持重载,我们可以根据不同的需求定义多个构造函数。
- 如果类中没有显式定义构造函数,编译器会生成一个无参的隐式构造函数;但一旦用户自己定义了构造函数,编译器就不再生成。
- 无参构造函数、全缺省构造函数以及编译器默认生成的隐式构造函数,都属于默认构造函数。不过,这三种函数存在时只能存在一个,若同时存在,调用时会产生歧义。
- 编译器默认生成的隐式构造函数,对于内置类型的成员变量是否初始化是不确定的,这取决于编译器.
- 当一个类包含自定义类型的成员变量,并且在该类的构造函数中没有显式初始化这些自定义成员变量时,编译器会在创建该类对象时自动调用这些成员变量所属类型的默认构造函数。如果自定义类型没有默认构造函数,就会报错。
下面是Date类的构造函数示例:
class stu_class {
public:
	// 1,无参数构造函数
	stu_class() {
		_grade = 3;
		_clas = 5;
	}
	// 2,全缺省构造函数
	stu_class(int grade = 3, int clas = 5) {
		_grade = grade;
		_clas = clas;
	}
	// 3,带参数构造函数
	stu_class(int grade, int clas)
	{
		_grade = grade;
		_clas = clas;
	}
private:
	int _grade;
	int _clas;
};
注意:这里的 1 和 2 ,只能同时存在一个。2 和 3 也不能同时存在,因为不构成函数重构。
创建对象并调用默认构造函数的写法:
1,调用不带参数的:stu_class stu1; ,注意不能写成stu_class stu1();,因为会和函数声明歧义
2,调用带参数的:stu_class stu2(6, 3);
构造函数使用实例:
示例一:
#include<iostream>
using namespace std;
class stu_class {
public:
	void stu_print() {
		cout << "grade " << _grade << " " << "class " << _clas << endl;
	}
	// 1,无参数构造函数
	stu_class() {
		_grade = 3;
		_clas = 5;
	}
	// 3,带参数构造函数
	stu_class(int grade, int clas)
	{
		_grade = grade;
		_clas = clas;
	}
private:
	int _grade;
	int _clas;
};
int main() {
	stu_class stu1;
	stu_class stu2(6,3);
	stu1.stu_print();
	stu2.stu_print();
	return 0;
}
运行结果:
grade 3 class 5
grade 6 class 3
示例二:
#include<iostream>
using namespace std;
class stu_class {
public:
	void stu_print() {
		cout << "grade " << _grade << " " << "class " << _clas << endl;
	}
	// 1,全缺省构造函数
	stu_class(int grade = 5, int clas = 3) {
		_grade = grade;
		_clas = clas;
	}

private:
	int _grade;
	int _clas;
};
int main() {
	stu_class stu1; // 调用全缺省
	stu_class stu2(6,3); // 给全缺省传参
	stu1.stu_print();
	stu2.stu_print();
	return 0;
}
运行结果:
grade 5 class 3
grade 6 class 3
示例三:
#include<iostream>
using namespace std;

class stu_class {
public:
	void stu_print() {
		cout << "grade " << _grade << " " << "class " << _clas << endl;
	}
	stu_class(int grade = 5, int clas = 3) {
		_grade = grade;
		_clas = clas;
	}

private:
	int _grade;
	int _clas;
};

class two_stu {
public:
	void print() {
		stu1.stu_print();
		stu2.stu_print();
		cout << "neizhi: " << _neizhi << endl;
	}
	two_stu(int neizhi = 1) {
		_neizhi = neizhi;
	}

private:
	int _neizhi; // 内置变量
	stu_class stu1;
	stu_class stu2;
};

int main() {
	two_stu two;
	two.print();
}
输出结果:
grade 5 class 3
grade 5 class 3
neizhi: 1
解释一下代码:
- 首先创建了
stu_class类,成员变量:年级、班级,以及自定义了构造函数(且这个函数是一个默认构造函数); - 再创建了
two_stu类,成员变量:两个stu_class类型变量,一个内置类型变量,自定义构造函数函数中没有显式初始化这些自定义成员变量。 - 然后我们创建
two_stu的实例观察two_stu的构造函数的使用情况:发现:对于自定义变量**stu_class**,调用了它自身的默认构造函数
在包含自定义类型变量的类中,直接不提供构造函数:
#include<iostream>
using namespace std;

class stu_class {
public:
	void stu_print() {
		cout << "grade " << _grade << " " << "class " << _clas << endl;
	}
	stu_class(int grade = 5, int clas = 3) {
		_grade = grade;
		_clas = clas;
	}

private:
	int _grade;
	int _clas;
};

class two_stu {
public:
	void print() {
		stu1.stu_print();
		stu2.stu_print();
		cout << "neizhi: " << _neizhi << endl;
	}

private:
	int _neizhi; // 内置变量
	stu_class stu1;
	stu_class stu2;
};

int main() {
	two_stu two;
	two.print();
}
运行结果:
grade 5 class 3
grade 5 class 3
neizhi: -858993460
2.1 初始化列表
初始化列表可以理解为是对构造函数的一个改进。即:除了在构造函数体内进行赋值初始化外,还可以使用初始化列表来初始化数据成员。初始化列表存在于每个构造函数中,且是每个成员变量定义初始化的地方(即:每个成员都需要经过初始化列表)
2.1.1 语法
下面是一个简单的初始化列表:
class Date {
public:
	Date(int year, int month, int day)
		:_year(year)
		, _month(month)
		, _day(day)
	// 上面这里是初始化列表,以 : 开头,用 , 分割变量
	// ()内是传入的用于初始化成员变量的参数
	{
		// 这是函数体
	}

private:
	int _year;
	int _month;
	int _day;
};
注意:
- 每个成员变量在初始化列表中只能出现⼀次
- 引⽤成员变量,const成员变量,没有默认构造的类类型变量,必须放在初始化列表位置进⾏初始化,否则会编译报错
- 初始化列表中按照成员变量在类中声明顺序进⾏初始化
- C++11⽀持在成员变量声明的位置给缺省值,当变量没有在初始化化列显式的初始化时,会用这个缺省值初始化成员变量
- 如果即没有缺省值,又没有在初始化列表显式的初始化,则对于内置类型,是否初始化行为是不确定的,对于自定义类型,有默认构造则调用默认构造,没有则报错
2.1.2 示例
用上面的Date类举例:
#include<iostream>
using namespace std;
class Date {
public :
	Date(int year = 1900, int month = 9, int day = 1)
		:_year(year)
		, _month(month)
		, _day(day)
	{}

	void Print() {
		cout << _year << "/" << _month << "/" << _day << endl;
	}
//这里是声明:
private:
	int _year = 1945;
	int _month = 9;
	int _day = 2;
};

int main() {
	Date d1;
	d1.Print();
	Date d2(2025, 9, 3);
	d2.Print();
	return 0;
}
输出:
1900/9/1
2025/9/3对于,首先,对于d1和d2,都没有我们用到声明时给的缺省值,因为这3个成员变量都在初始化列表中有显式的初始化。对于d1,应为没有传参,所以初始化列表用了参数列表(int year = 1900, int month = 9, int day = 1)里面的缺省值对变量进行了初始化,对于d2用了传入的参数进行初始化。
使用声明时缺省参数的例子:
#include<iostream>
using namespace std;
class Date {
public :
	Date(int year, int month, int day = 1)
		:_month(month)
		,_day(day)
	{}

	void Print() {
		cout << _year << "/" << _month << "/" << _day << endl;
	}
private:
	int _year = 1945;
	int _month = 9;
	int _day = 2;
};

int main() {
	Date d1(2000, 9, 10);
	d1.Print();
	Date d2(2025, 10);
	d2.Print();
	return 0;
}在这里,不管第一个参数传什么给year都没用,因为初始化列表里面没有用到year参数来初始化_year,所以都是使用声明时给的缺省值来初始化_year
const成员变量、引用和类类型的初始化:
class Time
{
public:
	Time(int x = 1)
	{
		_t = x;
	}
private:
	int _t;
};

class Date {
public :
	Date(int &x, int y)
		:_ref(x)  // 引用初始化,将 _ref 绑定到传入的参数 x,绑定后不能再修改
		,_t(3)   // 类类型初始化,调用 Time 类的构造函数,传入参数 y 来初始化对象 _t
		,_y(y)  // 初始化 const 类型的变量 _y,必须在初始化列表中完成,之后不能修改
	{}

private:
	int& _ref;
	Time _t;
	const int _y;
};
(三)析构函数
析构函数:用于在对象销毁时执行清理操作(如函数调用结束后,局部变量会自动销毁)。主要作用是释放对象占用的资源(如动态内存、文件句柄、网络连接等),确保程序不会发生资源泄漏。
析构函数的特点如下:
- 函数名是在类名前加上字符
~。 - 无参数且无返回值。
- 一个类只能有一个析构函数,如果没有显式定义,系统会自动生成默认的析构函数。
- 对象生命周期结束时,系统会自动调用析构函数。
- 编译器自动生成的析构函数对内置类型成员不做处理,但会调用自定义类型成员的析构函数。而且,即使我们自己显式编写了析构函数,自定义类型成员的析构函数依然会被调用。
- 如果类中没有申请资源,析构函数可以不写,直接使用编译器生成的默认析构函数即可;但如果类中申请了资源,就必须自己编写析构函数,否则会导致资源泄漏。
- 在一个局部域中,多个对象的析构顺序是后定义的先析构(后定义的在栈顶,先销毁)。
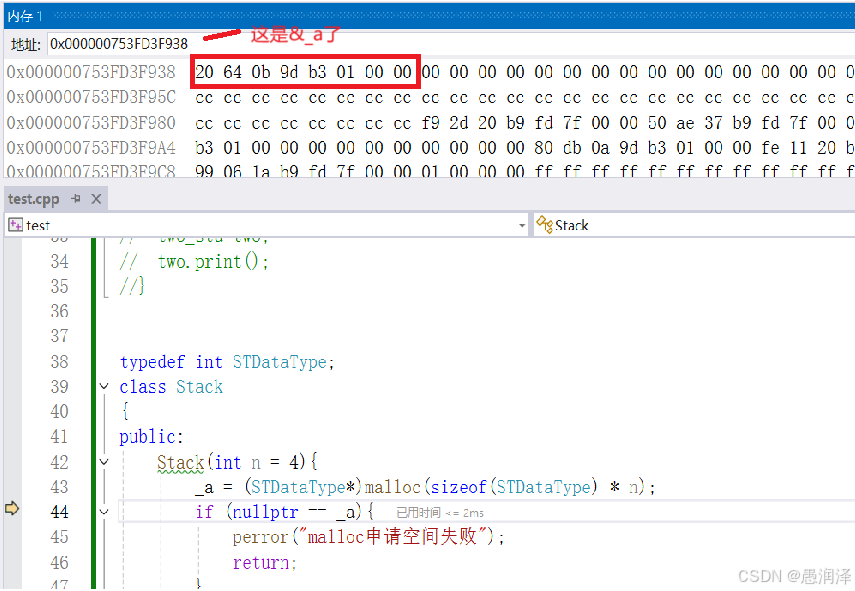
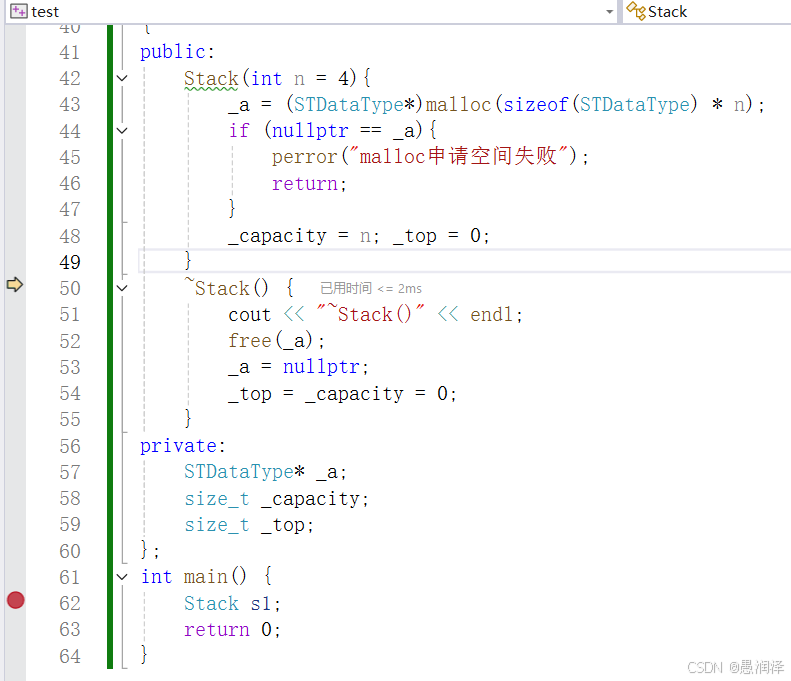
下面是Stack类的析构函数示例:
#include<iostream>
using namespace std;
typedef int STDataType;
class Stack
{
public:
    Stack(int n = 4){
        _a = (STDataType*)malloc(sizeof(STDataType) * n);
        if (nullptr == _a){
            perror("malloc申请空间失败");
            return;
        }
        _capacity = n; _top = 0;
    }
    ~Stack() {
        cout << "~Stack()" << endl;
        free(_a);
        _a = nullptr;
        _top = _capacity = 0;
    }
private:
    STDataType* _a;
    size_t _capacity;
    size_t _top;
};
int main() {
    Stack s1;
    return 0;
}这里推荐手动调试一下,观察_a地址的变化:
下面给出调试到malloc语句分配好内存以及刚到return语句,自动进入析构函数内部的调试截图:
1,执行到Stack内部,刚执行完malloc,注意看_a地址
2,按F11单步执行,一直到return 0,s1生命周期要结束,再按一下F11,自动调用析构函数~Stack(),进入~Stack():
(四)拷贝构造函数
4.1 拷贝
我们先理解拷贝这个概念。
在C++中,传值传参和传值返回时,都会发生拷贝。传值传参和传值返回的本质是创建一个新的对象或值,并将其传递给调用者,这个过程就叫做拷贝,是不可避免的,除非编译器进行了优化。可以简单理解为:
- 没有优化时,返回值先复制给临时变量,临时变量再复制给接收对象,两次拷贝
- 优化后:不使用临时变量,直接将返回值拷贝给接收对象
内置类型和自定义类型的拷贝行为不同:
- 内置类型:直接复制值,过程就是简单的内存拷贝,一个字节一个字节的复制,得到新副本
- 自定义类型:会调用拷贝构造函数,得到新副本
4.2 拷贝构造函数
拷贝构造函数是一种特殊的构造函数,用于使用同类对象初始化创建新对象。如果一个构造函数的第一个参数是自身类类型的引用,且任何额外的参数都有默认值,那么它就是拷贝构造函数。
拷贝构造函数有以下特点:
- 它是构造函数的一个重载形式。
- 第一个参数必须是类类型对象的引用,后面的参数要有缺省值。第一个参数使用传值方式会导致编译器报错(引发无穷递归调用)。
- 如果没有显式定义拷贝构造函数,编译器会自动生成。自动生成的拷贝构造函数对内置类型成员变量进行浅拷贝(浅拷贝,即一个字节一个字节地拷贝),对自定义类型成员变量会调用其拷贝构造函数。
- 自定义类型中:如果变量全是内置类型,并且无资源分配,则编译器自动生成的拷贝构造函数(对内置变量进行浅拷贝)就能满足需求
- 像
Stack类,虽然成员变量也是内置类型,但其中的_a指针指向了资源,编译器自动生成的浅拷贝就不符合要求,需要我们自己实现深拷贝(对指向的资源也进行拷贝) - 通常,如果一个类显式实现了析构函数并释放资源,那么通常也需要显式编写拷贝构造函数。
- 传值返回会产生一个临时对象并调用拷贝构造函数,而传值引用返回返回的是对象的别名,不会产生拷贝。(但是,如果返回对象是当前函数局部域的局部对象,则返回对象在函数结束后会被销毁,此时引用返回会产生野引用,所以只有当返回对象在函数结束后依然存在时,才能使用引用返回。)
下面是Date类和Stack类的拷贝构造函数示例:
#include<iostream>
using namespace std;
class Date
{
public:
    Date(int year = 1, int month = 1, int day = 1)
    {
        _year = year;
        _month = month;
        _day = day;
    }
    Date(const Date& d) // 第一个参数必须是类类型对象的引用
    {
        _year = d._year;
        _month = d._month;
        _day = d._day;
    }
    void Print()
    {
        cout << _year << "-" << _month << "-" << _day << endl;
    }
private:
    int _year;
    int _month;
    int _day;
};

class Stack // 假设数据都是整型
{
public:
    Stack(int n = 4)
    {
        _a = (int *)malloc(sizeof(int) * n);
        if (nullptr == _a)
        {
            perror("malloc申请空间失败");
            return;
        }
        _capacity = n;
        _top = 0;
    }
    Stack(const Stack& st) // 拷贝构造函数
    {
        _a = (int *)malloc(sizeof(int) * st._capacity); // 深拷贝
        if (nullptr == _a)
        {
            perror("malloc申请空间失败!!!");
            return;
        }
        memcpy(_a, st._a, sizeof(int) * (st._top+1));
        _top = st._top;
        _capacity = st._capacity;
    }
    ~Stack()
    {
        cout << "~Stack()" << endl;
        free(_a);
        _a = nullptr;
        _top = _capacity = 0;
    }
    void Print() {
        cout << _capacity << endl;
    }
private:
    int* _a;
    size_t _capacity;
    size_t _top;
};

int main() {
    Date d1(2025, 3, 8); // 构造函数初始化
    Date d2(d1);  // 拷贝构造函数初始化
    Date d3 = d2; // 这也是拷贝构造的写法
    Stack s1;
    Stack s2 = s1;
    d3.Print();
    cout << "s2的capacity: ";
    s2.Print();
    return 0;
}
输出结果:
2025-3-8
s2的capacity: 4
~Stack()
~Stack()
(五)const成员函数
const成员函数是指在函数声明和定义后加上const关键字的成员函数。const实际修饰该成员函数隐含的this指针,表明在该成员函数中不能对类的任何成员进⾏修改。
如:
// 假如这个Print 是定义在Date类里面的
void Print() const
{
cout << _year << "-" << _month << "-" << _day << endl;
}在没有const时void Print(),Print() 参数列表隐藏的参数:Date* const this (注意这个const修饰的指针,表示指针本身内容不可以修改,但是指针指向空间可以改)
加了const以后,参数变成:const Date* const this代表指针指向内容不能修改,即:类的任何成员不可修改。
同一个函数名可以有const和非const两个版本(即:函数重载),编译器会根据调用对象的const性质来选择调用哪个版本。
示例:
三,运算符重载
运算符重载就是:允许我们为自定义类型(类或结构体)定义运算符的行为。通过运算符重载,可以使自定义类型的对象像内置类型一样使用运算符。
运算符重载语法:
- 运算符重载是有特殊名字的函数,有返回类型,参数列表和函数体。名字格式:**
operator<运算符>**,这个运算符要是语法中有的。 - 重载运算符函数的参数个数和该运算符作⽤的运算对象数量⼀样多。即一元运算符就只能有一个参数,二元就两个,第一个参数对应左运算对象,第二个对应右运算对象。且至少有一个自定义类型的参数。
- 如果⼀个重载运算符函数是成员函数,则它的第⼀个运算对象默认传给隐式的
this指针,因此运算符重载作为成员函数时,参数⽐运算对象少⼀个。 .*,::,.,? :,sizeof,这五个运算符不能重载- C++规定,
后置++重载时,增加⼀个int形参,跟前置++构成函数重载,⽅便区分。 - 重载
<<和>>时,需要重载为全局函数,并把ostream/istream(cout和cin的类)放到第⼀个形参位置,第二个参数放自定义类型。因为重载为成员函数时,this指针默认抢占了第⼀个形参位置,第⼀个形参位置是左侧运算对象,调⽤时就变成了对象<<cout,不符合使⽤习惯和可读性。
示例一
#include<iostream>
using namespace std;

class Date {
public:
	Date(int year, int month, int day) {
		_year = year;
		_month = month;
		_day = day;
	}
	// 定义一个运算符重载(类的成员函数可以访问私有变量)
	// 的访问控制权限是基于类本身,而非类的具体对象,所以可以访问d2
	bool operator==(Date d2){
		return _year == d2._year && _month == d2._month && _day == d2._day;
	}

private:
	int _year;
	int _month;
	int _day;
};

int main() {
	Date d1(2025, 3, 8);
	Date d2(2025, 3, 9);
	cout << d1.operator==(d2) << endl;  // 输出 0
	return 0;
}
示例二
前置++和后置++区别:
前置++:
Dater& operator++()后置++
Dater& operator++(int) // 在参数列表多加一个 int示例三
重构流插入<<和流提取>>:
如:cin >> x >> y ;:从左往右结合,返回左操作数(即返回 cin 本身)
#include<iostream>
using namespace std;

class Date {
	// 友元函数,文章后面会讲,先理解为,让这个函数可以使用private对象
	friend istream& operator>>(istream& in, Date& d);
	friend ostream& operator<<(ostream& out, const Date& d);
public:
	Date(int year = 2025, int month = 3, int day = 1) {
		_year = year;
		_month = month;
		_day = day;
	}

private:
	int _year;
	int _month;
	int _day;
};
// 在全局重载 <<
ostream& operator<<(ostream& out, const Date&d) { // 不能修改引用对象内容
	out << d._year << "/" << d._month << "/" << d._day << endl;
	return out;
}


// 重载 >>
istream& operator>>(istream& in, Date& d) { // 这里要插入数据,所以不能加const
	cout << "请依次输入年月日: " << endl;
	cin >> d._year >> d._month >> d._day;
	return in; // 返回istream类型的引用,可实现连续赋值
}

int main() {
	Date d1;
	cin >> d1;
	cout << d1;
}
输出结果:
请依次输入年月日:
2025 3 9
2025/3/9
6.1 赋值运算符重载
赋值运算符重载用于完成两个已经存在的对象之间的拷贝赋值,这和拷贝构造函数不同,拷贝构造函数是用一个对象拷贝初始化另一个正在创建的对象。
赋值运算符重载的特点如下:
- 它是一个运算符重载,并且规定必须重载为成员函数。参数建议写成**
const**当前类类型引用,这样可以避免传值传参带来的拷贝。 - 有返回值,且建议返回当前类类型引用,引用返回可以提高效率,返回值的目的是为了支持连续赋值的场景。
- 如果没有显式实现,编译器会自动生成一个默认的赋值运算符重载。其行为和默认拷贝构造函数类似,对内置类型成员变量进行值拷贝(浅拷贝),对自定义类型成员变量会调用其赋值运算符重载函数。
- 和拷贝构造函数类似,像
Date类这种成员变量全是内置类型且没有指向特殊资源的类,编译器自动生成的赋值运算符重载就能满足需求;而像**Stack**类这种有指针指向资源的类,就需要我们自己实现深拷贝
示例:
#include<iostream>
using namespace std;
// 赋值运算符重载
class Stack // 假设数据都是整型
{
public:
    // 构造函数
    Stack(int capacity = 4)
    {
        _a = (int*)malloc(sizeof(int) * capacity);
        if (_a == nullptr)
        {
            perror("内存空间分配失败");
            return;
        }
        _capacity = capacity;
        _top = -1;
    }
    // 拷贝构造函数
    Stack(const Stack& st)
    {
        _a = (int*)malloc(sizeof(int) * st._capacity);
        if (_a == nullptr)
        {
            perror("内存空间分配失败");
            return;
        }
        memcpy(_a, st._a, sizeof(int) * (st._top + 1)); // 按字节一个个复制
        _capacity = st._capacity;
        _top = st._top;
    }
    // 赋值运算符重载
    Stack& operator=(const Stack& st)
    {
        free(_a); // 需要先释放之前的
        _a = (int*)malloc(sizeof(int) * st._capacity);
        if (_a == nullptr)
        {
            perror("内存空间分配失败");
            return *this;
        }
        memcpy(_a, st._a, sizeof(int) * (st._top + 1)); // 按字节一个个复制
        _capacity = st._capacity;
        _top = st._top;
        return *this; // 返回引用,支持连续赋值
    }
    ~Stack() {
        free(_a);
        _a = nullptr;
        _capacity = 0;
        _top = -1;
    }
    void Print()
    {
        cout << _capacity << endl;
    }
private:
    int* _a;
    size_t _capacity;
    size_t _top;
};
int main() {
    Stack st1(8);
    Stack st2;
    cout << "运用赋值重载之前,st2 capacity: ";
    st2.Print();
    Stack st3;
    st3 = st2 = st1;  // 赋值运算的结合率是从右往左,返回值是左操作数
    cout << "运用赋值重载之后,st2 capacity: ";
    st2.Print();
    cout << "st3 capacity: ";
    st3.Print();
    return 0;
}
输出结果:
运用赋值重载之前,st2 capacity: 4
运用赋值重载之后,st2 capacity: 8
st3 capacity: 8
6.2 取地址运算符重载
取地址运算符重载有两种形式:普通取地址运算符重载 和 const取地址运算符重载(const取出的不能改变所指空间内容)。编译器会为类默认生成取地址运算符的重载版本,无需自行实现。
使用示例(使用Date类):
int main() {
	Date d1;
	Date* d1_ptr = &d1;
	const Date* c_d1_ptr = &d1;
	printf("%p\n", d1_ptr);
	printf("%p", c_d1_ptr);
}
输出结果:
00000023F82FF5A8
00000023F82FF5A8
四,类型转换
C++支持内置类型隐式转换为类类型对象,前提是有相关内置类型为参数的构造函数(参数数量不限)。比如:
class A {
public:
    A(int a1) : _a1(a1) {}
    A(int a1, int a2)
        :_a1(a1)
        , _a2(a2)
    {}
private:
    int _a1 = 1;
    int _a2 = 2;
};
int main() {
    A aa1 = 1;
    A aa2 = { 2,2 };
    return 0;
}- 在这段代码中,
int类型的1被隐式转换为A类对象aa1。实现过程:先调用A(int a1)这个单参数构造函数构造⼀个A的临时对象,临时对象的类型是A类,再⽤这个临时对象拷⻉构造aa3,(有些编译器自行优化:遇到连续构造+拷⻉构造->一次构造,不产生临时对象) { 2,2 }多参数转换成A类对象aa2(C++11 后支持的)- 如果不想支持这种隐式转换,可以在构造函数前加
explicit关键字。 - 类类型的对象之间也能隐式转换,同样需要相应构造函数支持。
五,static成员
用static修饰的成员变量叫静态成员变量,它为所有类对象共享,不属于某个具体对象,存放在静态区,并且一定要在类外初始化。静态成员也受访问限定符影响。例如:
class A {
public:
    A() { ++_scount; }
    static int GetACount() { return _scount; }
private:
    static int _scount;
};
int A::_scount = 0;
int main() {
    cout << A::GetACount() << endl;
    A a1, a2;
    cout << A::GetACount() << endl;
    return 0;
}这里_scount是静态成员变量,用于统计A类对象的个数。通过A::GetACount()可以访问这个静态成员变量。
用static修饰的成员函数叫静态成员函数,它没有this指针。
- 静态成员函数只能访问其他静态成员,没有
this指针无法访问其他成员。 - 非静态成员函数可以访问任意静态成员变量和静态成员函数。
- 突破类域就可以访问静态成员/函数,可以通过
类名::静态成员或者对象.静态成员的方式。 - 静态成员变量不能在声明位置给缺省值初始化,因为静态成员不属于某个对象,不经过构造函数初始化列表
六,友元
友元提供了突破类访问限定符封装的方式,分为友元函数和友元类。友元类中的成员函数都是另一个类的友元函数。实现:在函数声明或类声明前加friend,并把友元声明放在类里。
友元函数可以访问类的私有和保护成员,它不是类的成员函数,可在类定义的任何地方声明,不受访问限定符的限制,且一个函数可以是多个类的友元函数。例如:
class A;
class B;
class A {
    friend void func(const A& aa, const B& bb);  // 友元声明,这样就可以访问A类的私有和保护成员
private:
    int _a1 = 1;
};
class B {
    friend void func(const A& aa, const B& bb);
private:
    int _b1 = 3;
};
void func(const A& aa, const B& bb) {
    cout << aa._a1 << endl;
    cout << bb._b1 << endl;
}在这个例子中,func函数是A和B类的友元函数,能够访问它们的私有成员。
友元类的关系是单向的且不能传递。比如A类是B类的友元,B类不一定是A类的友元;A是B的友元,B是C的友元,但A不是C的友元。
七,内部类
如果一个类定义在另一个类内部,就是内部类。
- 内部类是独立的类,受外部类类域和访问限定符限制,外部类对象不包含内部类。
- 内部类默认是外部类的友元类。
- 内部类本质也是⼀种封装,当A类跟B类紧密关联,A类实现出来主要就是给B类使⽤,那么可以考虑把A类设计为B的内部类,如果放到private/protected位置,那么A类就是B类的专属内部类,其他地⽅都⽤不了。
例如:
class A {
private:
    static int _k;
    int _h = 1;
public:
    class B {
    public:
        void foo(const A& a) {
            cout << _k << endl;
            cout << a._h << endl;
        }
    };
};
int A::_k = 1;
int main() {
    A::B b;
    A aa;
    b.foo(aa);
    return 0;
}在这段代码中,B的实现主要是输出A的私有变量,B是A的内部类,B的成员函数foo可以访问A的私有成员。
八,匿名对象
用类型(实参)定义出来的对象就是匿名对象(平时的叫有名对象),它的生命周期只在当前一行。例如:
class A {
public:
    A(int a = 0) : _a(a) { cout << "A(int a)" << endl; }
    ~A() { cout << "~A()" << endl; }
private:
    int _a;
};
int main() {
    A(1);
    return 0;
}这里A(1)就是一个匿名对象,在这行代码执行完后,它就会被析构。匿名对象适用于临时使用一下对象的场景。
九,对象拷贝时的编译器优化
在本文(四)拷贝构造的时候,提到了拷贝,现在再探讨对象拷贝时编译器的优化。在 C++ 中,对象拷贝时的编译器优化是提升程序性能的关键机制。如何优化C++标准并没有严格规定,各个编译器会根据情况⾃⾏处理。
以Visual Studio 2022编译器的优化举例(2022看不到优化之前的):
可以用2019调试,关闭优化步骤: 项目属性(右击项目) → C/C++ → 优化 → 已禁用 (/Od)
当遇到连续拷贝+拷贝构造时,编译器会直接优化成一次构造
下面,我们通过打印语句来观察编译器的优化:
代码:
#include<iostream>
using namespace std;

class A
{
public:
	A(int a = 0)
		:_a1(a)
	{
		cout << "A(int a)" << endl;
	}
	A(const A& aa)
		:_a1(aa._a1)
	{
		cout << "A(const A& aa)" << endl;
	}
	A& operator=(const A& aa)
	{
		cout << "A& operator=(const A& aa)" << endl;
		if (this != &aa)
		{
			_a1 = aa._a1;
		}
		return *this;
	}

	~A()
	{
		cout << "~A()" << endl;
	}
private:
	int _a1 = 1;
};
void f1(A aa)
{
}
A f2()
{
	A aa;
	return aa;
}

int main()
{

	 隐式类型,连续构造+拷⻉构造->优化为直接构造
	A aa1 = 1;
	cout << endl;
	return 0;
}
未优化( 1 次构造 + 1 次拷贝构造,伴随 2 次析构。):
A(int a)          // 1. 用 1 构造临时对象
A(const A& aa)    // 2. 用临时对象拷贝构造 aa1
~A()              // 3. 临时对象析构
                  // (此处输出换行)
~A()              // 4. main 结束时 aa1 析构
优化后(1 次构造):
A(int a) // 只有一次构造,直接构造出aa1

~A()  // 这是打印endl之后的语句,所以是对aa1的析构
优化后:编译器会把 A aa1 = 1; 当作 A a11(1); 来处理。也就是说,aa1 是直接使用 1 作为参数通过构造函数 A(int a) 构造出来的,没有中间的临时对象产生。
本文参与 腾讯云自媒体同步曝光计划,分享自作者个人站点/博客。
原始发表:2025-03-10,如有侵权请联系 cloudcommunity@tencent.com 删除
评论
登录后参与评论
推荐阅读
目录
腾讯云开发者

Copyright © 2013 - 2026 Tencent Cloud. All Rights Reserved. 腾讯云 版权所有
深圳市腾讯计算机系统有限公司 ICP备案/许可证号:粤B2-20090059 ![]() 粤公网安备44030502008569号
粤公网安备44030502008569号
腾讯云计算(北京)有限责任公司 京ICP证150476号 | 京ICP备11018762号