Three.js基础


Intro
场景
场景基础
场景中显示东西,必要组件:
组件 | 说明 |
|---|---|
摄像机 | 决定屏幕上哪些东西需要渲染 |
光源 | 决定材质如何显示以及用于产生阴影 |
对象 | 摄像机透视图中主要的渲染兑现,如方块、球体 |
渲染器 | webGL,webGPU等 |

function init() {

    var stats = initStats();

    // create a scene, that will hold all our elements such as objects, cameras and lights.
    var scene = new THREE.Scene();

    // create a camera, which defines where we're looking at.
    var camera = new THREE.PerspectiveCamera(45, window.innerWidth / window.innerHeight, 0.1, 100);

    // create a render and set the size
    var renderer = new THREE.WebGLRenderer();

    renderer.setClearColor(new THREE.Color(0x000000));
    renderer.setSize(window.innerWidth, window.innerHeight);
    renderer.shadowMap.enabled = true;

    // create the ground plane
    var planeGeometry = new THREE.PlaneGeometry(60, 40, 1, 1);
    var planeMaterial = new THREE.MeshLambertMaterial({
        color: 0xffffff
    });
    var plane = new THREE.Mesh(planeGeometry, planeMaterial);
    plane.receiveShadow = true;

    // rotate and position the plane
    plane.rotation.x = -0.5 * Math.PI;
    plane.position.x = 0;
    plane.position.y = 0;
    plane.position.z = 0;

    // add the plane to the scene
    scene.add(plane);

    // position and point the camera to the center of the scene
    camera.position.x = -30;
    camera.position.y = 40;
    camera.position.z = 30;
    camera.lookAt(scene.position);

    // add subtle ambient lighting
    var ambientLight = new THREE.AmbientLight(0x3c3c3c);
    scene.add(ambientLight);

    // add spotlight for the shadows
    var spotLight = new THREE.SpotLight(0xffffff, 1.2, 150, 120);
    spotLight.position.set(-40, 60, -10);
    spotLight.castShadow = true;
    scene.add(spotLight);

    // add the output of the renderer to the html element
    document.getElementById("webgl-output").appendChild(renderer.domElement);

    // call the render function
    var step = 0;

    var controls = new function () {
        this.rotationSpeed = 0.02;
        this.numberOfObjects = scene.children.length;

        this.removeCube = function () {
            var allChildren = scene.children;
            var lastObject = allChildren[allChildren.length - 1];
            if (lastObject instanceof THREE.Mesh) {
                scene.remove(lastObject);
                this.numberOfObjects = scene.children.length;
            }
        };

        this.addCube = function () {

            var cubeSize = Math.ceil((Math.random() * 3));
            var cubeGeometry = new THREE.BoxGeometry(cubeSize, cubeSize, cubeSize);
            var cubeMaterial = new THREE.MeshLambertMaterial({
                color: Math.random() * 0xffffff
            });
            var cube = new THREE.Mesh(cubeGeometry, cubeMaterial);
            cube.castShadow = true;
            cube.name = "cube-" + scene.children.length;


            // position the cube randomly in the scene

            cube.position.x = -30 + Math.round((Math.random() * planeGeometry.parameters.width));
            cube.position.y = Math.round((Math.random() * 5));
            cube.position.z = -20 + Math.round((Math.random() * planeGeometry.parameters.height));

            // add the cube to the scene
            scene.add(cube);
            this.numberOfObjects = scene.children.length;
        };

        this.outputObjects = function () {
            console.log(scene.children);
        }
    };

    var gui = new dat.GUI();
    gui.add(controls, 'rotationSpeed', 0, 0.5);
    gui.add(controls, 'addCube');
    gui.add(controls, 'removeCube');
    gui.add(controls, 'outputObjects');
    gui.add(controls, 'numberOfObjects').listen();

    // attach them here, since appendChild needs to be called first
    var trackballControls = initTrackballControls(camera, renderer);
    var clock = new THREE.Clock();

    render();

    function render() {

        trackballControls.update(clock.getDelta());
        stats.update();

        // rotate the cubes around its axes
        scene.traverse(function (e) {
            if (e instanceof THREE.Mesh && e != plane) {
                e.rotation.x += controls.rotationSpeed;
                e.rotation.y += controls.rotationSpeed;
                e.rotation.z += controls.rotationSpeed;
            }
        });

        // render using requestAnimationFrame
        requestAnimationFrame(render);
        renderer.render(scene, camera);
    }
}scene.add场景中添加对象scene.remote场景中移除对象scene.children获取场景中对象scene.getObjectByName根据name获取场景中对象。scene.traverse传入回调函数,便利场景中每个对象。
场景雾化效果

show code
function init() {

    var stats = initStats();

    // create a scene, that will hold all our elements such as objects, cameras and lights.
    var scene = new THREE.Scene();
    // scene.fog = new THREE.FogExp2(0xffffff, 0.015);
    scene.fog = new THREE.Fog(0xffffff, 10, 100);

    // create a camera, which defines where we're looking at.
    var camera = new THREE.PerspectiveCamera(45, window.innerWidth / window.innerHeight, 0.1, 1000);

    // create a render and set the size
    var renderer = new THREE.WebGLRenderer();

    renderer.setClearColor(new THREE.Color(0x000000));
    renderer.setSize(window.innerWidth, window.innerHeight);
    renderer.shadowMap.enabled = true;

    // create the ground plane
    var planeGeometry = new THREE.PlaneGeometry(60, 40, 1, 1);
    var planeMaterial = new THREE.MeshLambertMaterial({
        color: 0xffffff
    });
    var plane = new THREE.Mesh(planeGeometry, planeMaterial);
    plane.receiveShadow = true;

    // rotate and position the plane
    plane.rotation.x = -0.5 * Math.PI;
    plane.position.x = 0;
    plane.position.y = 0;
    plane.position.z = 0;

    // add the plane to the scene
    scene.add(plane);

    // position and point the camera to the center of the scene
    camera.position.x = -40;
    camera.position.y = 20;
    camera.position.z = 40;
    camera.lookAt(scene.position);

    // add subtle ambient lighting
    var ambientLight = new THREE.AmbientLight(0x0c0c0c);
    scene.add(ambientLight);

    // add spotlight for the shadows
    var spotLight = new THREE.SpotLight(0xffffff, 1, 150, 120);
    spotLight.position.set(-40, 60, -10);
    spotLight.castShadow = true;
    scene.add(spotLight);

    // add the output of the renderer to the html element
    document.getElementById("webgl-output").appendChild(renderer.domElement);

    // call the render function
    var step = 0;

    var controls = new function () {
        this.rotationSpeed = 0.02;
        this.numberOfObjects = scene.children.length;

        this.removeCube = function () {
            var allChildren = scene.children;
            var lastObject = allChildren[allChildren.length - 1];
            if (lastObject instanceof THREE.Mesh) {
                scene.remove(lastObject);
                this.numberOfObjects = scene.children.length;
            }
        };

        this.addCube = function () {

            var cubeSize = Math.ceil((Math.random() * 3));
            var cubeGeometry = new THREE.BoxGeometry(cubeSize, cubeSize, cubeSize);
            var cubeMaterial = new THREE.MeshLambertMaterial({
                color: 0xFF0000
            });
            var cube = new THREE.Mesh(cubeGeometry, cubeMaterial);
            cube.castShadow = true;

            // position the cube randomly in the scene
            cube.position.x = -30 + Math.round((Math.random() * planeGeometry.parameters.width));
            cube.position.y = Math.round((Math.random() * 5));
            cube.position.z = -20 + Math.round((Math.random() * planeGeometry.parameters.height));

            // add the cube to the scene
            scene.add(cube);
            this.numberOfObjects = scene.children.length;
        };

        this.outputObjects = function () {
            console.log(scene.children);
        }
    };

    var gui = new dat.GUI();
    gui.add(controls, 'rotationSpeed', 0, 0.5);
    gui.add(controls, 'addCube');
    gui.add(controls, 'removeCube');
    gui.add(controls, 'outputObjects');
    gui.add(controls, 'numberOfObjects').listen();

    var trackballControls = initTrackballControls(camera, renderer);
    var clock = new THREE.Clock();

    render();

    function render() {

        trackballControls.update(clock.getDelta());
        stats.update();

        // rotate the cubes around its axes
        scene.traverse(function (e) {
            if (e instanceof THREE.Mesh && e != plane) {

                e.rotation.x += controls.rotationSpeed;
                e.rotation.y += controls.rotationSpeed;
                e.rotation.z += controls.rotationSpeed;
            }
        });

        // render using requestAnimationFrame
        requestAnimationFrame(render);
        renderer.render(scene, camera);
    }
}
screne.fog = new THREE.For(0xffffff, 0.015, 100),第二个参数是near(近处)属性,第三个是far(远处)属性。 雾的浓度线性增长。screne.fog = new THREE.For(0xffffff, 0.01)只设置颜色和浓度,浓度随距离指数增长。
场景overrideMaterial属性
通过scene.overrideMaterial = new THREE.MeshLambertMaterial({ color: 0xffffff });来强制设置场景中对象的材质,极端情况可以做性能优化。

show code
function init() {

    var stats = initStats();

    // create a scene, that will hold all our elements such as objects, cameras and lights.
    var scene = new THREE.Scene();
    scene.overrideMaterial = new THREE.MeshLambertMaterial({
        color: 0xffffff
    });

    // create a camera, which defines where we're looking at.
    var camera = new THREE.PerspectiveCamera(45, window.innerWidth / window.innerHeight, 0.1, 1000);

    // create a render and set the size
    var renderer = new THREE.WebGLRenderer();

    renderer.setClearColor(new THREE.Color(0x000000));
    renderer.setSize(window.innerWidth, window.innerHeight);
    renderer.shadowMap.enabled = true;

    // create the ground plane
    var planeGeometry = new THREE.PlaneGeometry(60, 40, 1, 1);
    var planeMaterial = new THREE.MeshLambertMaterial({
        color: 0xffffff
    });
    var plane = new THREE.Mesh(planeGeometry, planeMaterial);
    plane.receiveShadow = true;

    // rotate and position the plane
    plane.rotation.x = -0.5 * Math.PI;
    plane.position.x = 0;
    plane.position.y = 0;
    plane.position.z = 0;

    // add the plane to the scene
    scene.add(plane);

    // position and point the camera to the center of the scene
    camera.position.x = -30;
    camera.position.y = 40;
    camera.position.z = 30;
    camera.lookAt(scene.position);

    // add subtle ambient lighting
    var ambientLight = new THREE.AmbientLight(0x0c0c0c);
    scene.add(ambientLight);

    // add spotlight for the shadows
    var spotLight = new THREE.SpotLight(0xffffff, 1, 150, 120);
    spotLight.position.set(-40, 60, -10);
    spotLight.castShadow = true;
    scene.add(spotLight);

    // add the output of the renderer to the html element
    document.getElementById("webgl-output").appendChild(renderer.domElement);

    // call the render function
    var step = 0;

    var controls = new function () {
        this.rotationSpeed = 0.02;
        this.numberOfObjects = scene.children.length;

        this.removeCube = function () {
            var allChildren = scene.children;
            var lastObject = allChildren[allChildren.length - 1];
            if (lastObject instanceof THREE.Mesh) {
                scene.remove(lastObject);
                this.numberOfObjects = scene.children.length;
            }
        };

        this.addCube = function () {

            var cubeSize = Math.ceil((Math.random() * 3));
            var cubeGeometry = new THREE.BoxGeometry(cubeSize, cubeSize, cubeSize);
            var cubeMaterial = new THREE.MeshLambertMaterial({
                color: Math.random() * 0xffffff
            });
            var cube = new THREE.Mesh(cubeGeometry, cubeMaterial);
            cube.castShadow = true;

            // position the cube randomly in the scene
            cube.position.x = -30 + Math.round((Math.random() * planeGeometry.parameters.width));
            cube.position.y = Math.round((Math.random() * 5));
            cube.position.z = -20 + Math.round((Math.random() * planeGeometry.parameters.height));

            // add the cube to the scene
            scene.add(cube);
            this.numberOfObjects = scene.children.length;
        };

        this.outputObjects = function () {
            console.log(scene.children);
        }
    };

    var gui = new dat.GUI();
    gui.add(controls, 'rotationSpeed', 0, 0.5);
    gui.add(controls, 'addCube');
    gui.add(controls, 'removeCube');
    gui.add(controls, 'outputObjects');
    gui.add(controls, 'numberOfObjects').listen();

    var trackballControls = initTrackballControls(camera, renderer);
    var clock = new THREE.Clock();

    render();

    function render() {

        trackballControls.update(clock.getDelta());
        stats.update();

        // rotate the cubes around its axes
        scene.traverse(function (e) {
            if (e instanceof THREE.Mesh && e != plane) {

                e.rotation.x += controls.rotationSpeed;
                e.rotation.y += controls.rotationSpeed;
                e.rotation.z += controls.rotationSpeed;
            }
        });

        // render using requestAnimationFrame
        requestAnimationFrame(render);
        renderer.render(scene, camera);
    }
}
几何体和网格(mesh)
创建对象的经典步骤,形状,材质,mesh。
var planeGeometry = new THREE.PlaneGeometry(60, 40, 1, 1);
var planeMaterial = new THREE.MeshLambertMaterial({
		color: 0xffffff
});
var plane = new THREE.Mesh(planeGeometry, planeMaterial);
threejs中可用几何体

show code
function init() {

    var stats = initStats();

    // create a scene, that will hold all our elements such as objects, cameras and lights.
    var scene = new THREE.Scene();

    // create a camera, which defines where we're looking at.
    var camera = new THREE.PerspectiveCamera(45, window.innerWidth / window.innerHeight, 0.1, 1000);

    // create a render and set the size
    var renderer = new THREE.WebGLRenderer();

    renderer.setClearColor(new THREE.Color(0x000000));
    renderer.setSize(window.innerWidth, window.innerHeight);
    renderer.shadowMap.enabled = true;

    // create the ground plane
    var planeGeometry = new THREE.PlaneGeometry(60, 40, 1, 1);
    var planeMaterial = new THREE.MeshLambertMaterial({
        color: 0xffffff
    });
    var plane = new THREE.Mesh(planeGeometry, planeMaterial);
    plane.receiveShadow = true;

    // rotate and position the plane
    plane.rotation.x = -0.5 * Math.PI;
    plane.position.x = 0;
    plane.position.y = 0;
    plane.position.z = 0;

    // add the plane to the scene
    scene.add(plane);

    // position and point the camera to the center of the scene
    camera.position.x = -50;
    camera.position.y = 30;
    camera.position.z = 20;
    camera.lookAt(new THREE.Vector3(-10, 0, 0));

    // add subtle ambient lighting
    var ambientLight = new THREE.AmbientLight(0x555555);
    scene.add(ambientLight);

    // add spotlight for the shadows
    var spotLight = new THREE.SpotLight(0xffffff, 1.2, 150, Math.PI / 4, 0, 2);
    spotLight.shadow.mapSize.height = 1024;
    spotLight.shadow.mapSize.width = 1024;
    spotLight.position.set(-40, 30, 30);
    spotLight.castShadow = true;
    scene.add(spotLight);

    // add geometries
    addGeometries(scene);

    // add the output of the renderer to the html element
    document.getElementById("webgl-output").appendChild(renderer.domElement);

    // call the render function
    var step = 0;


    function addGeometries(scene) {
        var geoms = [];

        geoms.push(new THREE.CylinderGeometry(1, 4, 4));

        // basic cube
        geoms.push(new THREE.BoxGeometry(2, 2, 2));

        // basic spherer
        geoms.push(new THREE.SphereGeometry(2));

        geoms.push(new THREE.IcosahedronGeometry(4));

        // create a convex shape (a shape without dents)
        // using a couple of points
        // for instance a cube
        var points = [
            new THREE.Vector3(2, 2, 2),
            new THREE.Vector3(2, 2, -2),
            new THREE.Vector3(-2, 2, -2),
            new THREE.Vector3(-2, 2, 2),
            new THREE.Vector3(2, -2, 2),
            new THREE.Vector3(2, -2, -2),
            new THREE.Vector3(-2, -2, -2),
            new THREE.Vector3(-2, -2, 2)
        ];
        geoms.push(new THREE.ConvexGeometry(points));

        // create a lathgeometry
        //http://en.wikipedia.org/wiki/Lathe_(graphics)
        var pts = []; //points array - the path profile points will be stored here
        var detail = .1; //half-circle detail - how many angle increments will be used to generate points
        var radius = 3; //radius for half_sphere
        for (var angle = 0.0; angle < Math.PI; angle += detail) //loop from 0.0 radians to PI (0 - 180 degrees)
            pts.push(new THREE.Vector3(Math.cos(angle) * radius, 0, Math.sin(angle) * radius)); //angle/radius to x,z
        geoms.push(new THREE.LatheGeometry(pts, 12));

        // create a OctahedronGeometry
        geoms.push(new THREE.OctahedronGeometry(3));

        // create a geometry based on a function
        geoms.push(new THREE.ParametricGeometry(THREE.ParametricGeometries.mobius3d, 20, 10));

        //
        geoms.push(new THREE.TetrahedronGeometry(3));

        geoms.push(new THREE.TorusGeometry(3, 1, 10, 10));

        geoms.push(new THREE.TorusKnotGeometry(3, 0.5, 50, 20));

        var j = 0;
        for (var i = 0; i < geoms.length; i++) {
            var cubeMaterial = new THREE.MeshLambertMaterial({
                wireframe: true,
                color: Math.random() * 0xffffff
            });

            var materials = [

                new THREE.MeshLambertMaterial({
                    color: Math.random() * 0xffffff
                }),
                new THREE.MeshBasicMaterial({
                    color: 0x000000,
                    wireframe: true
                })

            ];

            var mesh = THREE.SceneUtils.createMultiMaterialObject(geoms[i], materials);
            mesh.traverse(function (e) {
                e.castShadow = true
            });

            //var mesh = new THREE.Mesh(geoms[i],materials[i]);
            //mesh.castShadow=true;
            mesh.position.x = -24 + ((i % 4) * 12);
            mesh.position.y = 4;
            mesh.position.z = -8 + (j * 12);

            if ((i + 1) % 4 == 0) j++;
            scene.add(mesh);
        }

    }


    var trackballControls = initTrackballControls(camera, renderer);
    var clock = new THREE.Clock();

    render();

    function render() {
        trackballControls.update(clock.getDelta());
        stats.update();

        // render using requestAnimationFrame
        requestAnimationFrame(render);
        renderer.render(scene, camera);
    }
}
创建几何体
- 顶点和面就组合成了几何体
- three.js也建议使用三角形定义一个面
- 注意创建面的顶点数据
- 顺时针——面向摄像机的面
- 逆时针——背向摄像机的面

show code
function init() {

  var stats = initStats();

  // create a scene, that will hold all our elements such as objects, cameras and lights.
  var scene = new THREE.Scene();

  // create a camera, which defines where we're looking at.
  var camera = new THREE.PerspectiveCamera(45, window.innerWidth / window.innerHeight, 0.1, 1000);

  // create a render and set the size
  var renderer = new THREE.WebGLRenderer();

  renderer.setClearColor(new THREE.Color(0x000000));
  renderer.setSize(window.innerWidth, window.innerHeight);
  renderer.shadowMap.enabled = true;

  // create the ground plane
  var planeGeometry = new THREE.PlaneGeometry(60, 40, 1, 1);
  var planeMaterial = new THREE.MeshLambertMaterial({color: 0xffffff});
  var plane = new THREE.Mesh(planeGeometry, planeMaterial);
  plane.receiveShadow = true;

  // rotate and position the plane
  plane.rotation.x = -0.5 * Math.PI;
  plane.position.x = 0;
  plane.position.y = 0;
  plane.position.z = 0;

  // add the plane to the scene
  scene.add(plane);

  // position and point the camera to the center of the scene
  camera.position.x = -20;
  camera.position.y = 25;
  camera.position.z = 20;
  camera.lookAt(new THREE.Vector3(5, 0, 0));

  // add subtle ambient lighting
  var ambientLight = new THREE.AmbientLight(0x494949);
  scene.add(ambientLight);

  // add the output of the renderer to the html element
  document.getElementById("webgl-output").appendChild(renderer.domElement);

  // call the render function
  var step = 0;


  var vertices = [
      new THREE.Vector3(1, 3, 1),
      new THREE.Vector3(1, 3, -1),
      new THREE.Vector3(1, -1, 1),
      new THREE.Vector3(1, -1, -1),
      new THREE.Vector3(-1, 3, -1),
      new THREE.Vector3(-1, 3, 1),
      new THREE.Vector3(-1, -1, -1),
      new THREE.Vector3(-1, -1, 1)
  ];

  var faces = [
      new THREE.Face3(0, 2, 1),
      new THREE.Face3(2, 3, 1),
      new THREE.Face3(4, 6, 5),
      new THREE.Face3(6, 7, 5),
      new THREE.Face3(4, 5, 1),
      new THREE.Face3(5, 0, 1),
      new THREE.Face3(7, 6, 2),
      new THREE.Face3(6, 3, 2),
      new THREE.Face3(5, 7, 0),
      new THREE.Face3(7, 2, 0),
      new THREE.Face3(1, 3, 4),
      new THREE.Face3(3, 6, 4),
  ];

  var geom = new THREE.Geometry();
  geom.vertices = vertices;
  geom.faces = faces;
  geom.computeFaceNormals();

  var materials = [
    new THREE.MeshBasicMaterial({color: 0x000000, wireframe: true}),
    new THREE.MeshLambertMaterial({opacity: 0.6, color: 0x44ff44, transparent: true})
  ];

  var mesh = THREE.SceneUtils.createMultiMaterialObject(geom, materials);
  mesh.castShadow = true;
  mesh.children.forEach(function (e) {
      e.castShadow = true
  });

  scene.add(mesh);

  // add spotlight for the shadows
  var spotLight = new THREE.SpotLight(0xffffff, 1, 180, Math.PI/4);
  spotLight.shadow.mapSize.height = 2048;
  spotLight.shadow.mapSize.width = 2048;
  spotLight.position.set(-40, 30, 30);
  spotLight.castShadow = true;
  spotLight.lookAt(mesh);
  scene.add(spotLight);

  function addControl(x, y, z) {
      var controls = new function () {
          this.x = x;
          this.y = y;
          this.z = z;
      };

      return controls;
  }

  var controlPoints = [];
  controlPoints.push(addControl(3, 5, 3));
  controlPoints.push(addControl(3, 5, 0));
  controlPoints.push(addControl(3, 0, 3));
  controlPoints.push(addControl(3, 0, 0));
  controlPoints.push(addControl(0, 5, 0));
  controlPoints.push(addControl(0, 5, 3));
  controlPoints.push(addControl(0, 0, 0));
  controlPoints.push(addControl(0, 0, 3));

  var gui = new dat.GUI();
  gui.add(new function () {
      this.clone = function () {

          var clonedGeometry = mesh.children[0].geometry.clone();
          var materials = [
              new THREE.MeshLambertMaterial({opacity: 0.8, color: 0xff44ff, transparent: true}),
              new THREE.MeshBasicMaterial({color: 0x000000, wireframe: true})
          ];

          var mesh2 = THREE.SceneUtils.createMultiMaterialObject(clonedGeometry, materials);
          mesh2.children.forEach(function (e) {
              e.castShadow = true
          });

          mesh2.translateX(5);
          mesh2.translateZ(5);
          mesh2.name = "clone";
          scene.remove(scene.getChildByName("clone"));
          scene.add(mesh2);


      }
  }, 'clone');

  for (var i = 0; i < 8; i++) {

      f1 = gui.addFolder('Vertices ' + (i + 1));
      f1.add(controlPoints[i], 'x', -10, 10);
      f1.add(controlPoints[i], 'y', -10, 10);
      f1.add(controlPoints[i], 'z', -10, 10);

  }

  var trackballControls = initTrackballControls(camera, renderer);
  var clock = new THREE.Clock();

  render();

  function render() {
      trackballControls.update(clock.getDelta());
      stats.update();

      var vertices = [];
      for (var i = 0; i < 8; i++) {
          vertices.push(new THREE.Vector3(controlPoints[i].x, controlPoints[i].y, controlPoints[i].z));
      }

      mesh.children.forEach(function (e) {
          e.geometry.vertices = vertices;
          e.geometry.verticesNeedUpdate = true;
          e.geometry.computeFaceNormals();
          delete e.geometry.__directGeometry
      });

      // render using requestAnimationFrame
      requestAnimationFrame(render);
      renderer.render(scene, camera);
  }
}
mesh网格对象的属性和方法
网格 = 形状 + 材质
mesh网格对象的属性和方法:
方法/属性 | |
|---|---|
position | 相对于父对象的位置。父对象通常是THREE.Scene或者THREE.Object3D对象 |
rotation | 设置每个轴的旋转弧度,可以分别设置rotateX(),rotateY(),rotateZ() |
scale | 通过x,y,z轴缩放对象 |
translateX(amount) | 沿x轴将对象平移amound 距离 |
translateY(amount) | 沿y轴将对象平移amound 距离 |
translateZ(amount) | 沿z轴将对象平移amound 距离 |
visible | 为false时,mesh对象将不会被渲染到场景中 |
show code
function init() {

  var stats = initStats();

  // create a scene, that will hold all our elements such as objects, cameras and lights.
  var scene = new THREE.Scene();

  // create a camera, which defines where we're looking at.
  var camera = new THREE.PerspectiveCamera(45, window.innerWidth / window.innerHeight, 0.1, 1000);

  // create a render and set the size
  var renderer = new THREE.WebGLRenderer();

  renderer.setClearColor(new THREE.Color(0x000000));
  renderer.setSize(window.innerWidth, window.innerHeight);
  renderer.shadowMap.enabled = true;

  // create the ground plane
  var planeGeometry = new THREE.PlaneGeometry(60, 40, 1, 1);
  var planeMaterial = new THREE.MeshLambertMaterial({color: 0xffffff});
  var plane = new THREE.Mesh(planeGeometry, planeMaterial);
  plane.receiveShadow = true;

  // rotate and position the plane
  plane.rotation.x = -0.5 * Math.PI;
  plane.position.x = 0;
  plane.position.y = 0;
  plane.position.z = 0;

  // add the plane to the scene
  scene.add(plane);

  // position and point the camera to the center of the scene
  camera.position.x = -30;
  camera.position.y = 40;
  camera.position.z = 30;
  camera.lookAt(scene.position);

  // add subtle ambient lighting
  var ambientLight = new THREE.AmbientLight(0x3c3c3c);
  scene.add(ambientLight);

  // add spotlight for the shadows
  // add spotlight for the shadows
  var spotLight = new THREE.SpotLight(0xffffff, 1, 180, Math.PI/4);
  spotLight.shadow.mapSize.height = 2048;
  spotLight.shadow.mapSize.width = 2048;
  spotLight.position.set(-40, 30, 30);
  spotLight.castShadow = true;
  scene.add(spotLight);

  // add the output of the renderer to the html element
  document.getElementById("webgl-output").appendChild(renderer.domElement);

  // call the render function
  var step = 0;

  var controls = new function () {
      this.scaleX = 1;
      this.scaleY = 1;
      this.scaleZ = 1;

      this.positionX = 0;
      this.positionY = 4;
      this.positionZ = 0;

      this.rotationX = 0;
      this.rotationY = 0;
      this.rotationZ = 0;
      this.scale = 1;

      this.translateX = 0;
      this.translateY = 0;
      this.translateZ = 0;

      this.visible = true;

      this.translate = function () {

          cube.translateX(controls.translateX);
          cube.translateY(controls.translateY);
          cube.translateZ(controls.translateZ);

          controls.positionX = cube.position.x;
          controls.positionY = cube.position.y;
          controls.positionZ = cube.position.z;
      }
  };


  var material = new THREE.MeshLambertMaterial({color: 0x44ff44});
  var geom = new THREE.BoxGeometry(5, 8, 3);

  // var materials = [
  //   new THREE.MeshLambertMaterial({opacity: 0.8, color: 0x44ff44, transparent: true}),
  //   new THREE.MeshBasicMaterial({color: 0x000000, wireframe: true})
  // ];

  // var cube = THREE.SceneUtils.createMultiMaterialObject(geom, materials);

  var cube = new THREE.Mesh(geom, material);
  cube.position.y = 4;
  cube.castShadow = true;
  scene.add(cube);


  var gui = new dat.GUI();

  guiScale = gui.addFolder('scale');
  guiScale.add(controls, 'scaleX', 0, 5);
  guiScale.add(controls, 'scaleY', 0, 5);
  guiScale.add(controls, 'scaleZ', 0, 5);

  guiPosition = gui.addFolder('position');
  var contX = guiPosition.add(controls, 'positionX', -10, 10);
  var contY = guiPosition.add(controls, 'positionY', -4, 20);
  var contZ = guiPosition.add(controls, 'positionZ', -10, 10);

  contX.listen();
  contX.onChange(function (value) {
      cube.position.x = controls.positionX;
      // cube.children[1].position.x = controls.positionX;
  });

  contY.listen();
  contY.onChange(function (value) {
      cube.position.y = controls.positionY;
  });

  contZ.listen();
  contZ.onChange(function (value) {
      cube.position.z = controls.positionZ;
  });


  guiRotation = gui.addFolder('rotation');
  guiRotation.add(controls, 'rotationX', -4, 4);
  guiRotation.add(controls, 'rotationY', -4, 4);
  guiRotation.add(controls, 'rotationZ', -4, 4);

  guiTranslate = gui.addFolder('translate');

  guiTranslate.add(controls, 'translateX', -10, 10);
  guiTranslate.add(controls, 'translateY', -10, 10);
  guiTranslate.add(controls, 'translateZ', -10, 10);
  guiTranslate.add(controls, 'translate');

  gui.add(controls, 'visible');

  var trackballControls = initTrackballControls(camera, renderer);
  var clock = new THREE.Clock();

  render();

  function render() {
      trackballControls.update(clock.getDelta());
      stats.update();
      cube.visible = controls.visible;

      cube.rotation.x = controls.rotationX;
      cube.rotation.y = controls.rotationY;
      cube.rotation.z = controls.rotationZ;

      cube.scale.set(controls.scaleX, controls.scaleY, controls.scaleZ);
      requestAnimationFrame(render);
      renderer.render(scene, camera);
  }
}
选择合适的摄像机
正交投影摄像机和透视投影摄像机

function init() {

  var stats = initStats();

  // create a scene, that will hold all our elements such as objects, cameras and lights.
  var scene = new THREE.Scene();

  // create a camera, which defines where we're looking at.
  var camera = new THREE.PerspectiveCamera(45, window.innerWidth / window.innerHeight, 0.1, 1000);
  camera.position.x = 120;
  camera.position.y = 60;
  camera.position.z = 180;

  // create a render and set the size
  var renderer = new THREE.WebGLRenderer();

  renderer.setClearColor(new THREE.Color(0x000000));
  renderer.setSize(window.innerWidth, window.innerHeight);

  // create the ground plane
  var planeGeometry = new THREE.PlaneGeometry(180, 180);
  var planeMaterial = new THREE.MeshLambertMaterial({color: 0xffffff});
  var plane = new THREE.Mesh(planeGeometry, planeMaterial);


  // rotate and position the plane
  plane.rotation.x = -0.5 * Math.PI;
  plane.position.x = 0;
  plane.position.y = 0;
  plane.position.z = 0;

  // add the plane to the scene
  scene.add(plane);

  var cubeGeometry = new THREE.BoxGeometry(4, 4, 4);

  for (var j = 0; j < (planeGeometry.parameters.height / 5); j++) {
      for (var i = 0; i < planeGeometry.parameters.width / 5; i++) {
          var rnd = Math.random() * 0.75 + 0.25;
          var cubeMaterial = new THREE.MeshLambertMaterial();
          cubeMaterial.color = new THREE.Color(rnd, 0, 0);
          var cube = new THREE.Mesh(cubeGeometry, cubeMaterial);

          cube.position.z = -((planeGeometry.parameters.height) / 2) + 2 + (j * 5);
          cube.position.x = -((planeGeometry.parameters.width) / 2) + 2 + (i * 5);
          cube.position.y = 2;

          scene.add(cube);
      }
  }


  var directionalLight = new THREE.DirectionalLight(0xffffff, 0.7);
  directionalLight.position.set(-20, 40, 60);
  scene.add(directionalLight);


  // add subtle ambient lighting
  var ambientLight = new THREE.AmbientLight(0x292929);
  scene.add(ambientLight);

  // add the output of the renderer to the html element
  document.getElementById("webgl-output").appendChild(renderer.domElement);

  // call the render function
  var step = 0;

  var trackballControls
  var controls = new function () {
      this.perspective = "Perspective";
      this.switchCamera = function () {
          if (camera instanceof THREE.PerspectiveCamera) {
              camera = new THREE.OrthographicCamera(window.innerWidth / -16, window.innerWidth / 16, window.innerHeight / 16, window.innerHeight / -16, -200, 500);
              camera.position.x = 120;
              camera.position.y = 60;
              camera.position.z = 180;
              camera.lookAt(scene.position);

              trackballControls = initTrackballControls(camera, renderer);
              this.perspective = "Orthographic";
          } else {
              camera = new THREE.PerspectiveCamera(45, window.innerWidth / window.innerHeight, 0.1, 1000);
              camera.position.x = 120;
              camera.position.y = 60;
              camera.position.z = 180;


              camera.lookAt(scene.position);
              trackballControls = initTrackballControls(camera, renderer);
              this.perspective = "Perspective";
          }
      };
  };

  var gui = new dat.GUI();
  gui.add(controls, 'switchCamera');
  gui.add(controls, 'perspective').listen();

  // make sure that for the first time, the
  // camera is looking at the scene
  camera.lookAt(scene.position);

  trackballControls = initTrackballControls(camera, renderer);
  var clock = new THREE.Clock();

  render();

  function render() {
      trackballControls.update(clock.getDelta());
      stats.update();

      // render using requestAnimationFrame
      requestAnimationFrame(render);
      renderer.render(scene, camera);
  }
}- 正交投影摄像机(
THREE.PerspectiveCamera):所有的立方体被渲染出来的尺寸都是一样(对象相对于摄像机的距离怼渲染的结果是没有影响的) - 透视投影摄像机(
THREE.OrthographicCamera):透视效果
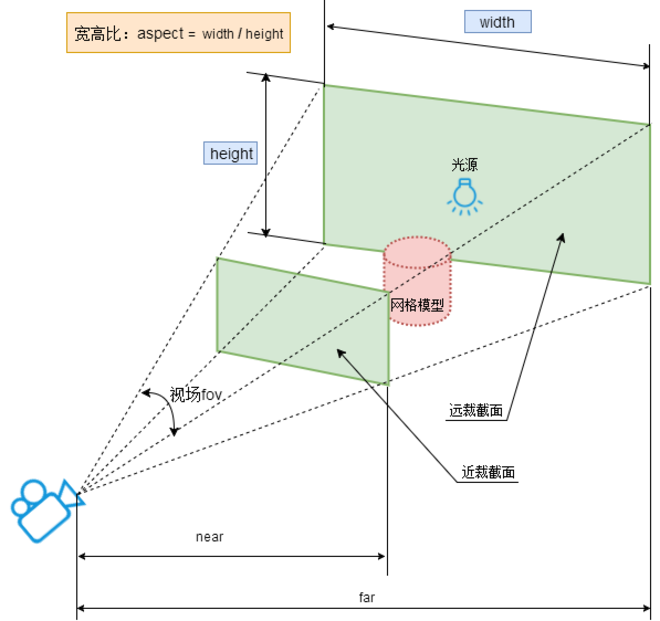
透视投影摄像机(THREE.PerspectiveCamera)
PerspectiveCamera( fov, aspect, near, far )参数 | 含义 | 推荐默认值 |
|---|---|---|
fov | fov表示视场,所谓视场就是能够看到的角度范围,人的眼睛大约能够看到180度的视场,视角大小设置要根据具体应用,一般游戏会设置60~90度 | 45 |
aspect(长宽比) | aspect表示渲染窗口的长宽比,如果一个网页上只有一个全屏的canvas画布且画布上只有一个窗口,那么aspect的值就是网页窗口客户区的宽高比 | window.innerWidth/window.innerHeight |
near(近面距离) | near属性表示的是从距离相机多远的位置开始渲染,一般情况会设置一个很小的值。 | 0.1 |
far(远面距离) | far属性表示的是距离相机多远的位置截止渲染,如果设置的值偏小小,会有部分场景看不到 | 1000 |
zoom(变焦) | zoom 属性可以放大和缩小场景。小于1场景缩小,大于1场景放大,负数,场景会上下颠倒 | 1 |
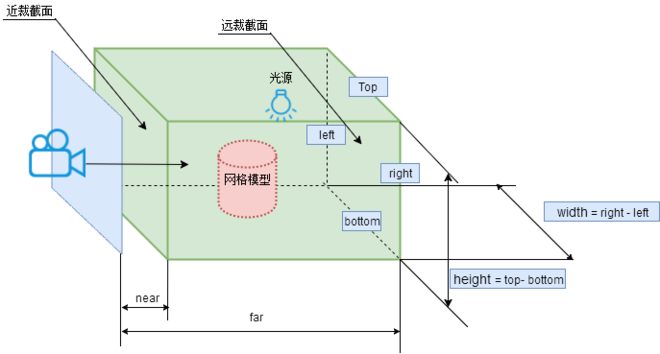
正交投影摄像机(THREE.PerspectiveCamera)
OrthographicCamera( left, right, top, bottom, near, far )参数 | 含义 | 推荐默认值 |
|---|---|---|
left | 渲染空间的左边界 | |
right | 渲染空间的右边界 | |
top | 渲染空间的上边界 | |
bottom | 渲染空间的下边界 | |
near | near属性表示的是从距离相机多远的位置开始渲染,一般情况会设置一个很小的值。 | 0.1 |
far | far属性表示的是距离相机多远的位置截止渲染,如果设置的值偏小小,会有部分场景看不到 | 1000 |
zoom(变焦) | zoom 属性可以放大和缩小场景。小于1场景缩小,大于1场景放大,负数,场景会上下颠倒 | 1 |
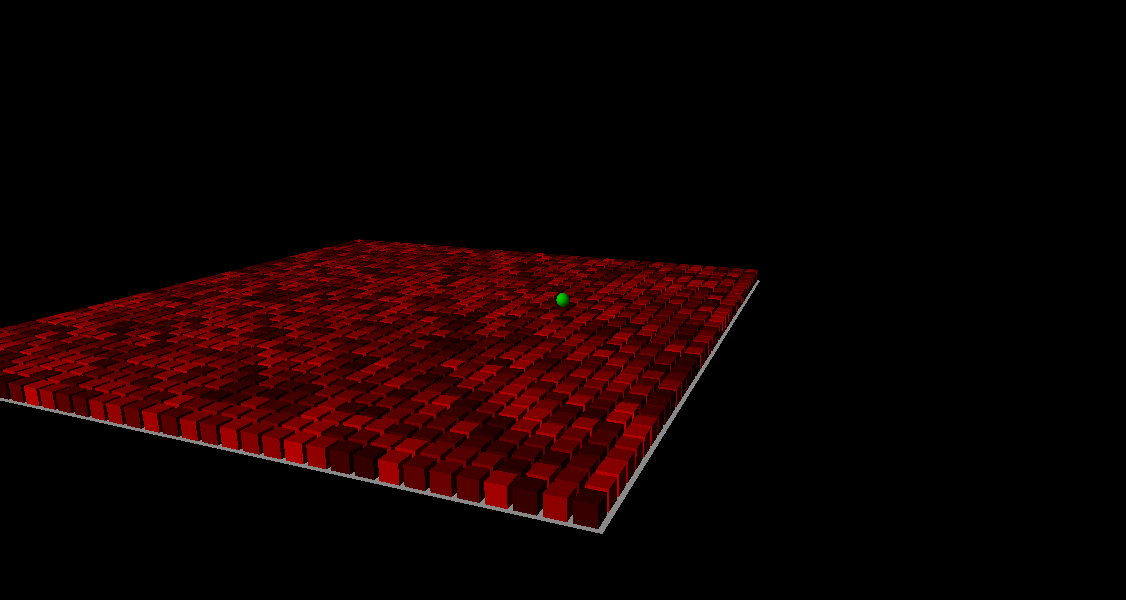
设置摄像机聚焦
默认摄像机指向场景的中心position(0,0,0),我们可以随意更改。
camera.lookAt(new THTREE.Vector3(x,y,z));或者还可以设置跟随某个对象camera.lookAt(mesh.position);
如下是两种摄像机下,改变摄像机聚焦点的效果。
show code
function init() {

  var stats = initStats();

  // create a scene, that will hold all our elements such as objects, cameras and lights.
  var scene = new THREE.Scene();

  // create a camera, which defines where we're looking at.
  var camera = new THREE.PerspectiveCamera(45, window.innerWidth / window.innerHeight, 0.1, 1000);
  camera.position.x = 120;
  camera.position.y = 60;
  camera.position.z = 180;

  // create a render and set the size
  var renderer = new THREE.WebGLRenderer();

  renderer.setClearColor(new THREE.Color(0x000000));
  renderer.setSize(window.innerWidth, window.innerHeight);

  // create the ground plane
  var planeGeometry = new THREE.PlaneGeometry(180, 180);
  var planeMaterial = new THREE.MeshLambertMaterial({color: 0xffffff});
  var plane = new THREE.Mesh(planeGeometry, planeMaterial);


  // rotate and position the plane
  plane.rotation.x = -0.5 * Math.PI;
  plane.position.x = 0;
  plane.position.y = 0;
  plane.position.z = 0;

  // add the plane to the scene
  scene.add(plane);

  var cubeGeometry = new THREE.BoxGeometry(4, 4, 4);
  for (var j = 0; j < (planeGeometry.parameters.height / 5); j++) {
      for (var i = 0; i < planeGeometry.parameters.width / 5; i++) {
          var rnd = Math.random() * 0.75 + 0.25;
          var cubeMaterial = new THREE.MeshLambertMaterial();
          cubeMaterial.color = new THREE.Color(rnd, 0, 0);
          var cube = new THREE.Mesh(cubeGeometry, cubeMaterial);

          cube.position.z = -((planeGeometry.parameters.height) / 2) + 2 + (j * 5);
          cube.position.x = -((planeGeometry.parameters.width) / 2) + 2 + (i * 5);
          cube.position.y = 2;

          scene.add(cube);
      }
  }

  var lookAtGeom = new THREE.SphereGeometry(2);
  var lookAtMesh = new THREE.Mesh(lookAtGeom, new THREE.MeshLambertMaterial({color: 0x00ff00}));
  scene.add(lookAtMesh);


  var directionalLight = new THREE.DirectionalLight(0xffffff, 0.7);
  directionalLight.position.set(-20, 40, 60);
  scene.add(directionalLight);


  // add subtle ambient lighting
  var ambientLight = new THREE.AmbientLight(0x292929);
  scene.add(ambientLight);

  // add the output of the renderer to the html element
  document.getElementById("webgl-output").appendChild(renderer.domElement);

  // call the render function
  var step = 0;

  var controls = new function () {
      this.perspective = "Perspective";
      this.switchCamera = function () {
          if (camera instanceof THREE.PerspectiveCamera) {
              camera = new THREE.OrthographicCamera(window.innerWidth / -16, window.innerWidth / 16, window.innerHeight / 16, window.innerHeight / -16, -200, 500);
              camera.position.x = 120;
              camera.position.y = 60;
              camera.position.z = 180;

              camera.lookAt(scene.position);
              this.perspective = "Orthographic";
          } else {
              camera = new THREE.PerspectiveCamera(45, window.innerWidth / window.innerHeight, 0.1, 1000);
              camera.position.x = 120;
              camera.position.y = 60;
              camera.position.z = 180;

              camera.lookAt(scene.position);
              this.perspective = "Perspective";
          }
      };
  };

  var gui = new dat.GUI();
  gui.add(controls, 'switchCamera');
  gui.add(controls, 'perspective').listen();

  // make sure that for the first time, the
  // camera is looking at the scene
  //   camera.lookAt(scene.position);
  render();


  var step = 0;

  function render() {

      stats.update();
      // render using requestAnimationFrame
      step += 0.02;
      if (camera instanceof THREE.Camera) {
          var x = 10 + ( 100 * (Math.sin(step)));
          camera.lookAt(new THREE.Vector3(x, 10, 0));
          lookAtMesh.position.copy(new THREE.Vector3(x, 10, 0));
      }

//        .position.x = 20+( 10*(Math.cos(step)));
      requestAnimationFrame(render);
      renderer.render(scene, camera);
  }
}
本文参与 腾讯云自媒体同步曝光计划,分享自作者个人站点/博客。
如有侵权请联系 cloudcommunity@tencent.com 删除
评论
登录后参与评论
推荐阅读
目录
腾讯云开发者

Copyright © 2013 - 2026 Tencent Cloud. All Rights Reserved. 腾讯云 版权所有
深圳市腾讯计算机系统有限公司 ICP备案/许可证号:粤B2-20090059 ![]() 粤公网安备44030502008569号
粤公网安备44030502008569号
腾讯云计算(北京)有限责任公司 京ICP证150476号 | 京ICP备11018762号