Elasticsearch核心API之reindex API的应用及原理分析
原创
Elasticsearch核心API之reindex API的应用及原理分析
原创
空洞的盒子
发布于 2025-08-01 18:20:20
发布于 2025-08-01 18:20:20
什么是Elasticsearch的reindex?
本文基于Elasticsearch 7.14版本源码。
功能介绍
在 Elasticsearch 7.14 中,Reindex API是一个核心数据管理工具,用于跨索引高效复制,转换文档或索引迁移。它通过后台并行处理机制实现大规模数据迁移,同时提供丰富的控制选项。
应用场景
1. 索引重建与优化
- 修改索引映射(如字段类型变更)、调整分片数。
2. 数据归档与生命周期管理
- 将旧数据从热节点迁移到冷节点。
3. 多版本索引升级
- ES 版本升级后,将旧版索引数据迁移到新版兼容索引。
4. 数据清洗与标准化
- 修复数据格式(如日期格式转换)、过滤无效数据。
5. 测试环境数据复制
- 复制生产环境索引到测试集群进行问题复现。
6. 跨集群数据同步
- 灾备集群数据同步(替代部分商业工具功能)。
使用方式
1.基础调用
只需要指定源索引与目的索引,其余参数均采用默认值。
POST _reindex
{
  "source": {
    "index": "my-index-000001"
  },
  "dest": {
    "index": "my-new-index-000001"
  }
}
2.手动切片
针对每个请求指定切片ID与切片总数。来作为reindex请求的任务切片参数。
POST _reindex
{
  "source": {
    "index": "my-index-000001",
    "slice": {
      "id": 0,
      "max": 2
    }
  },
  "dest": {
    "index": "my-new-index-000001"
  }
}
POST _reindex
{
  "source": {
    "index": "my-index-000001",
    "slice": {
      "id": 1,
      "max": 2
    }
  },
  "dest": {
    "index": "my-new-index-000001"
  }
}
3.自动切片
使用Sliced scroll对_id进行任务切片,使其并行执行。使用slices指定切片总数。
POST _reindex?slices=5&refresh
{
  "source": {
    "index": "my-index-000001"
  },
  "dest": {
    "index": "my-new-index-000001"
  }
}
4.reindex索引路由
在执行reindex时如果文档带有路由信息,在指定路由信息后,该文档的路由信息会被保留。
POST _reindex
{
  "source": {
    "index": "source",
    "query": {
      "match": {
        "company": "cat"
      }
    }
  },
  "dest": {
    "index": "dest",
    "routing": "=cat"
  }
}

# 指定batch_size进行reindex的文档路由。
POST _reindex
{
  "source": {
    "index": "source",
    "size": 100
  },
  "dest": {
    "index": "dest",
    "routing": "=cat"
  }
}
5.指定pipeline进行reindex
如果需要再reindex的过程中加工查询到的数据,然后在写入目的索引。就可以指定管道对数据进行加工。
POST _reindex
{
  "source": {
    "index": "source"
  },
  "dest": {
    "index": "dest",
    "pipeline": "some_ingest_pipeline"
  }
}
6.过滤指定字段进行reindex
在复制数据过程中,如果只需要复制每条数据中的部分字段,我们可以使用指定_source的方式对字段进行筛选。
POST _reindex
{
  "source": {
    "index": "my-index-000001",
    "_source": ["user.id", "_doc"]
  },
  "dest": {
    "index": "my-new-index-000001"
  }
}
7.使用scripts进行reindex
在进行reindex时,如果需要应用最新模板配置或对文档进行修改后再写入目的索引。则可以使用该方式。
POST _reindex
{
  "source": {
    "index": "metricbeat-*"
  },
  "dest": {
    "index": "metricbeat"
  },
  "script": {
    "lang": "painless",
    "source": "ctx._index = 'metricbeat-' + (ctx._index.substring('metricbeat-'.length(), ctx._index.length())) + '-1'"
  }
}


# 使用script对文档进行修改。
POST _reindex
{
  "source": {
    "index": "my-index-000001"
  },
  "dest": {
    "index": "my-new-index-000001",
    "version_type": "external"
  },
  "script": {
    "source": "if (ctx._source.foo == 'bar') {ctx._version++; ctx._source.remove('foo')}",
    "lang": "painless"
  }
}
8.从远程集群reindex索引数据
POST _reindex
{
  "source": {
    "remote": {
      "host": "http://otherhost:9200",
      "username": "user",
      "password": "pass"
    },
    "index": "my-index-000001",
    "query": {
      "match": {
        "test": "data"
      }
    }
  },
  "dest": {
    "index": "my-new-index-000001"
  }
}
重点参数释义
Query parameters | 含义 |
|---|---|
refresh | 默认值:false;设置为true会立即刷新索引分片。 |
timeout | 索引等待操作的超时时间(Automatic index creation,Dynamic mapping updates,Waiting for active shards) |
wait_for_active_shards | 操作之前必须处于活动状态的分片副本数。默认值为1,代表必须主分片活跃。 |
wait_for_completion | 是否阻塞当前任务指导操作完成。默认为true。如果设置为false,则会返回taskID,在后台执行该任务。 |
requests_per_second | 请求流量的限制(以每秒子请求数为统计单位),默认值:-1(无限制) |
require_alias | 如果设置为true,则目标索引必须为索引别名。默认值:false |
scroll | 指定滚动搜索维持一致性的时间。 |
slices | 用于指定当前任务被划分为多少子任务的切片数。默认值:1,代表当前任务不会在切分子任务。 |
max_docs | 需要处理的最大文档数。默认是全部文档。 |
操作注意事项
- 操作之前,需要确保源索引没有数据在进行写入,或update操作。目的是为了确保reindex前后数据量一致。
- 基于集群压力,合理设置size参数。避免size设置过大对集群造成压力。
- 根据索引数据量与分片规划,合理指定Slice参数。一般建议默认为auto。
- 在进行reindex之前,建议根据源索引合理规划目的索引的主分片数。以提高写入速度,均衡节点负载。
- 在reindex执行时,建议目的索引不要配置副本,待reindex任务完成后在添加副本。以提高写入速度。
reindex原理与源码分析
reindex原理
从调用reindex API发起reindex任务,至reindex任务执行完成大致分为以下几个阶段:
reindex API调用验证阶段
- 接收rest api请求,客户端发起(
POST _reindex) - 接收reindex请求,并验证请求中携带的各类参数。
- 请求参数验证完成后,针对没有指定的参数值,会使用默认值来执行后续流程。
reindex请求构造阶段
在接受到客户端提交的请求并验证完成后,Elasticsearch便要开始基于客户端提交的语句开始请求的构造。
- 构造source部分。需要配置远程索引,索引名,查询条件。
- 构造dest部分。需要设置目标索引,操作类型,管道,版本类型等。
- 构造其他运行参数。例如:max_docs,srcipt,conflict策略。
reindex请求解析阶段
- 解析source字段。主要进行提取索引,远程信息,查询条件等。
- 解析dest字段。主要进行设置目标索引,操作类型,路由等。
- 处理max_docs与size参数。需要兼容不同版本的api限制。
- 解析script和conflict字段。用于支持脚本和冲突策略。
reindex请求执行阶段
- 调用BulkByScrollTask创建父任务reindex task,并将任务注册至Task Manager。
- 创建Leader Task并根据Slice Info 创建Worker Task。
- 每个Worker Task独立完成对源索引的查询,文档的加工与目的索引的写入工作。
- 在Worker Task执行期间定时汇报任务状态至Leader Task。并由Leader Task对任务状态进行汇总。
- Leader Task任务汇总完成后,如果由失败任务或文档冲突,Leader Task会根据配置的冲突策略与重试次数,对相应任务进行重试。直至所有任务执行完成。
Reindex Task在Elasticsearch中的执行逻辑如下图所示:
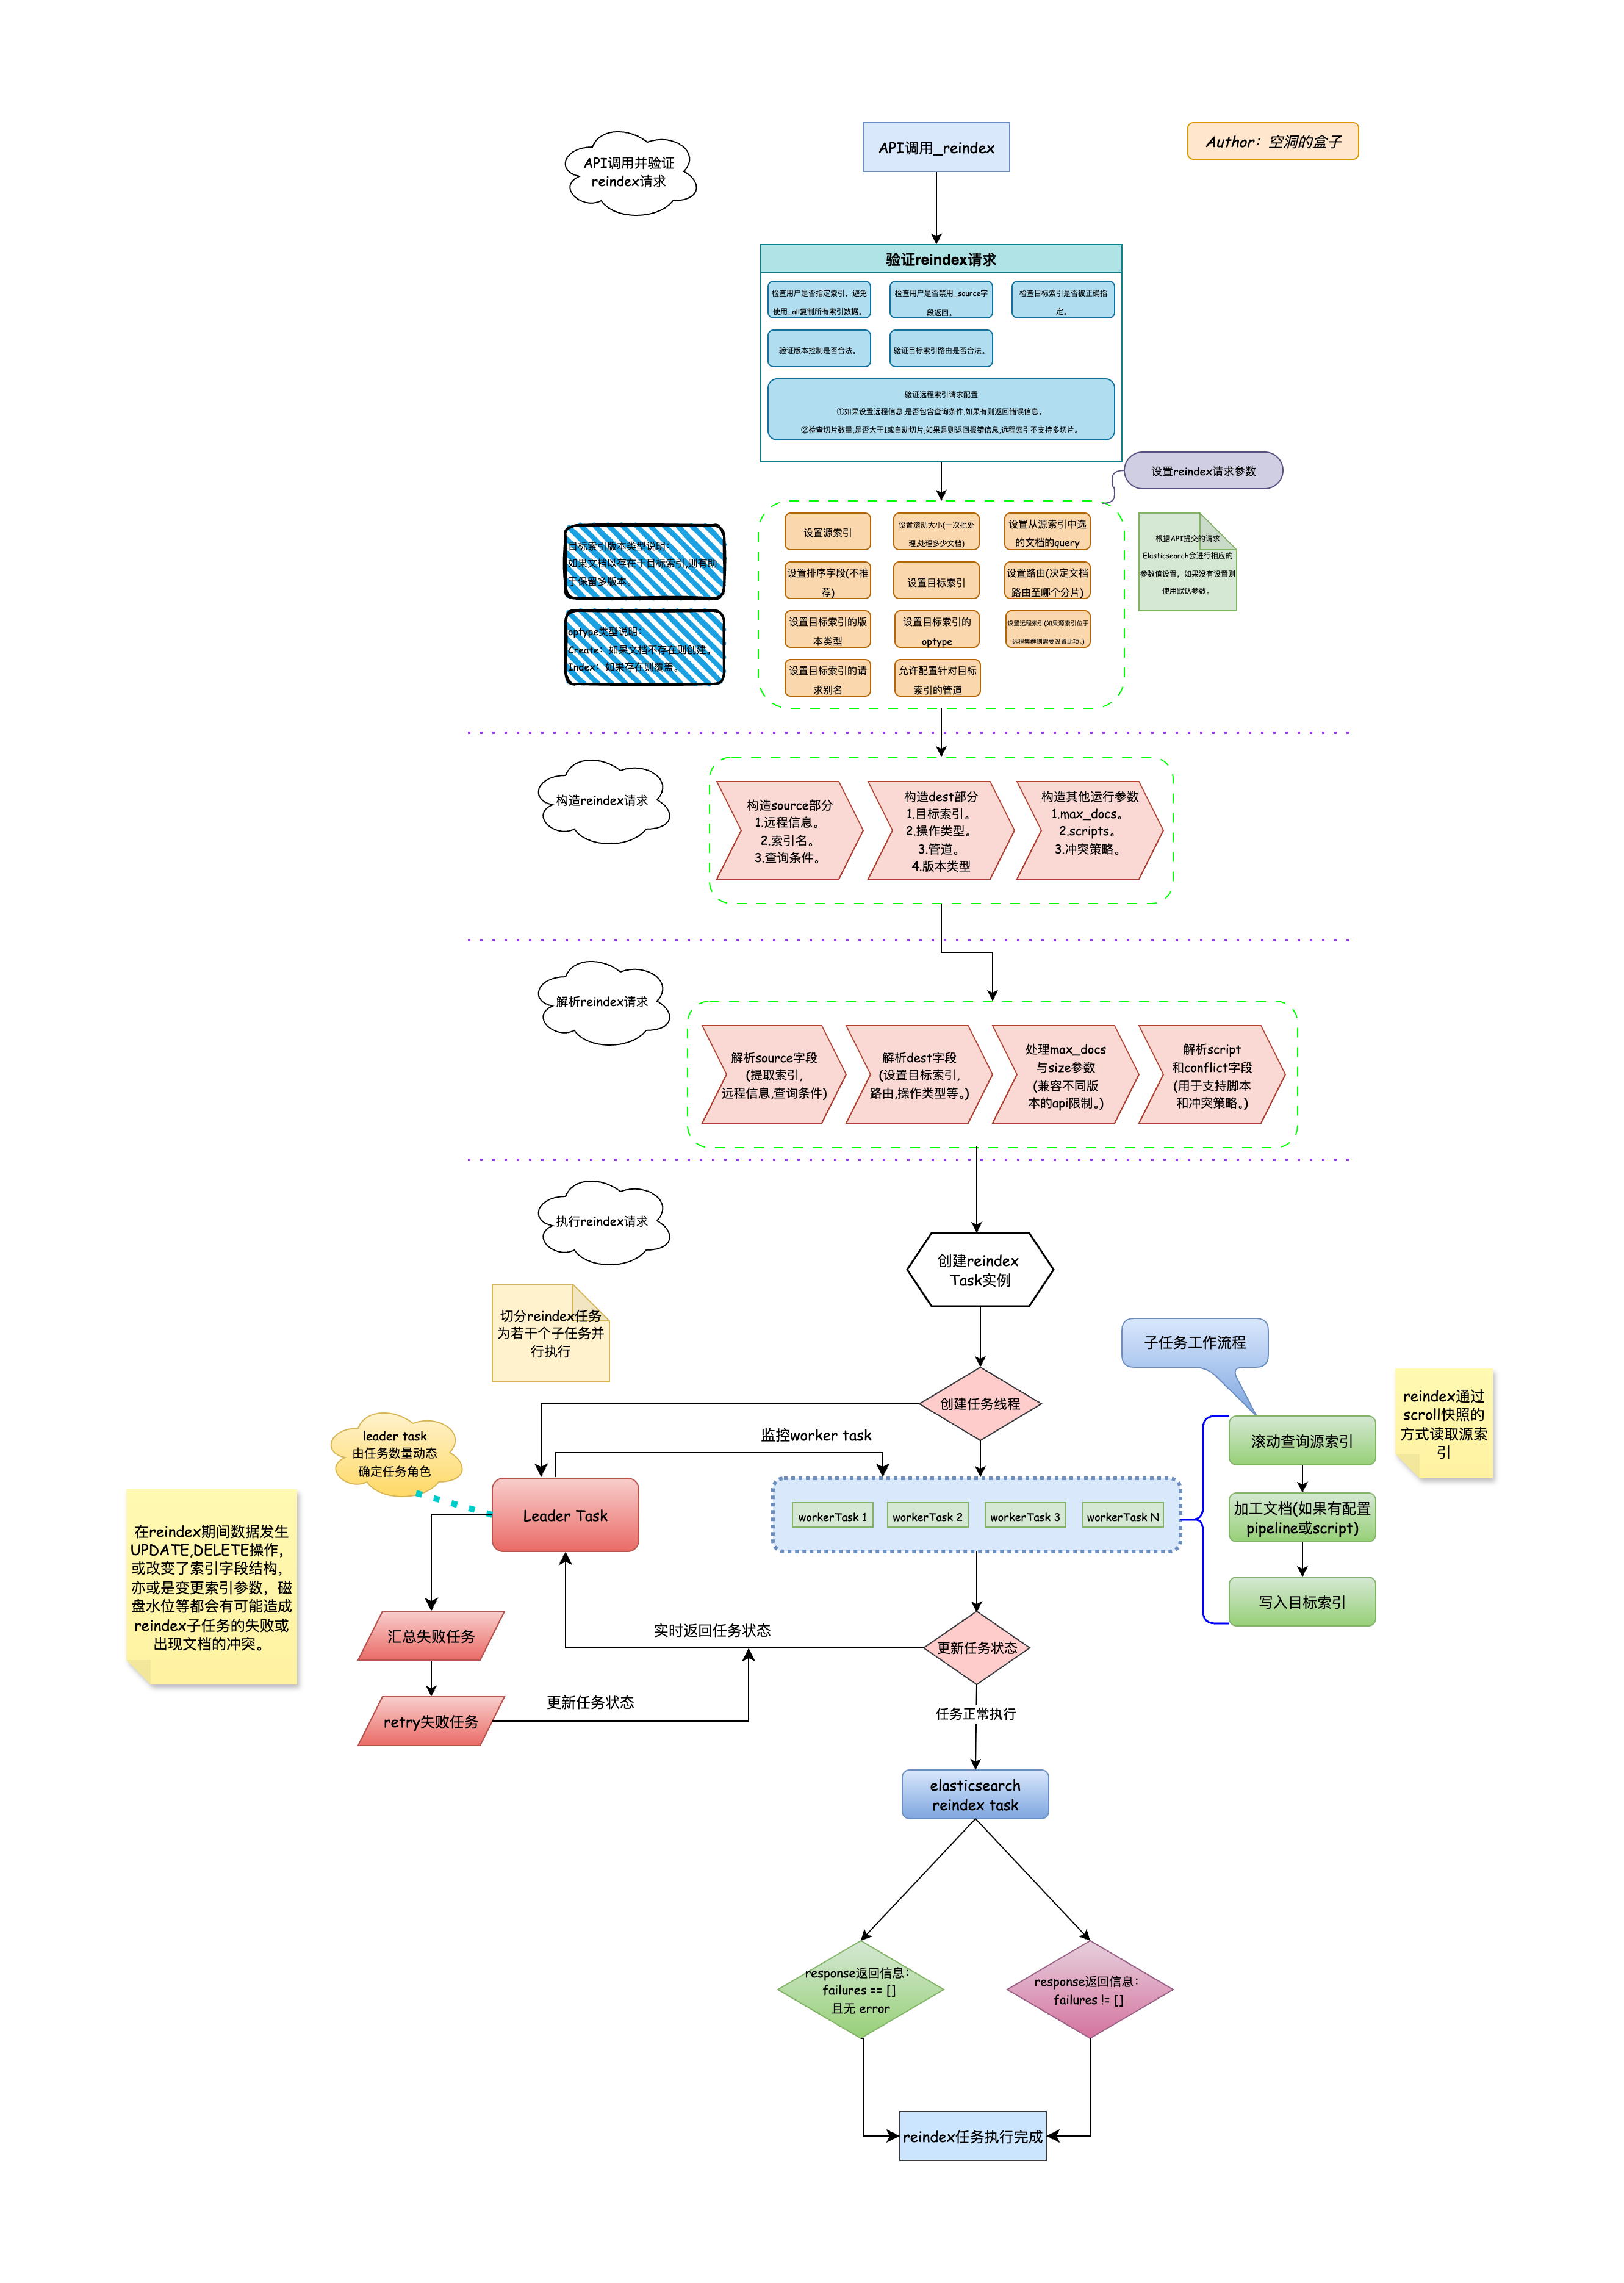
reindex任务执行流程
Leader Task与Worker Task生成与交互原理
- 根据请求中传入的Slice Info信息。获取其中的Slice ID。
- 验证并判断Slice ID,来决定当前任务是否进行切片,如果需要切片,切片多少个任务。
- 在接收请求的节点创建Leader Task。由Leader Task统一管理创建出的Worker Task。
- Worker Task会定时同步任务状态,进度,文档版本等任务信息至Leader Task。同时Leader Task也会对Worker Task进行收集汇总,统一处理异常任务。
任务生成与交互流程图如下图所示:
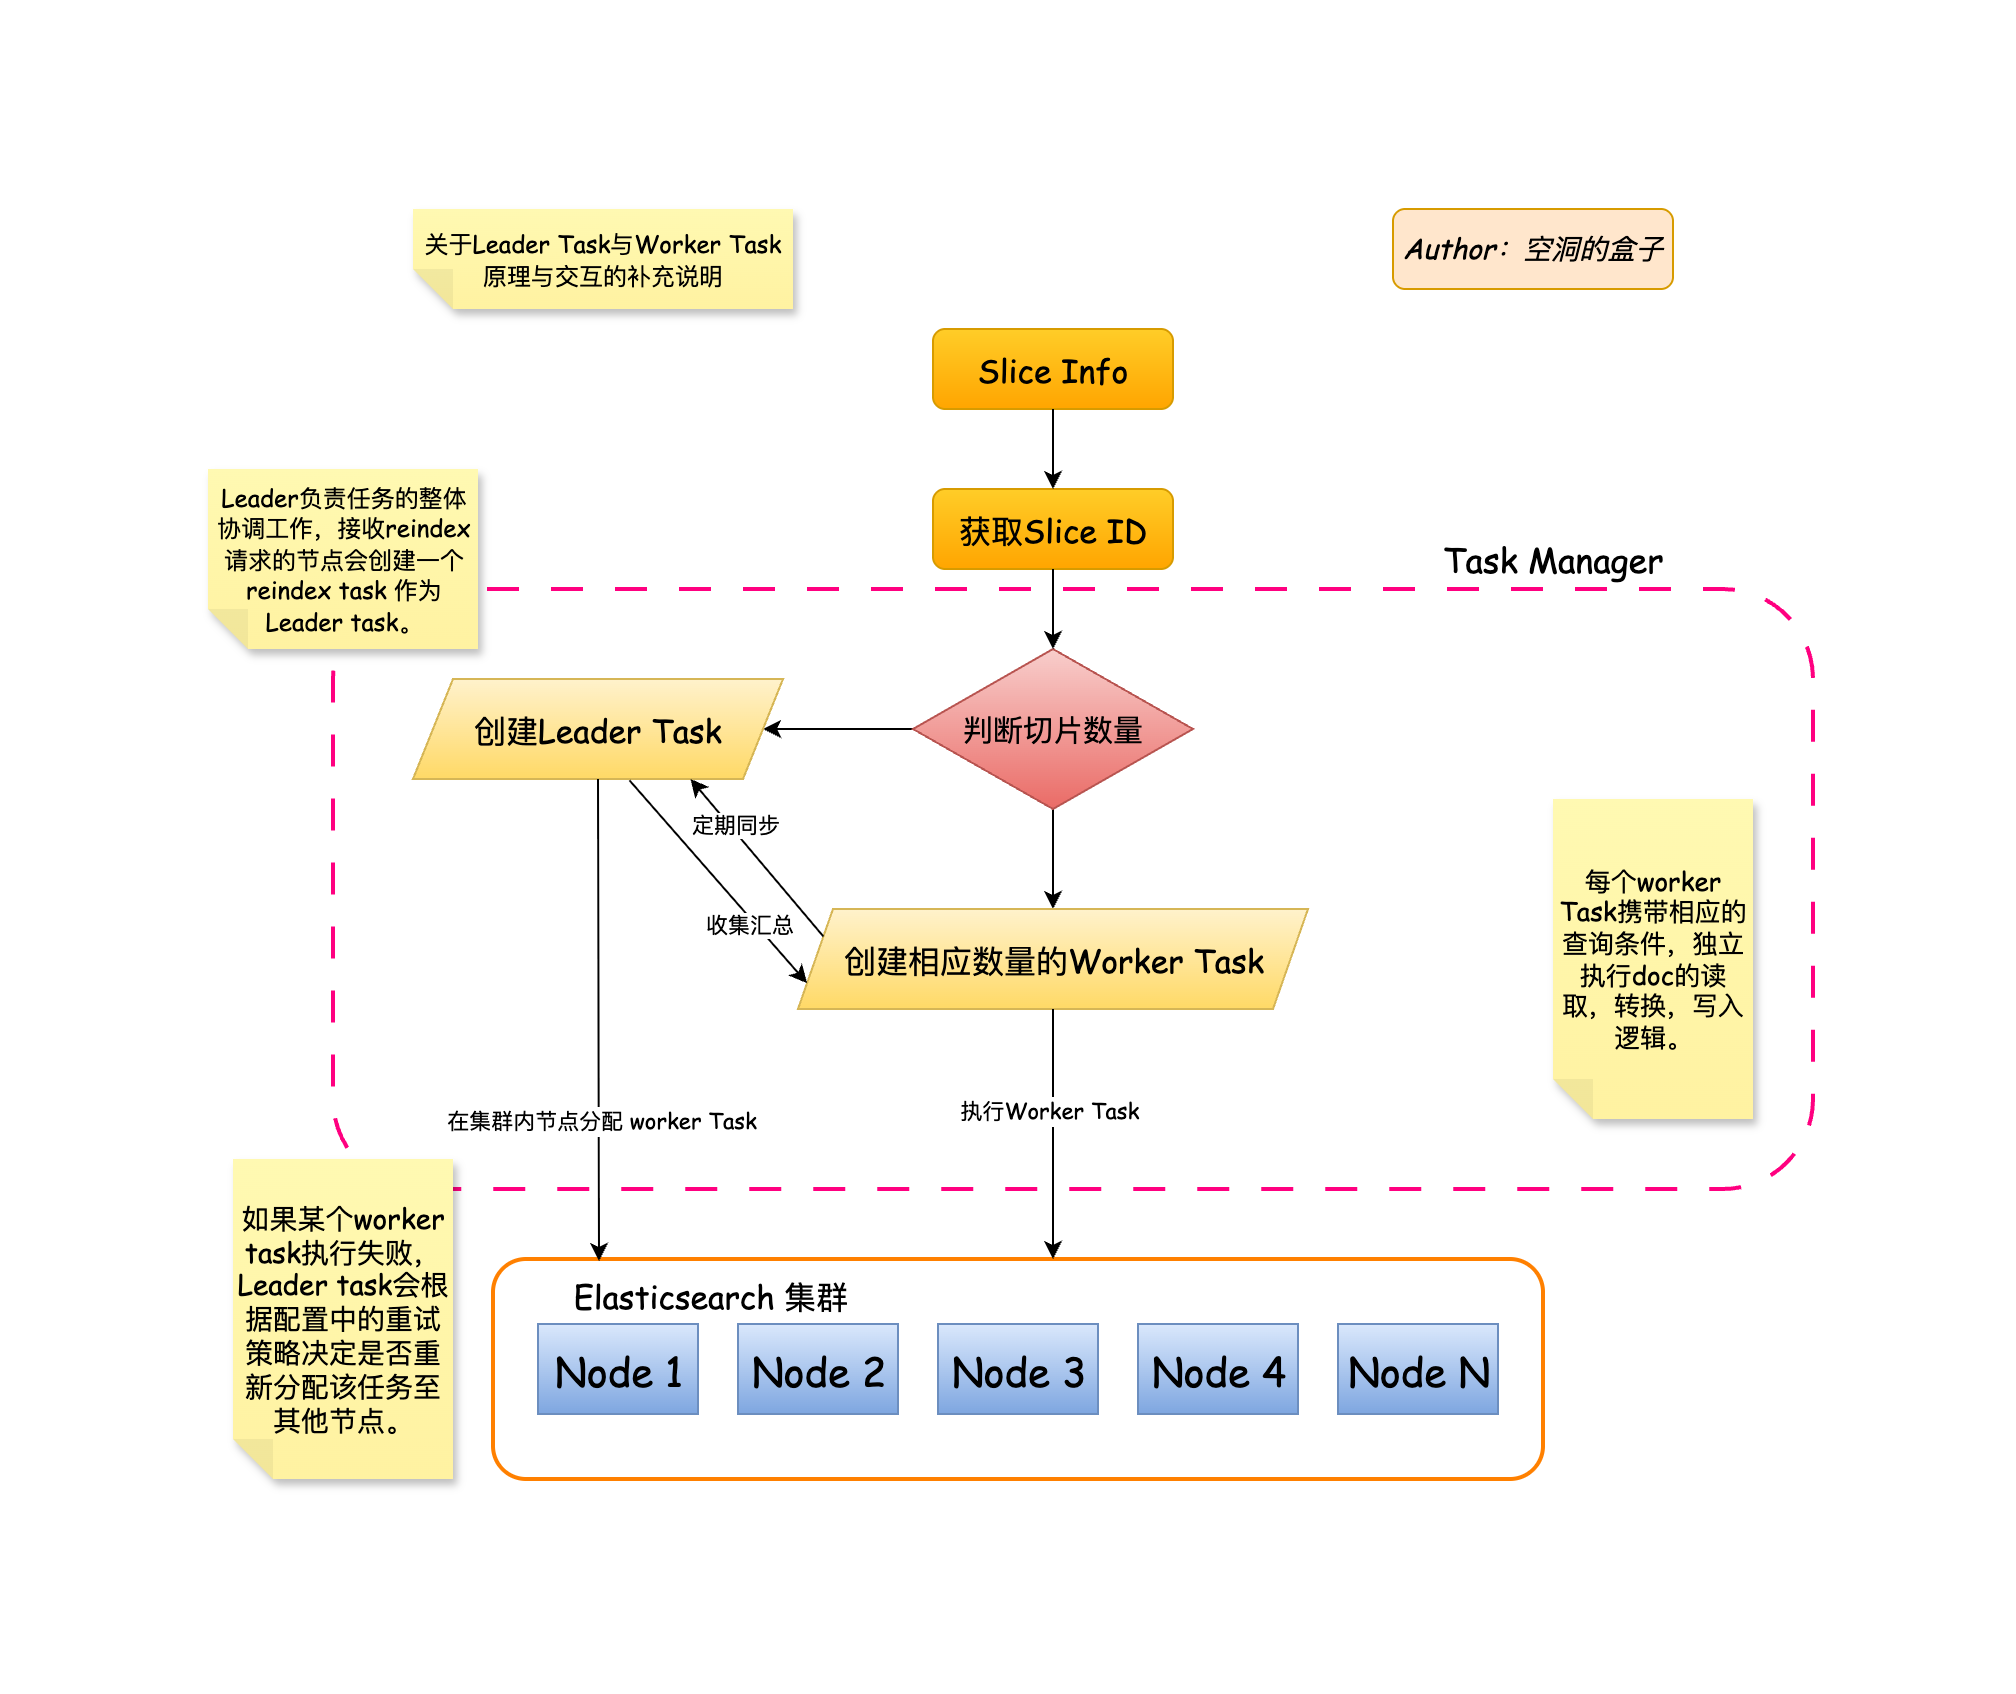
Leader Task与Worker Task任务交互流程
部分主要源码分析
ReindexAction.java
public class ReindexAction extends ActionType<BulkByScrollResponse> {
    public static final ReindexAction INSTANCE = new ReindexAction();
    public static final String NAME = "indices:data/write/reindex";

    private ReindexAction() {
        super(NAME, BulkByScrollResponse::new);
    }
}
用于Elasticsearch中的重新索引操作,通过BulkByScrollResponse来响应reindex请求。
主要功能包括:
- 定义了单例实例INSTANCE和操作名称NAME
- 构造函数中注册了响应处理器BulkByScrollResponse::new
ReindexRequest.java
这个文件主要用于 Elasticsearch 中的 reindex 操作。它封装了源索引和目标索引的信息、查询条件、版本控制、路由、远程集群信息等,并提供了构建、验证、序列化和反序列化方法。支持设置分片、文档数量限制、脚本处理等功能,确保 reindex 任务正确执行。
public ActionRequestValidationException validate() {
        ActionRequestValidationException e = super.validate();
        if (getSearchRequest().indices() == null || getSearchRequest().indices().length == 0) {
            e = addValidationError("use _all if you really want to copy from all existing indexes", e);
        }
        if (getSearchRequest().source().fetchSource() != null && getSearchRequest().source().fetchSource().fetchSource() == false) {
            e = addValidationError("_source:false is not supported in this context", e);
        }
        /*
         * Note that we don't call index's validator - it won't work because
         * we'll be filling in portions of it as we receive the docs. But we can
         * validate some things so we do that below.
         */
        if (destination.index() == null) {
            e = addValidationError("index must be specified", e);
            return e;
        }
        if (false == routingIsValid()) {
            e = addValidationError("routing must be unset, [keep], [discard] or [=<some new value>]", e);
        }
        if (destination.versionType() == INTERNAL) {
            if (destination.version() != Versions.MATCH_ANY && destination.version() != Versions.MATCH_DELETED) {
                e = addValidationError("unsupported version for internal versioning [" + destination.version() + ']', e);
            }
        }
        if (getRemoteInfo() != null) {
            if (getSearchRequest().source().query() != null) {
                e = addValidationError("reindex from remote sources should use RemoteInfo's query instead of source's query", e);
            }
            if (getSlices() == AbstractBulkByScrollRequest.AUTO_SLICES || getSlices() > 1) {
                e = addValidationError("reindex from remote sources doesn't support slices > 1 but was [" + getSlices() + "]", e);
            }
        }
        return e;
    }
该方法用于验证ReindexRequest的有效性,主要检查以下几点:
- 搜索请求的索引是否为空;
- 是否禁用了_source字段;
- 目标索引是否指定;
- 路由参数是否合法;
- 版本类型和版本号是否支持;
- 远程信息配置是否与查询冲突,以及分片数是否超过限制。
BulkByScrollTask.java
主要功能:
- 当请求未分片时,该任务直接执行搜索操作
- 当请求分片时,任务可以作为协调者(通过setWorkerCount设置工作节点数)或工作者(通过setWorker设置具体工作参数)
- 由于分片数可能自动确定,任务类型在创建时不确定,需要在请求处理时动态设置
public TaskInfo taskInfoGivenSubtaskInfo(String localNodeId, List<TaskInfo> sliceInfo) {
        if (isLeader() == false) {
            throw new IllegalStateException("This task is not set to be a leader of other slice subtasks");
        }

        List<BulkByScrollTask.StatusOrException> sliceStatuses = Arrays.asList(
            new BulkByScrollTask.StatusOrException[leaderState.getSlices()]
        );
        for (TaskInfo t : sliceInfo) {
            BulkByScrollTask.Status status = (BulkByScrollTask.Status) t.status();
            sliceStatuses.set(status.getSliceId(), new BulkByScrollTask.StatusOrException(status));
        }
        Status status = leaderState.getStatus(sliceStatuses);
        return taskInfo(localNodeId, getDescription(), status);
    }
该方法用于构建一个任务状态信息对象(Task Info)。首先检查当前任务是否为切片任务的领导者,如果不是则抛出异常;然后根据切片数量初始化一个状态列表,并遍历子任务信息填充对应的状态;最后通过领导者状态生成汇总状态并返回完整的任务信息。
public void setWorkerCount(int slices) {
        if (isLeader()) {
            throw new IllegalStateException("This task is already a leader for other slice subtasks");
        }
        if (isWorker()) {
            throw new IllegalStateException("This task is already a worker");
        }

        leaderState = new LeaderBulkByScrollTaskState(this, slices);
    }
该方法用于将当前任务设置为领导任务,管理指定数量的切片子任务。首先检查当前任务是否已经是领导或工作者角色,若是则抛出异常;否则创建一个新的 `LeaderBulkByScrollTaskState` 实例作为领导状态。
public void setWorker(float requestsPerSecond, @Nullable Integer sliceId) {
        if (isWorker()) {
            throw new IllegalStateException("This task is already a worker");
        }
        if (isLeader()) {
            throw new IllegalStateException("This task is already a leader for other slice subtasks");
        }

        workerState = new WorkerBulkByScrollTaskState(this, sliceId, requestsPerSecond);
        if (isCancelled()) {
            workerState.handleCancel();
        }
    }
这段代码用于将当前任务设置为执行搜索请求的工作者(worker)任务。首先检查任务是否已经是工作者或领导者,若是则抛出异常;否则创建一个新的 WorkerBulkByScrollTaskState 实例,并在任务已被取消时调用 handleCancel() 方法处理取消逻辑。
WorkerBulkByScrollTaskState.java
主要用于跟踪和管理批量滚动任务的执行状态,包括文档处理计数、批处理、重试、版本冲突等。它支持任务取消、节流控制和状态统计,并通过 DelayedPrepareBulkRequest 实现请求的延迟调度与重新节流。
  public void delayPrepareBulkRequest(
        ThreadPool threadPool,
        long lastBatchStartTimeNS,
        int lastBatchSize,
        AbstractRunnable prepareBulkRequestRunnable
    ) {
        // Synchronize so we are less likely to schedule the same request twice.
        synchronized (delayedPrepareBulkRequestReference) {
            TimeValue delay = throttleWaitTime(lastBatchStartTimeNS, System.nanoTime(), lastBatchSize);
            logger.debug("[{}]: preparing bulk request for [{}]", task.getId(), delay);
            try {
                delayedPrepareBulkRequestReference.set(
                    new DelayedPrepareBulkRequest(threadPool, getRequestsPerSecond(), delay, new RunOnce(prepareBulkRequestRunnable))
                );
            } catch (EsRejectedExecutionException e) {
                prepareBulkRequestRunnable.onRejection(e);
            }
        }
    }
该方法用于延迟执行批量请求,实现请求限流。通过计算当前批次的等待时间,若线程池拒绝执行,则触发拒绝回调;否则将任务封装为DelayedPrepareBulkRequest并提交。使用同步块避免重复调度同一任务。
class DelayedPrepareBulkRequest {
        private final ThreadPool threadPool;
        private final Runnable command;
        private final float requestsPerSecond;
        private final Scheduler.ScheduledCancellable scheduled;

        DelayedPrepareBulkRequest(ThreadPool threadPool, float requestsPerSecond, TimeValue delay, Runnable command) {
            this.threadPool = threadPool;
            this.requestsPerSecond = requestsPerSecond;
            this.command = command;
            this.scheduled = threadPool.schedule(() -> {
                throttledNanos.addAndGet(delay.nanos());
                command.run();
            }, delay, ThreadPool.Names.GENERIC);
        }

        DelayedPrepareBulkRequest rethrottle(float newRequestsPerSecond) {
            if (newRequestsPerSecond < requestsPerSecond) {
                /* The user is attempting to slow the request down. We'll let the
                 * change in throttle take effect the next time we delay
                 * prepareBulkRequest. We can't just reschedule the request further
                 * out in the future because the bulk context might time out. */
                logger.debug(
                    "[{}]: skipping rescheduling because the new throttle [{}] is slower than the old one [{}]",
                    task.getId(),
                    newRequestsPerSecond,
                    requestsPerSecond
                );
                return this;
            }

            long remainingDelay = scheduled.getDelay(TimeUnit.NANOSECONDS);
            // Actually reschedule the task
            if (scheduled == null || false == scheduled.cancel()) {
                // Couldn't cancel, probably because the task has finished or been scheduled. Either way we have nothing to do here.
                logger.debug("[{}]: skipping rescheduling because we couldn't cancel the task", task.getId());
                return this;
            }

            /* Strangely enough getting here doesn't mean that you actually
             * cancelled the request, just that you probably did. If you stress
             * test it you'll find that requests sneak through. So each request
             * is given a runOnce boolean to prevent that. */
            TimeValue newDelay = newDelay(remainingDelay, newRequestsPerSecond);
            logger.debug("[{}]: rescheduling for [{}] in the future", task.getId(), newDelay);
            return new DelayedPrepareBulkRequest(threadPool, requestsPerSecond, newDelay, command);
        }

        /**
         * Scale back remaining delay to fit the new delay.
         */
        TimeValue newDelay(long remainingDelay, float newRequestsPerSecond) {
            if (remainingDelay < 0) {
                return timeValueNanos(0);
            }
            return timeValueNanos(round(remainingDelay * requestsPerSecond / newRequestsPerSecond));
        }
    }
DelayedPrepareBulkRequest 用于延迟执行批量请求,支持限流(requestsPerSecond)。构造时通过 ThreadPool 延迟调度任务。rethrottle 方法用于动态调整请求速率:若新速率更慢,则不立即调整;若更快,则取消原任务并根据剩余延迟和新速率重新计算延迟时间,重新调度任务。newDelay 方法负责按比例缩放延迟时间。
原创声明:本文系作者授权腾讯云开发者社区发表,未经许可,不得转载。
如有侵权,请联系 cloudcommunity@tencent.com 删除。
原创声明:本文系作者授权腾讯云开发者社区发表,未经许可,不得转载。
如有侵权,请联系 cloudcommunity@tencent.com 删除。
评论
登录后参与评论
推荐阅读
目录
腾讯云开发者

Copyright © 2013 - 2026 Tencent Cloud. All Rights Reserved. 腾讯云 版权所有
深圳市腾讯计算机系统有限公司 ICP备案/许可证号:粤B2-20090059 ![]() 粤公网安备44030502008569号
粤公网安备44030502008569号
腾讯云计算(北京)有限责任公司 京ICP证150476号 | 京ICP备11018762号