Spring中的BeanPostProcessor有什么作用
原创

一、前言
在Spring中,你一定看到过BeanPostProcessor,那么这个接口有什么作用呢?
简单说下,他是Spring中创建bean的过程中,非常重要的一个扩展;它允许我们在Spring容器初始化、依赖注入、bean的初始化的时候,插入自定义的一些逻辑。
正因为如此,它大大提高了Spring的灵活性和扩展性,那么我们该如何去使用它呢?
二、代码
我们先看看看这个接口的源码,有什么方法,注释我就去掉了,想了解的可以自行翻阅源码
package org.springframework.beans.factory.config;
import org.springframework.beans.BeansException;
import org.springframework.lang.Nullable;
public interface BeanPostProcessor {
@Nullable
default Object postProcessBeforeInitialization(Object bean, String beanName) throws BeansException {
return bean;
}
@Nullable
default Object postProcessAfterInitialization(Object bean, String beanName) throws BeansException {
return bean;
}
}可以看到,这个接口定义了两个方法,都有默认的实现
postProcessBeforeInitialization():此方法会在bean的初始化之前调用
postProcessAfterInitialization():此方法会在bean的初始化之后调用
下面我们就用一个简单的demo来使用以下这个BeanPostProcessor。
那么首先,我们定义一个配置文件application.yml,添加下面的信息
custom:
  property1: value1
property2: value2现在我们写一个bean,读取这配置文件的配置
package com.banmoon.config;
import lombok.Data;
import org.springframework.boot.context.properties.ConfigurationProperties;
import org.springframework.context.annotation.Configuration;
import java.util.List;
@Data
@Configuration
@ConfigurationProperties("custom")
public class CustomProperties {
private String property1;
private String property2;
private List<String> moreProperties;
}接下来,我们需要实现BeanPostProcessor,在其中实现了postProcessAfterInitialization方法
package com.banmoon.config;
import lombok.extern.slf4j.Slf4j;
import org.jetbrains.annotations.NotNull;
import org.springframework.beans.BeansException;
import org.springframework.beans.factory.config.BeanPostProcessor;
import org.springframework.stereotype.Component;
import java.util.ArrayList;
import java.util.List;
import java.util.Objects;
@Slf4j
@Component
public class CustomBeanPostProcessor implements BeanPostProcessor {
private final List<String> CUSTOM_PROPERTIES = new ArrayList<String>() {{
add("value3");
add("value4");
}};
@Override
public Object postProcessAfterInitialization(@NotNull Object bean, @NotNull String beanName) throws BeansException {
if (bean instanceof CustomProperties) {
// 将新的属性源添加到属性中
CustomProperties customProperties = (CustomProperties) bean;
List<String> moreProperties = customProperties.getMoreProperties();
if (Objects.isNull(moreProperties)) {
moreProperties = new ArrayList<>();
customProperties.setMoreProperties(moreProperties);
}
moreProperties.addAll(CUSTOM_PROPERTIES);
}
return bean;
}
}这代码逻辑十分简单,就是判断一下bean类型,然后往指定的属性中添加属性
下面我们启动一下Spring,从配置文件中读取,看看能不能读取到custom.moreProperties
package com.banmoon;
import com.banmoon.config.CustomProperties;
import lombok.extern.slf4j.Slf4j;
import org.springframework.boot.CommandLineRunner;
import org.springframework.boot.SpringApplication;
import org.springframework.boot.autoconfigure.SpringBootApplication;
import javax.annotation.Resource;
@Slf4j
@SpringBootApplication
public class DjMain implements CommandLineRunner {
@Resource
private CustomProperties customProperties;
public static void main(String[] args) {
SpringApplication.run(DjMain.class);
}
@Override
public void run(String... args) throws Exception {
log.info("customProperties1: {}", customProperties.getProperty1());
log.info("customProperties2: {}", customProperties.getProperty2());
log.info("moreProperties: {}", customProperties.getMoreProperties());
}
}这段代码就是启动类,直接启动获取看看结果
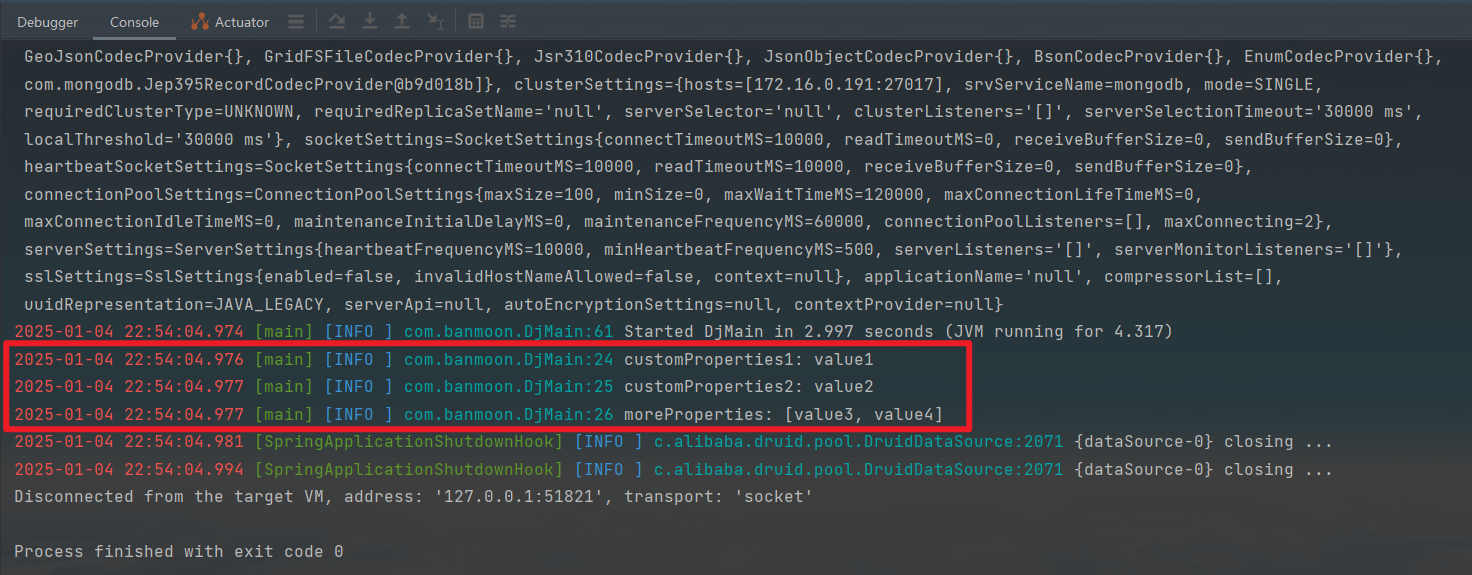
image-20250104225435861
三、最后
总结一下,它可以允许开发者在bean的初始化前后对bean进行一些操作,那么主要可以用它来做些什么事情?我简单列举一下
- 就像我上面那样,修改了
bean的属性 - 包装
bean的方法,就像AOP那样 - 指定一些特定的
bean初始化前后,需要做其他额外的操作
这边还需要再强调的事
- 你的
BeanPostProcessor得在包扫描当中,这点应该明白 - 如果不加条件判断要处理的特定
bean,所有的bean的都会受影响;就像我上面那样进行判断,对特定的bean进行操作即可
好了,通过本文的讲解以及demo的演示,相信大家已经对BeanPostProcessor的功能、使用有了深入的理解
原创声明:本文系作者授权腾讯云开发者社区发表,未经许可,不得转载。
如有侵权,请联系 cloudcommunity@tencent.com 删除。
原创声明:本文系作者授权腾讯云开发者社区发表,未经许可,不得转载。
如有侵权,请联系 cloudcommunity@tencent.com 删除。
评论
登录后参与评论
推荐阅读
目录
腾讯云开发者

Copyright © 2013 - 2026 Tencent Cloud. All Rights Reserved. 腾讯云 版权所有
深圳市腾讯计算机系统有限公司 ICP备案/许可证号:粤B2-20090059 ![]() 粤公网安备44030502008569号
粤公网安备44030502008569号
腾讯云计算(北京)有限责任公司 京ICP证150476号 | 京ICP备11018762号