项目四 Flume interceptor对日志信息预处理
原创
项目四 Flume interceptor对日志信息预处理
原创
码农GT038527
修改于 2024-10-01 19:17:42
修改于 2024-10-01 19:17:42
简介
这篇文章主要是测试flume相关拦截器
时间拦截器
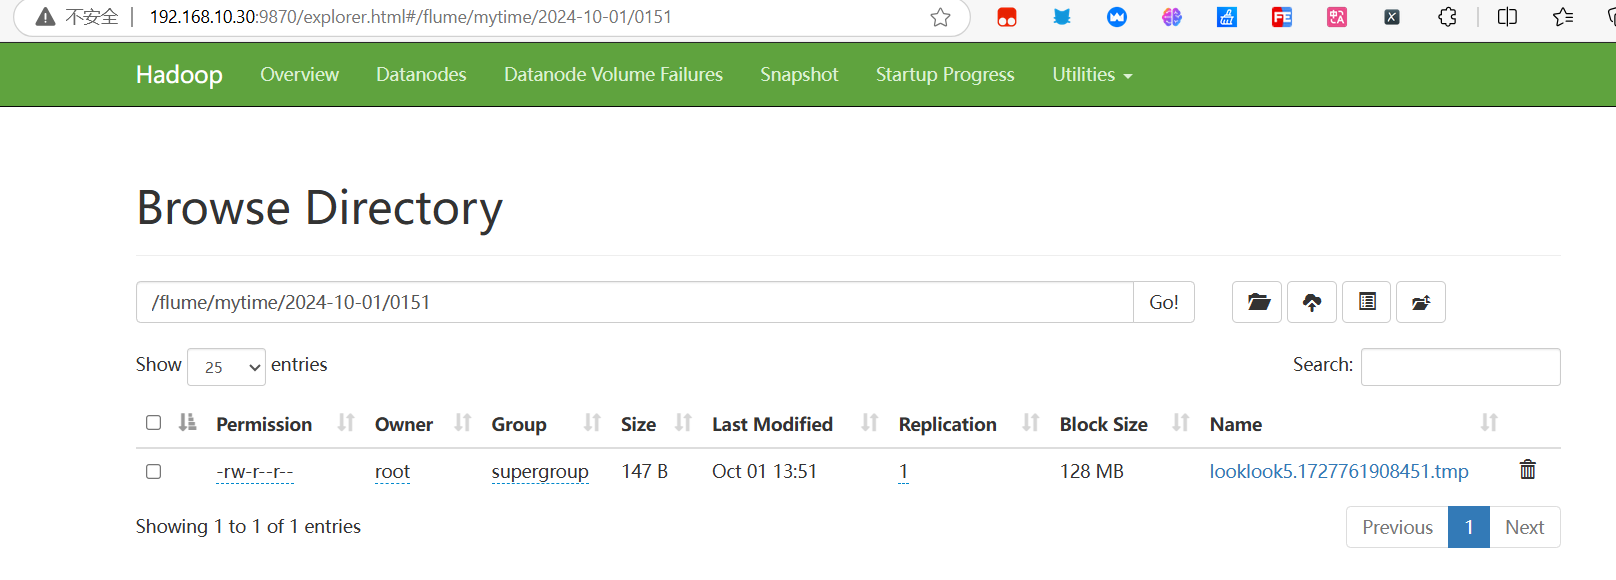
该Flume配置文件定义了一个数据收集流程,旨在从Syslog源接收日志信息。配置中的a1.sources.r1定义了一个TCP端口(50000),使得Flume能够接收来自主机“master”的Syslog数据。为了处理时间信息,配置中添加了timestamp拦截器,通过preserveExisting设置为false,确保每条日志都赋予新的时间戳。接收到的数据通过配置的通道(c1)进行传输,然后被发送至HDFS存储。a1.sinks.k1部分将数据存储在指定路径下,采用按日期和分钟进行自动分目录命名的方式,确保日志文件的组织与管理更为高效。整个流程目的在于实现高效的日志数据采集和便于后续分析。
主机名拦截器
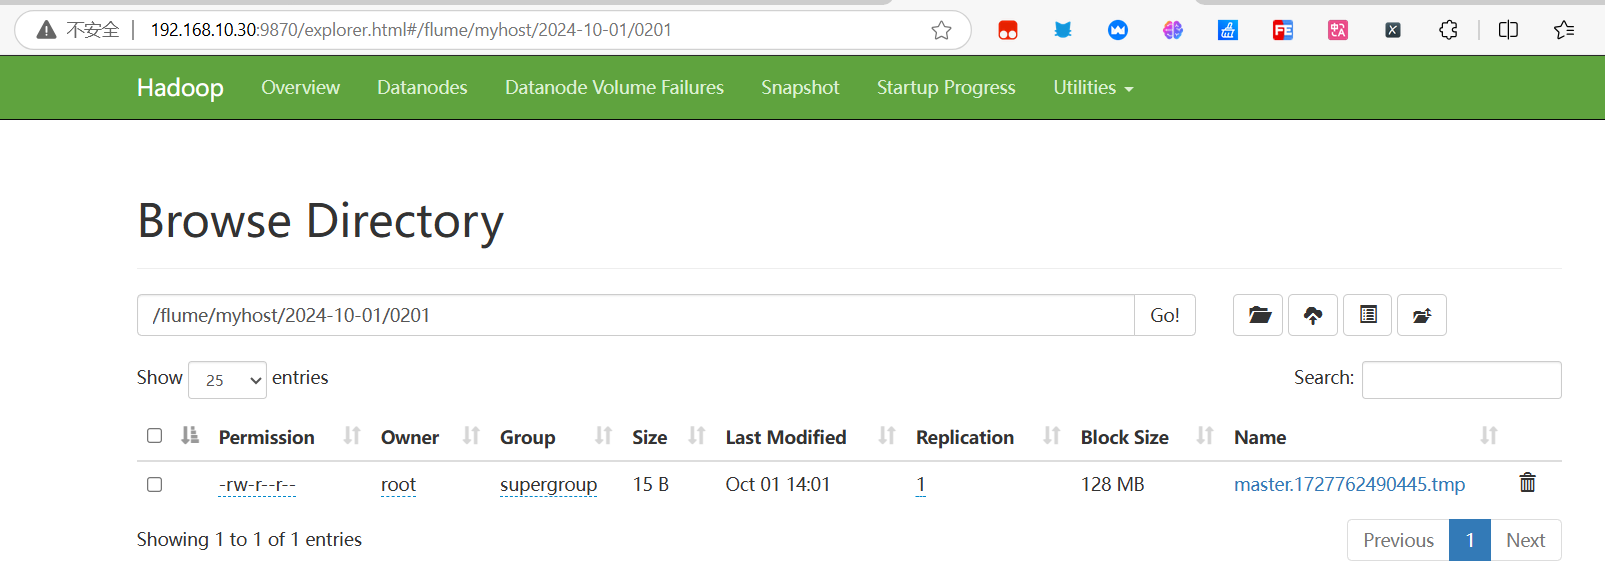
该Flume配置文件设置了一个HTTP源来接收JSON格式的日志数据,并绑定到主机“master”的50000端口。配置中使用了两个拦截器:时间戳拦截器记录每条日志的时间,主机拦截器添加主机名信息。接收的数据通过内存通道传输,并被写入HDFS,文件按日期和分钟自动组织,前缀为主机名,便于识别来源。整体而言,该配置实现了HTTP日志的接收、时间戳与主机信息添加,以及高效存储至HDFS的功能。
静态拦截器
该Flume配置文件设置了一个用于接收Syslog数据的源,监听在主机“master”的50000端口。通过内存通道(c1)来传输数据。配置中的拦截器使用了static类型,定义了一个静态键值对(static_key和static_value),这意味着每条接收的日志信息将附加这些静态元数据。最后,使用logger类型的汇聚器(sink)将处理后的日志输出到控制台或日志文件中。这种设计适合于对日志进行简单的监控和调试,静态元数据的添加可以帮助标识或分类日志数据。整体而言,该配置实现了简单的日志接收和标记功能,便于后续分析和追踪。
regex拦截器
该Flume配置文件设置了一个TCP的Syslog源,监听在主机“master”的50000端口,用于接收Syslog消息。配置中使用了regex_filter拦截器,定义了一个正则表达式(^[0-9]*$),该过滤器会排除所有匹配此正则表达式的消息(即仅包含数字的消息,所以不是纯数字数据都会打印出来),因为excludeEvents设置为true。这意味着只有不匹配此模式的消息才会被处理并传递到下一个阶段。所有未被排除的消息通过内存通道(c1)传输,并最终输出到控制台或日志文件中,由logger汇聚器(sink)负责处理。这种配置适合于需要根据特定模式过滤和处理日志消息的场景。
搜索并替代拦截器
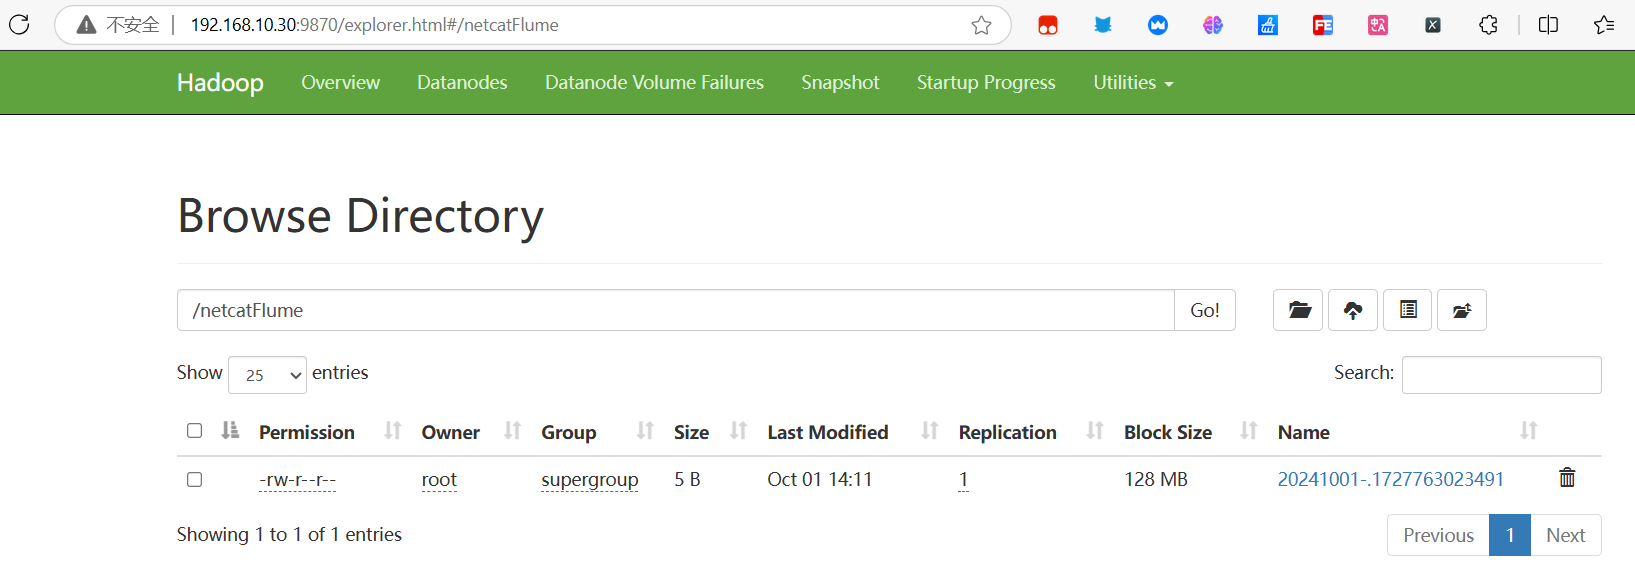
该Flume配置文件设置了一个HTTP源,绑定了主机“master”的50000端口,用于接收HTTP请求中的数据。配置中使用了search_replace拦截器,该拦截器能够搜索特定的正则表达式模式(^[A-Za-z0-9_]+)并将匹配的内容替换为指定字符串(test)。所有数据通过内存通道(c1)传输,并最终写入HDFS。HDFS的汇聚器(sink)将数据存储在/netcatFlume目录下,文件命名包括日期和时间,并且每10MB或每60秒滚动生成新文件。这种配置适用于需要对HTTP请求中的特定内容进行处理并持久化存储的场景。
前提准备
# 创建存放拦截器的配置文件目录
mkdir -p /opt/module/flume/conf/Interceptor

#  创建存放启动拦截器的脚本目录
mkdir -p /opt/module/flume/conf/Interceptor/shell

# 启动Hadoop所有进程,创建相关路径
hadoop fs -mkdir -p /flume/mytime
hadoop fs -mkdir -p /flume/myhost
# 添加权限
hadoop fs -chmod -R 777 /flume/*
设置时间戳拦截器
- 配置文件
# 切换至拦截器的配置文件目录
cd /opt/module/flume/conf/Interceptor

# 编辑配置文件
vim mytime.conf

a1.sources = r1
a1.sinks = k1
a1.channels = c1

a1.sources.r1.type = syslogtcp
a1.sources.r1.port = 50000
a1.sources.r1.host = master
a1.sources.r1.channels = c1
a1.sources.r1.interceptors = i1
a1.sources.r1.interceptors.i1.type = timestamp
a1.sources.r1.interceptors.i1.preserveExisting = false

a1.sinks.k1.type = hdfs
a1.sinks.k1.channel = c1
a1.sinks.k1.hdfs.path = hdfs://master:8020/flume/mytime/%Y-%m-%d/%H%M
a1.sinks.k1.hdfs.filePrefix = looklook5
a1.sinks.k1.hdfs.fileType = DataStream

a1.channels.c1.type = memory
a1.channels.c1.capacity = 1000
a1.channels.c1.transactionCapacity = 100- 启动脚本
# 切换至脚本目录
cd /opt/module/flume/conf/Interceptor/shell

# 编辑脚本
vim mytime-conf

/opt/module/flume/bin/flume-ng agent -n a1 -c /opt/module/flume/conf/ -f /opt/module/flume/conf/Interceptor/mytime.conf -Dflume.root.logger=INFO,console

# 添加权限
chmod 777 ./*- 启动流程
# 切换至脚本目录
cd /opt/module/flume/conf/Interceptor/shell

# 启动脚本
mytime-conf

# 打开另外一个终端进行测试
curl -X POST -d '[{"headers" : {"looklook1" : "looklook1 isheader", "looklook2" : "looklook2 isheader"}, "body" : "hellolooklook5"}]' http://master:50000
- 测试结果
- flume日志信息

- 命令查看

- web端查看
设置主机名拦截器
- 配置文件
# 切换至拦截器的配置文件目录
cd /opt/module/flume/conf/Interceptor

# 编辑配置文件
vim myhost.conf

a1.sources = r1
a1.sinks = k1
a1.channels = c1

a1.sources.r1.type = http
a1.sources.r1.bind = master
a1.sources.r1.port = 50000
a1.sources.r1.handler = org.apache.flume.source.http.JSONHandler

a1.sources.r1.interceptors = i1 i2
a1.sources.r1.interceptors.i1.type = timestamp
a1.sources.r1.interceptors.i1.preserveExisting = false
a1.sources.r1.interceptors.i2.type = host
a1.sources.r1.interceptors.i2.useIP = false

a1.sinks.k1.type = hdfs
a1.sinks.k1.hdfs.path = hdfs://master:8020/flume/myhost/%Y-%m-%d/%H%M
a1.sinks.k1.hdfs.filePrefix = %{host}
a1.sinks.k1.hdfs.fileType = DataStream
a1.sinks.k1.hdfs.writeFormat = Text
a1.sinks.k1.hdfs.rollInterval = 0
a1.sinks.k1.hdfs.rollCount = 10
a1.sinks.k1.hdfs.rollSize = 1024000

a1.channels.c1.type = memory
a1.channels.c1.capacity = 1000
a1.channels.c1.transactionCapacity = 100

a1.sinks.k1.channel = c1
a1.sources.r1.channels = c1- 启动脚本
# 切换至脚本目录
cd /opt/module/flume/conf/Interceptor/shell

# 编辑脚本
vim myhost-conf

/opt/module/flume/bin/flume-ng agent -n a1 -c /opt/module/flume/conf/ -f /opt/module/flume/conf/Interceptor/myhost.conf -Dflume.root.logger=INFO,console

# 添加权限
chmod 777 ./*- 启动流程
# 切换至脚本目录
cd /opt/module/flume/conf/Interceptor/shell

# 启动脚本
myhost-conf

# 打开另外一个终端进行测试
curl -X POST -d '[{"headers" : {} ,"body" : "hellolooklook5"}]' http://master:50000
- 测试结果
- flume日志信息

- 命令查看

- web端查看
设置静态拦截器
- 配置文件
# 切换至拦截器的配置文件目录
cd /opt/module/flume/conf/Interceptor

# 编辑配置文件
vim static.conf

a1.sources = r1
a1.sinks = k1
a1.channels = c1

a1.sources.r1.type = syslogtcp
a1.sources.r1.port = 50000
a1.sources.r1.host = master
a1.sources.r1.channels = c1

a1.sources.r1.interceptors = i1
a1.sources.r1.interceptors.i1.type = static
a1.sources.r1.interceptors.i1.key = static_key
a1.sources.r1.interceptors.i1.value = static_value
a1.sinks.k1.type = logger
a1.sinks.k1.channel = c1

a1.channels.c1.type = memory
a1.channels.c1.capacity = 1000
a1.channels.c1.transactionCapacity = 100

a1.sources.r1.channels = c1
a1.sinks.k1.channel = c1- 启动脚本
# 切换至脚本目录
cd /opt/module/flume/conf/Interceptor/shell

# 编辑脚本
vim static-conf

/opt/module/flume/bin/flume-ng agent -n a1 -c /opt/module/flume/conf/ -f /opt/module/flume/conf/Interceptor/static.conf -Dflume.root.logger=INFO,console

# 添加权限
chmod 777 ./*- 启动流程
# 切换至脚本目录
cd /opt/module/flume/conf/Interceptor/shell

# 启动脚本
static-conf

# 打开另外一个终端进行测试
curl -X POST -d '["headers": {"flume"}, "body": {"test"}]' http://master:50000
- 测试结果

设置regex过滤拦截器
- 配置文件
# 切换至拦截器的配置文件目录
cd /opt/module/flume/conf/Interceptor

# 编辑配置文件
vim regex-filter.conf

a1.sources = r1
a1.sinks = k1
a1.channels = c1

a1.sources.r1.type = syslogtcp
a1.sources.r1.host = master
a1.sources.r1.port = 50000
a1.sources.r1.channels = c1
a1.sources.r1.interceptors = i1

a1.sources.r1.interceptors.i1.type = regex_filter
a1.sources.r1.interceptors.i1.regex = ^[0-9]*$
a1.sources.r1.interceptors.i1.excludeEvents = true

a1.sinks.k1.type = logger
a1.sinks.k1.channel = c1

a1.channels.c1.type = memory
a1.channels.c1.capacity = 1000
a1.channels.c1.transactionCapacity = 100- 启动脚本
# 切换至脚本目录
cd /opt/module/flume/conf/Interceptor/shell

# 编辑脚本
vim regex-filter-conf

/opt/module/flume/bin/flume-ng agent -n a1 -c /opt/module/flume/conf/ -f /opt/module/flume/conf/Interceptor/regex-filter.conf -Dflume.root.logger=INFO,console

# 添加权限
chmod 777 ./*- 启动流程
# 切换至脚本目录
cd /opt/module/flume/conf/Interceptor/shell

# 启动脚本
regex-filter-conf

# 打开另外一个终端进行测试
# nc 是 netcat 的缩写,是一个用于网络通信的工具,可以用来发送和接收数据
echo "a" | nc master 50000
echo "1222" | nc master 50000
echo "a222" | nc master 50000
- 测试结果

设置搜索并替换拦截器
- 配置文件
# 切换至拦截器的配置文件目录
cd /opt/module/flume/conf/Interceptor

# 编辑配置文件
vim search.conf

a1.sources = r1
a1.channels = c1
a1.sinks = k1

a1.sources.r1.type = http
a1.sources.r1.bind = master
a1.sources.r1.port = 50000

a1.sources.r1.interceptors = search-replace
a1.sources.r1.interceptors.search-replace.type = search_replace
a1.sources.r1.interceptors.search-replace.searchPattern = ^[A-Za-z0-9_]+
a1.sources.r1.interceptors.search-replace.replaceString = test
a1.sources.r1.interceptors.search-replace.charset = UTF-8

a1.channels.c1.type = memory
a1.channels.c1.capacity = 1000
a1.channels.c1.transactionCapacity = 1000

a1.sinks.k1.type = hdfs
a1.sinks.k1.hdfs.path = /netcatFlume
a1.sinks.k1.hdfs.filePrefix = %Y%m%d-
a1.sinks.k1.hdfs.writeFormat = text
a1.sinks.k1.hdfs.fileType = DataStream
a1.sinks.k1.hdfs.rollSize = 10485760
a1.sinks.k1.hdfs.rollCount = 0
a1.sinks.k1.hdfs.rollInterval = 60
a1.sinks.k1.hdfs.useLocalTimeStamp = true

a1.sources.r1.channels = c1
a1.sinks.k1.channel = c1- 启动脚本
# 切换至脚本目录
cd /opt/module/flume/conf/Interceptor/shell

# 编辑脚本
vim search-conf

/opt/module/flume/bin/flume-ng agent -n a1 -c /opt/module/flume/conf/ -f /opt/module/flume/conf/Interceptor/search.conf -Dflume.root.logger=INFO,console

# 添加权限
chmod 777 ./*- 启动流程
# 切换至脚本目录
cd /opt/module/flume/conf/Interceptor/shell

# 启动脚本
search-conf

# 打开另外一个终端进行测试
curl -x POST -d '[{"headers" : {} ,"body" : "example"}]' http://master:50000
- 测试结果
- flume日志信息

- 命令查看

- web端查看
原创声明:本文系作者授权腾讯云开发者社区发表,未经许可,不得转载。
如有侵权,请联系 cloudcommunity@tencent.com 删除。
原创声明:本文系作者授权腾讯云开发者社区发表,未经许可,不得转载。
如有侵权,请联系 cloudcommunity@tencent.com 删除。
评论
登录后参与评论
推荐阅读
目录
腾讯云开发者

Copyright © 2013 - 2026 Tencent Cloud. All Rights Reserved. 腾讯云 版权所有
深圳市腾讯计算机系统有限公司 ICP备案/许可证号:粤B2-20090059 ![]() 粤公网安备44030502008569号
粤公网安备44030502008569号
腾讯云计算(北京)有限责任公司 京ICP证150476号 | 京ICP备11018762号