OpenCTI威胁情报库部署
原创

一、环境变量准备
# 下载依赖包
#yum install -y yum-utils device-mapper-persistent-data lvm2 git jq
cd /opt
# git clone https://github.com/OpenCTI-Platform/docker.git
# mv docker-master OpenCTI-Platform
cd /opt/OpenCTI-Platform
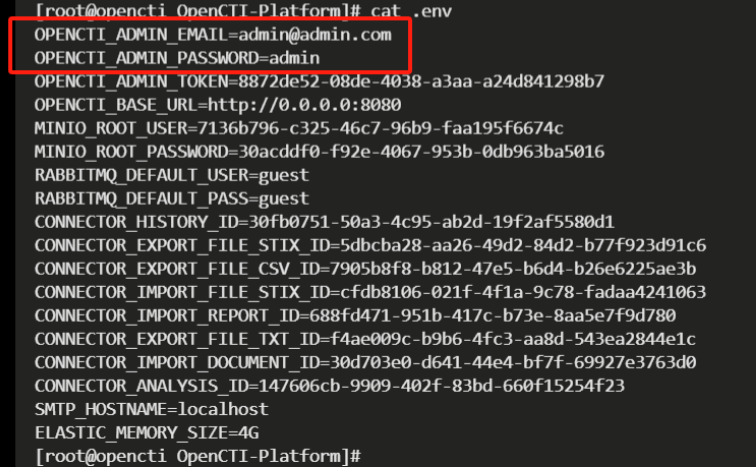
#环境变量文件写入
#OPENCTI_ADMIN_EMAIL为平台登陆账号,请自行修改
#OPENCTI_ADMIN_PASSWORD为平台登陆密码,请自行修改
(cat <<EOF
OPENCTI_ADMIN_EMAIL=admin@admin.com
OPENCTI_ADMIN_PASSWORD=admin
OPENCTI_ADMIN_TOKEN=8872de52-08de-4038-a3aa-a24d841298b7
OPENCTI_BASE_URL=http://0.0.0.0:8080
MINIO_ROOT_USER=$(cat /proc/sys/kernel/random/uuid)
MINIO_ROOT_PASSWORD=$(cat /proc/sys/kernel/random/uuid)
RABBITMQ_DEFAULT_USER=guest
RABBITMQ_DEFAULT_PASS=guest
CONNECTOR_HISTORY_ID=$(cat /proc/sys/kernel/random/uuid)
CONNECTOR_EXPORT_FILE_STIX_ID=$(cat /proc/sys/kernel/random/uuid)
CONNECTOR_EXPORT_FILE_CSV_ID=$(cat /proc/sys/kernel/random/uuid)
CONNECTOR_IMPORT_FILE_STIX_ID=$(cat /proc/sys/kernel/random/uuid)
CONNECTOR_IMPORT_REPORT_ID=$(cat /proc/sys/kernel/random/uuid)
CONNECTOR_EXPORT_FILE_TXT_ID=$(cat /proc/sys/kernel/random/uuid)
CONNECTOR_IMPORT_DOCUMENT_ID=$(cat /proc/sys/kernel/random/uuid)
CONNECTOR_ANALYSIS_ID=$(cat /proc/sys/kernel/random/uuid)
SMTP_HOSTNAME=localhost
ELASTIC_MEMORY_SIZE=4G
EOF
) > .env
#环境变量生效
source .env
#内存分区配置
echo "vm.max_map_count=1048575" >> /etc/sysctl.conf
sysctl -p拉取镜像,镜像列表如下
redis:7.2.5
docker.elastic.co/elasticsearch/elasticsearch:8.15.0
minio/minio:RELEASE.2024-05-28T17-19-04Z
rabbitmq:3.13-management
opencti/platform:6.2.14
opencti/worker:6.2.14
opencti/connector-export-file-csv:6.2.14
opencti/connector-export-file-txt:6.2.14
opencti/connector-export-file-stix:6.2.14
opencti/connector-import-file-stix:6.2.14
opencti/connector-import-document:6.2.14
项目启动
cd /opt/OpenCTI-Platform
docker-compose up -d
集群有多个容器组件需要启动,所有组件完全启动需要时间,耐心等待所有容器正常运行
二、登陆平台
当所有容器都正常启动后,访问http://<ip>:8080 访问平台,登陆用户名和密码在你宿主机 docker-compose.yml所在目录下的.env文件中
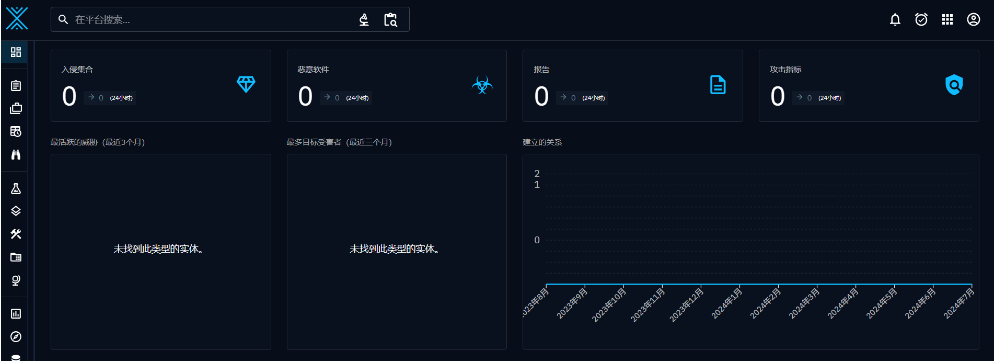
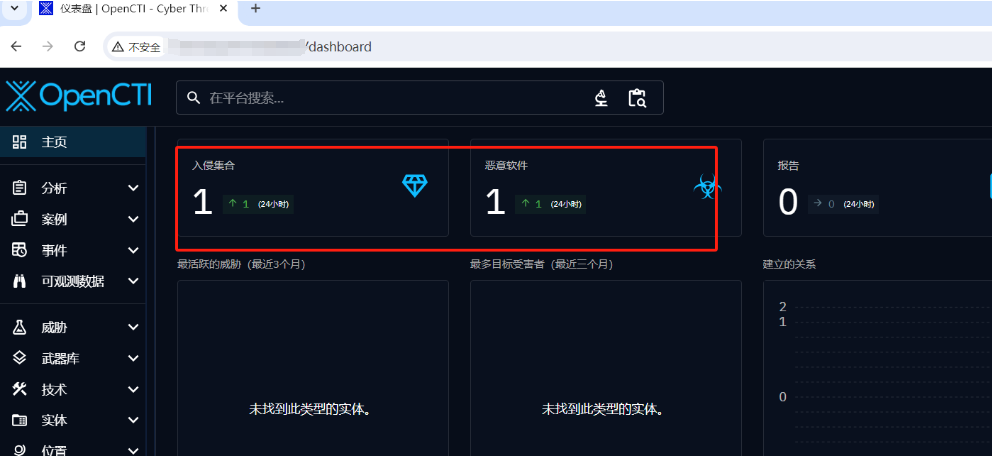
登陆后,看到威胁情报库首页,由于我们情报库没有导入任何信息(并没有连接任何威胁信息来源),因此首页没有任何威胁信息
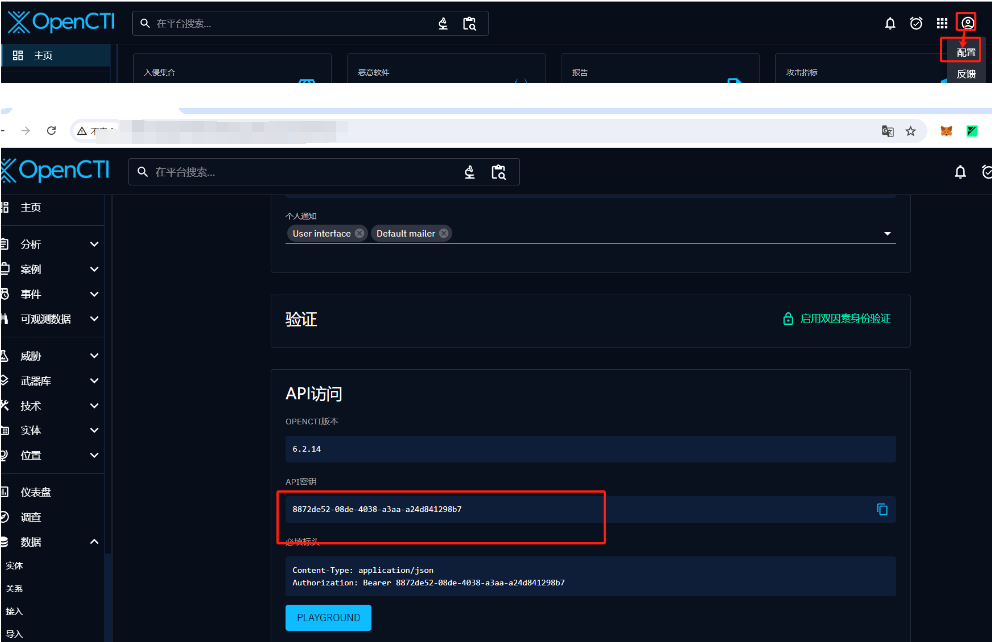
然后再右上角,配置中查看自己的API秘钥信息,方便我们后面调用
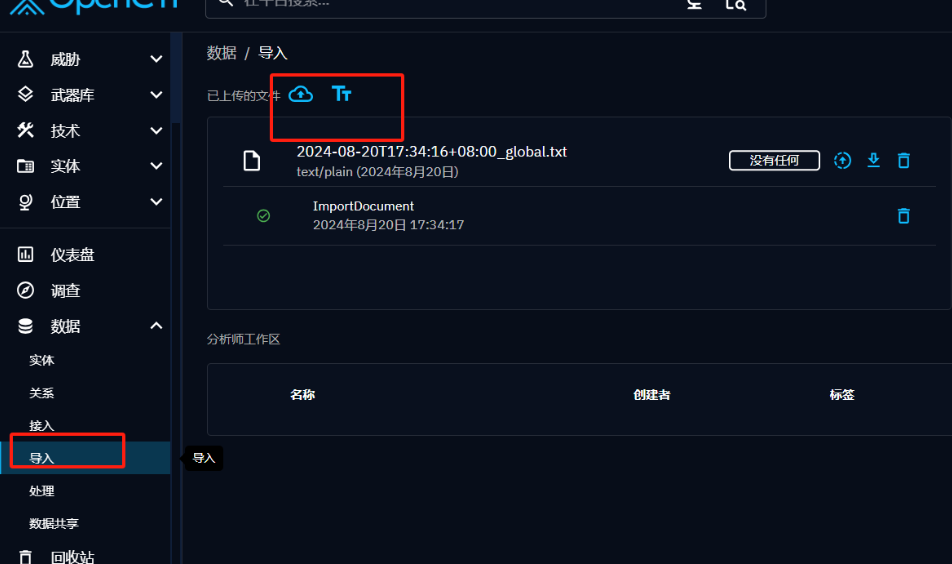
三、添加威胁情报信息
1、直接在平台导入文件,但是需要企业版才能处理导入的数据
2、使用工具进行导入
工具需要连接/创建import connecter进行工作,需要外网环境
3、使用py脚本/程序进行导入
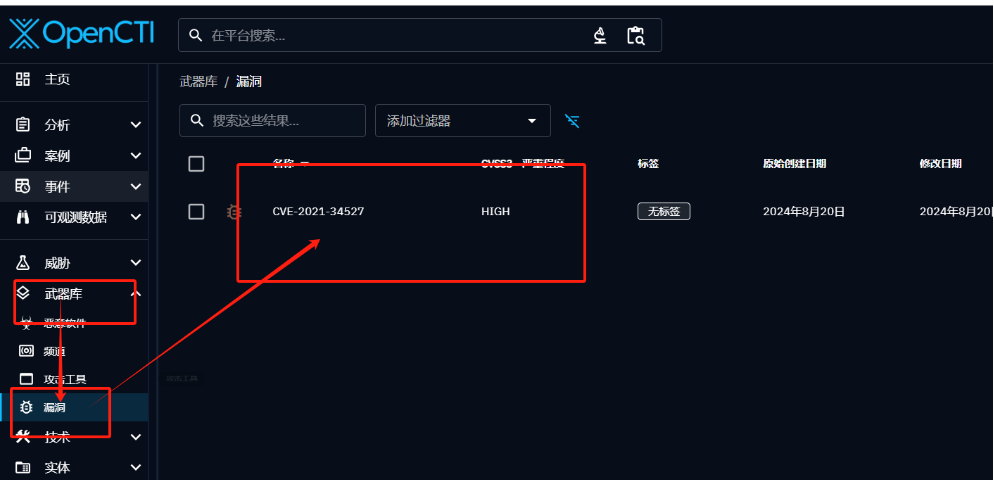
向OpenCTI添加漏洞情报信息
cd /opt/python_connector/
python3 vulnerabilities_add_to_opencti.py
脚本vulnerabilities_add_to_opencti.py内容如下
import requests
import json

# OpenCTI API URL和API token
api_url = 'http://192.168.239.138:8080/graphql'
api_token = '8872de52-08de-4038-a3aa-a24d841298b7'

# GraphQL mutation 查询,创建漏洞信息
query = """
mutation CreateVulnerability($input: VulnerabilityAddInput!) {
  vulnerabilityAdd(input: $input) {
    id
    standard_id
    name
    description
  }
}
"""

# 漏洞数据,移除不支持的字段
variables = {
    "input": {
        "name": "CVE-2021-34527",
        "description": "Windows Print Spooler Remote Code Execution Vulnerability (PrintNightmare).",
        "x_opencti_aliases": ["PrintNightmare"],
        "x_opencti_cvss_base_score": 8.8,
        "x_opencti_cvss_base_severity": "HIGH",
        "x_opencti_cvss_attack_vector": "NETWORK",
        "x_opencti_cvss_integrity_impact": "HIGH",
        "x_opencti_cvss_availability_impact": "LOW",
        "x_opencti_cvss_confidentiality_impact": "HIGH",
        "x_opencti_cisa_kev": True,
        "x_opencti_epss_score": 0.98,
        "x_opencti_epss_percentile": 99.9
    }
}

# HTTP 请求头
headers = {
    "Authorization": f"Bearer {api_token}",
    "Content-Type": "application/json"
}

# 发送请求
response = requests.post(api_url, json={'query': query, 'variables': variables}, headers=headers)

# 处理响应
if response.status_code == 200:
    data = response.json()
    if "errors" in data:
        print("Error returned by OpenCTI:", data["errors"])
    else:
        vulnerability = data["data"]["vulnerabilityAdd"]
        print("Vulnerability uploaded successfully:", vulnerability)
else:
    print(f"Failed to create vulnerability. HTTP status code: {response.status_code}")
    print(response.text)
向OpenCTI添加攻击合集情报信息
cd /opt/python_connector/
python3 Intrusion_add.py
脚本Intrusion_add.py内容如下:
import requests

# OpenCTI API URL 和 API token
api_url = 'http://192.168.239.138:8080/graphql'
api_token = '8872de52-08de-4038-a3aa-a24d841298b7'

# GraphQL mutation 查询,创建 Intrusion Set 信息
query = """
mutation CreateIntrusionSet($input: IntrusionSetAddInput!) {
  intrusionSetAdd(input: $input) {
    id
    standard_id
    name
    description
  }
}
"""

# Intrusion Set 数据
variables = {
    "input": {
        "name": "APT29",
        "description": "APT29 is a Russia-based threat group.",
        "aliases": ["Cozy Bear", "The Dukes"],
        "first_seen": "2008-01-01T00:00:00.000Z",
        "last_seen": "2021-12-31T23:59:59.000Z",
        "goals": ["Espionage", "Intellectual Property Theft"],
        "primary_motivation": "Ideology",
        "secondary_motivations": ["Organizational Gain"]
    }
}

# HTTP 请求头
headers = {
    "Authorization": f"Bearer {api_token}",
    "Content-Type": "application/json"
}

# 发送请求
response = requests.post(api_url, json={'query': query, 'variables': variables}, headers=headers)

# 处理响应
if response.status_code == 200:
    data = response.json()
    if "errors" in data:
        print("Error returned by OpenCTI:", data["errors"])
    else:
        intrusion_set = data["data"]["intrusionSetAdd"]
        print("Intrusion Set uploaded successfully:", intrusion_set)
else:
    print(f"Failed to create Intrusion Set. HTTP status code: {response.status_code}")
    print(response.text)
向OpenCTI添加恶意软件的信息
cd /opt/python_connector/
python3 Malware_add.py
脚本Malware_add.py内容如下:
import requests

# OpenCTI API URL 和 API token
api_url = 'http://192.168.239.138:8080/graphql'
api_token = '8872de52-08de-4038-a3aa-a24d841298b7'

# GraphQL mutation 查询,创建 Malware 信息
query = """
mutation CreateMalware($input: MalwareAddInput!) {
  malwareAdd(input: $input) {
    id
    standard_id
    name
    description
  }
}
"""

# Malware 数据
variables = {
    "input": {
        "name": "Emotet",
        "description": "Emotet is a modular banking Trojan that mainly functions as a downloader or dropper of other banking Trojans.",
        "aliases": ["Geodo", "Heodo"],
        "is_family": True,
        "malware_types": ["Trojan", "Downloader"],
        "first_seen": "2014-06-01T00:00:00.000Z",
        "last_seen": "2021-01-27T00:00:00.000Z",
        "architecture_execution_envs": ["x86", "x64"],
        "implementation_languages": ["C", "C++"],
        "capabilities": ["Anti-VM", "Obfuscation", "Command and Control"]
    }
}

# HTTP 请求头
headers = {
    "Authorization": f"Bearer {api_token}",
    "Content-Type": "application/json"
}

# 发送请求
response = requests.post(api_url, json={'query': query, 'variables': variables}, headers=headers)

# 处理响应
if response.status_code == 200:
    data = response.json()
    if "errors" in data:
        print("Error returned by OpenCTI:", data["errors"])
    else:
        malware = data["data"]["malwareAdd"]
        print("Malware uploaded successfully:", malware)
else:
    print(f"Failed to create Malware. HTTP status code: {response.status_code}")
    print(response.text)
添加完成后,在情报库主页可以查看添加的信息:
四、查询情报库信息
我们通常是调用威胁情报库的API(graphQL方式)来查询情报信息,本次使用python代码来调用威胁情报库的API
假设我们发现一个名称为Emotet的文件,不知道是否为正常文件,我们可以在威胁情报库查询这个关键词,看看是否有威胁信息,python查询代码如下:
import requests

# OpenCTI API URL 和 API token
api_url = 'http://192.168.239.138:8080/graphql'
api_token = '8872de52-08de-4038-a3aa-a24d841298b7'

# GraphQL 查询语句
query = """
query GetMalware($search: String) {
  malwares(search: $search) {
    edges {
      node {
        id
        standard_id
        name
        description
        is_family
        malware_types
        first_seen
        last_seen
        architecture_execution_envs
        implementation_languages
        capabilities
        aliases
        created_at
        updated_at
      }
    }
  }
}
"""

# 查询变量,指定关键词 "Emotet"
variables = {
    "search": "Emotet"
}

# HTTP 请求头
headers = {
    "Authorization": f"Bearer {api_token}",
    "Content-Type": "application/json"
}

# 发送请求
response = requests.post(api_url, json={'query': query, 'variables': variables}, headers=headers)

# 处理响应
if response.status_code == 200:
    data = response.json()
    if "errors" in data:
        print("Error returned by OpenCTI:", data["errors"])
    else:
        malwares = data["data"]["malwares"]["edges"]
        for malware in malwares:
            print("Malware found:", malware["node"])
else:
    print(f"Failed to query Malware. HTTP status code: {response.status_code}")
    print(response.text)
执行如下代码
cd /opt/python_connector
python3 Search_malware.py
如上图,在威胁情报库的查询结果中,我们可以看到Emotet有恶意下载器或后门木马相关信息,大概率是恶意的文件,下一步可以继续在威胁情报库查询文件hash码
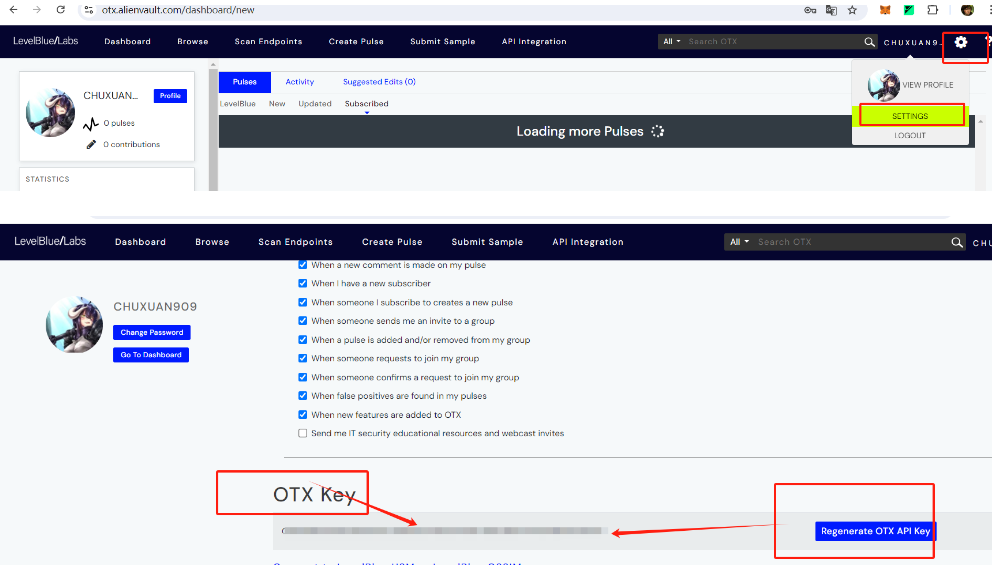
五、集成AlienVault
上一步我们是通过python脚本添加了威胁情报信息到情报库,实际上,可以将外网情报库平台上的信息都传输到opencti平台上,比如AlienVault这个在线威胁情报交换平台
(第一步)登陆https://otx.alienvault.com/ 完成注册,并且在右上的settings中,拿到OTX Key
在/opt/OpenCTI-Platform/docker-compose.yml文件,添加上alienvault的sever服务和镜像(和其他connector平级),添加的内容如下:
connector-alienvault:
    image: opencti/connector-alienvault:6.2.14 #版本号和你安装的opencti版本号一致
    environment:
      - OPENCTI_URL=http://opencti:8080
      - OPENCTI_TOKEN=${OPENCTI_ADMIN_TOKEN}
      - CONNECTOR_ID=e78f7367-4d0d-4bd8-b388-db9cdc74c7b1    ##自己随意生成的UUID v4
      - CONNECTOR_TYPE=EXTERNAL_IMPORT
      - CONNECTOR_NAME=AlienVault
      - CONNECTOR_SCOPE=alienvault
      - CONNECTOR_CONFIDENCE_LEVEL=15 # From 0 (Unknown) to 100 (Fully trusted)
      - CONNECTOR_UPDATE_EXISTING_DATA=false
      - CONNECTOR_LOG_LEVEL=info
      - ALIENVAULT_BASE_URL=https://otx.alienvault.com
      - ALIENVAULT_API_KEY=xxxxxx            ## ====>注册alienvault之后生成的API的KEY<====
      - ALIENVAULT_CREATE_OBSERVABLES=true
      - ALIENVAULT_CREATE_INDICATORS=true
      - ALIENVAULT_PULSE_START_TIMESTAMP=2020-05-01T00:00:00                  # BEWARE! Could be a lot of pulses!
      - ALIENVAULT_REPORT_TYPE=threat-report
      - ALIENVAULT_REPORT_STATUS=New
      - ALIENVAULT_GUESS_MALWARE=false                                        # Use tags to guess malware.
      - ALIENVAULT_GUESS_CVE=false                                            # Use tags to guess CVE.
      - ALIENVAULT_EXCLUDED_PULSE_INDICATOR_TYPES=FileHash-MD5,FileHash-SHA1  # Excluded Pulse indicator types.
      - ALIENVAULT_ENABLE_RELATIONSHIPS=true                                  # Enable/Disable relationship creation between SDOs.
      - ALIENVAULT_ENABLE_ATTACK_PATTERNS_INDICATES=true                      # Enable/Disable "indicates" relationships between indicators and attack patterns
      - ALIENVAULT_INTERVAL_SEC=3600  #同步拉取数据的时间,单位为秒
    restart: always
    depends_on:
      - opencti
重启项目
docker-compose down
#等待stop完成后
docker-compose up -d
原创声明:本文系作者授权腾讯云开发者社区发表,未经许可,不得转载。
如有侵权,请联系 cloudcommunity@tencent.com 删除。
原创声明:本文系作者授权腾讯云开发者社区发表,未经许可,不得转载。
如有侵权,请联系 cloudcommunity@tencent.com 删除。
评论
登录后参与评论
推荐阅读
腾讯云开发者

Copyright © 2013 - 2026 Tencent Cloud. All Rights Reserved. 腾讯云 版权所有
深圳市腾讯计算机系统有限公司 ICP备案/许可证号:粤B2-20090059 ![]() 粤公网安备44030502008569号
粤公网安备44030502008569号
腾讯云计算(北京)有限责任公司 京ICP证150476号 | 京ICP备11018762号