在CVM上安装Ghost个人博客
原创

介绍
Ghost是一个轻量级的JavaScript编写的博客平台,基于MIT许可证开放源代码。Ghost的设计主旨是简化个人网站发布以及网上出版的过程。Ghost是一款个人博客系统,它是使用Node.js语言和MySQL数据库开发的,同时支持MySQL、MariaDB、SQLite和PostgreSQL。用户可以在支持Node.js的服务器上使用自己的博客。Ghost官方支持版,同时有爱好者开发的第三方中文汉化版,如Ghost的中文汉化版。Ghost提供开发插件的API和可以定制的Handlebars主题模板样式。
在本教程中,您将使用官方ghost-cli在Ubuntu 16.04上安装一个的Ghost实例。我们将安装Ghost,配置Nginx来代理对Ghost的请求,使用腾讯云免费SSL证书保护它,并配置Ghost,使它在后台作为系统服务运行。
准备
要完成本教程,您需要:
- 一个Ubuntu 16.04服务器,我们建议您使用腾讯云免费的开发者实验室进行试验。
- 在您的服务器上安装Node.js,如何安装Node.js请参考这篇文章
- 在您的服务器上安装Nginx,如何安装Nginx请参考这篇文章
- 在您的服务器上安装MySQL,如何安装MySQL请参考这篇文章
- 配置一个指向服务器的域名。您需要通过Ghost的安装使用腾讯云SSL证书启用SSL支持。
第一步、安装Ghost CLI应用程序
我们将使用官方ghost-cli程序安装Ghost。该程序可安装Ghost,创建MySQL用户和数据库,将Nginx配置为反向代理,并使用SSL/TLS加密来保护站点。
首先,用npm下载ghost-cli:
sudo npm i -g ghost-cli我们把Ghost放在var/www/ghost目录中,这是推荐的安装位置。创建此目录:
mkdir /var/www/ghost然后确保您的用户拥有此目录。
sudo chown $USER:$USER /var/www/ghost/var/www/ghost目录必须具有您的用户的所有权限,以及其他所有人的读取和执行权限,因此请使用以下命令设置权限:
sudo chmod 775 /var/www/ghost安装CLI并安装目录后,我们可以设置我们的博客。
第二步、安装和配置Ghost
Ghost CLI应用程序有一个安装向导,它将引导您完成配置一个有效的Ghost博客的所有步骤。
切换到 /var/www/ghost/目录。
cd /var/www/ghost/然后使用该ghost命令安装Ghost。它将配置Ghost以使用MySQL作为默认数据库。虽然您可以使用其他数据库,但MySQL是推荐选择。
ghost install安装程序将首先确保您已安装了必要的准备程序,然后下载并安装Ghost:
✔ Checking system Node.js version
✔ Checking logged in user
✔ Checking current folder permissions
✔ Checking operating system compatibility
✔ Checking for a MySQL installation
✔ Checking memory availability
✔ Checking for latest Ghost version
✔ Setting up install directory
✔ Downloading and installing Ghost v1.22.2
✔ Finishing install process安装过程完成后,系统将提示您输入博客URL以及MySQL数据库信息。在此步骤中提供root用户名和密码。您可以使用默认的ghost_prod作为数据库名称。
? Enter your blog URL: http://example.com
? Enter your MySQL hostname: localhost
? Enter your MySQL username: root
? Enter your MySQL password: [hidden]
? Enter your Ghost database name: ghost_prod配置向导将创建一个ghost系统用户,并询问是否应该创建一个ghostMySQL用户,您应该允许:
✔ Configuring Ghost
✔ Setting up instance
Running sudo command: useradd --system --user-group ghost
Running sudo command: chown -R ghost:ghost /var/www/ghost/content
✔ Setting up "ghost" system user
? Do you wish to set up "ghost" mysql user? Yes
✔ Setting up "ghost" mysql user
接下来,它会询问您是否要配置Nginx。点击确认,安装程序将为您的博客创建适当的反向代理服务器块:
? Do you wish to set up Nginx? Yes
✔ Creating nginx config file at /var/www/ghost/system/files/example.con.conf
Running sudo command: ln -sf /var/www/ghost/system/files/example.com.conf /etc/nginx/sites-available/example.com.conf
Running sudo command: ln -sf /etc/nginx/sites-available/example.com.conf /etc/nginx/sites-enabled/example.com.conf
Running sudo command: nginx -s reload
✔ Setting up Nginx
接下来,系统将提示您设置SSL支持。如果您使用的是已注册的域名,并且已将DNS设置配置为指向服务器的IP地址,请按N继续。
Output? Do you wish to set up SSL? NO
这里先选择NO,后续我们申请腾讯云的SSL证书进行安装
接下来,配置向导将提示您设置systemd服务。按Y继续,向导将创建一个名为ghost_example-com的新systemd服务,并使其在启动时启动:
? Do you wish to set up Systemd? Yes
✔ Creating systemd service file at /var/www/ghost/system/files/ghost_example-com.service
Running sudo command: ln -sf /var/www/ghost/system/files/ghost_example-com.service /lib/systemd/system/ghost_example-com.service
Running sudo command: systemctl daemon-reload
✔ Setting up Systemd最后,向导将配置您的数据库并询问它是否应该启动Ghost,您应该按Y:
Running sudo command: /var/www/ghost/current/node_modules/.bin/knex-migrator-migrate --init --mgpath /var/www/ghost/current
✔ Running database migrations
? Do you want to start Ghost? Yes
Running sudo command: systemctl is-active ghost_example-com
✔ Ensuring user is not logged in as ghost user
✔ Checking if logged in user is directory owner
✔ Checking current folder permissions
Running sudo command: systemctl is-active ghost_example-com
✔ Validating config
✔ Checking folder permissions
✔ Checking file permissions
✔ Checking content folder ownership
✔ Checking memory availability
Running sudo command: systemctl start ghost_example-com
✔ Starting Ghost
Running sudo command: systemctl is-enabled ghost_example-com
Running sudo command: systemctl enable ghost_example-com --quiet
✔ Starting Ghost
在启用配置之前,我们需要安装SSL证书,具体操作流程如下:
申请域名型(DV)SSL证书
申请入口
进入SSL证书管理控制台

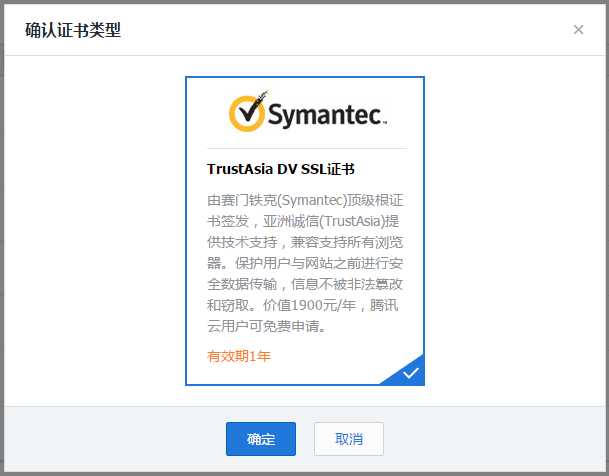
单击【申请证书】

查看申请域名型证书型号,单击【确定】
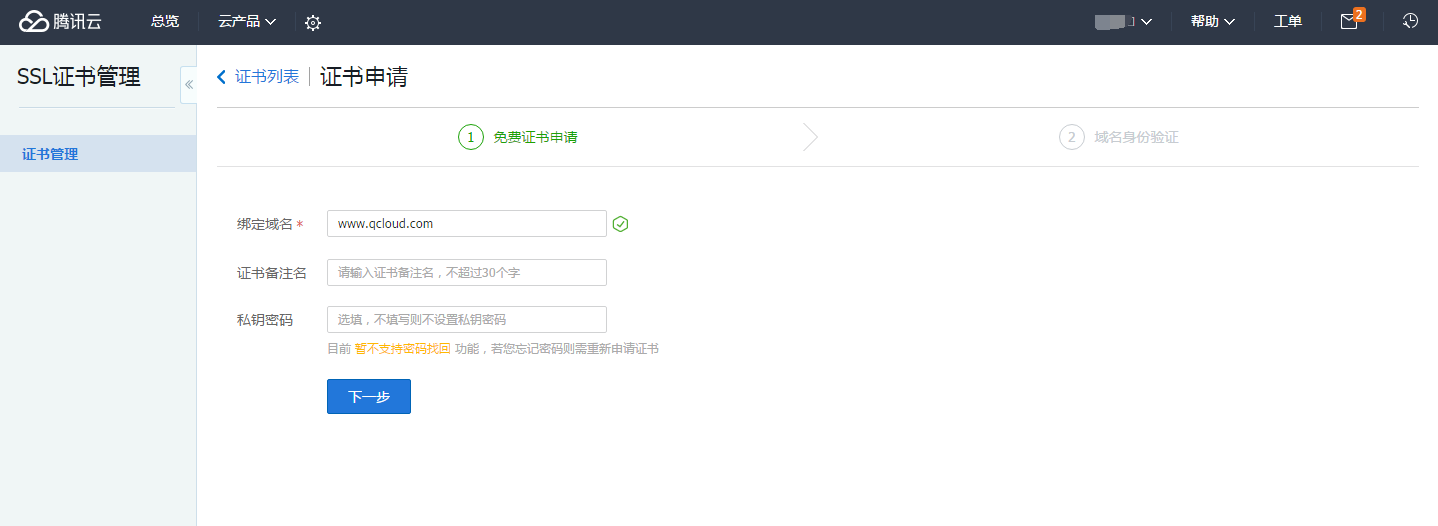
填写申请
填写申请域名,例如qcloud.com,cloud.tencent.com,demo.test.qlcoud.com。
手动DNS验证方式
证书默认支持收到DNS验证,验证方法可查看详情。

提交申请后验证身份
提交申请成功后弹窗提示如下,需要前往【证书详情页】获取CName记录添加解析:
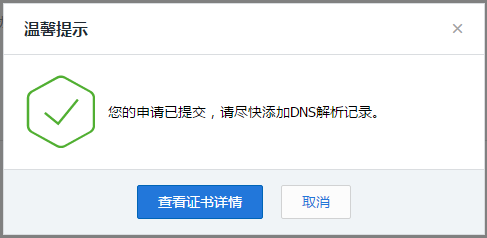
获取CName记录如Tips中显示,需要尽快成功添加解析,方可通过CA机构审核:

安装证书
下载好证书如下:
cert.crt privkey.key我们需要将申请成功后需要下载证书文件复制到nginx配置文件中certs目录中。这里需要切换到root权限,使用以下命令切换到root用户。
sudo su接下来我们找到nginx目录
cd /etc/nginx/接下来创建一个放SSL证书的目录,我们命名为certs
mkdir certs
cd certs然后将您在腾讯云下载的证书复制到这个目录下,注意名称必须为cert.crt privkey.key。
接下来请打开ghost目录中的配置文件
nano /var/www/ghost/system/files/example.con.conf增加下面的配置
ssl_certificate /etc/ssl/certs/cert.crt;
ssl_certificate_key /etc/ssl/private/privkey.key;
接下来重启nginx服务即可正常使用腾讯云的证书。
service nginx restart您的Ghost博客现已安装并可供使用。您可以在http://example.com访问您的博客。现在让我们创建一个帐户,以便您创建第一篇文章。
第三步、创建帐户并配置您的博客
要登录并配置您的博客,请访问http://example.com/login。您将看到以下页面:

按“ 创建帐户”按钮即可开始使用。
您将看到“创建帐户”页面,该页面会让您设置博客标题,以及您的姓名、电子邮件地址和密码:

填写详细信息,然后按“ 最后一步:邀请您的团队”按钮。
该向导将要求您输入其他作者的电子邮件地址,但您可以稍后在屏幕底部选择我将执行此操作的链接。
然后,您将看到一个帖子列表,在Ghost里叫做“故事”:

您可以在左侧的菜单创建新故事或管理博客的其他设置。
结论
在本教程中,您安装了Ghost,配置了Nginx以代理对Ghost的请求,并确保Ghost作为系统服务运行。感谢您的阅读,更多Linux教程请前往腾讯云+社区查看。
参考文献:《How To Install and Configure Ghost on Ubuntu 16.04》
原创声明:本文系作者授权腾讯云开发者社区发表,未经许可,不得转载。
如有侵权,请联系 cloudcommunity@tencent.com 删除。
原创声明:本文系作者授权腾讯云开发者社区发表,未经许可,不得转载。
如有侵权,请联系 cloudcommunity@tencent.com 删除。
评论
登录后参与评论
推荐阅读
目录
腾讯云开发者

Copyright © 2013 - 2026 Tencent Cloud. All Rights Reserved. 腾讯云 版权所有
深圳市腾讯计算机系统有限公司 ICP备案/许可证号:粤B2-20090059 ![]() 粤公网安备44030502008569号
粤公网安备44030502008569号
腾讯云计算(北京)有限责任公司 京ICP证150476号 | 京ICP备11018762号