TUIKit 是一款基于腾讯云 IM SDK 和 UTS 原生渲染技术的 uni-app UI 组件库,流畅度远超传统 Webview 方案,提供了一系列通用的 UI 组件,涵盖会话、聊天、群组、音视频通话等核心功能。基于这些精心设计的 UI 组件,您可以快速构建优雅、可靠、可扩展的即时通讯应用。

关键概念
原生渲染:基于 UTS 技术直接编译为 Kotlin/Swift 原生代码,流畅度远超 Webview 方案。
开源免费:插件源码以 uni_modules 形式开放,UI 样式、交互逻辑均可直接修改,无需二次封装。
前提条件
IDE: HBuilderX 版本 ≥ 4.66。
Vue 版本: Vue3、Vue2。
Node 版本:Node.js ≥ 18.0.0。
支持平台: 仅支持打包为 Android / iOS App,不支持 H5 和小程序。
支持项目: uni-app 项目、uni-app x 项目。
说明:
H5 和小程序项目,如有需要请参考以下替代方案:
打包 Web H5,可参考:Web H5(Vue3)。
打包小程序,可参考:uni-app 完整版(Vue3/Vue2)。
接入过程中遇到任何卡点或有改进建议,欢迎通过 UniApp Atomicx 接入体验反馈 反馈,官方会及时跟进处理。
集成步骤
说明:
步骤1:创建项目
打开 HBuilderX,在菜单栏中选择 “文件 > 新建 > 项目”,创建一个名为
chat-example 的 uni-app / uni-app x 项目。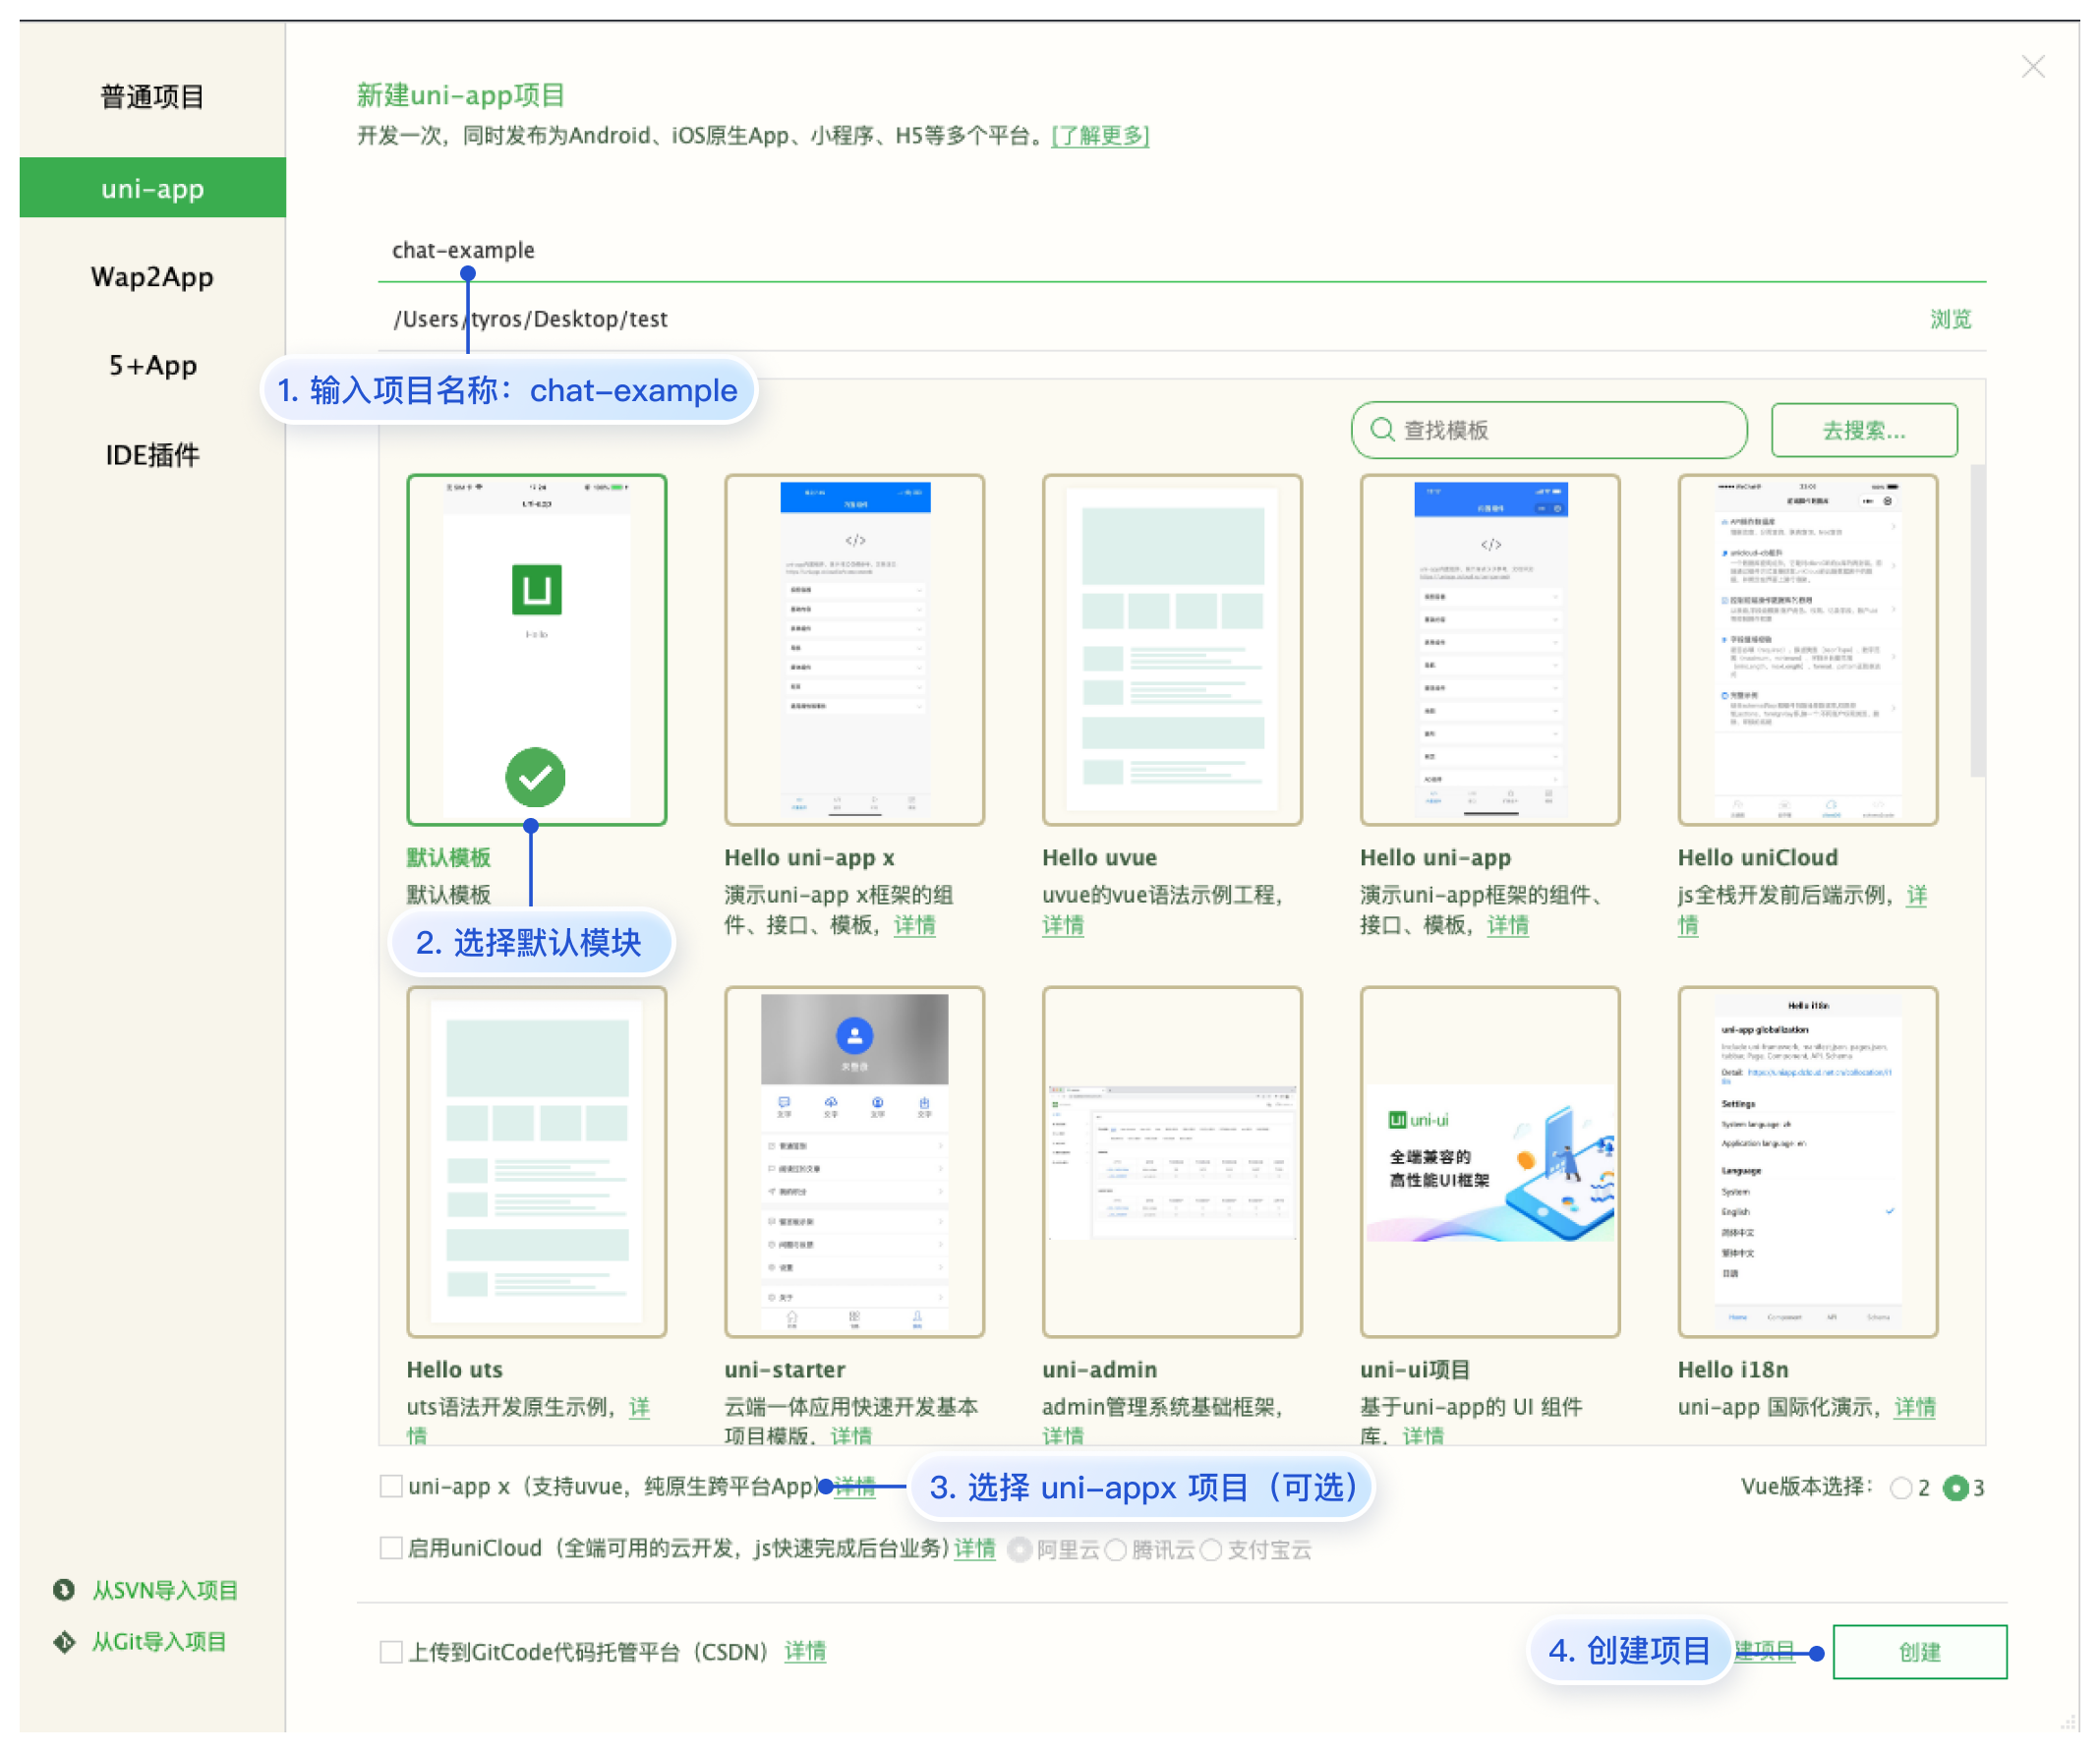
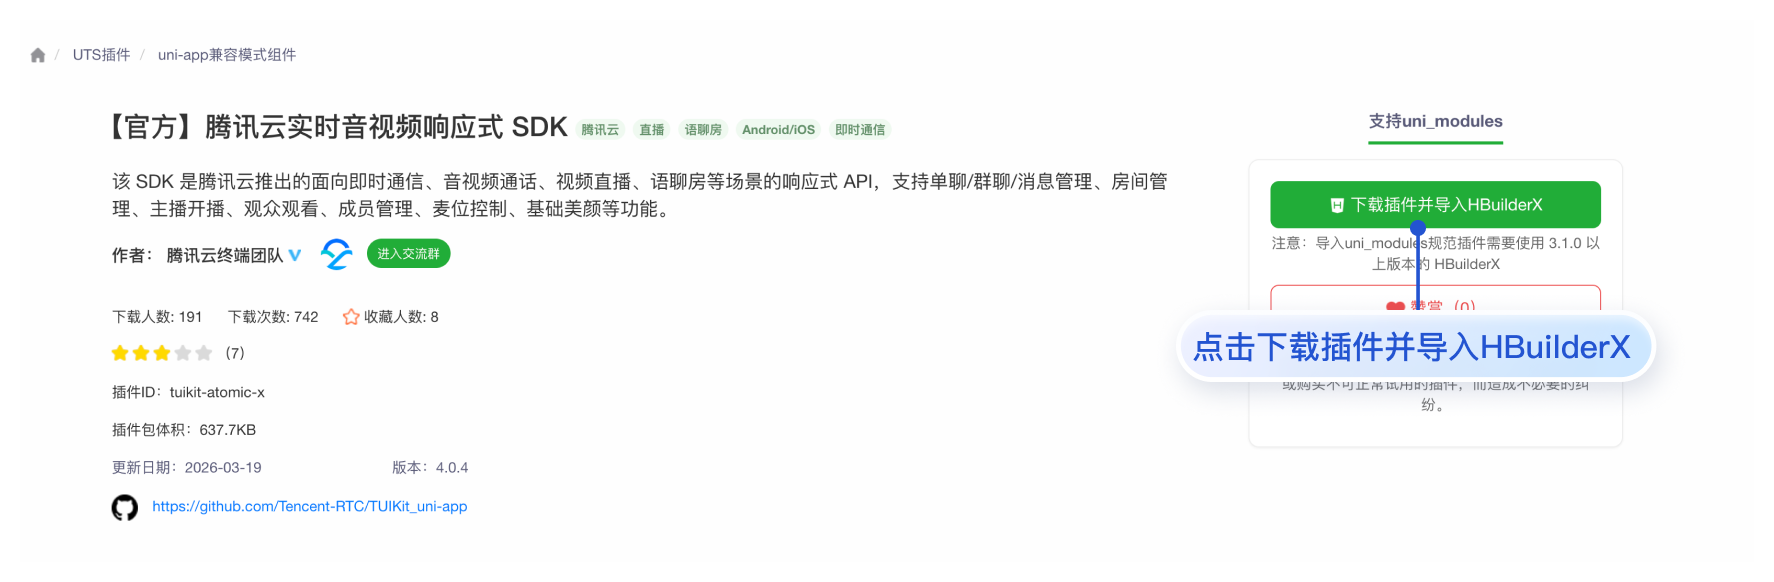
步骤2:安装 TUIKit 插件
步骤3:配置原生模块与 Android 权限
说明:
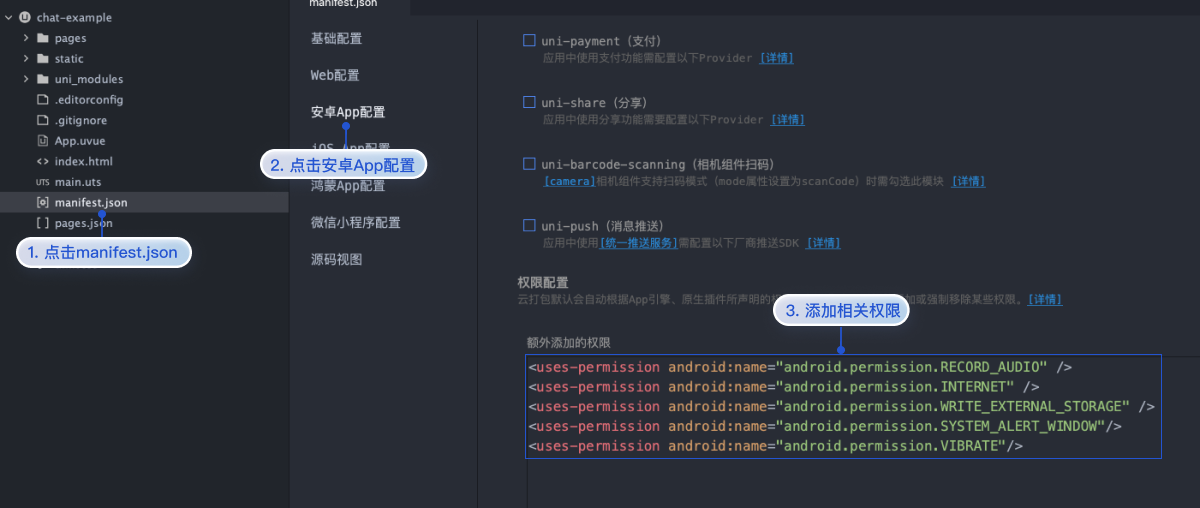
Camera 、Record、 VideoPlayer 模块用于聊天中的拍照、录音、视频播放功能。Android 权限用于录音、网络访问和文件存储。1. 模块配置。点击
manifest.json > 点击安卓 / iOS 模块配置 > 勾选 Camera&Gallery(相机和相册)、Record(录音)、 VideoPlayer(视频播放)。如图所示: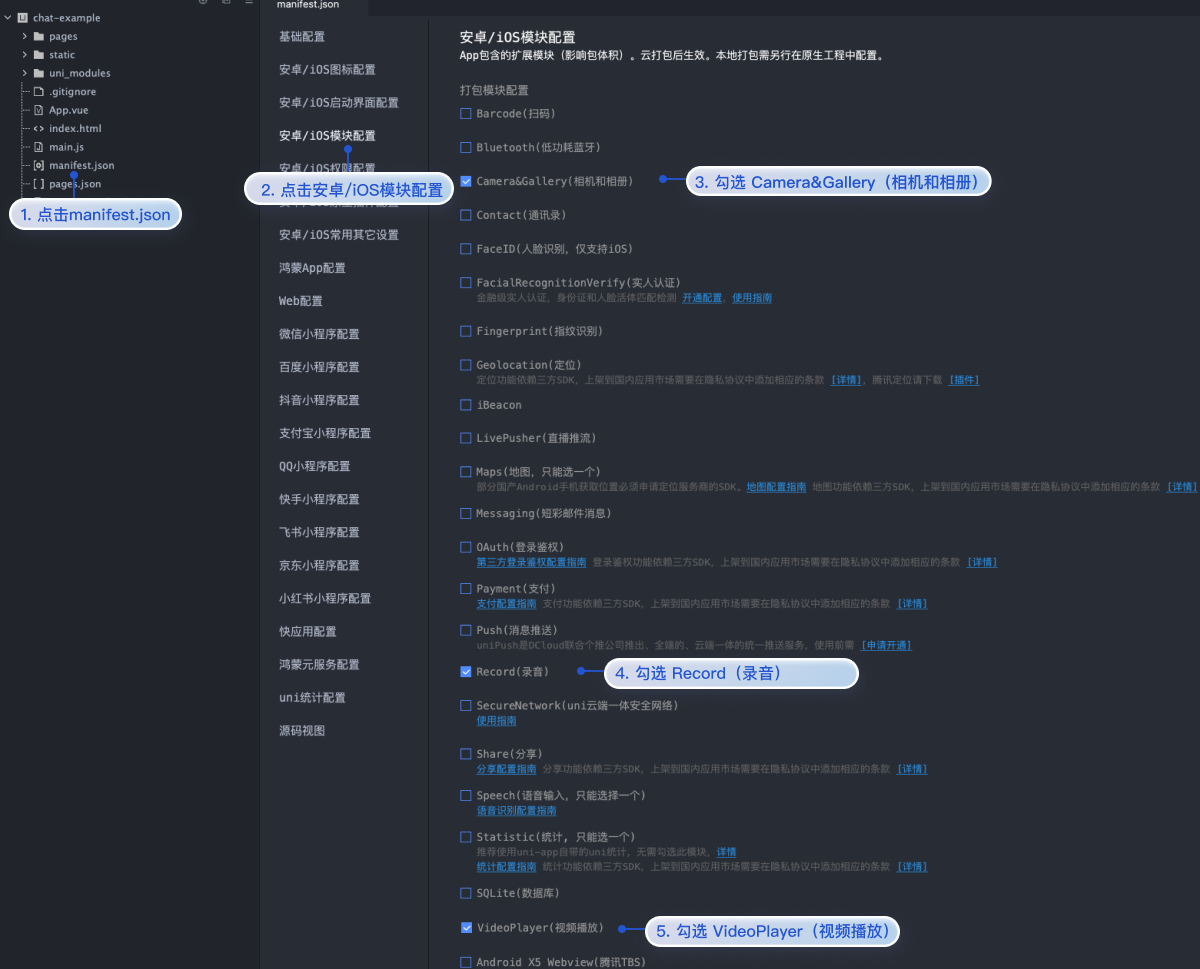
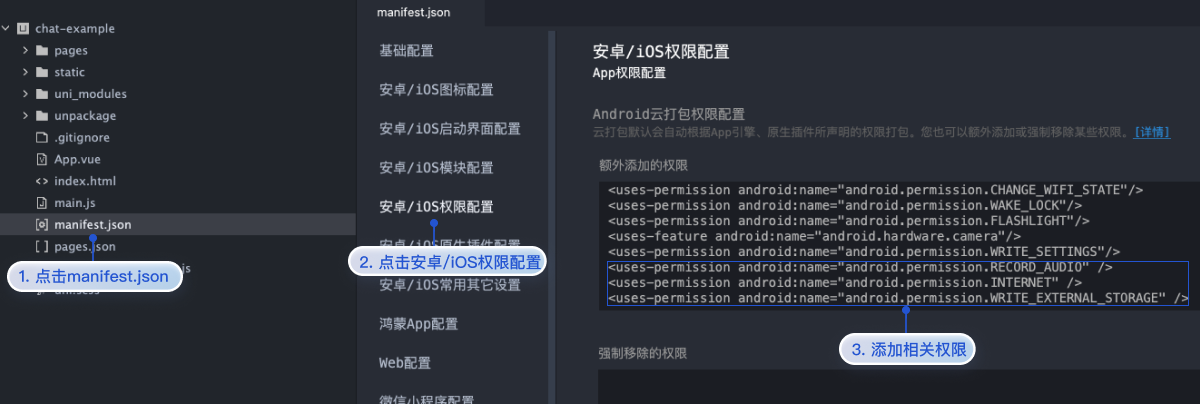
2. 配置 Android 相关权限。点击
manifest.json> 点击安卓 / iOS权限配置 > Android 云打包配置中配置如下权限。如图所示:<uses-permission android:name="android.permission.RECORD_AUDIO" /><uses-permission android:name="android.permission.INTERNET" /><uses-permission android:name="android.permission.WRITE_EXTERNAL_STORAGE" /><uses-permission android:name="android.permission.SYSTEM_ALERT_WINDOW"/><uses-permission android:name="android.permission.VIBRATE"/>
配置 Android 相关权限。点击
manifest.json> 点击安卓 App 配置 > 权限配置中配置如下权限。如图所示:<uses-permission android:name="android.permission.RECORD_AUDIO" /><uses-permission android:name="android.permission.INTERNET" /><uses-permission android:name="android.permission.WRITE_EXTERNAL_STORAGE" /><uses-permission android:name="android.permission.SYSTEM_ALERT_WINDOW"/><uses-permission android:name="android.permission.VIBRATE"/>
步骤4:集成 TUIKit
1. 集成 TUIKit:uni-app 项目根据
manifest.json > 基础配置 > Vue 版本,集成 TUIKit。uni-app x 不区分 vue 版本。拷贝 TUIKit 页面及静态资源:将
uni_modules/tuikit-atomic-x/quickstart/下的pages/* 拷贝到项目 page 目录,static/* 拷贝到项目 static 目录下。cp -r uni_modules/tuikit-atomic-x/quickstart/static/* static/ && cp -r uni_modules/tuikit-atomic-x/quickstart/pages/* pages/
xcopy /E /I /Y "uni_modules\\tuikit-atomic-x\\quickstart\\static\\*" "static\\" && xcopy /E /I /Y "uni_modules\\tuikit-atomic-x\\quickstart\\pages\\*" "pages\\"
1. 转换兼容模式:仅 Vue2 项目,Vue3 项目可忽略。
说明:
该脚本用于将插件源码中 Vue3 的 Composition API 写法自动转换为 Vue2 的 Options API 写法,以确保在 Vue2 项目中正常运行。
node ./uni_modules/tuikit-atomic-x/scripts/switch-to-compatible-mode.js
2. 拷贝 TUIKit 页面及静态资源:将
uni_modules/tuikit-atomic-x/quickstart/ 下的 pages/* 拷贝到项目 page 目录,static/* 拷贝到项目 static 目录下。cp -r uni_modules/tuikit-atomic-x/quickstart/static/* static/ && cp -r uni_modules/tuikit-atomic-x/quickstart/pages/* pages/
xcopy /E /I /Y "uni_modules\\tuikit-atomic-x\\quickstart\\static\\*" "static\\" && xcopy /E /I /Y "uni_modules\\tuikit-atomic-x\\quickstart\\pages\\*" "pages\\"
1. 转换 uniappx 模式:仅 uni-app x 项目,uni-app 项目可忽略。
说明:
该脚本用于将插件中 nvue 组件转化为 uvue 组件。
node ./uni_modules/tuikit-atomic-x/scripts/switch-to-uniappx-mode.js
2. 拷贝 TUIKit 页面及静态资源:将
uni_modules/tuikit-atomic-x/quickstart/ 下的 pages/* 拷贝到项目 page 目录,static/* 拷贝到项目 static 目录下。cp -r uni_modules/tuikit-atomic-x/quickstart/static/* static/ && cp -r uni_modules/tuikit-atomic-x/quickstart/pages/* pages/
xcopy /E /I /Y "uni_modules\\tuikit-atomic-x\\quickstart\\static\\*" "static\\" && xcopy /E /I /Y "uni_modules\\tuikit-atomic-x\\quickstart\\pages\\*" "pages\\"
2. 配置页面路由:替换
pages.json 内容,注册所需页面路由:{"pages": [{"path": "pages/login/login","style": {"navigationStyle": "custom"}},{"path": "pages/index/index","style": {"navigationStyle": "custom"}},{"path": "pages/scenes/chat/conversationList/conversationList","style": {"navigationStyle": "custom","backgroundColor": "#f5f5f5"}},{"path": "pages/scenes/chat/chat/index","style": {"navigationStyle": "custom","backgroundColor": "#f5f5f5","app-plus": {"titleNView": false}}},{"path": "pages/scenes/chat/chatSetting/index","style": {"navigationStyle": "custom","backgroundColor": "#f5f5f5"}},{"path": "pages/scenes/chat/groupManagement/index","style": {"navigationStyle": "custom"}},{"path": "pages/scenes/chat/groupMemberList/index","style": {"navigationStyle": "custom","backgroundColor": "#f5f5f5"}},{"path": "pages/scenes/chat/search/search","style": {"navigationStyle": "custom"}},{"path": "pages/scenes/chat/search/searchInConversation","style": {"navigationStyle": "custom"}},{"path": "pages/scenes/chat/userPicker/userPicker","style": {"navigationBarTitleText": "选人列表","navigationBarBackgroundColor": "#ffffff","navigationBarTextStyle": "black","backgroundColor": "#f5f5f5"}},{"path": "pages/scenes/chat/createGroup/createGroup","style": {"navigationBarTitleText": "创建群聊","navigationBarBackgroundColor": "#ffffff","navigationBarTextStyle": "black","backgroundColor": "#f5f5f5"}},{"path": "pages/scenes/chat/groupTypeInfo/groupTypeInfo","style": {"navigationBarTitleText": "选择群类型","navigationBarBackgroundColor": "#ffffff","navigationBarTextStyle": "black","backgroundColor": "#f5f5f5"}},{"path": "pages/scenes/chat/videoPlayer/videoPlayer","style": {"app-plus": {"titleNView": false,"screenOrientation": ["portrait-primary","landscape-primary","landscape-secondary"]}}},{"path": "pages/scenes/chat/contacts/contactList/index","style": {"navigationStyle": "custom","backgroundColor": "#f5f5f5"}},{"path": "pages/scenes/chat/contacts/contactInfo/index","style": {"navigationStyle": "custom","backgroundColor": "#f5f5f5"}},{"path": "pages/scenes/chat/contacts/addFriend/index","style": {"navigationStyle": "custom","backgroundColor": "#f5f5f5"}},{"path": "pages/scenes/chat/contacts/addGroup/index","style": {"navigationStyle": "custom","backgroundColor": "#f5f5f5"}},{"path": "pages/scenes/chat/contacts/contactList/friendApplicationList","style": {"navigationStyle": "custom","backgroundColor": "#f5f5f5"}},{"path": "pages/scenes/chat/contacts/contactList/groupApplicationList","style": {"navigationStyle": "custom","backgroundColor": "#f5f5f5"}},{"path": "pages/scenes/chat/contacts/contactList/groupList","style": {"navigationStyle": "custom","backgroundColor": "#f5f5f5"}},{"path": "pages/scenes/chat/contacts/contactList/blackList","style": {"navigationStyle": "custom","backgroundColor": "#f5f5f5"}},{"path": "pages/scenes/chat/contacts/applicationVerify/index","style": {"navigationStyle": "custom","backgroundColor": "#f5f5f5"}},{"path": "pages/scenes/chat/contacts/setRemark/index","style": {"navigationStyle": "custom","backgroundColor": "#f5f5f5"}},{"path": "uni_modules/tuikit-atomic-x/pages/call","style": {"navigationBarTitleText": "","navigationStyle": "custom"}}],"tabBar": {"color": "#999999","selectedColor": "#147AFF","borderStyle": "black","backgroundColor": "#ffffff","list": [{"pagePath": "pages/scenes/chat/conversationList/conversationList","text": "消息","iconPath": "static/tuikit/message.png","selectedIconPath": "static/tuikit/message-selected.png"},{"pagePath": "pages/scenes/chat/contacts/contactList/index","text": "通讯录","iconPath": "static/tuikit/relation.png","selectedIconPath": "static/tuikit/relation-selected.png"}]},"globalStyle": {"navigationBarTextStyle": "black","navigationBarTitleText": "腾讯云 IM","navigationBarBackgroundColor": "#EBF0F6","backgroundColor": "#F8F8F8"}}
说明:
如需调整页面路由,请同步修改页面和
uni_modules/tuikit-atomic-x/components 中路由跳转逻辑。运行和测试
说明:
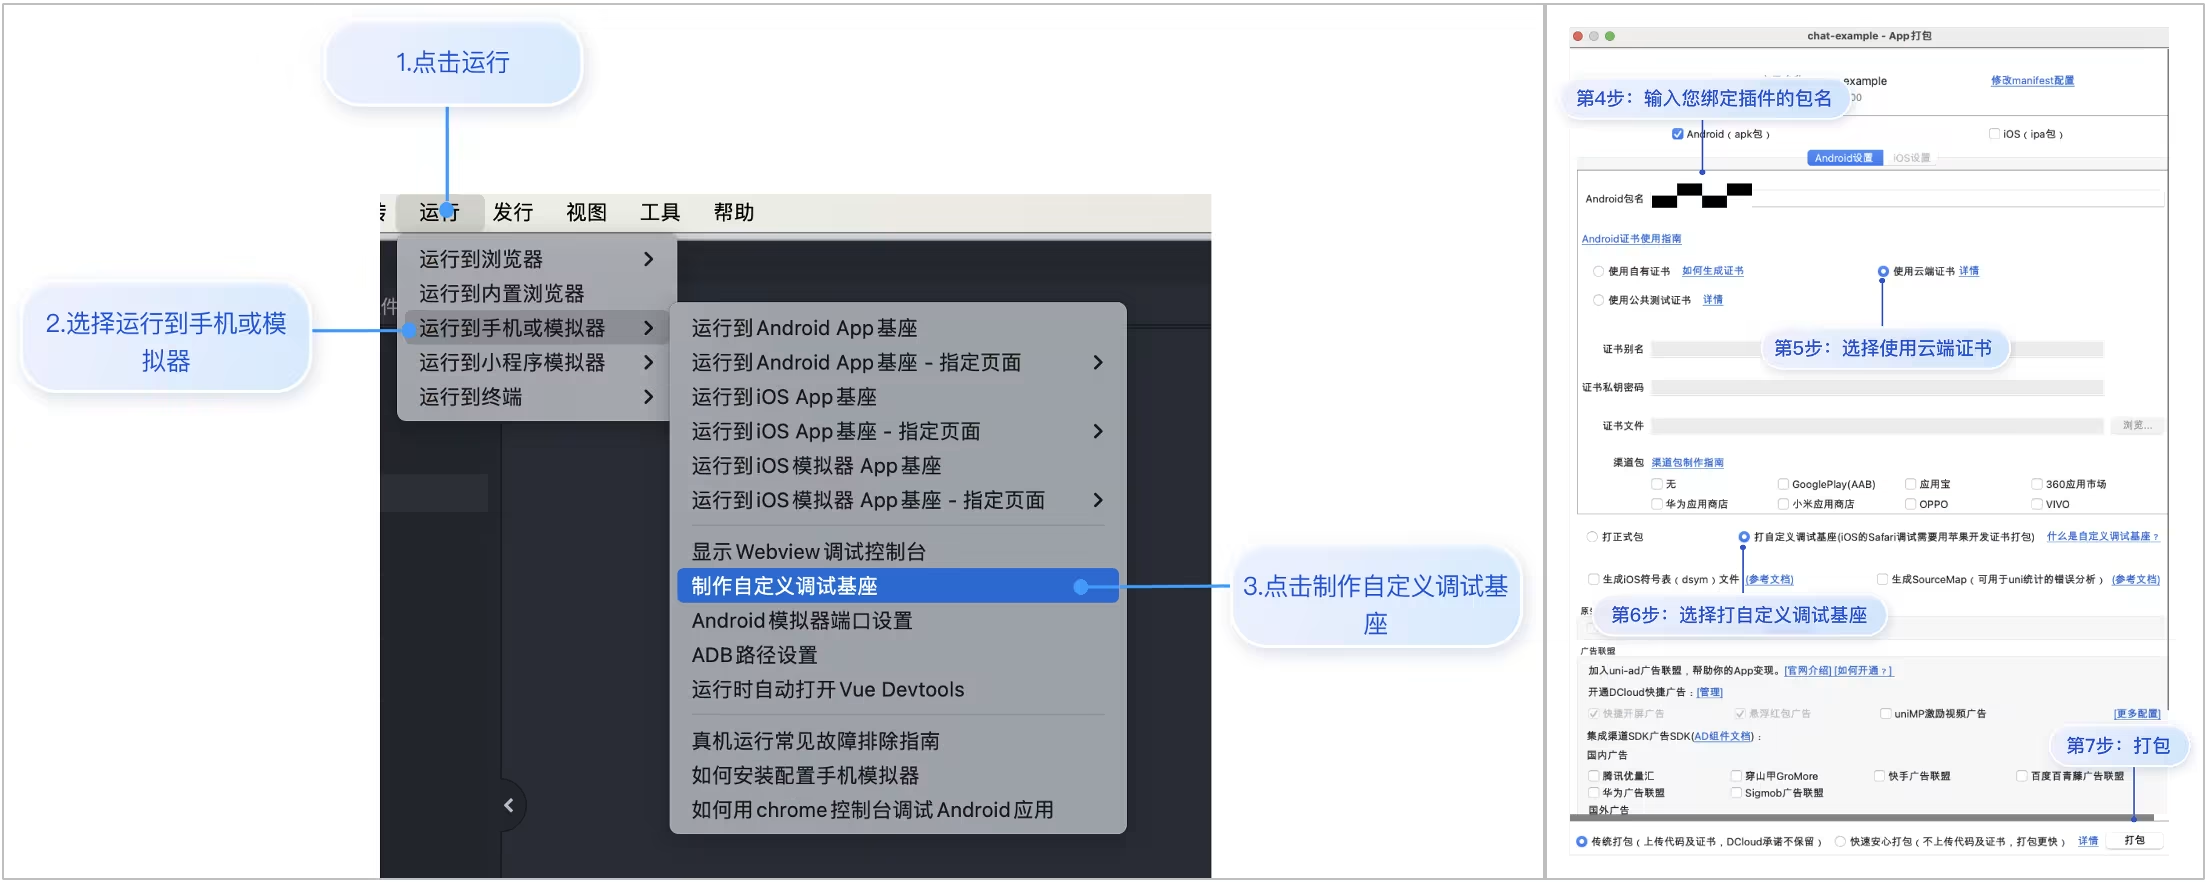
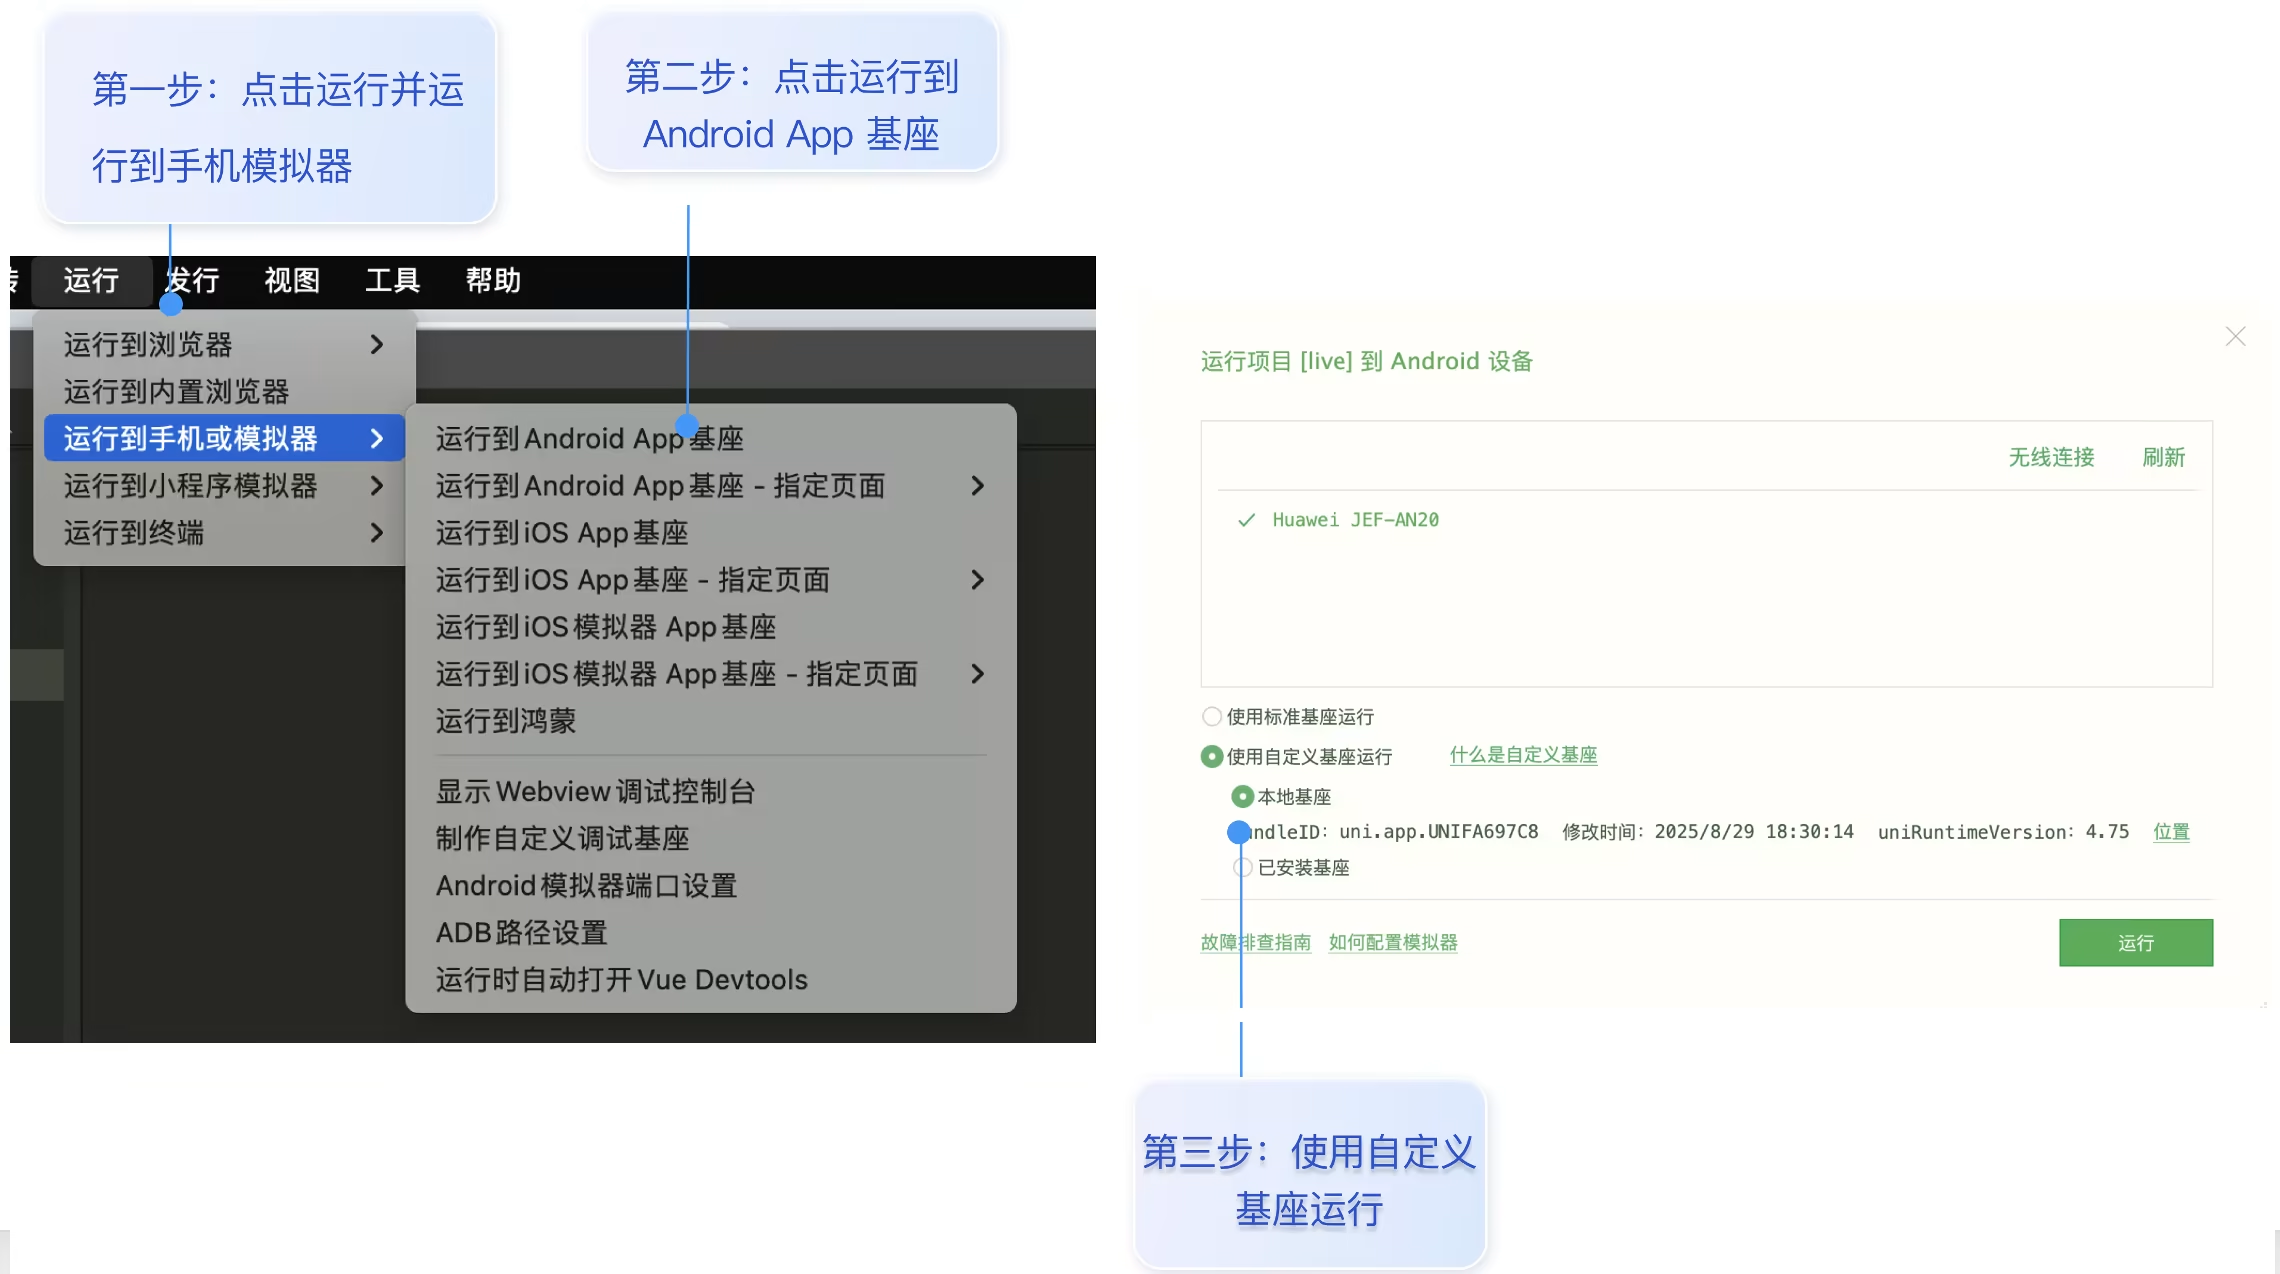
1. 制作自定义基座。点击运行 > 运行到手机或模拟器 > 制作自定义调试基座:
说明:
首次制作自定义基座需要下载 Gradle 依赖,Android 通常需要 10~20 分钟,iOS 需要 5~10 分钟。过程中请勿中断。
2. 登录。在
pages/login/login.vue 中,填入 SDKAppID、 userID、userSig,点击登录。参数 | 类型 | 说明 |
SDKAppID | Number | 说明: SDKAppID 是腾讯云 IM 客户应用的唯一标识。我们建议每一个独立的 App 都申请一个新的 SDKAppID。不同 SDKAppID 之间的消息是天然隔离的,不能互通。 |
SecretKey | String | |
userID | String | 用户的唯一标识符,由您定义,只能包含大小写字母(a-z,A-Z)、数字(0-9)、下划线和连字符。 |
userSig | String | 安全提示: uni-app Vue3、uni-app Vue2 项目示例支持通过 genTestUserSig 函数生成 userSig。该方法中 SecretKey 很容易被反编译逆向破解,一旦您的密钥泄露,攻击者就可以盗用您的腾讯云流量。该方法仅适合本地跑通功能调试。 正确的 UserSig 签发方式请参见 服务端生成 UserSig。uni-app x 项目不支持通过 genTestUserSig 函数生成 userSig。您可以在 即时通信 IM 控制台 或者通过 服务端生成自行生成 userSig。示例代码中的 UserSig 仅供测试使用,生产环境请通过 服务端生成。 敏感信息(UserSig/SecretKey)仅用于 Demo 测试,不可提交到代码仓库或用于生产环境。 |
import { ref } from 'vue'import { useLoginState } from '@/uni_modules/tuikit-atomic-x/state/LoginState';import { genTestUserSig } from '@/uni_modules/tuikit-atomic-x/debug/GenerateTestUserSig';const { login } = useLoginState();const sdkAppId = 0; // SDKAppIDconst userId = ref(''); // userIDconst secretKey = ''; // SecretKey// 登录login({sdkAppID: sdkAppId,userID: userId.value,userSig: genTestUserSig({SDKAppID: sdkAppId,userID: userId.value,secretKey: secretKey}).userSig,success: () => {uni.reLaunch({ url: '/pages/scenes/chat/conversationList/conversationList' })},fail: (code: number, msg: string) => {uni.showToast({ title: msg || '登录失败', icon: 'none' })}})
import { useLoginState } from '@/uni_modules/tuikit-atomic-x/state/LoginState'import { genTestUserSig } from '@/uni_modules/tuikit-atomic-x/debug/GenerateTestUserSig'export default {data() {var loginState = useLoginState()return {loginState: loginState,sdkAppId: 0, // SDKAppIDuserId: '', // userIDsecretKey: '', // SecretKey}},methods: {handleLogin() {this.loginState.login({sdkAppID: this.sdkAppId,userID: this.userId,userSig: genTestUserSig({SDKAppID: this.sdkAppId,userID: this.userId,secretKey: this.secretKey,}).userSig,success: () => {uni.reLaunch({ url: '/pages/scenes/chat/conversationList/conversationList' })},fail: (_, msg) => {uni.showToast({ title: msg || '登录失败', icon: 'none' })}})}}}
import { useLoginState } from '@/uni_modules/tuikit-atomic-x/state/LoginState';const { login } = useLoginState();const sdkAppId = 0; // SDKAppIDconst userId = ref(''); // userIDconst userSig = ''; // userSig// 登录login({sdkAppID: sdkAppId,userID: userId.value,userSig: userSig,success: () => {uni.reLaunch({ url: '/pages/scenes/chat/conversationList/conversationList' })},fail: (code: number, msg: string) => {uni.showToast({ title: msg || '登录失败', icon: 'none' })}})
3. 运行项目。点击运行 > 运行到手机或模拟器 > 运行到 Android/iOS 基座,使用制作好的自定义基座运行到手机。
集成音视频通话(推荐)
初始化 TUICallKit 服务。在根目录下的
App.vue 中引入如下代码。说明:
TUICallKit 暂不支持 uni-app x 项目,仅支持 uni-app 项目。
import { initCallService } from '@/uni_modules/tuikit-atomic-x/server/callService';initCallService();
常见问题
技术兼容性类
Q:该 TUIKit 插件是否支持编译到 H5 或微信小程序?
A:不支持。由于新版 TUIKit 基于 UTS (Uni-app Type Script) 插件架构开发,深度依赖 Android 和 iOS 的原生能力(如原生渲染引擎、本地数据库、音视频编解码),因此仅支持打包为 App (Android/iOS)。如果您需要 H5 或小程序版本,请使用腾讯云 IM 的 Web 或小程序专用 SDK。
Q:该 TUIKit 插件是否支持获取 chat 实例?
A:不支持。新版 TUIKit 基于 UTS(Uni-app Type Script)插件架构开发,其底层为原生 SDK,数据通过 hybridApi 进行交互,因此无法获取 Chat 实例。
Q:我的现有项目全是 .vue 页面(Webview 渲染),能直接集成吗?
A:可以混用,但需要注意页面模式。
nvue 页面和 vue 页面可以互相跳转,但是 vue 页面的子组件不建议是 nvue 组件。TUIKit 的 UI 组件是 nvue 组件,因此使用 TUIKit 所在的页面(pages)必须也是 nvue 文件。
建议方案: 将聊天页、会话列表等 IM 相关核心页面配置为
nvue 页面。注意事项: 在
pages.json 中配置相关路由时,请确保样式渲染模式正确。现有项目的 .vue 页面可以通过路由跳转到 IM 的 nvue 页面,两者可以共存,但不能在同一个页面文件中混写。可以理解为 nvue 组件具有污染性,nvue 组件的父组件、父页面都要是 nvue 文件。参考信息:uni-app > 纯原生渲染模式。
Q:页面样式错乱、布局塌陷?
A:没有严格遵守 nvue 的 Flex 布局规范。
nvue 页面中:
1. 默认
flex-direction 是 column(纵向),而非 Web 的 row。2. 文本必须包裹在
<text> 组件中,不能直接写在 <div> 或 <view> 里。3. 不支持简写属性(例如
margin: 10px 20px),必须写全(margin-top, margin-left 等)。4. 更多参考信息:uni-app-nvue 开发与 Vue 开发的常见区别。
集成与构建类
Q:运行报错 "uni is not defined" 或组件无法加载?
A:请检查是否制作并使用了自定义调试基座。
由于插件包含原生代码(Java/Objective-C),标准基座不包含这些原生库。
解决步骤: 请严格按照文档“运行和测试-步骤2”操作,在 HBuilderX 中点击 运行 > 运行到手机或模拟器 > 制作自定义调试基座。制作完成后,运行时请务必选择运行到 Android/iOS 基座,并勾选“使用自定义基座”。
Q:制作自定义基座时一直失败或卡顿怎么办?
A:这通常是本地原生编译环境(Gradle 或 CocoaPods)配置问题导致的。
Android: 请检查本地 JDK 版本是否兼容,以及网络是否能正常访问 Maven/Google 仓库。
iOS: 请确保已安装 CocoaPods 且版本更新,同时检查网络环境是否能访问 GitHub 或 CDN 库。
Q:如何移除 CallKit 功能?
如果您不需要集成 CallKit 功能,请在
pages/scenes/chat/chat/index.nvue 中给 MessageInput 组件传入 toolList 属性,如下所示:<template><MessageInputv-if="conversationID"ref="messageInputRef":conversationID="conversationID":toolList="customToolList"@height-change="onMessageInputHeightChange"/></template><script setup lang="ts">import { computed } from 'vue';import MessageInput, { DEFAULT_TOOLS } from '@/uni_modules/tuikit-atomic-x/components/MessageInput/MessageInput.nvue';const customToolList = computed(() => DEFAULT_TOOLS.filter(tool => tool.id !== 'videoCall' && tool.id !== 'voiceCall'));</script>


