操作步骤
步骤1:集成消息推送插件
{"dependencies": {..."com.tencent.timpush.unity": "https://github.com/TencentCloud/TIMSDK.git#push_unity"}}
步骤2:推送参数配置
IM 控制台会为您分配一个证书 ID,见下图:
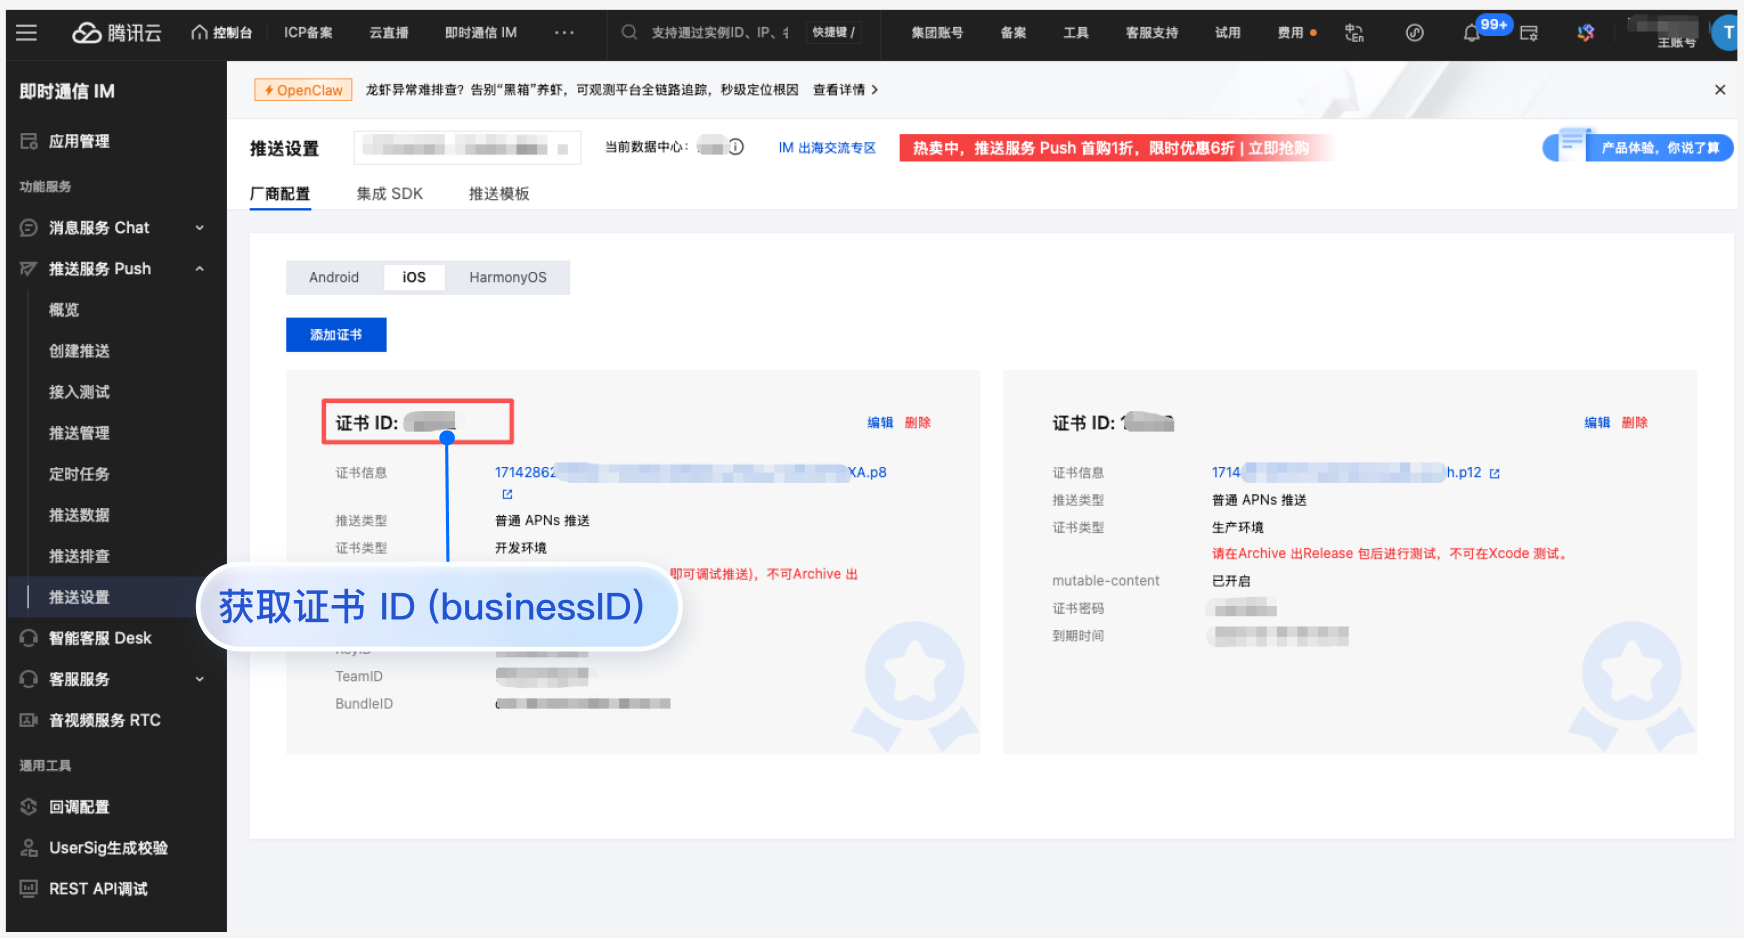
您需要在
Assets/Plugins/iOS 目录下创建文件 UnityIMPush.mm(若目录不存在,需要手动创建),并且在文件中实现 businessID 协议方法返回证书 ID 即可,可以参考如下实现:#import "TPush/TPush.h"#import "UnityAppController.h"@interface UnityAppController (ThirdPartyExtension) <TIMPushDelegate>- (int)businessID;- (NSString *)applicationGroupID;@end@implementation UnityAppController (ThirdPartyExtension)#pragma mark - TIMPush- (int)businessID {//上一步控制台给的证书ID,如 1234567int kBusinessID = 1234567;return kBusinessID;}- (NSString *)applicationGroupID {//AppGroup IDreturn "AppGroup ID";}- (BOOL)onRemoteNotificationReceived:(NSString *)notice {// custom navigatereturn NO;}@end
完成 IM 控制台 厂商推送信息填写后,下载并添加配置文件到工程。将下载的
timpush-configs.json 文件添加到项目的 Assets/Plugins/Android 目录下,如果该目录不存在,请手动创建。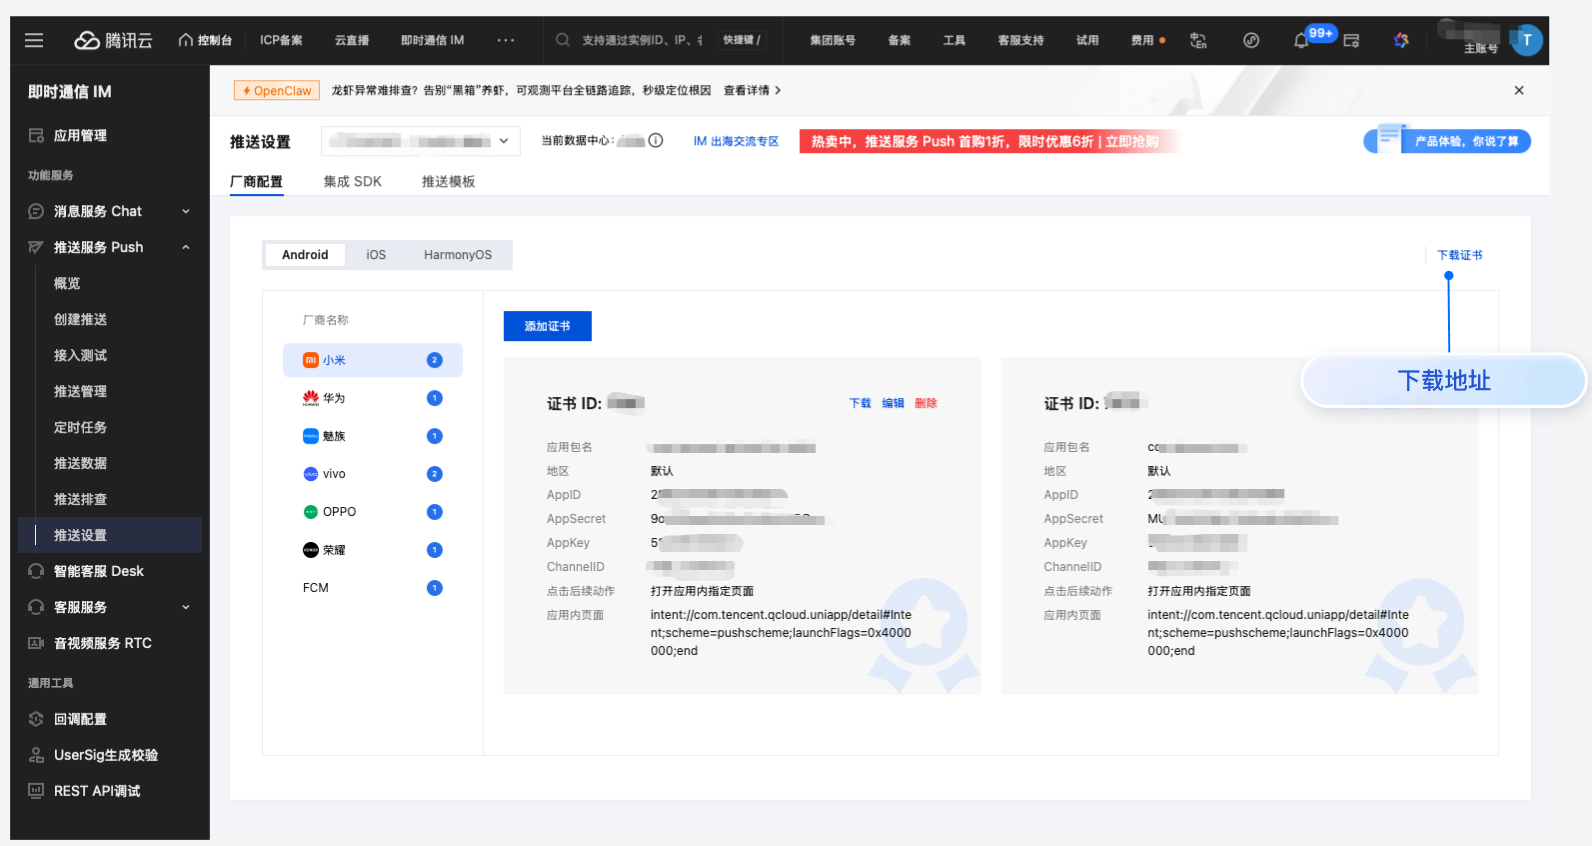
步骤3: 客户端厂商配置
iOS 端无需进行此步骤。
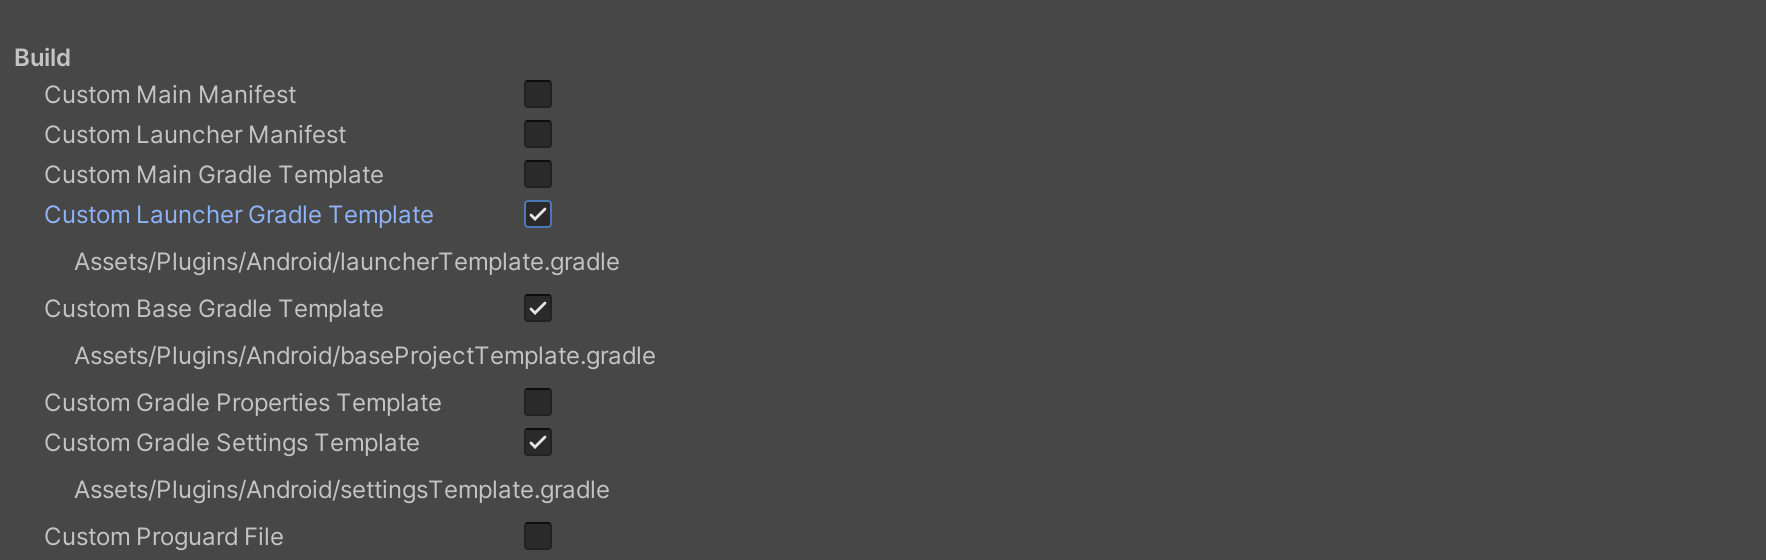
可以按照 File > Build Settings > Player Settings 然后在安卓平台的设置中找到 Publishing Settings > Build,勾选下方的三个配置:
找到 Assets/Plugins/Android/launcherTemplate.gradle 文件,在文件最后新增
dependencies 配置,并根据需要,引入下列全部或部分厂商的推送包。只有引入对应厂商的推送包,才能启用该厂商的原生推送能力。dependencies {// 推送主包必须要集成implementation 'com.tencent.timpush:tpush:VERSION'// 其他依赖包implementation 'androidx.appcompat:appcompat:1.3.0'implementation 'com.google.code.gson:gson:2.10.1'// 按照需要集成对应厂商implementation 'com.tencent.timpush:huawei:VERSION'implementation 'com.tencent.timpush:xiaomi:VERSION'implementation 'com.tencent.timpush:oppo:VERSION'implementation 'com.tencent.timpush:vivo:VERSION'implementation 'com.tencent.timpush:honor:VERSION'implementation 'com.tencent.timpush:meizu:VERSION'implementation 'com.tencent.timpush:fcm:VERSION'}
vivo 和荣耀适配
根据 vivo 和荣耀厂商接入指引,需要将
APPID 和 APPKEY 添加到清单文件,可以通过修改 Assets/Plugins/Android/launcherTemplate.gradle 文件来实现// Assets/Plugins/Android/launcherTemplate.gradleandroid {...defaultConfig {...manifestPlaceholders = ["VIVO_APPKEY" : "您应用分配的证书 APPKEY","VIVO_APPID" : "您应用分配的证书 APPID","HONOR_APPID" : "您应用分配的证书 APPID"]}}
华为、荣耀和 Google FCM 适配
按照厂商方法,集成对应的 plugin 和 json 配置文件。
注意:
以下荣耀的适配仅 7.7.5283 及以上版本需要配置。
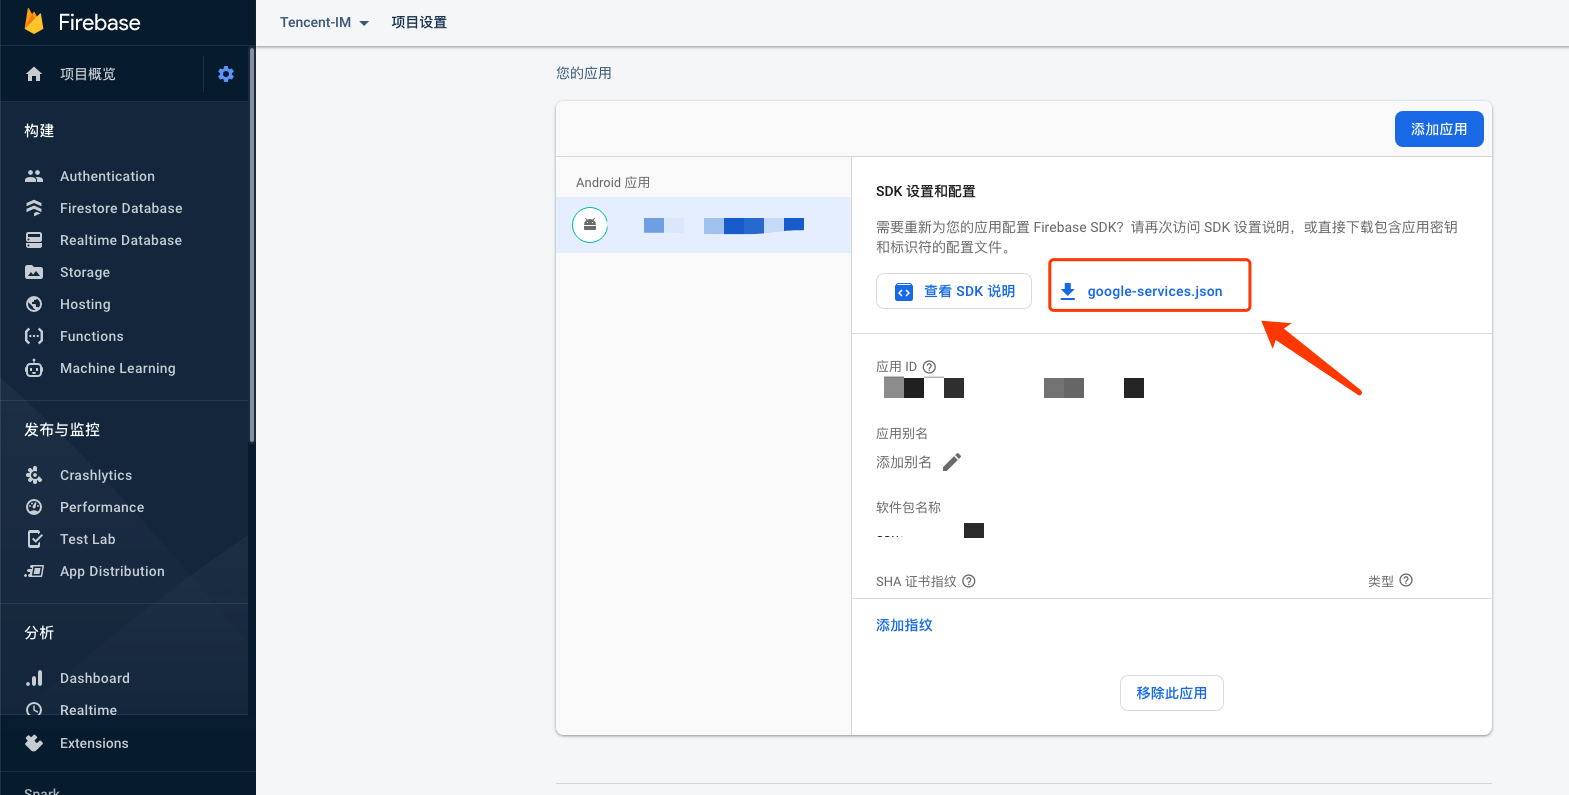
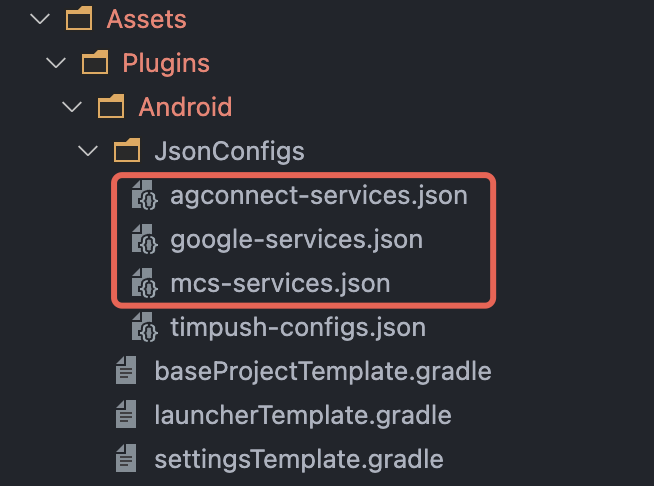
1.1 下载配置文件添加到工程根目录 Assets/Plugins/Android/JsonConfigs 目录下,该目录需要手动创建。
配置文件下载位置:

配置文件下载位置:

配置文件下载位置:
配置文件的放置位置如下所示:
1.2 在 Assets/Plugins/Android/baseProjectTemplate.gradle 文件中 buildscript > dependencies 下添加以下配置(如果是需要新增
buildscript 建议放在文件最上面):在 Assets/Plugins/Android/baseProjectTemplate.gradle 文件中 buildscript > dependencies 下添加以下配置:
buildscript {dependencies {...classpath 'com.huawei.agconnect:agcp:1.6.0.300'classpath 'com.hihonor.mcs:asplugin:2.0.1.300'classpath 'com.google.gms:google-services:4.3.15'}}
在 Assets/Plugins/Android/settingsTemplate.gradle 文件中 buildscript > repositories 和 allprojects > repositories 下添加以下仓库配置:
pluginManagement {repositories {gradlePluginPortal()mavenCentral()maven { url "https://mirrors.tencent.com/nexus/repository/maven-public/" }// 配置HMS Core SDK的Maven仓地址。maven {url 'https://developer.huawei.com/repo/'}maven {url 'https://developer.hihonor.com/repo'}}}dependencyResolutionManagement {...repositories {mavenCentral()maven { url "https://mirrors.tencent.com/nexus/repository/maven-public/" }// 配置HMS Core SDK的Maven仓地址。maven {url 'https://developer.huawei.com/repo/'}maven {url 'https://developer.hihonor.com/repo'}}}
在 Assets/Plugins/Android/baseProjectTemplate.gradle 文件中 buildscript 下添加以下配置:
buildscript {repositories {mavenCentral()maven { url "https://mirrors.tencent.com/nexus/repository/maven-public/" }// 配置HMS Core SDK的Maven仓地址。maven {url 'https://developer.huawei.com/repo/'}maven {url 'https://developer.hihonor.com/repo'}}dependencies {...classpath 'com.google.gms:google-services:4.2.0'classpath 'com.huawei.agconnect:agcp:1.4.1.300'classpath 'com.hihonor.mcs:asplugin:2.0.1.300'}}
在 Assets/Plugins/Android/settingsTemplate.gradle 文件中 allprojects > repositories 下添加以下仓库配置:
allprojects {...repositories {mavenCentral()maven { url "https://mirrors.tencent.com/nexus/repository/maven-public/" }// 配置HMS Core SDK的Maven仓地址。maven {url 'https://developer.huawei.com/repo/'}maven {url 'https://developer.hihonor.com/repo'}}}
在项目级 build.gradle 文件中
buildscript 和 allprojects 下添加以下配置:buildscript {repositories {mavenCentral()maven { url "https://mirrors.tencent.com/nexus/repository/maven-public/" }// 配置HMS Core SDK的Maven仓地址。maven {url 'https://developer.huawei.com/repo/'}maven {url 'https://developer.hihonor.com/repo'}}dependencies {...classpath 'com.google.gms:google-services:4.2.0'classpath 'com.huawei.agconnect:agcp:1.4.1.300'classpath 'com.hihonor.mcs:asplugin:2.0.1.300'}}allprojects {repositories {mavenCentral()maven { url "https://mirrors.tencent.com/nexus/repository/maven-public/" }// 配置HMS Core SDK的Maven仓地址。maven {url 'https://developer.huawei.com/repo/'}maven {url 'https://developer.hihonor.com/repo'}}}
1.3 在 Assets/Plugins/Android/launcherTemplate.gradle 文件中添加下方配置:
apply plugin: 'com.google.gms.google-services'apply plugin: 'com.huawei.agconnect'apply plugin: 'com.hihonor.mcs.asplugin'
步骤4:处理消息点击回调,并解析参数
如果您需要自定义解析收到的远程推送,您可按照如下方法实现:
注意:
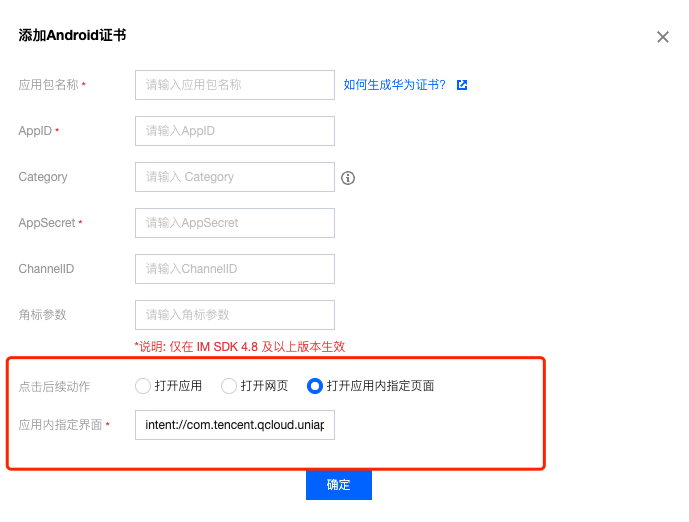
1. 注册回调时机必须放在程序入口函数中。
2. 控制台中点击后续动作的配置请按如下方式处理,选择打开应用内指定界面,请勿修改使用默认值。
PushListener listener = new PushListener(onRecvPushMessage: (message) => {Debug.Log($"收到推送消息: 标题:{message.title}, 内容:{message.desc}, 透传内容:{message.ext}, 消息 ID:{message.messageID}");}, onRevokePushMessage: (messageID) => {Debug.Log($"撤销推送消息 ID: {messageID}");}, onNotificationClicked: (ext) => {Debug.Log($"点击推送消息: {ext}");});PushManager.AddPushListener(listener);
步骤5: 注册推送插件
调用
PushManager.RegisterPush 方法成功后,就可以收到离线推送通知了。注意:
如果您已经集成 IM 产品并在 IM 登录成功后调用该接口,请将 appKey 参数设置为 null,否则会将 IM 账号下线。
PushManager.RegisterPush(sdkAppId: 您的sdkAppId, appKey: "客户端密钥", new PushCallback(onSuccess: (data) => {Debug.Log($"注册推送成功: {data}");}, onError: (errCode, errMsg, data) => {Debug.Log($"注册推送失败: 错误码:{errCode}, 错误信息:{errMsg}");}));
步骤6: 消息推送触达统计
如果您需要统计触达数据,请按照如下完成配置:

回执地址:
https://api.im.qcloud.com/v3/offline_push_report/huawei注意:
华为推送证书 ID <= 11344时,使用华为推送 v2 版本接口,不支持触达和点击回执,请重新生成更新证书 ID。
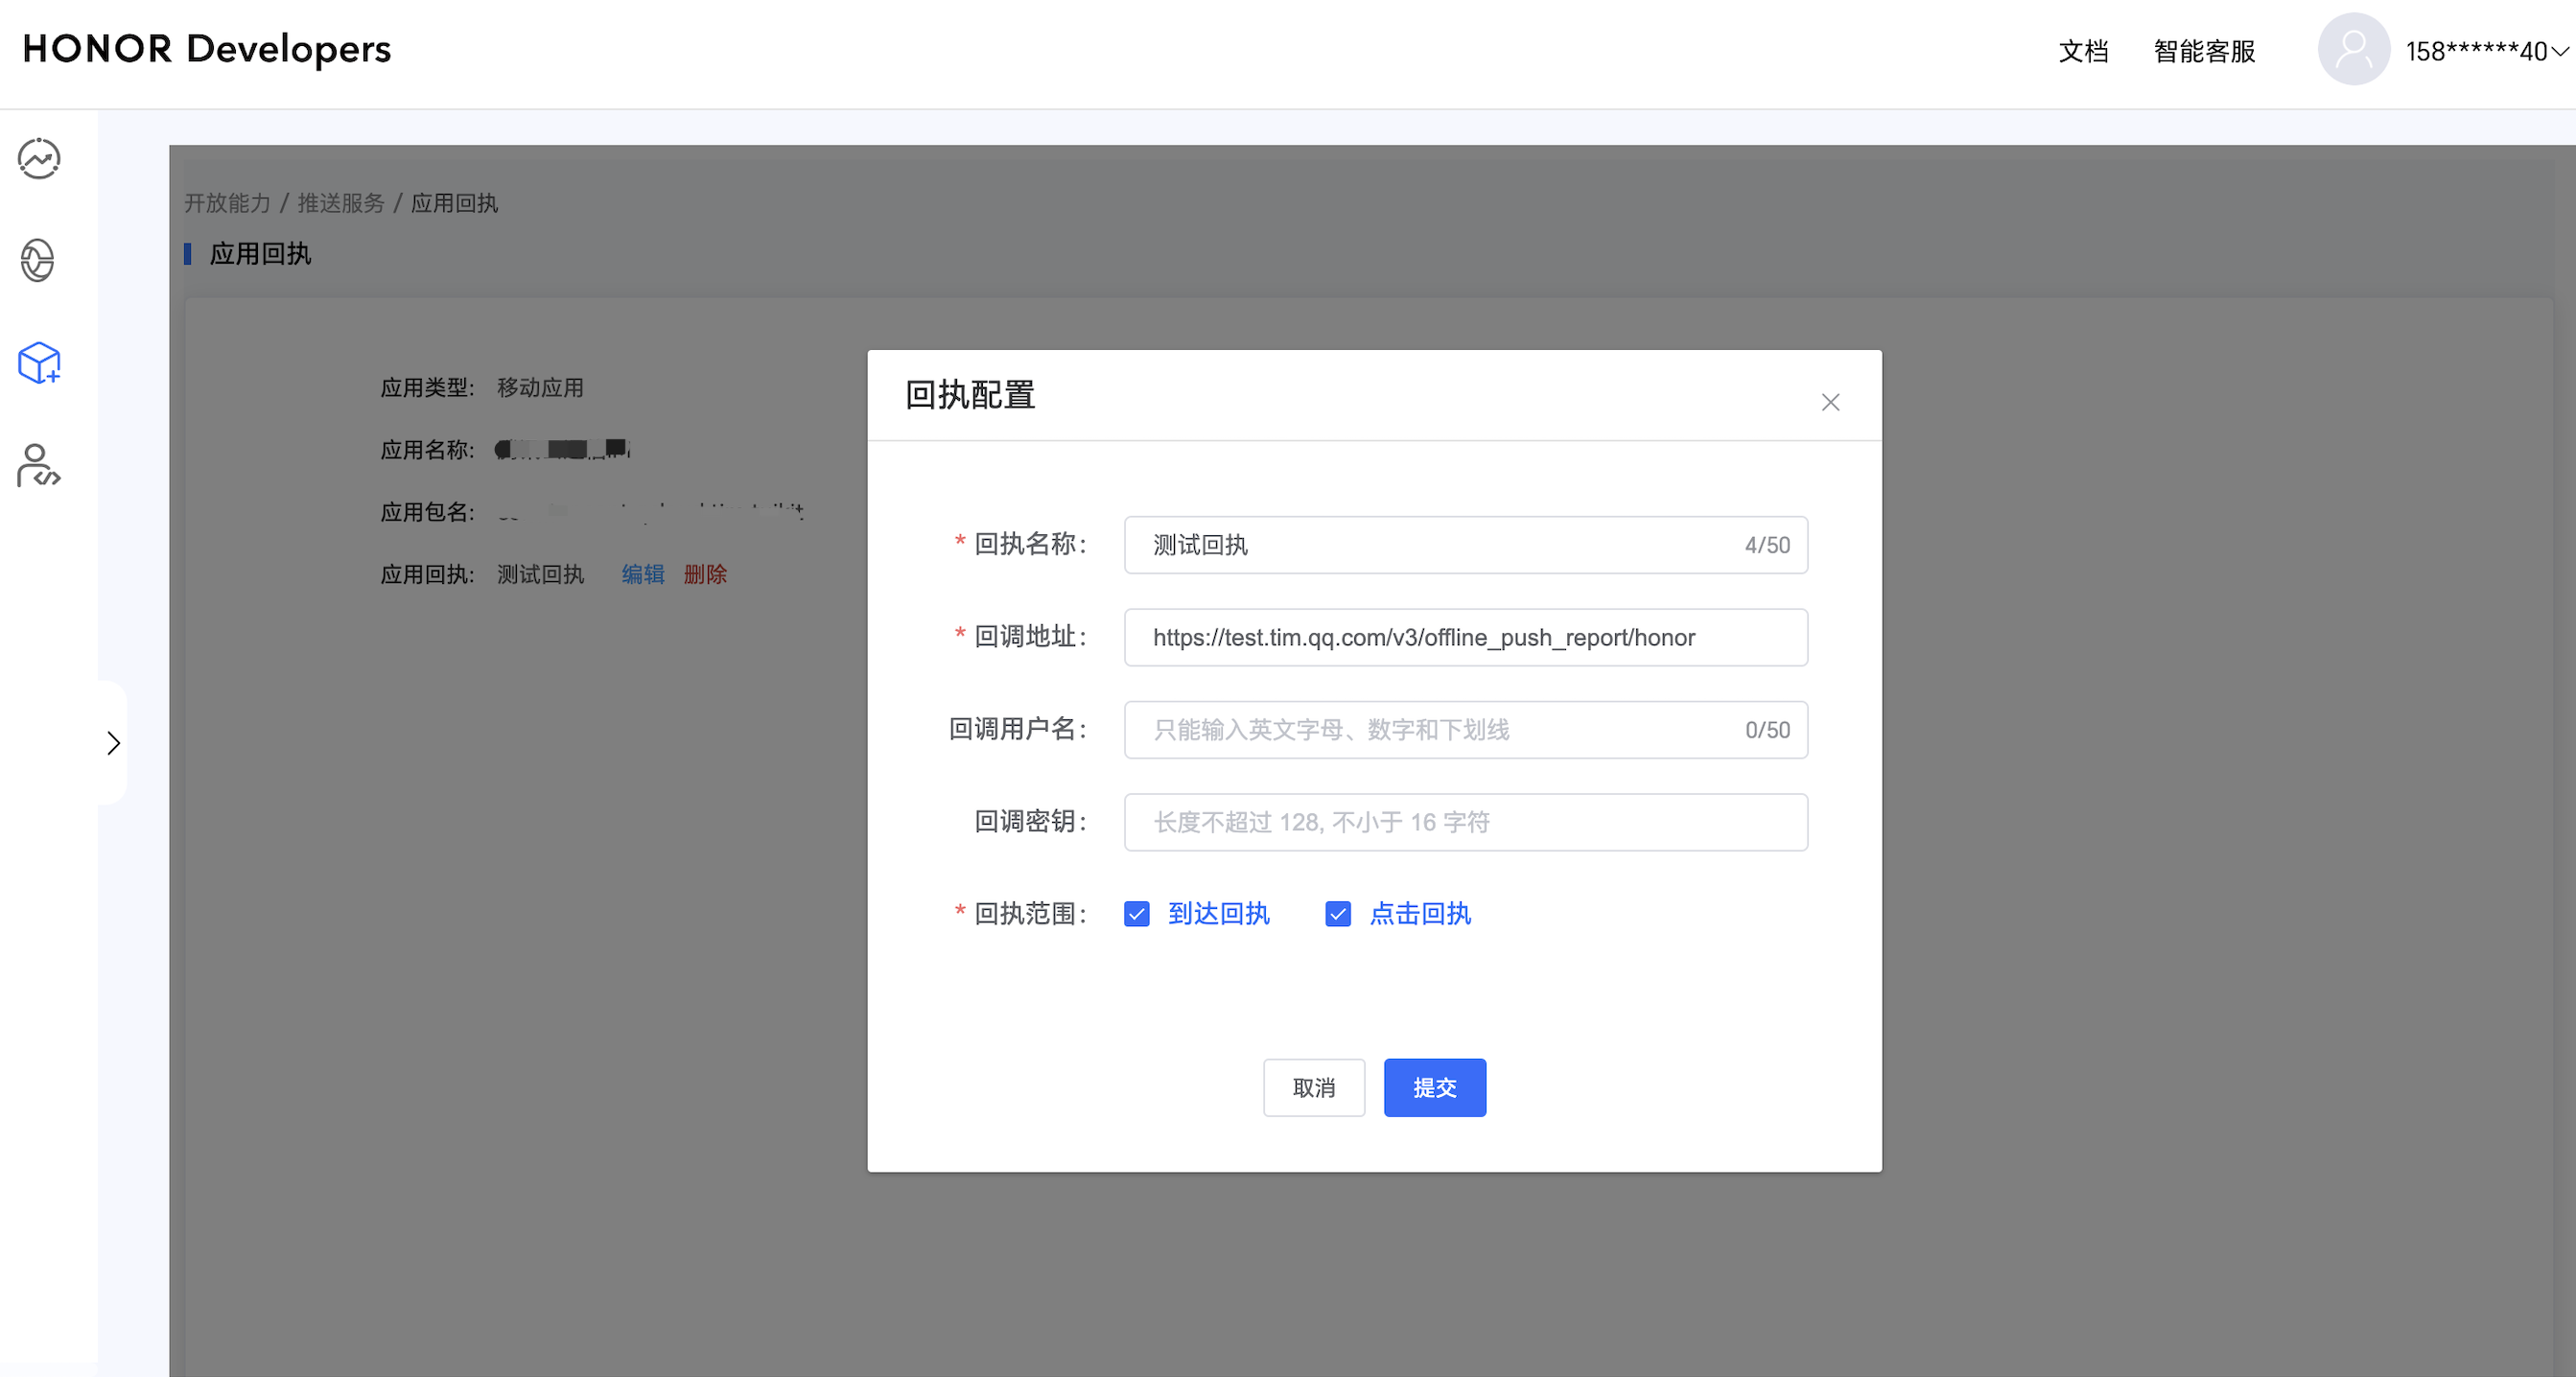
回执地址:
https://api.im.qcloud.com/v3/offline_push_report/honor回调地址配置 | 回执 ID 配置到 IM 控制台 |
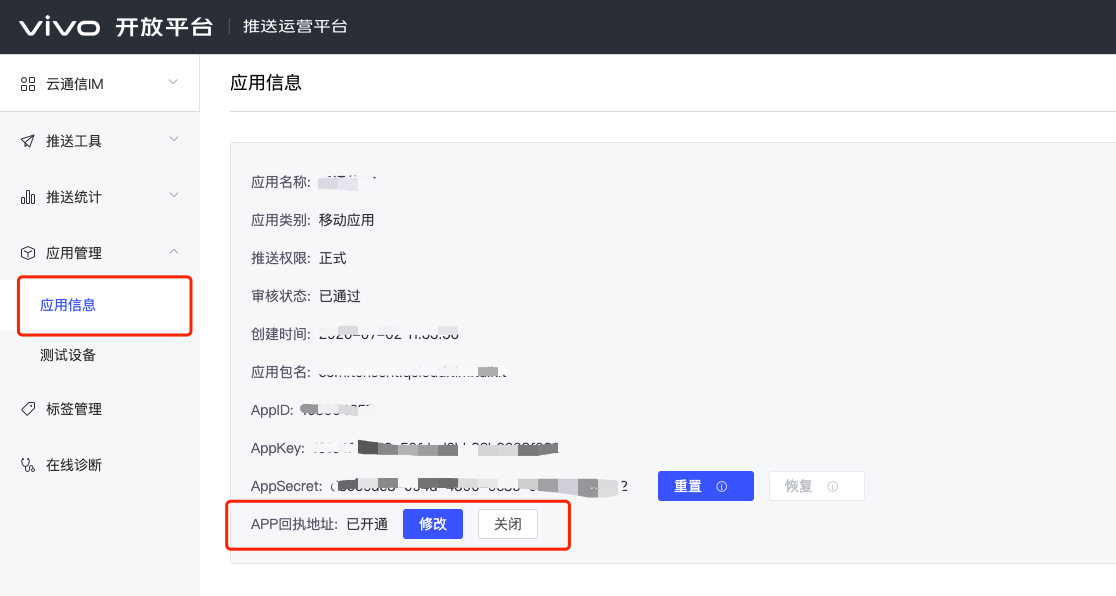 回执地址: https://api.im.qcloud.com/v3/offline_push_report/vivo | 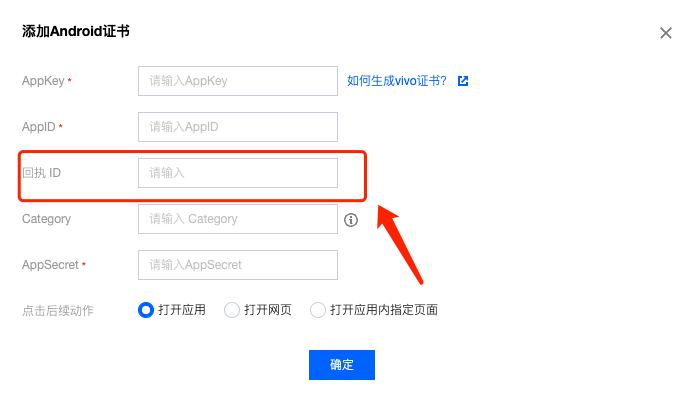 |
打开回执开关 | 配置回执地址 |
 |  |
回执地址:
https://api.im.qcloud.com/v3/offline_push_report/meizu注意:
打开回执开关后,请务必确保回执地址正确配置。不配置或者配置地址错误,都会影响推送功能。
iOS 端推送触达统计配置,请参见:
如果您需要统计推送的抵达和点击数据,您需要在 AppDelegate.m 文件中实现
- applicationGroupID 方法,这里可参考推送参数配置部分,返回 App Group ID (生成方式可参见 厂商配置-生成 App GroupID)。在 Notification Service Extension 的
-didReceiveNotificationRequest:withContentHandler: 方法中调用推送抵达率统计函数:@implementation NotificationService- (void)didReceiveNotificationRequest:(UNNotificationRequest *)request withContentHandler:(void (^)(UNNotificationContent * _Nonnull))contentHandler {//appGroup 标识当前主 APP 和 Extension 之间共享的 APP Group,需要在主 APP 的 Capability 中配置 App Groups 能力。//格式为group + [主bundleID]+ key//如group.com.tencent.im.pushkeyNSString * appGroupID = kTIMPushAppGroupKey;__weak typeof(self) weakSelf = self;[TIMPushManager handleNotificationServiceRequest:request appGroupID:appGroupID callback:^(UNNotificationContent *content) {weakSelf.bestAttemptContent = [content mutableCopy];// Modify the notification content here...// self.bestAttemptContent.title = [NSString stringWithFormat:@"%@ [modified]", self.bestAttemptContent.title];weakSelf.contentHandler(weakSelf.bestAttemptContent);}];}@end
注意:
1. 上报推送触达数据,需要开启 mutable-content 开关来支持 iOS 10 的 Extension 功能。

2. 数据详情可在推送数据页面查看,推送数据页面仅限 购买推送插件 后使用。
其余支持厂商不需要配置,FCM 暂不支持推送统计功能。


