操作场景
在对象存储(Cloud Object Storage,COS)服务中,每次发送请求时,COS 服务端都会为请求生成一个 ID,即 RequestId。当您在使用 COS 过程中遇到问题(如上传失败、访问异常等),可以在 自助诊断工具 中填入请求的 RequestId,帮助您快速定位使用 COS API 的错误问题。本文为您介绍在不同场景下获取 RequestId 的方法。
在控制台通过浏览器获取
1. 登录 对象存储控制台,在左侧导航栏中单击存储桶列表,进入存储桶列表页。
2. 单击存储桶名称进入想要访问的存储桶。
3. 按
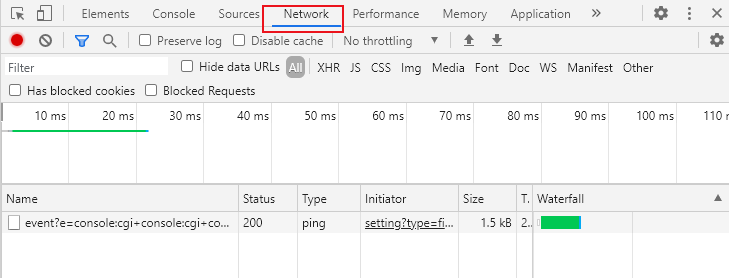
F12键,进入浏览器的开发者工具页面。4. 单击开发者工具上方的 Network。


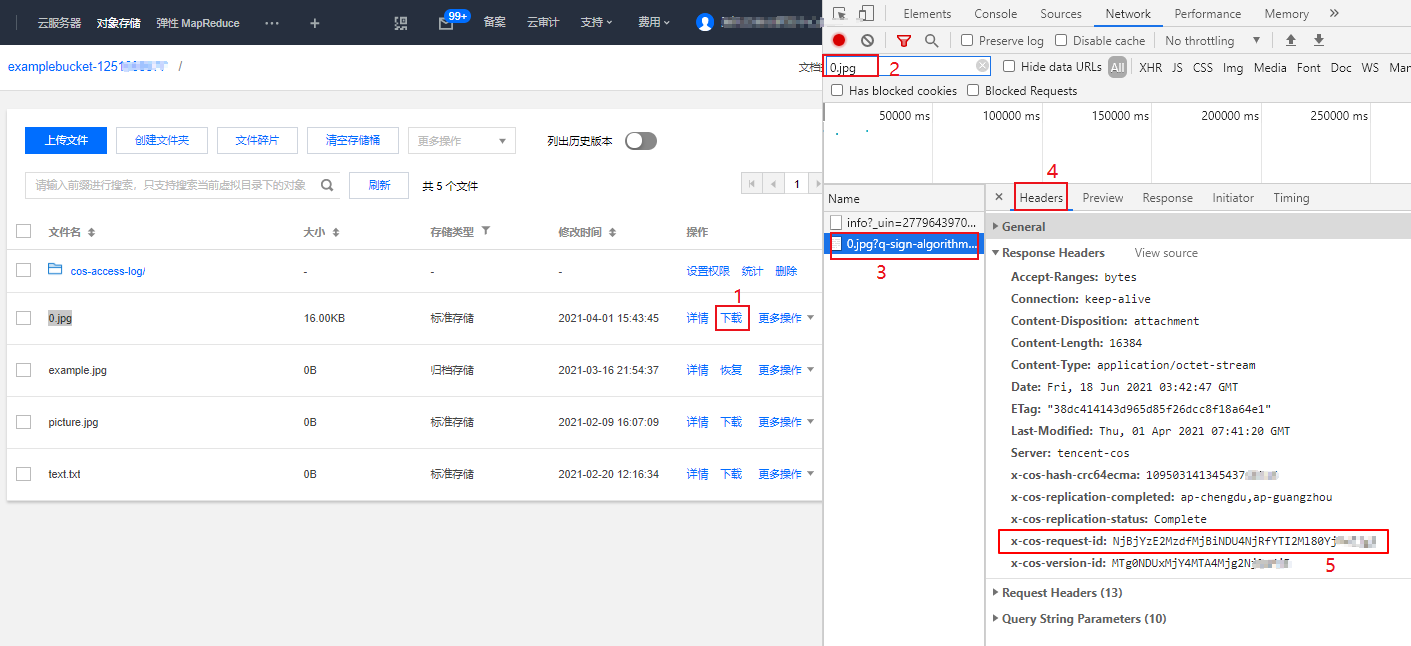
5. 在需要下载的文件名右侧,单击下载,并在开发者工具页面中输入要下载的文件名进行过滤,选择文件,单击 Headers,在 Response Headers 区域中获取 RequestId 信息。


访问文件失败时获取
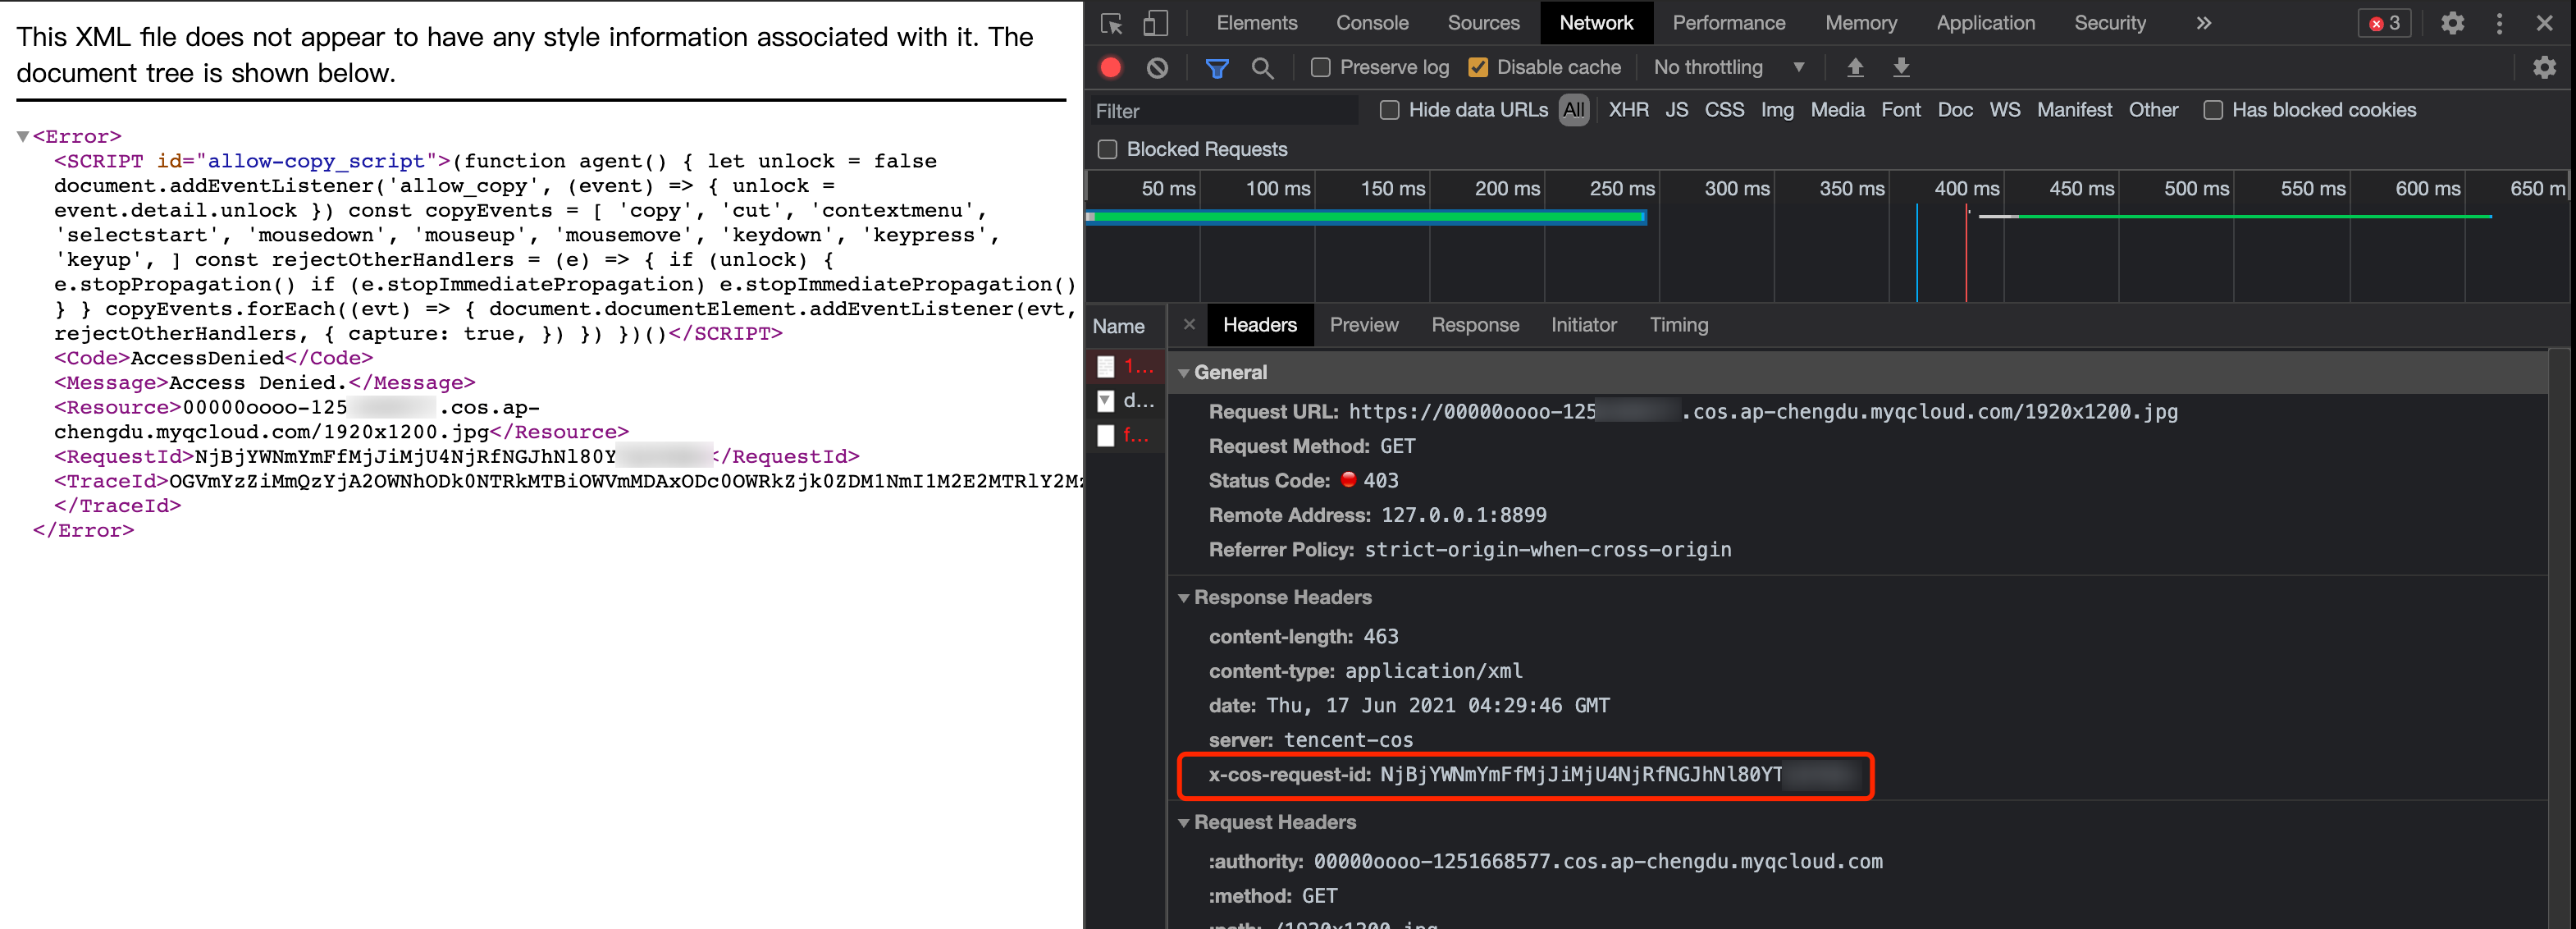
您可以在访问文件失败时,从页面展示返回的 XML 信息中获取 RequestId 节点信息。


也可以进行如下操作获取:
1. 按
F12键,进入浏览器的开发者工具页面。2. 单击页面上方的 Network,选择 All 类型,便能在 Response Headers 中找到 RequestId 字段信息。


通过 SDK 获取
由于 SDK 包含的接口太多,无法一一穷举所有接口示例,故所有的 SDK 均以上传文件为例,演示如何获取当前操作的 RequestId。
通过 .NET SDK 获取
try{string bucket = "examplebucket-1250000000"; //存储桶,格式:BucketName-APPIDstring cosPath = "test.cs"; // 对象键byte[] data = System.Text.Encoding.Default.GetBytes("Hello COS"); // 二进制数据PutObjectRequest putObjectRequest = new PutObjectRequest(bucket, cosPath, data);PutObjectResult result = cosXml.PutObject(putObjectRequest);string requestId = result.responseHeaders.GetValueOrDefault("x-cos-request-id")[0];Console.WriteLine(requestId);}catch (COSXML.CosException.CosClientException clientEx){//请求失败Console.WriteLine("CosClientException: " + clientEx);}catch (COSXML.CosException.CosServerException serverEx){//请求失败Console.WriteLine("CosServerException: " + serverEx.GetInfo());}
通过 Go SDK 获取
package mainimport ("context""fmt""net/http""net/url""strings""github.com/tencentyun/cos-go-sdk-v5")func main() {// 将 examplebucket-1250000000 和 COS_REGION 修改为真实的信息u, _ := url.Parse("https://examplebucket-1250000000.cos.COS_REGION.myqcloud.com")b := &cos.BaseURL{BucketURL: u}c := cos.NewClient(b, &http.Client{Transport: &cos.AuthorizationTransport{SecretID: "SECRETID",SecretKey: "SECRETKEY",},})// 对象键(Key)是对象在存储桶中的唯一标识。// 例如,在对象的访问域名 `examplebucket-1250000000.cos.COS_REGION.myqcloud.com/test.go` 中,对象键为 test.goname := "test.go"// 1.通过字符串上传对象f := strings.NewReader("Hello COS")response, err := c.Object.Put(context.Background(), name, f, nil)if err != nil {// error 信息中直接包含 RequestId 字段panic(err)}requestId := response.Header.Get("X-Cos-Request-Id")fmt.Println(requestId)}
通过 Java SDK 获取
// 1 初始化用户身份信息(secretId, secretKey)。String secretId = "SECRETID";String secretKey = "SECRETKEY";COSCredentials cred = new BasicCOSCredentials(secretId, secretKey);// 2 设置 bucket 的地域, COS 地域的简称请参照 https://cloud.tencent.com/document/product/436/6224// clientConfig 中包含了设置 region, https(默认 http), 超时, 代理等 set 方法, 使用可参见源码或者常见问题 Java SDK 部分。Region region = new Region("COS_REGION");ClientConfig clientConfig = new ClientConfig(region);// 这里建议设置使用 https 协议clientConfig.setHttpProtocol(HttpProtocol.https);// 3 生成 cos 客户端。COSClient cosClient = new COSClient(cred, clientConfig);// Bucket 的命名格式为 BucketName-APPID ,此处填写的存储桶名称必须为此格式String bucketName = "examplebucket-1250000000";String content = "Hello COS";String key = "test.java";PutObjectResult putObjectResult = cosClient.putObject(bucketName, key, content);String requestId = putObjectResult.getRequestId();System.out.println(requestId);
通过 Python SDK 获取
# -*- coding=utf-8from qcloud_cos import CosConfigfrom qcloud_cos import CosS3Clientimport sysimport osimport logging# 正常情况日志级别使用 INFO,需要定位时可以修改为 DEBUG,此时 SDK 会打印和服务端的通信信息logging.basicConfig(level=logging.INFO, stream=sys.stdout)# 1. 设置用户属性, 包括 secret_id, secret_key, region等。Appid 已在 CosConfig 中移除,请在参数 Bucket 中带上 Appid。Bucket 由 BucketName-Appid 组成secret_id = os.environ['COS_SECRET_ID'] # 用户的 SecretId,建议使用子账号密钥,授权遵循最小权限指引,降低使用风险。子账号密钥获取可参见 https://cloud.tencent.com/document/product/598/37140secret_key = os.environ['COS_SECRET_KEY'] # 用户的 SecretKey,建议使用子账号密钥,授权遵循最小权限指引,降低使用风险。子账号密钥获取可参见 https://cloud.tencent.com/document/product/598/37140region = 'ap-beijing' # 替换为用户的 region,已创建桶归属的 region 可以在控制台查看,https://console.cloud.tencent.com/cos5/bucket# COS 支持的所有 region 列表参见 https://cloud.tencent.com/document/product/436/6224token = None # 如果使用永久密钥不需要填入 token,如果使用临时密钥需要填入,临时密钥生成和使用指引参见 https://cloud.tencent.com/document/product/436/14048scheme = 'https' # 指定使用 http/https 协议来访问 COS,默认为 https,可不填config = CosConfig(Region=region, SecretId=secret_id, SecretKey=secret_key, Token=token, Scheme=scheme)client = CosS3Client(config)try:response = client.put_object(Bucket='examplebucket-1250000000',Key='exampleobject',Body=b'abcdefg')# 请求正常返回通过 response 查看 request-idif 'x-cos-request-id' in response:print(response['x-cos-request-id'])# 请求失败通过异常查看 request-idexcept CosServiceError as e:print(e.get_request_id())
通过 JavaScript SDK 获取
cos.putObject({Bucket: 'examplebucket-1250000000', /* 必须 */Region: 'COS_REGION', /* 必须 */Key: 'test.js', /* 必须 */StorageClass: 'STANDARD',Body: 'Hello COS',onProgress: function(progressData) {console.log(JSON.stringify(progressData));}}, function(err, data) {var requestId = (err || data).headers['x-cos-request-id'];console.log(requestId );});
通过 Node.js SDK 获取
var COS = require('cos-nodejs-sdk-v5');var cos = new COS({SecretId: 'SECRETID',SecretKey: 'SECRETKEY'});cos.putObject({Bucket: 'examplebucket-1250000000', /* 必须 */Region: 'COS_REGION', /* 必须 */Key: 'test.nodejs', /* 必须 */StorageClass: 'STANDARD',Body: Buffer.from('Hello COS'),onProgress: function(progressData) {console.log(JSON.stringify(progressData));}}, function(err, data) {var requestId = (err || data).headers['x-cos-request-id'];console.log(requestId );});
通过微信小程序 SDK 获取
var COS = require('cos-wx-sdk-v5');var cos = new COS({SecretId: 'SECRETID',SecretKey: 'SECRETKEY'});cos.putObject({Bucket: 'examplebucket-1250000000', /* 必须 */Region: 'COS_REGION', /* 必须 */Key: 'test.js', /* 必须 */StorageClass: 'STANDARD',Body: 'Hello COS',onProgress: function(progressData) {console.log(JSON.stringify(progressData));}}, function(err, data) {var requestId = (err || data).headers['x-cos-request-id'];console.log(requestId );});
通过 PHP SDK 获取
$secretId = "SECRETID"; //"云 API 密钥 SecretId";$secretKey = "SECRETKEY"; //"云 API 密钥 SecretKey";$region = "COS_REGION"; //设置一个默认的存储桶地域$cosClient = new Qcloud\\Cos\\Client(array('region' => $region,'scheme' => 'https', //协议头部,默认为 http'credentials'=> array('secretId' => $secretId ,'secretKey' => $secretKey)));# 上传文件## putObject(上传接口,最大支持上传5G文件)### 上传内存中的字符串try {$bucket = "examplebucket-1250000000"; //存储桶名称 格式:BucketName-APPID$key = "test.php"; //此处的 key 为对象键,对象键是对象在存储桶中的唯一标识$result = $cosClient->putObject(array('Bucket' => $bucket,'Key' => $key,'Body' => 'Hello COS'));$requestId = $result['RequestId'];print_r($requestId);} catch (\\Exception $e) {echo "$e\\n";}
通过 iOS SDK 获取
QCloudCOSXMLUploadObjectRequest* put = [QCloudCOSXMLUploadObjectRequest new];/** 本地文件路径,请确保 URL 是以 file:// 开头,格式如下 :1. [NSURL URLWithString:@"file:////var/mobile/Containers/Data/Application/DBPF7490-D5U8-4ABF-A0AF-CC49D6A60AEB/Documents/exampleobject"]2. [NSURL fileURLWithPath:@"/var/mobile/Containers/Data/Application/DBPF7490-D5U8-4ABF-A0AF-CC49D6A60AEB/Documents/exampleobject"]*/NSURL* url = [NSURL fileURLWithPath:@"文件的URL"];// 存储桶名称,由 BucketName-Appid 组成,可以在 COS 控制台查看 https://console.cloud.tencent.com/cos5/bucketput.bucket = @"examplebucket-1250000000";// 对象键,是对象在 COS 上的完整路径,如果带目录的话,格式为 "video/xxx/movie.mp4"put.object = @"exampleobject";// 需要上传的对象内容。可以传入 NSData*或者 NSURL*类型的变量put.body = url;// 监听上传进度[put setSendProcessBlock:^(int64_t bytesSent,int64_t totalBytesSent,int64_t totalBytesExpectedToSend) {// bytesSent 本次要发送的字节数(一个大文件可能要分多次发送)// totalBytesSent 已发送的字节数// totalBytesExpectedToSend 本次上传要发送的总字节数(即一个文件大小)}];// 监听上传结果[put setFinishBlock:^(QCloudUploadObjectResult *result, NSError *error) {// 获取requestid[result.__originHTTPURLResponse__.allHeaderFields objectForKey:@"x-cos-request-id"]}];[put setInitMultipleUploadFinishBlock:^(QCloudInitiateMultipartUploadResult *multipleUploadInitResult,QCloudCOSXMLUploadObjectResumeData resumeData) {// 在初始化分块上传完成以后会回调该 block,在这里可以获取 resumeData,uploadidNSString* uploadId = multipleUploadInitResult.uploadId;}];[[QCloudCOSTransferMangerService defaultCOSTransferManager] UploadObject:put];
通过 Android SDK 获取
// 1. 初始化 TransferService。在相同配置的情况下,您应该复用同一个 TransferServiceTransferConfig transferConfig = new TransferConfig.Builder().build();CosXmlServiceConfig cosXmlServiceConfig = new CosXmlServiceConfig.Builder().setRegion(COS_REGION).builder();CosXmlService cosXmlService = new CosXmlService(context, cosXmlServiceConfig, credentialProvider);TransferService transferService = new TransferService(cosXmlService, transferConfig);// 2. 初始化 PutObjectRequestString bucket = "examplebucket-1250000000"; //存储桶,格式:BucketName-APPIDString cosPath = "exampleobject"; //对象在存储桶中的位置标识符,即称对象键String srcPath = "examplefilepath"; //本地文件的绝对路径PutObjectRequest putObjectRequest = new PutObjectRequest(bucket,cosPath, srcPath);// 3. 调用 upload 方法上传文件final COSUploadTask uploadTask = transferService.upload(putObjectRequest);uploadTask.setCosXmlResultListener(new CosXmlResultListener() {@Overridepublic void onSuccess(CosXmlRequest request, CosXmlResult result) {// 上传成功,可以在这里拿到 requestIdString requestId = result.getHeader("x-cos-request-id");}@Overridepublic void onFail(CosXmlRequest request,CosXmlClientException clientException,CosXmlServiceException serviceException) {// 只有 CosXmlServiceException 异常才会有 requestIdif (serviceException != null) {String requestId = serviceException.getRequestId();}}});