HTTP
在这节课中,你将借助 Angular 的 HttpClient 来添加一些数据持久化特性。
HeroService通过 HTTP 请求获取英雄数据。- 用户可以添加、编辑和删除英雄,并通过 HTTP 来保存这些更改。
- 用户可以根据名字搜索英雄。
启用 HTTP 服务
HttpClient 是 Angular 通过 HTTP 与远程服务器通讯的机制。
要让 HttpClient 在应用中随处可用,请
- 打开根模块
AppModule, - 从
@angular/common/http中导入HttpClientModule符号, - 把它加入
@NgModule.imports数组。
模拟数据服务器
这个教学例子会与一个使用 内存 Web API(In-memory Web API) 模拟出的远程数据服务器通讯。
安装完这个模块之后,应用将会通过 HttpClient 来发起请求和接收响应,而不用在乎实际上是这个内存 Web API 在拦截这些请求、操作一个内存数据库,并且给出仿真的响应。
这给本教程带来了极大的便利。你不用被迫先架设一个服务器再来学习 HttpClient。
在你自己的应用开发的早期阶段这也同样很方便,那时候服务器的 Web API 可能定义上存在错误或者尚未实现。
重要: 这个内存 Web API 模块与 Angular 中的 HTTP 模块无关。
如果你只是在阅读本教程来学习 HttpClient,那么可以跳过这一步。 如果你正在随着本教程敲代码,那就留下来,并加上这个内存 Web API。
从 npm 中安装这个内存 Web API 包(译注:请使用 0.5+ 的版本,不要使用 0.4-)
content_copynpm install angular-in-memory-web-api --save导入 HttpClientInMemoryWebApiModule 和 InMemoryDataService 类(你很快就要创建它)。
src/app/app.module.ts (In-memory Web API imports)
content_copyimport { HttpClientInMemoryWebApiModule } from 'angular-in-memory-web-api';
import { InMemoryDataService }  from './in-memory-data.service';
把 HttpClientInMemoryWebApiModule 添加到 @NgModule.imports 数组中(放在 HttpClient 之后), 然后使用 InMemoryDataService 来配置它。
content_copyHttpClientModule,

// The HttpClientInMemoryWebApiModule module intercepts HTTP requests
// and returns simulated server responses.
// Remove it when a real server is ready to receive requests.
HttpClientInMemoryWebApiModule.forRoot(
  InMemoryDataService, { dataEncapsulation: false }
)
forRoot() 配置方法接受一个 InMemoryDataService 类(初期的内存数据库)作为参数。
在英雄指南范例中创建一个类 src/app/in-memory-data.service.ts,内容如下:
src/app/in-memory-data.service.ts
content_copyimport { InMemoryDbService } from 'angular-in-memory-web-api';

export class InMemoryDataService implements InMemoryDbService {
  createDb() {
    const heroes = [
      { id: 11, name: 'Mr. Nice' },
      { id: 12, name: 'Narco' },
      { id: 13, name: 'Bombasto' },
      { id: 14, name: 'Celeritas' },
      { id: 15, name: 'Magneta' },
      { id: 16, name: 'RubberMan' },
      { id: 17, name: 'Dynama' },
      { id: 18, name: 'Dr IQ' },
      { id: 19, name: 'Magma' },
      { id: 20, name: 'Tornado' }
    ];
    return {heroes};
  }
}
这个文件替代了 mock-heroes.ts(你可以安全删除它了)。
等你真实的服务器就绪时,就可以删除这个内存 Web API,该应用的请求就会直接发给真实的服务器。
现在,回来看 HttpClient。
英雄与 HTTP
导入一些所需的 HTTP 符号:
src/app/hero.service.ts (import HTTP symbols)
content_copyimport { HttpClient, HttpHeaders } from '@angular/common/http';把 HttpClient 注入到构造函数中一个名叫 http 的私有属性中。
content_copyconstructor(
  private http: HttpClient,
  private messageService: MessageService) { }
保留对 MessageService 的注入。你将会频繁调用它,因此请把它包裹进一个私有的 log 方法中。
content_copy/** Log a HeroService message with the MessageService */
private log(message: string) {
  this.messageService.add(`HeroService: ${message}`);
}
把服务器上英雄数据资源的访问地址定义为 heroesURL。
content_copyprivate heroesUrl = 'api/heroes'; // URL to web api通过 HttpClient 获取英雄
当前的 HeroService.getHeroes() 使用 RxJS 的 of() 函数来把模拟英雄数据返回为 Observable<Hero[]> 格式。
src/app/hero.service.ts (getHeroes with RxJs 'of()')
content_copygetHeroes(): Observable<Hero[]> {
  return of(HEROES);
}
把该方法转换成使用 HttpClient 的
content_copy/** GET heroes from the server */
getHeroes (): Observable<Hero[]> {
  return this.http.get<Hero[]>(this.heroesUrl)
}
刷新浏览器后,英雄数据就会从模拟服务器被成功读取。
你用 http.get 替换了 of,没有做其它修改,但是应用仍然在正常工作,这是因为这两个函数都返回了 Observable<Hero[]>。
Http 方法返回单个值
所有的 HttpClient 方法都会返回某个值的 RxJS Observable。
HTTP 是一个请求/响应式协议。你发起请求,它返回单个的响应。
通常,Observable 可以在一段时间内返回多个值。 但来自 HttpClient 的 Observable 总是发出一个值,然后结束,再也不会发出其它值。
具体到这次 HttpClient.get 调用,它返回一个 Observable<Hero[]>,顾名思义就是“一个英雄数组的可观察对象”。在实践中,它也只会返回一个英雄数组。
HttpClient.get 返回响应数据
HttpClient.get 默认情况下把响应体当做无类型的 JSON 对象进行返回。 如果指定了可选的模板类型 <Hero[]>,就会给返回你一个类型化的对象。
JSON 数据的具体形态是由服务器的数据 API 决定的。 英雄指南的数据 API 会把英雄数据作为一个数组进行返回。
其它 API 可能在返回对象中深埋着你想要的数据。 你可能要借助 RxJS 的 map 操作符对 Observable 的结果进行处理,以便把这些数据挖掘出来。
虽然不打算在此展开讨论,不过你可以到范例源码中的 getHeroNo404() 方法中找到一个使用 map 操作符的例子。
错误处理
凡事皆会出错,特别是当你从远端服务器获取数据的时候。HeroService.getHeroes() 方法应该捕获错误,并做适当的处理。
要捕获错误,你就要使用 RxJS 的 catchError() 操作符来建立对 Observable 结果的处理管道(pipe)。
从 rxjs/operators 中导入 catchError 符号,以及你稍后将会用到的其它操作符。
content_copyimport { catchError, map, tap } from 'rxjs/operators';现在,使用 .pipe() 方法来扩展 Observable 的结果,并给它一个 catchError() 操作符。
content_copygetHeroes (): Observable<Hero[]> {
  return this.http.get<Hero[]>(this.heroesUrl)
    .pipe(
      catchError(this.handleError('getHeroes', []))
    );
}
catchError() 操作符会拦截失败的 Observable。 它把错误对象传给错误处理器,错误处理器会处理这个错误。
下面的 handleError() 方法会报告这个错误,并返回一个无害的结果(安全值),以便应用能正常工作。
handleError
下面这个 errorHandler() 将会在很多 HeroService 的方法之间共享,所以要把它通用化,以支持这些彼此不同的需求。
它不再直接处理这些错误,而是返回给 catchError 返回一个错误处理函数。还要用操作名和出错时要返回的安全值来对这个错误处理函数进行配置。
content_copy/** * Handle Http operation that failed. * Let the app continue. * @param operation - name of the operation that failed * @param result - optional value to return as the observable result */private handleError<T> (operation = 'operation', result?: T) { return (error: any): Observable<T> => { // TODO: send the error to remote logging infrastructure console.error(error); // log to console instead // TODO: better job of transforming error for user consumption this.log(`${operation} failed: ${error.message}`); // Let the app keep running by returning an empty result. return of(result as T); };}在控制台中汇报了这个错误之后,这个处理器会汇报一个用户友好的消息,并给应用返回一个安全值,让它继续工作。
因为每个服务方法都会返回不同类型的 Observable 结果,因此 errorHandler() 也需要一个类型参数,以便它返回一个此类型的安全值,正如应用所期望的那样。
窥探 Observable
HeroService 的方法将会窥探 Observable 的数据流,并通过 log() 函数往页面底部发送一条消息。
它们可以使用 RxJS 的 tap 操作符来实现,该操作符会查看 Observable 中的值,使用那些值做一些事情,并且把它们传出来。 这种 tap 回调不会改变这些值本身。
下面是 getHeroes 的最终版本,它使用 tap 来记录各种操作。
content_copy/** GET heroes from the server */
getHeroes (): Observable<Hero[]> {
  return this.http.get<Hero[]>(this.heroesUrl)
    .pipe(
      tap(heroes => this.log('fetched heroes')),
      catchError(this.handleError('getHeroes', []))
    );
}
通过 id 获取英雄
大多数 web API 都可以通过 api/hero/:id 的形式(比如 api/hero/:id )支持根据 id 获取单个对象。 添加一个 HeroService.getHero() 方法来发起请求:
src/app/hero.service.ts
content_copy/** GET hero by id. Will 404 if id not found */
getHero(id: number): Observable<Hero> {
  const url = `${this.heroesUrl}/${id}`;
  return this.http.get<Hero>(url).pipe(
    tap(_ => this.log(`fetched hero id=${id}`)),
    catchError(this.handleError<Hero>(`getHero id=${id}`))
  );
}
这里和 getHeroes() 相比有三个显著的差异。
- 它使用想获取的英雄的 id 构建了一个请求 URL。
- 服务器应该使用单个英雄作为回应,而不是一个英雄数组。
- 所以,
getHero会返回Observable<Hero>(“一个可观察的单个英雄对象”),而不是一个可观察的英雄对象数组。
修改英雄
在英雄详情视图中编辑英雄的名字。 随着输入,英雄的名字也跟着在页面顶部的标题区更新了。 但是当你点击“后退”按钮时,这些修改都丢失了。
如果你希望保留这些修改,就要把它们写回到服务器。
在英雄详情模板的底部添加一个保存按钮,它绑定了一个 click 事件,事件绑定会调用组件中一个名叫 save() 的新方法:
src/app/hero-detail/hero-detail.component.html (save)
content_copy<button (click)="save()">save</button>添加如下的 save() 方法,它使用英雄服务中的 updateHero() 方法来保存对英雄名字的修改,然后导航回前一个视图。
src/app/hero-detail/hero-detail.component.ts (save)
content_copysave(): void {
   this.heroService.updateHero(this.hero)
     .subscribe(() => this.goBack());
 }
添加 HeroService.updateHero()
updateHero() 的总体结构和 getHeroes() 很相似,但它会使用 http.put()来把修改后的英雄保存到服务器上。
src/app/hero.service.ts (update)
content_copy/** PUT: update the hero on the server */
updateHero (hero: Hero): Observable<any> {
  return this.http.put(this.heroesUrl, hero, httpOptions).pipe(
    tap(_ => this.log(`updated hero id=${hero.id}`)),
    catchError(this.handleError<any>('updateHero'))
  );
}
HttpClient.put() 方法接受三个参数
- URL 地址
- 要修改的数据(这里就是修改后的英雄)
- 选项
URL 没变。英雄 Web API 通过英雄对象的 id 就可以知道要修改哪个英雄。
英雄 Web API 期待在保存时的请求中有一个特殊的头。 这个头是在 HeroService 的 httpOptions 常量中定义的。
content_copyconst httpOptions = {
  headers: new HttpHeaders({ 'Content-Type': 'application/json' })
};
刷新浏览器,修改英雄名,保存这些修改,然后点击“后退”按钮。 现在,改名后的英雄已经显示在列表中了。
添加新英雄
要添加英雄,本应用中只需要英雄的名字。你可以使用一个和添加按钮成对的 input 元素。
把下列代码插入到 HeroesComponent 模板中标题的紧后面:
src/app/heroes/heroes.component.html (add)
content_copy<div>
  <label>Hero name:
    <input #heroName />
  </label>
  <!-- (click) passes input value to add() and then clears the input -->
  <button (click)="add(heroName.value); heroName.value=''">
    add
  </button>
</div>
当点击事件触发时,调用组件的点击处理器,然后清空这个输入框,以便用来输入另一个名字。
src/app/heroes/heroes.component.ts (add)
content_copyadd(name: string): void {
  name = name.trim();
  if (!name) { return; }
  this.heroService.addHero({ name } as Hero)
    .subscribe(hero => {
      this.heroes.push(hero);
    });
}
当指定的名字非空时,这个处理器会用这个名字创建一个类似于 Hero 的对象(只缺少 id 属性),并把它传给服务的 addHero() 方法。
当 addHero 保存成功时,subscribe 的回调函数会收到这个新英雄,并把它追加到 heroes 列表中以供显示。
你将在下一节编写 HeroService.addHero。
添加 HeroService.addHero()
往 HeroService 类中添加 addHero() 方法。
src/app/hero.service.ts (addHero)
content_copy/** POST: add a new hero to the server */
addHero (hero: Hero): Observable<Hero> {
  return this.http.post<Hero>(this.heroesUrl, hero, httpOptions).pipe(
    tap((hero: Hero) => this.log(`added hero w/ id=${hero.id}`)),
    catchError(this.handleError<Hero>('addHero'))
  );
}
HeroService.addHero() 和 updateHero 有两点不同。
- 它调用
HttpClient.post()而不是put()。 - 它期待服务器为这个新的英雄生成一个 id,然后把它通过
Observable<Hero>返回给调用者。
刷新浏览器,并添加一些英雄。
删除某个英雄
英雄列表中的每个英雄都有一个删除按钮。
把下列按钮(button)元素添加到 HeroesComponent 的模板中,就在每个 <li> 元素中的英雄名字后方。
content_copy<button class="delete" title="delete hero"
  (click)="delete(hero)">x</button>
英雄列表的 HTML 应该是这样的:
src/app/heroes/heroes.component.html (list of heroes)
content_copy<ul class="heroes">
  <li *ngFor="let hero of heroes">
    <a routerLink="/detail/{{hero.id}}">
      <span class="badge">{{hero.id}}</span> {{hero.name}}
    </a>
    <button class="delete" title="delete hero"
      (click)="delete(hero)">x</button>
  </li>
</ul>
要把删除按钮定位在每个英雄条目的最右边,就要往 heroes.component.css中添加一些 CSS。你可以在下方的 最终代码 中找到这些 CSS。
把 delete() 处理器添加到组件中。
src/app/heroes/heroes.component.ts (delete)
content_copydelete(hero: Hero): void {
  this.heroes = this.heroes.filter(h => h !== hero);
  this.heroService.deleteHero(hero).subscribe();
}
虽然这个组件把删除英雄的逻辑委托给了 HeroService,但扔保留了更新它自己的英雄列表的职责。 组件的 delete() 方法会在 HeroService 对服务器的操作成功之前,先从列表中移除要删除的英雄。
组件与 heroService.delete() 返回的 Observable 还完全没有关联。必须订阅它。
如果你忘了调用 subscribe(),本服务将不会把这个删除请求发送给服务器。 作为一条通用的规则,Observable 在有人订阅之前什么都不会做。
你可以暂时删除 subscribe() 来确认这一点。点击“Dashboard”,然后点击“Heroes”,就又看到完整的英雄列表了。
添加 HeroService.deleteHero()
把 deleteHero() 方法添加到 HeroService 中,代码如下。
src/app/hero.service.ts (delete)
content_copy/** DELETE: delete the hero from the server */
deleteHero (hero: Hero | number): Observable<Hero> {
  const id = typeof hero === 'number' ? hero : hero.id;
  const url = `${this.heroesUrl}/${id}`;

  return this.http.delete<Hero>(url, httpOptions).pipe(
    tap(_ => this.log(`deleted hero id=${id}`)),
    catchError(this.handleError<Hero>('deleteHero'))
  );
}
注意
- 它调用了
HttpClient.delete。 - URL 就是英雄的资源 URL 加上要删除的英雄的
id。 - 你不用像
put和post中那样发送任何数据。 - 你仍要发送
httpOptions。
刷新浏览器,并试一下这个新的删除功能。
根据名字搜索
在最后一次练习中,你要学到把 Observable 的操作符串在一起,让你能将相似 HTTP 请求的数量最小化,并节省网络带宽。
你将往仪表盘中加入英雄搜索特性。 当用户在搜索框中输入名字时,你会不断发送根据名字过滤英雄的 HTTP 请求。 你的目标是仅仅发出尽可能少的必要请求。
HeroService.searchHeroes
先把 searchHeroes 方法添加到 HeroService 中。
src/app/hero.service.ts
content_copy/* GET heroes whose name contains search term */
searchHeroes(term: string): Observable<Hero[]> {
  if (!term.trim()) {
    // if not search term, return empty hero array.
    return of([]);
  }
  return this.http.get<Hero[]>(`${this.heroesUrl}/?name=${term}`).pipe(
    tap(_ => this.log(`found heroes matching "${term}"`)),
    catchError(this.handleError<Hero[]>('searchHeroes', []))
  );
}
如果没有搜索词,该方法立即返回一个空数组。 剩下的部分和 getHeroes()很像。 唯一的不同点是 URL,它包含了一个由搜索词组成的查询字符串。
为仪表盘添加搜索功能
打开 DashboardComponent 的模板并且把用于搜索英雄的元素 <app-hero-search> 添加到 DashboardComponent 模板的底部。
src/app/dashboard/dashboard.component.html
content_copy<h3>Top Heroes</h3>
<div class="grid grid-pad">
  <a *ngFor="let hero of heroes" class="col-1-4"
      routerLink="/detail/{{hero.id}}">
    <div class="module hero">
      <h4>{{hero.name}}</h4>
    </div>
  </a>
</div>

<app-hero-search></app-hero-search>
这个模板看起来很像 HeroesComponent 模板中的 *ngFor 复写器。
很不幸,添加这个元素让本应用挂了。 Angular 找不到哪个组件的选择器能匹配上 <app-hero-search>。
HeroSearchComponent 还不存在,这就解决。
创建 HeroSearchComponent
使用 CLI 创建一个 HeroSearchComponent。
content_copyng generate component hero-searchCLI 生成了 HeroSearchComponent 的三个文件,并把该组件添加到了 AppModule 的声明中。
把生成的 HeroSearchComponent 的模板改成一个输入框和一个匹配到的搜索结果的列表。代码如下:
src/app/hero-search/hero-search.component.html
content_copy<div id="search-component"> <h4>Hero Search</h4> <input #searchBox id="search-box" (keyup)="search(searchBox.value)" /> <ul class="search-result"> <li *ngFor="let hero of heroes$ | async" > <a routerLink="/detail/{{hero.id}}"> {{hero.name}} </a> </li> </ul></div>从下面的 最终代码 中把私有 CSS 样式添加到 hero-search.component.css中。
当用户在搜索框中输入时,一个 keyup 事件绑定会调用该组件的 search()方法,并传入新的搜索框的值。
AsyncPipe
如你所愿,*ngFor 重复渲染出了这些英雄。
仔细看,你会发现 *ngFor 是在一个名叫 heroes$ 的列表上迭代,而不是 heroes。
content_copy<li *ngFor="let hero of heroes$ | async" >$ 是一个命名惯例,用来表明 heroes$ 是一个 Observable,而不是数组。
AsyncPipe 会自动订阅到 Observable,这样你就不用再在组件类中订阅了。
修正 HeroSearchComponent 类
修改所生成的 HeroSearchComponent 类及其元数据,代码如下:
src/app/hero-search/hero-search.component.ts
content_copyimport { Component, OnInit } from '@angular/core'; import { Observable, Subject } from 'rxjs'; import { debounceTime, distinctUntilChanged, switchMap } from 'rxjs/operators'; import { Hero } from '../hero';import { HeroService } from '../hero.service'; @Component({ selector: 'app-hero-search', templateUrl: './hero-search.component.html', styleUrls: [ './hero-search.component.css' ]})export class HeroSearchComponent implements OnInit { heroes$: Observable<Hero[]>; private searchTerms = new Subject<string>(); constructor(private heroService: HeroService) {} // Push a search term into the observable stream. search(term: string): void { this.searchTerms.next(term); } ngOnInit(): void { this.heroes$ = this.searchTerms.pipe( // wait 300ms after each keystroke before considering the term debounceTime(300), // ignore new term if same as previous term distinctUntilChanged(), // switch to new search observable each time the term changes switchMap((term: string) => this.heroService.searchHeroes(term)), ); }}注意,heroes$ 声明为一个 Observable
content_copyheroes$: Observable<Hero[]>;你将会在 ngOnInit() 中设置它,在此之前,先仔细看看 searchTerms 的定义。
RxJS Subject 类型的 searchTerms
searchTerms 属性声明成了 RxJS 的 Subject 类型。
content_copyprivate searchTerms = new Subject<string>();

// Push a search term into the observable stream.
search(term: string): void {
  this.searchTerms.next(term);
}
Subject 既是可观察对象的数据源,本身也是 Observable。 你可以像订阅任何 Observable 一样订阅 Subject。
你还可以通过调用它的 next(value) 方法往 Observable 中推送一些值,就像 search() 方法中一样。
search() 是通过对文本框的 keystroke 事件的事件绑定来调用的。
content_copy<input #searchBox id="search-box" (keyup)="search(searchBox.value)" />每当用户在文本框中输入时,这个事件绑定就会使用文本框的值(搜索词)调用 search() 函数。 searchTerms 变成了一个能发出搜索词的稳定的流。
串联 RxJS 操作符
如果每当用户击键后就直接调用 searchHeroes() 将导致创建海量的 HTTP 请求,浪费服务器资源并消耗大量网络流量。
应该怎么做呢?ngOnInit() 往 searchTerms 这个可观察对象的处理管道中加入了一系列 RxJS 操作符,用以缩减对 searchHeroes() 的调用次数,并最终返回一个可及时给出英雄搜索结果的可观察对象(每次都是 Hero[] )。
代码如下:
content_copythis.heroes$ = this.searchTerms.pipe(
  // wait 300ms after each keystroke before considering the term
  debounceTime(300),

  // ignore new term if same as previous term
  distinctUntilChanged(),

  // switch to new search observable each time the term changes
  switchMap((term: string) => this.heroService.searchHeroes(term)),
);- 在传出最终字符串之前,
debounceTime(300)将会等待,直到新增字符串的事件暂停了 300 毫秒。 你实际发起请求的间隔永远不会小于 300ms。 distinctUntilChanged()会确保只在过滤条件变化时才发送请求。switchMap()会为每个从debounce和distinctUntilChanged中通过的搜索词调用搜索服务。 它会取消并丢弃以前的搜索可观察对象,只保留最近的。
借助 switchMap 操作符, 每个有效的击键事件都会触发一次 HttpClient.get() 方法调用。 即使在每个请求之间都有至少 300ms 的间隔,仍然可能会同时存在多个尚未返回的 HTTP 请求。
switchMap() 会记住原始的请求顺序,只会返回最近一次 HTTP 方法调用的结果。 以前的那些请求都会被取消和舍弃。
注意,取消前一个 searchHeroes() 可观察对象并不会中止尚未完成的 HTTP 请求。 那些不想要的结果只会在它们抵达应用代码之前被舍弃。
记住,组件类中并没有订阅 heroes$ 这个可观察对象,而是由模板中的 AsyncPipe 完成的。
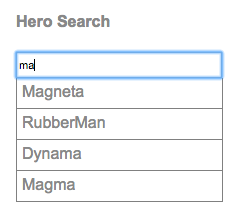
试试看
再次运行本应用。在这个 仪表盘 中,在搜索框中输入一些文字。如果你输入的字符匹配上了任何现有英雄的名字,你将会看到如下效果:
查看最终代码
本文讨论过的代码文件如下(都位于 src/app/ 文件夹中)。
HeroService, InMemoryDataService, AppModule
hero.service.ts
in-memory-data.service.ts
app.module.ts
content_copyimport { Injectable } from '@angular/core';import { HttpClient, HttpHeaders } from '@angular/common/http'; import { Observable, of } from 'rxjs';import { catchError, map, tap } from 'rxjs/operators'; import { Hero } from './hero';import { MessageService } from './message.service'; const httpOptions = { headers: new HttpHeaders({ 'Content-Type': 'application/json' })}; @Injectable({ providedIn: 'root' })export class HeroService { private heroesUrl = 'api/heroes'; // URL to web api constructor( private http: HttpClient, private messageService: MessageService) { } /** GET heroes from the server */ getHeroes (): Observable<Hero[]> { return this.http.get<Hero[]>(this.heroesUrl) .pipe( tap(heroes => this.log('fetched heroes')), catchError(this.handleError('getHeroes', [])) ); } /** GET hero by id. Return `undefined` when id not found */ getHeroNo404<Data>(id: number): Observable<Hero> { const url = `${this.heroesUrl}/?id=${id}`; return this.http.get<Hero[]>(url) .pipe( map(heroes => heroes[0]), // returns a {0|1} element array tap(h => { const outcome = h ? `fetched` : `did not find`; this.log(`${outcome} hero id=${id}`); }), catchError(this.handleError<Hero>(`getHero id=${id}`)) ); } /** GET hero by id. Will 404 if id not found */ getHero(id: number): Observable<Hero> { const url = `${this.heroesUrl}/${id}`; return this.http.get<Hero>(url).pipe( tap(_ => this.log(`fetched hero id=${id}`)), catchError(this.handleError<Hero>(`getHero id=${id}`)) ); } /* GET heroes whose name contains search term */ searchHeroes(term: string): Observable<Hero[]> { if (!term.trim()) { // if not search term, return empty hero array. return of([]); } return this.http.get<Hero[]>(`${this.heroesUrl}/?name=${term}`).pipe( tap(_ => this.log(`found heroes matching "${term}"`)), catchError(this.handleError<Hero[]>('searchHeroes', [])) ); } //////// Save methods ////////// /** POST: add a new hero to the server */ addHero (hero: Hero): Observable<Hero> { return this.http.post<Hero>(this.heroesUrl, hero, httpOptions).pipe( tap((hero: Hero) => this.log(`added hero w/ id=${hero.id}`)), catchError(this.handleError<Hero>('addHero')) ); } /** DELETE: delete the hero from the server */ deleteHero (hero: Hero | number): Observable<Hero> { const id = typeof hero === 'number' ? hero : hero.id; const url = `${this.heroesUrl}/${id}`; return this.http.delete<Hero>(url, httpOptions).pipe( tap(_ => this.log(`deleted hero id=${id}`)), catchError(this.handleError<Hero>('deleteHero')) ); } /** PUT: update the hero on the server */ updateHero (hero: Hero): Observable<any> { return this.http.put(this.heroesUrl, hero, httpOptions).pipe( tap(_ => this.log(`updated hero id=${hero.id}`)), catchError(this.handleError<any>('updateHero')) ); } /** * Handle Http operation that failed. * Let the app continue. * @param operation - name of the operation that failed * @param result - optional value to return as the observable result */ private handleError<T> (operation = 'operation', result?: T) { return (error: any): Observable<T> => { // TODO: send the error to remote logging infrastructure console.error(error); // log to console instead // TODO: better job of transforming error for user consumption this.log(`${operation} failed: ${error.message}`); // Let the app keep running by returning an empty result. return of(result as T); }; } /** Log a HeroService message with the MessageService */ private log(message: string) { this.messageService.add(`HeroService: ${message}`); }}HeroesComponent
heroes/heroes.component.html
heroes/heroes.component.ts
heroes/heroes.component.css
content_copy<h2>My Heroes</h2> <div> <label>Hero name: <input #heroName /> </label> <!-- (click) passes input value to add() and then clears the input --> <button (click)="add(heroName.value); heroName.value=''"> add </button></div> <ul class="heroes"> <li *ngFor="let hero of heroes"> <a routerLink="/detail/{{hero.id}}"> <span class="badge">{{hero.id}}</span> {{hero.name}} </a> <button class="delete" title="delete hero" (click)="delete(hero)">x</button> </li></ul>HeroDetailComponent
hero-detail/hero-detail.component.html
hero-detail/hero-detail.component.ts
content_copy<div *ngIf="hero">
  <h2>{{hero.name | uppercase}} Details</h2>
  <div><span>id: </span>{{hero.id}}</div>
  <div>
    <label>name:
      <input [(ngModel)]="hero.name" placeholder="name"/>
    </label>
  </div>
  <button (click)="goBack()">go back</button>
  <button (click)="save()">save</button>
</div>
HeroSearchComponent
hero-search/hero-search.component.html
hero-search/hero-search.component.ts
hero-search/hero-search.component.css
content_copy<div id="search-component"> <h4>Hero Search</h4> <input #searchBox id="search-box" (keyup)="search(searchBox.value)" /> <ul class="search-result"> <li *ngFor="let hero of heroes$ | async" > <a routerLink="/detail/{{hero.id}}"> {{hero.name}} </a> </li> </ul></div>小结
旅程即将结束,不过你已经收获颇丰。
- 你添加了在应用程序中使用 HTTP 的必备依赖。
- 你重构了
HeroService,以通过 web API 来加载英雄数据。 - 你扩展了
HeroService来支持post()、put()和delete()方法。 - 你修改了组件,以允许用户添加、编辑和删除英雄。
- 你配置了一个内存 Web API。
- 你学会了如何使用“可观察对象”。
《英雄指南》教程结束了。 如果你准备开始学习 Angular 开发的原理,请开始 架构 一章。
本文档系腾讯云开发者社区成员共同维护,如有问题请联系 cloudcommunity@tencent.com