GroundAnything:一个 4B 的"指哪打哪"模型,凭什么敢说比 GPT 级大模型还能打?
原创
GroundAnything:一个 4B 的"指哪打哪"模型,凭什么敢说比 GPT 级大模型还能打?
原创
大盘鸡拌面
发布于 2026-10-13 21:15:08
发布于 2026-10-13 21:15:08
一、先说清楚:这模型解决的到底是个什么问题
先别急着看架构图。咱们从一个特别朴素的问题聊起——你给模型一张图,说"帮我框出那辆红色的车",模型该怎么回答你?
现在主流做法(包括大部分多模态大模型)是这样的:把框写成一串 token,然后像写句子一样一个一个往外吐。<car><100><200><500><650>,吐完 <car> 才能吐 <100>,吐完 <100> 才能吐 <200>。这叫自回归,AR。
问题就出在这儿。
一个框 4 个数也就算了,但你要是让模型"把这张街景里所有车、人、骑车的人都框出来"呢?三十个目标就是三十串 token,一字排开,一个一个等。而且更要命的是——这玩意儿根本没有"从左到右"的天然顺序。图里左边那辆车和右边那个人,它俩谁先被框出来有关系吗?一点关系没有。是你硬给它们排了个队。
GroundAnything 这帮人(小鹏牵头,北大、港大、伯克利、普林斯顿一堆学校一起)的想法特别直接:既然这些坐标之间没有因果关系,那我凭什么要用因果的语言模型去生成它?
于是他们把扩散(diffusion)那套搬过来了。不是做图像生成的那种扩散,是离散的、作用在 token 上的扩散——先把整段回答全部盖成 [MASK],然后一轮一轮地"猜"出来:第一轮所有位置同时给个粗糙的猜测,第二轮看着彼此的结果再修一修,几轮之后收敛。
这就好比让大家同时动手画草稿,而不是排好队一个一个上黑板。
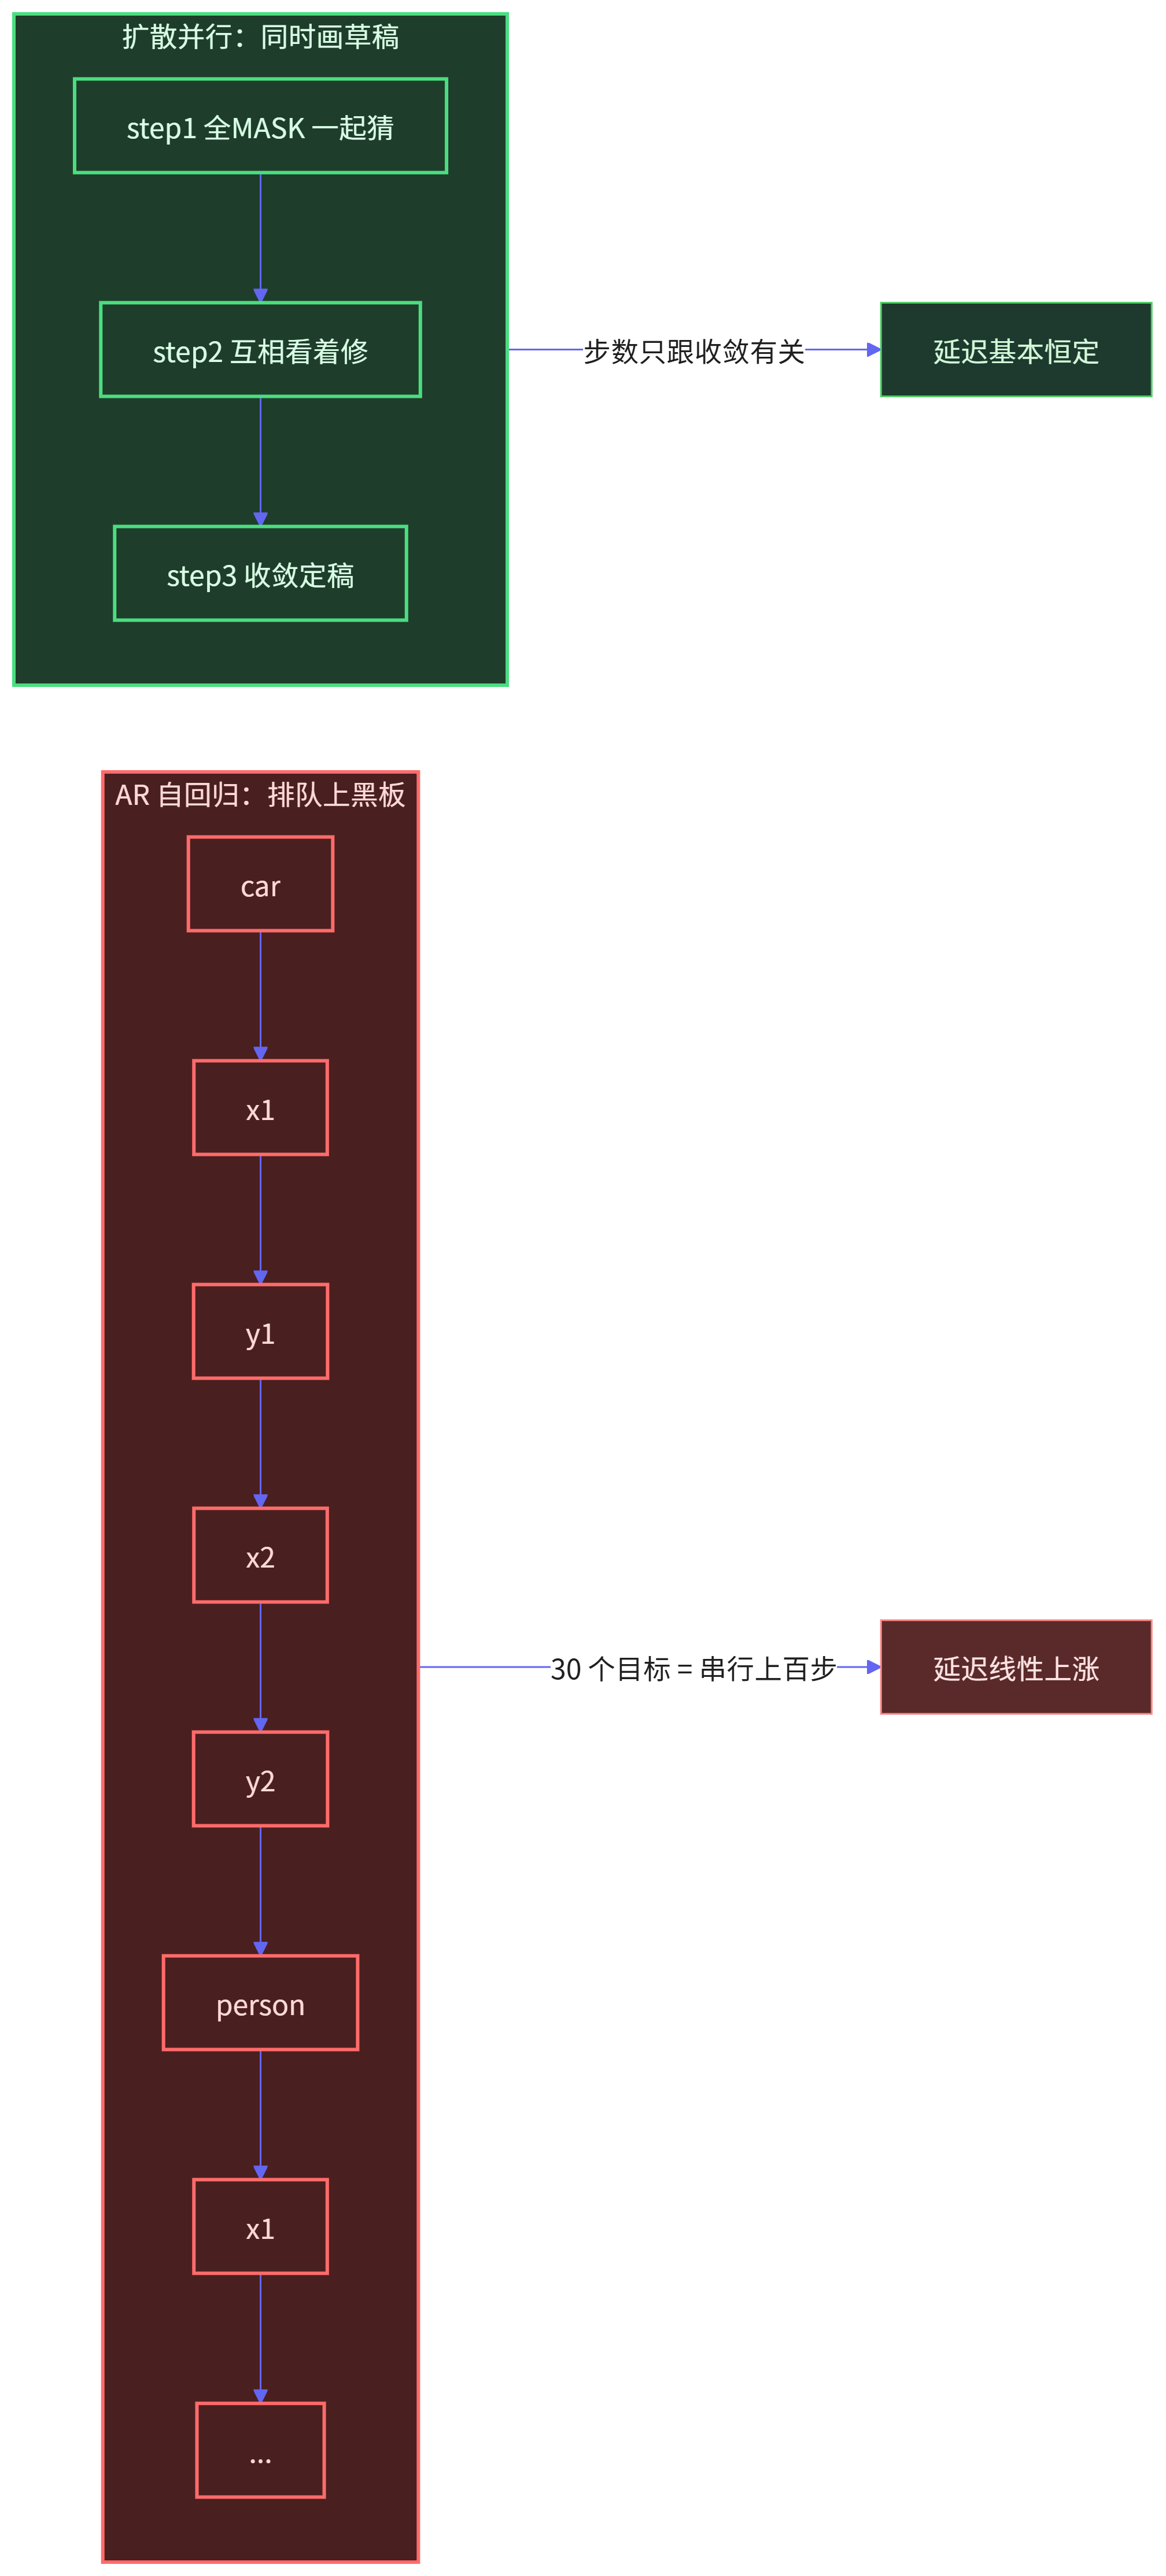
说白了,GroundAnything 这篇论文(arXiv:2609.39600)的题眼就在这儿:把定位这件事从"生成"重新定义成"证据提取"。物体在哪、是什么、跟别的东西什么关系,这些是图本身和你的问题一起约束出来的,不是靠上文推出来的。既然是约束满足问题,那就该并行求解。
二、它具体动了哪几刀
坐标不是数字,是词
第一刀砍在表示上。GroundAnything 把坐标量化成 0–999 一共 1000 个整数 token,直接塞进词表里,跟语义标签、协议标记共用一套词表。
这个设计看着平平无奇,其实省了很多事。你不用再为"回归头怎么设计""bbox 损失怎么加权"发愁,检测、指代、点定位、OCR、版面分析、GUI 元素定位,全都能归到同一个"生成一串结构化 token"的框架里。官方给的协议长这样:
<|object_ref_start|>car<|object_ref_end|><|box_start|><100><200><500><650><|box_end|>点就是两个坐标,目标不存在就填 None。干净利落,解析起来也就是个正则的事。
块级去噪:块内双向,块间因果
第二刀是最关键的工程妥协。纯扩散有个毛病——全双向注意力意味着 KV Cache 基本没法复用,每轮去噪都得重算,长回答直接爆炸。
他们的做法是切成块:块内部用双向注意力(所以块内的坐标可以互相看、并行猜),块与块之间保持因果(所以前面块的 KV 能缓存下来)。
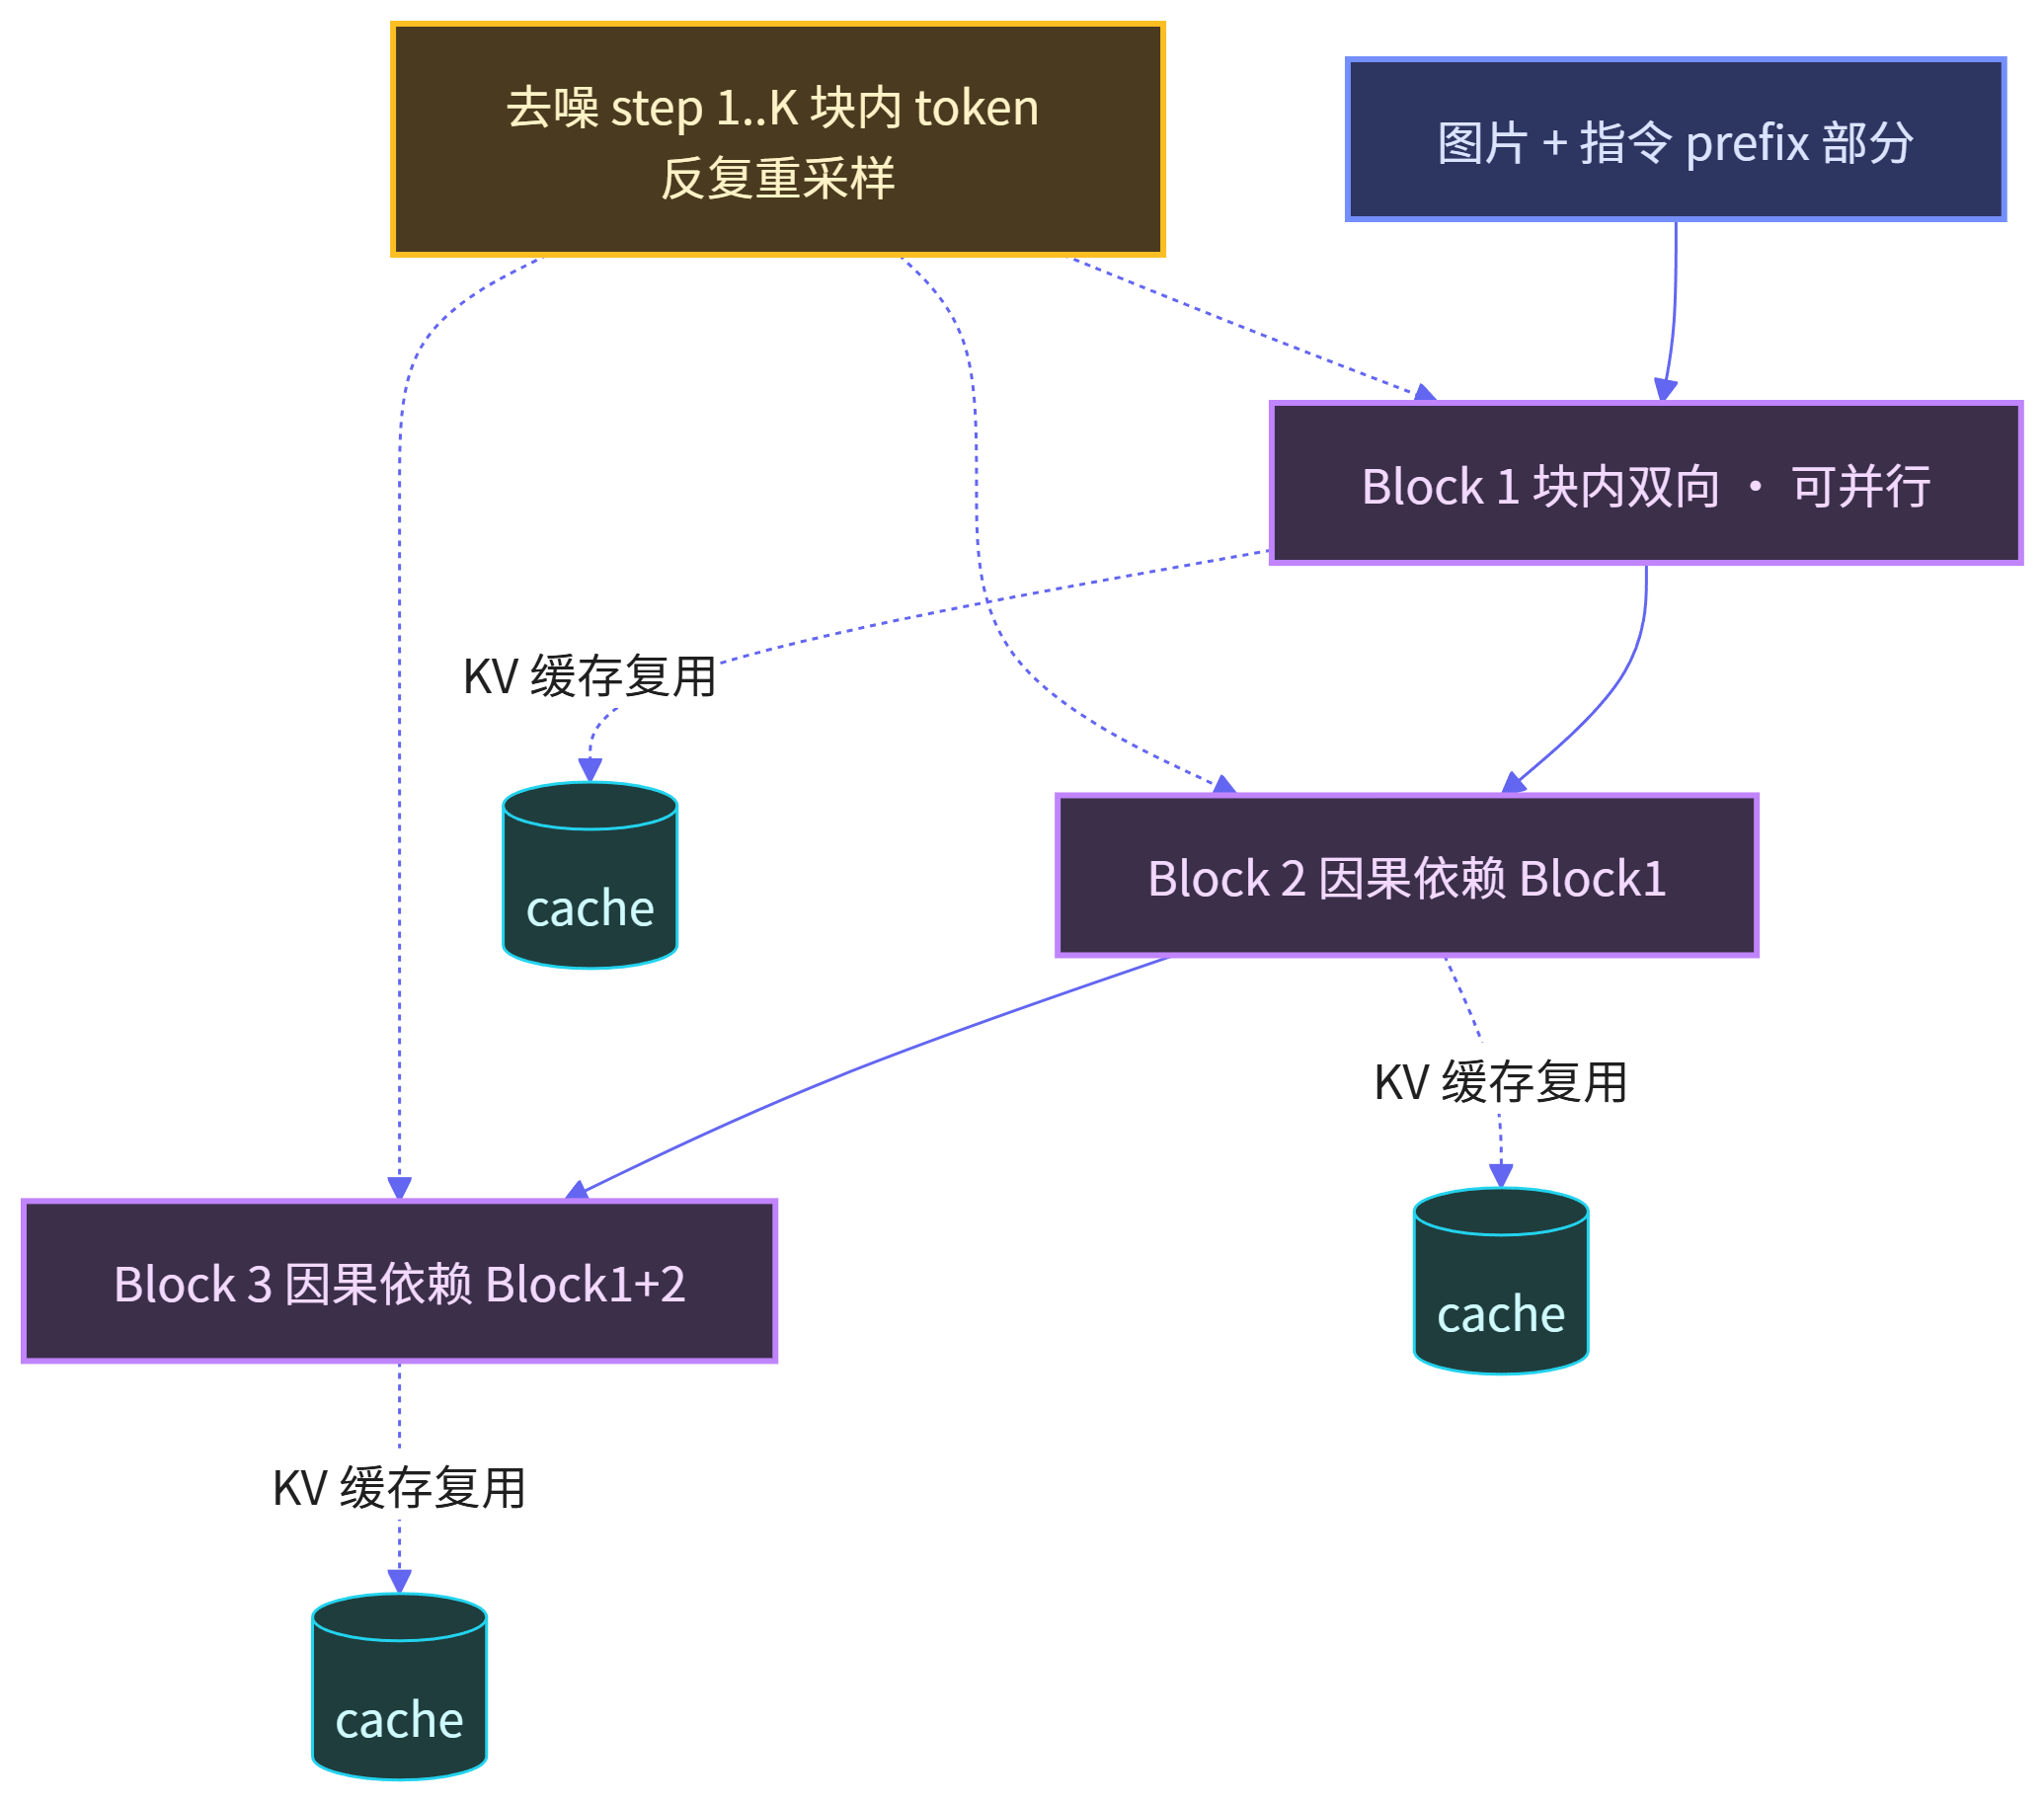
这样一来,"并行"和"能缓存"两个好处都拿到了。我觉得这是整篇论文里最值得抄的一招——不要为了范式 purity 牺牲工程可行性。纯扩散很美,但在需要 KV 复用的推理引擎里它就是跑不动,切块就是那个让理论能落地的缝合线。
训练:先当 AR 训,再转成扩散
第三刀在训练流程上。他们没有从零训一个扩散模型(那太贵了),而是拿一个训好的 AR checkpoint,直接做 AR→扩散的转换,转换时用 AR 和扩散的联合目标一起约束。之后才是 SFT + GRPO 强化学习后训练。

这个"一鱼两吃"的思路很聪明:同一个预训练底座,分岔出两个 checkpoint。AR 版(GroundAnything-VLM)负责刷榜,扩散版(GroundAnything)负责工程落地。底座是 MoonViT-V2 / Kimi-K3 的视觉编码器 + Qwen3-4B-Instruct-2507 的语言骨干,中间 2×2 空间聚合加两层 MLP 对齐。
三、三种解码姿势,怎么选才不亏
模型给了三种跑法,这个必须讲清楚,因为选错了你得到的结论会完全不一样。
姿势 | 模型 | 速度 | 精度 | 什么时候用 |
|---|---|---|---|---|
熵引导去噪(entropy-guided) | GroundAnything | 比 AR 快 2 倍以上 | 30 个基准平均 61.75% | 默认档,官方主结果都用它 |
自推测解码(self-speculative) | GroundAnything | 4.51× 于 AR 版 | COCO F1mIoU 只掉 0.74pp | 线上要吞吐,密集场景 |
自回归 | GroundAnything-VLM | 基准线 | 30 个基准平均 72.42% | 要精度、要刷榜、不怕慢 |
几个数字得说清楚,别被绕进去:
- GroundAnything-VLM 的 72.42% 和 GroundAnything 的 61.75% 不是同一个东西在比。前者是 AR 版在 30 个基准上的均分,后者是扩散版在熵引导模式下的均分。AR 版确实更强,这是实话,论文也没藏着——它直接说了 "remains competitive with GPT-6 Astra(71.35%)"。
- 但 61.75% 这个数字的意义在于:它超过了同规模下靠 MTP 做并行框解码的 LocateAnything(53.32%)。也就是说,在"要快"这个赛道上,扩散路线第一次打赢了 AR 路线的加速方案。
- 自推测解码那个 4.51× 是这么来的:扩散先并行起草(draft),AR 再来验证(verify)。起草是并行的所以快,验证能兜住精度所以只掉 0.74 个点。这个组合我觉得是全文最实用的一招。
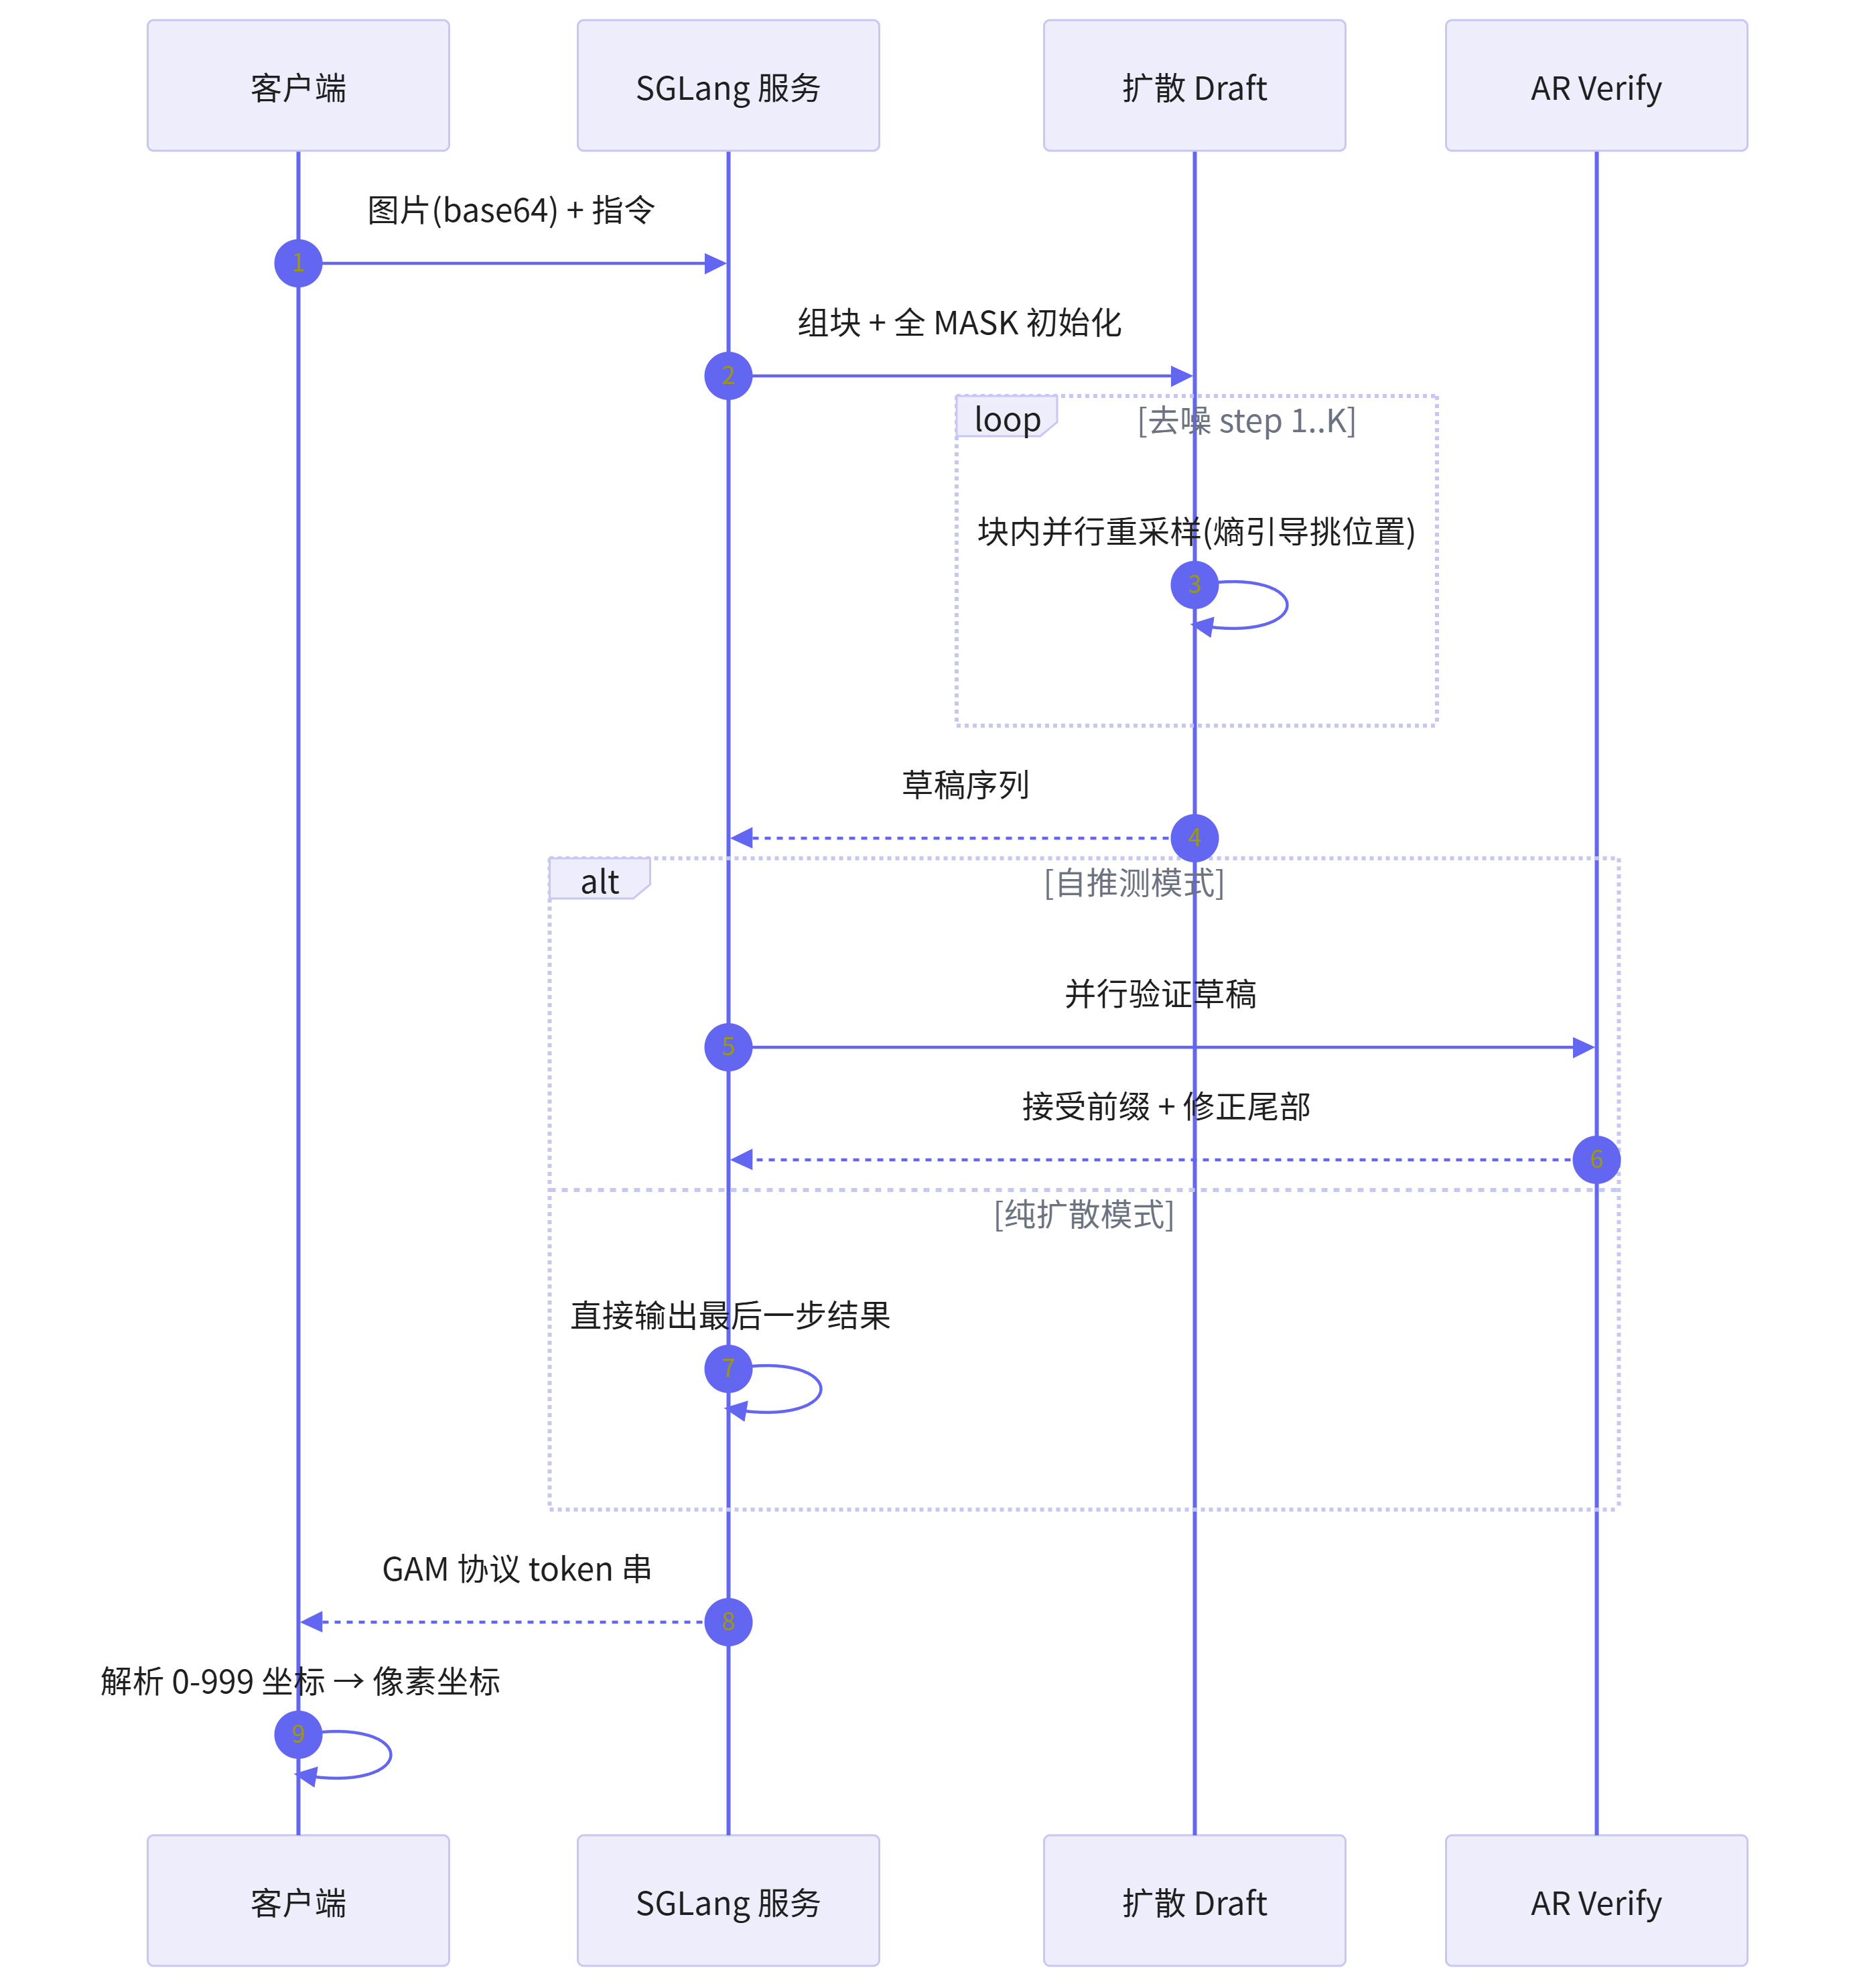
推理侧他们还做了 SGLang + CUDA Graph + FP8 的渐进优化。这点我特别认同——并行解码在纸面上快,不代表在服务里真快。块级去噪这种非标准 attention pattern,标准推理引擎根本不认,你不改引擎,理论上那个 4.51× 一分钱都拿不到。他们直接把定制版 SGLang 一起开源了,这个态度比发个权重厚道多了。
四、本地跑起来:从拉权重到拿到第一个框
环境要求 Linux x86_64 + Python 3.12,卡支持 B300 / B200 / H200 / H800 / PPU。注意 requirements.txt 只装客户端,不含模型运行时,服务环境要单独 setup。
git clone https://github.com/groundingpi/GroundAnything.git
cd GroundAnything
python3 -m pip install -r requirements.txt huggingface_hub

# 拉扩散版权重(已经是完整 bundle,不用再 prepare-model)
hf download GroundingPI/GroundAnything --local-dir weights/dlm_bundle

# 装服务环境,然后起服务
python3 run.py setup serve
python3 run.py serve --decoder denoise      # 熵引导
# python3 run.py serve --decoder speculative  # 想换自推测,先停掉上面这个
AR 版是另一套权重、另一个端口:
hf download GroundingPI/GroundAnything-VLM --local-dir weights/vlm
python3 run.py serve --config configs/release/vlm_sglang.yaml
两个服务的地址和模型 ID 别搞混:
服务 | Base URL | Model ID |
|---|---|---|
GroundAnything (DLM) | http://127.0.0.1:8101/v1 | groundinganything |
GroundAnything-VLM | http://127.0.0.1:8102/v1 | groundinganything-vlm |
客户端调用非常简单:
from grounding_anything import GroundingAnything, visualize

client = GroundingAnything(
    base_url="http://127.0.0.1:8101/v1",
    model="groundinganything",
)

# 指代框
result = client.predict("street.jpg", "the red car", task="bbox")
print(result.to_dict())

if result.valid:
    visualize("street.jpg", result).save("prediction.png")

# 指代点
point = client.predict("street.jpg", "the center of the red car", task="point")
print(point.to_dict())result.to_dict() 里有 task、predictions、raw_output、finish_reason、usage、parse_error、valid。坐标是 0–999 网格上的整数,可视化函数会帮你转成像素。
想绕过客户端直接打 HTTP(比如你已经有套服务框架,不想多引一个包),那就走 OpenAI 兼容的 /v1/chat/completions。这里有三个坑,我一个一个说:
import base64, json, re, requests

def encode_image(path: str) -> str:
    with open(path, "rb") as f:
        return base64.b64encode(f.read()).decode("utf-8")

def call_groundanything(image_path: str, prompt: str,
                        base_url="http://127.0.0.1:8101/v1",
                        model="groundinganything"):
    payload = {
        "model": model,
        "messages": [{
            "role": "user",
            "content": [
                {"type": "image_url",
                 "image_url": {"url": f"data:image/jpeg;base64,{encode_image(image_path)}"}},
                {"type": "text", "text": prompt},
            ],
        }],
        "max_tokens": 4096,
        # 坑 1:千万别开 skip_special_tokens,坐标全靠这些特殊 token 撑着
        "skip_special_tokens": False,
        "temperature": 0.0,
    }
    r = requests.post(f"{base_url}/chat/completions", json=payload, timeout=120)
    r.raise_for_status()
    return r.json()["choices"][0]["message"]["content"]
坑 1:skip_special_tokens 必须是 false。你要是把 <|box_start|> 这些过滤掉,后面就只剩一堆裸数字,没法解析。
坑 2:图片用 base64 data URI 塞进 image_url content part,不是单独字段。
坑 3:坐标 token 之间不能有空格。<100><200> 是对的,< 100 > < 200 > 会出问题——因为它是词表里的独立 token,不是文本数字。
不同任务对应不同 prompt,这个表建议存下来:
任务 | Prompt 模板 |
|---|---|
密集/开放集检测 | Locate all the instances that match the following categories: car</c>person. |
指代框 | Locate the target referred to by the following description: the red car. |
类别点 | Point to: car</c>person. |
指代点 | Point to the target referred to by the following description: the red car. |
OCR | OCR task detect all the text in box format. |
文档版面 | Detect all document layout elements that match the following categories: title</c>text. |
GUI 定位 | Point to the UI element to click for the following instruction: open the settings menu. |
视觉提示 | 先用原生空间 token 给参考框,再要求找同类 |
解析 GAM 协议,一个正则就够了:
BOX_RE = re.compile(
    r"<\|object_ref_start\|>(.*?)<\|object_ref_end\|>"
    r"<\|box_start\|>(.*?)<\|box_end\|>",
    re.S,
)

def parse_gam(text: str):
    """把 GAM 串解析成 [(label, [x1,y1,x2,y2] 或 [x,y] 或 None)]"""
    out = []
    for label, coords in BOX_RE.findall(text):
        nums = re.findall(r"<(\d+)>", coords)
        if not nums or "None" in coords:
            out.append((label.strip(), None))     # 目标不存在
            continue
        vals = [int(n) for n in nums]
        out.append((label.strip(), vals))
    return out

def to_pixels(vals, W, H):
    """0-999 网格 → 原图像素坐标"""
    if vals is None:
        return None
    if len(vals) == 2:
        return [vals[0] / 999 * W, vals[1] / 999 * H]
    x1, y1, x2, y2 = vals
    return [x1 / 999 * W, y1 / 999 * H, x2 / 999 * W, y2 / 999 * H]
五、一个真能落地的场景:给街景数据做自动标注
光跑个 demo 没意思,咱们干点实际的。假设你手上有一万张城市街景图,要给"车辆 / 行人 / 骑行者 / 交通标志"做框标注。找人标,一张两三块,一万张就是几万块加两周工期。用 GroundAnything 自动标,思路是这样的:
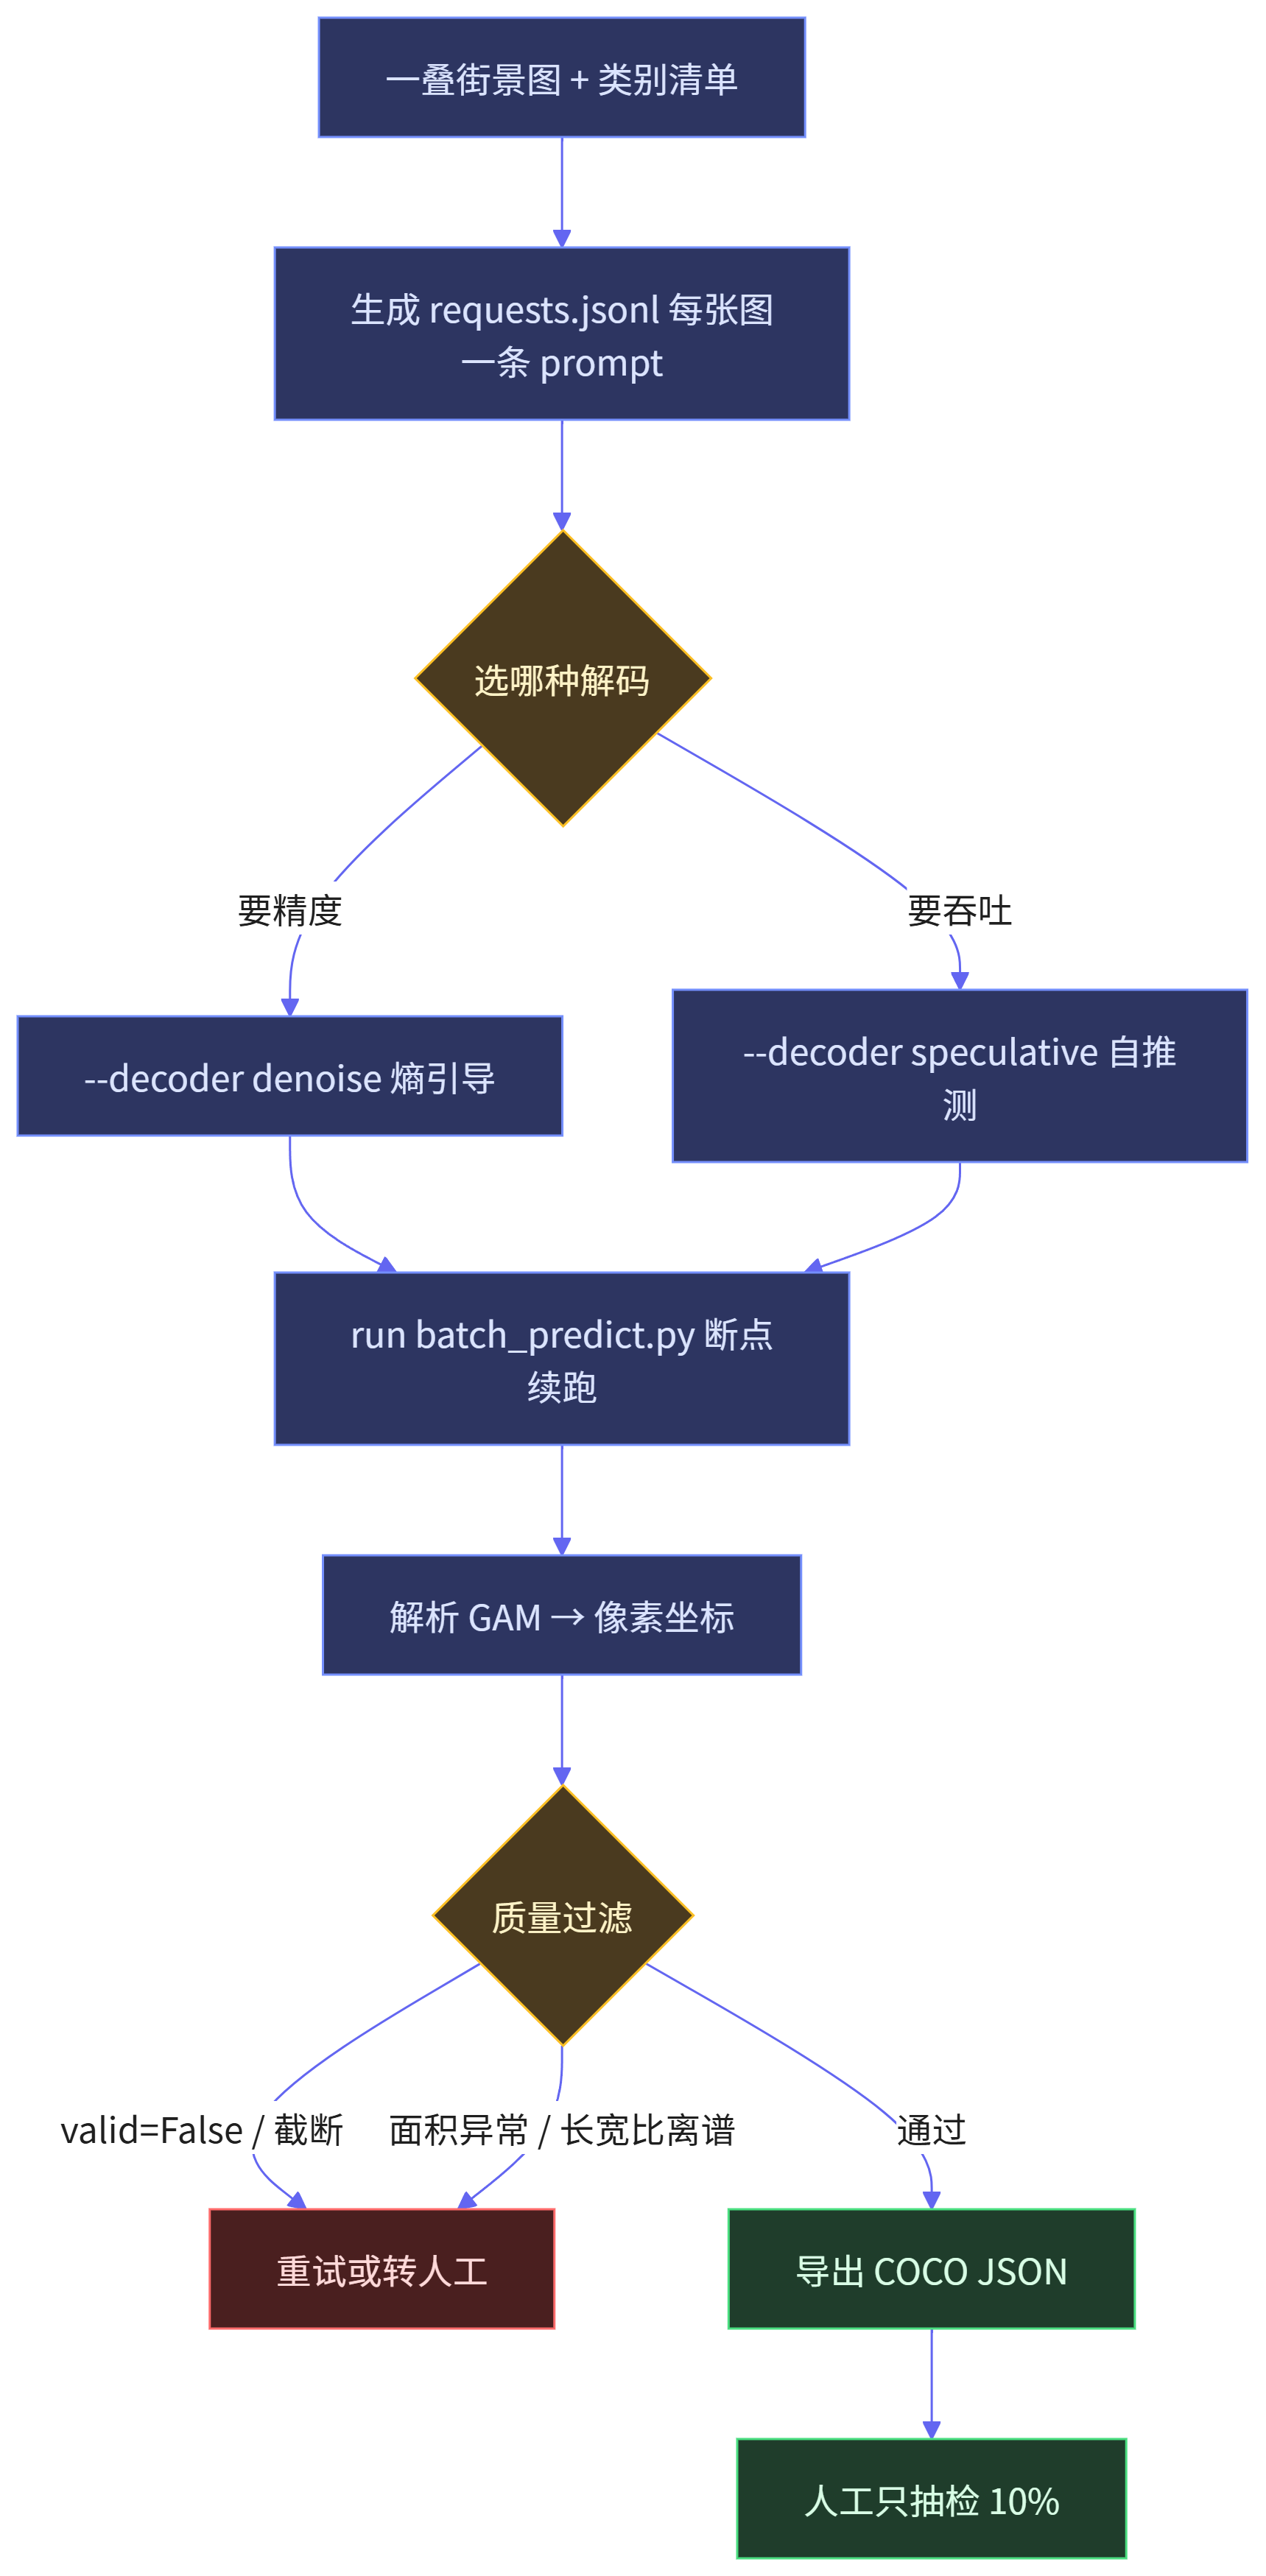
第一步:造 manifest
import json, os
from pathlib import Path

CATEGORIES = ["car", "person", "bicycle", "traffic sign"]
IMAGE_DIR = Path("data/street")

def build_manifest(image_dir: Path, out_path: str, categories=CATEGORIES):
    cats = "</c>".join(categories)
    prompt = f"Locate all the instances that match the following categories: {cats}."
    with open(out_path, "w", encoding="utf-8") as f:
        for p in sorted(image_dir.glob("*.jpg")):
            f.write(json.dumps({
                "image": str(p),
                "prompt": prompt,
                "task": "bbox",
            }, ensure_ascii=False) + "\n")

build_manifest(IMAGE_DIR, "requests.jsonl")
print("总条数:", sum(1 for _ in open("requests.jsonl", encoding="utf-8")))
第二步:跑批
官方那个 batch_predict.py 就是串行发请求,但它支持断点续跑——同样的输入和请求配置,成功的条目会跳过。这点很重要,一万张图跑到第 8000 张挂了不至于从头再来。
python3 examples/batch_predict.py \
  --input requests.jsonl --output predictions.jsonl \
--base-url http://127.0.0.1:8101/v1 --model groundinganything想提速,别指望在单实例里开并发——官方的 serving profile 是单序列的。正确的做法是:有几张卡就起几个服务副本,把 manifest 切成对应份数,每个 worker 写自己的输出文件,最后合并。
# 假设 4 张卡,切 4 份
split -n l/4 -d requests.jsonl part_
for i in 0 1 2 3; do
  python3 examples/batch_predict.py \
    --input part_0$i --output pred_$i.jsonl \
    --base-url http://127.0.0.1:810${i}/v1 --model groundinganything &
done
wait
cat pred_*.jsonl > predictions.jsonl
第三步:解析 + 质量过滤 + 导出 COCO
这一步是最容易被忽略、但决定你能不能用的一关。模型会给你截断的、格式坏的、或者坐标明显离谱的结果,不滤一遍直接拿去训练就是灾难。
import json
from PIL import Image

def load_jsonl(p):
    with open(p, encoding="utf-8") as f:
        for line in f:
            line = line.strip()
            if line:
                yield json.loads(line)

def quality_check(boxes, W, H, min_area_ratio=1e-4, max_area_ratio=0.9):
    """滤掉空结果、越界框、面积离谱的框"""
    keep = []
    for label, coords in boxes:
        if coords is None or len(coords) != 4:
            continue
        x1, y1, x2, y2 = to_pixels(coords, W, H)
        x1, x2 = sorted([x1, x2]); y1, y2 = sorted([y1, y2])
        x1, y1 = max(0, x1), max(0, y1)
        x2, y2 = min(W, x2), min(H, y2)
        if x2 <= x1 or y2 <= y1:
            continue
        area_ratio = ((x2 - x1) * (y2 - y1)) / (W * H)
        if not (min_area_ratio <= area_ratio <= max_area_ratio):
            continue
        keep.append((label, [x1, y1, x2, y2]))
    return keep

def export_coco(pred_path, out_path, categories=CATEGORIES):
    cat2id = {c: i + 1 for i, c in enumerate(categories)}
    images, annotations = [], []
    ann_id, img_id = 1, 1
    stats = {"total": 0, "valid": 0, "skipped": 0, "boxes": 0}

    for rec in load_jsonl(pred_path):
        stats["total"] += 1
        if not rec.get("valid", False):
            stats["skipped"] += 1
            continue
        p = rec["image"]
        try:
            W, H = Image.open(p).size
        except Exception:
            stats["skipped"] += 1
            continue

        parsed = parse_gam(rec.get("raw_output", ""))
        kept = quality_check(parsed, W, H)
        if not kept:
            stats["skipped"] += 1
            continue

        images.append({"id": img_id, "file_name": p, "width": W, "height": H})
        for label, (x1, y1, x2, y2) in kept:
            if label not in cat2id:
                continue
            annotations.append({
                "id": ann_id, "image_id": img_id, "category_id": cat2id[label],
                "bbox": [round(x1, 1), round(y1, 1),
                         round(x2 - x1, 1), round(y2 - y1, 1)],
                "area": round((x2 - x1) * (y2 - y1), 1),
                "iscrowd": 0,
            })
            ann_id += 1
        stats["valid"] += 1
        stats["boxes"] += len(kept)
        img_id += 1

    coco = {
        "images": images,
        "annotations": annotations,
        "categories": [{"id": i + 1, "name": c} for i, c in enumerate(categories)],
    }
    with open(out_path, "w", encoding="utf-8") as f:
        json.dump(coco, f, ensure_ascii=False)
    return stats

print(export_coco("predictions.jsonl", "street_coco.json"))
# {'total': 10000, 'valid': 9432, 'skipped': 568, 'boxes': 71238}skipped 那部分别扔,那是你的人工队列。正常情况落在 3%–8%,如果超过 15%,多半是 prompt 写得不对或者 max_tokens 给小了(密集场景很容易超 4096,这时候要么加大,要么把类别拆成几批分别请求)。
同样的流水线还能干嘛
换 prompt 就换场景,这套代码基本不用改:
- 票据/合同版面解析:
Detect all document layout elements that match the following categories: title</c>text</c>table. → 直接产出版面框,接 OCR 就能做结构化抽取。 - GUI 自动化:
Point to the UI element to click for the following instruction: 打开设置菜单. → 拿到点坐标直接喂给 ADB 或 Playwright。这种场景下延迟敏感,自推测模式的 4.51× 是真金白银。 - 视觉提示找同类:先给一个参考框,让模型找图里所有"这玩意儿"。工业质检里找缺陷特别好用——你给一个缺陷样本框,它把整张图类似的都标出来。
GroundAnything 让我觉得有意思的地方,不在于它刷了多少个点。72.42% 打平 GPT-6 Astra 这种事,半年后大概率会被别的模型盖过去。
真正值得记的是它提的那个问题:当我们把一个本来没有顺序的任务硬塞进自回归框架的时候,我们到底损失了什么?答案是延迟、是并行度、是一整套推理优化的可能性。而它给出的解法——块级去噪、块内双向块间因果——不是一个漂亮的数学结论,是一个能在真实推理引擎里跑起来的工程折中。
顺便提一句,权重是 2026-10-01 放的,代码 10-03,项目页 10-04,Apache 2.0。但因为底座里有 Kimi 派生的东西,实际用的时候 Kimi K3 License 那部分条款还得遵守,商用前建议看一眼 LICENSE。
如果你手上有那种"图很多、标注很贵、延迟很要命"的活儿,这模型值得花一个下午试试。
原创声明:本文系作者授权腾讯云开发者社区发表,未经许可,不得转载。
如有侵权,请联系 cloudcommunity@tencent.com 删除。
目录
腾讯云开发者

Copyright © 2013 - 2026 Tencent Cloud. All Rights Reserved. 腾讯云 版权所有
深圳市腾讯计算机系统有限公司 ICP备案/许可证号:粤B2-20090059  粤公网安备44030502008569号
腾讯云计算(北京)有限责任公司 京ICP证150476号 | 京ICP备11018762号