Netty入门学习
原创

一、介绍
Netty是JBOSS提供的一个Java开源框架,它是一个基于事件驱动的网络应用程序框架,用于快速开发可维护的高性能协议服务器和客户端。Netty是对Java NIO的封装和优化,让开发者能够更轻松地编写高性能的网络应用。
Netty的核心优势:
- 高性能:基于
Reactor模型,能够处理高并发连接 - 易用性:提供了简单易用的
API,降低了NIO的使用门槛 - 可扩展性:支持多种协议,如
HTTP、WebSocket、TCP等 - 稳定性:经过大量生产环境验证,非常稳定可靠
本文将通过一个简单的案例来介绍Netty的基本使用。
二、代码
1)环境准备
首先需要在Maven项目中添加Netty依赖:
 <dependency>
     <groupId>io.netty</groupId>
     <artifactId>netty-all</artifactId>
     <version>4.1.100.Final</version>
 </dependency>
2)服务端实现
下面是一个简单的Netty服务端实现,它监听8080端口,并对客户端发送的消息进行回显:
package com.banmoon.test;
import io.netty.bootstrap.ServerBootstrap;
import io.netty.channel.*;
import io.netty.channel.nio.NioEventLoopGroup;
import io.netty.channel.socket.SocketChannel;
import io.netty.channel.socket.nio.NioServerSocketChannel;
import io.netty.handler.codec.string.StringDecoder;
import io.netty.handler.codec.string.StringEncoder;
public class NettyServer {
public static void main(String[] args) throws InterruptedException {
// 1. 创建两个线程组
// bossGroup 用于处理客户端的连接
EventLoopGroup bossGroup = new NioEventLoopGroup(1);
// workerGroup 用于处理客户端的数据读写
EventLoopGroup workerGroup = new NioEventLoopGroup();
try {
// 2. 创建服务端启动对象
ServerBootstrap serverBootstrap = new ServerBootstrap();
serverBootstrap.group(bossGroup, workerGroup) // 设置线程组
.channel(NioServerSocketChannel.class) // 使用NIO通道
.option(ChannelOption.SO_BACKLOG, 128) // 设置线程队列等待连接个数
.childOption(ChannelOption.SO_KEEPALIVE, true) // 保持活动连接
.childHandler(new ChannelInitializer<SocketChannel>() { // 创建通道初始化对象
@Override
protected void initChannel(SocketChannel ch) throws Exception {
// 获取pipeline
ChannelPipeline pipeline = ch.pipeline();
// 添加处理器
pipeline.addLast(new StringDecoder()); // 解码器
pipeline.addLast(new StringEncoder()); // 编码器
pipeline.addLast(new NettyServerHandler()); // 自定义处理器
}
});
// 3. 绑定端口,启动服务
ChannelFuture channelFuture = serverBootstrap.bind(8080).sync();
System.out.println("服务器启动成功,监听端口:8080");
// 4. 监听关闭通道
channelFuture.channel().closeFuture().sync();
} finally {
// 5. 优雅关闭线程组
bossGroup.shutdownGracefully();
workerGroup.shutdownGracefully();
}
}
}
// 自定义处理器
class NettyServerHandler extends SimpleChannelInboundHandler<String> {
@Override
protected void channelRead0(ChannelHandlerContext ctx, String msg) throws Exception {
// 打印接收到的消息
System.out.println("服务器接收到消息:" + msg);
// 回显消息给客户端
ctx.writeAndFlush("服务器收到消息:" + msg);
}
@Override
public void channelActive(ChannelHandlerContext ctx) throws Exception {
System.out.println("客户端连接成功:" + ctx.channel().remoteAddress());
}
@Override
public void channelInactive(ChannelHandlerContext ctx) throws Exception {
System.out.println("客户端断开连接:" + ctx.channel().remoteAddress());
}
@Override
public void exceptionCaught(ChannelHandlerContext ctx, Throwable cause) throws Exception {
System.out.println("发生异常:" + cause.getMessage());
ctx.close();
}
}3)客户端实现
下面是一个简单的Netty客户端实现,它连接服务端并发送消息:
package com.banmoon.test;
import io.netty.bootstrap.Bootstrap;
import io.netty.channel.*;
import io.netty.channel.nio.NioEventLoopGroup;
import io.netty.channel.socket.SocketChannel;
import io.netty.channel.socket.nio.NioSocketChannel;
import io.netty.handler.codec.string.StringDecoder;
import io.netty.handler.codec.string.StringEncoder;
import java.util.Scanner;
public class NettyClient {
public static void main(String[] args) throws InterruptedException {
// 1. 创建一个线程组
EventLoopGroup group = new NioEventLoopGroup();
try {
// 2. 创建客户端启动对象
Bootstrap bootstrap = new Bootstrap();
bootstrap.group(group) // 设置线程组
.channel(NioSocketChannel.class) // 使用NIO通道
.option(ChannelOption.TCP_NODELAY, true) // 禁用Nagle算法
.handler(new ChannelInitializer<SocketChannel>() { // 创建通道初始化对象
@Override
protected void initChannel(SocketChannel ch) throws Exception {
// 获取pipeline
ChannelPipeline pipeline = ch.pipeline();
// 添加处理器
pipeline.addLast(new StringDecoder()); // 解码器
pipeline.addLast(new StringEncoder()); // 编码器
pipeline.addLast(new NettyClientHandler()); // 自定义处理器
}
});
// 3. 连接服务端
ChannelFuture channelFuture = bootstrap.connect("127.0.0.1", 8080).sync();
System.out.println("客户端连接成功!");
// 4. 发送消息
Channel channel = channelFuture.channel();
Scanner scanner = new Scanner(System.in);
while (scanner.hasNextLine()) {
String msg = scanner.nextLine();
channel.writeAndFlush(msg);
}
// 5. 监听关闭通道
channelFuture.channel().closeFuture().sync();
} finally {
// 6. 优雅关闭线程组
group.shutdownGracefully();
}
}
}
// 自定义处理器
class NettyClientHandler extends SimpleChannelInboundHandler<String> {
@Override
protected void channelRead0(ChannelHandlerContext ctx, String msg) throws Exception {
// 打印接收到的消息
System.out.println("客户端接收到消息:" + msg);
}
@Override
public void channelActive(ChannelHandlerContext ctx) throws Exception {
System.out.println("连接服务端成功!可以开始发送消息了。");
}
@Override
public void exceptionCaught(ChannelHandlerContext ctx, Throwable cause) throws Exception {
System.out.println("发生异常:" + cause.getMessage());
ctx.close();
}
}4)测试运行
- 先启动
NettyServer,服务器会监听8080端口 - 然后启动
NettyClient,客户端会连接到服务端 - 在客户端控制台输入消息,服务端会接收到并回显
- 服务端和客户端都会显示连接和断开连接的信息

image-20260120145425470
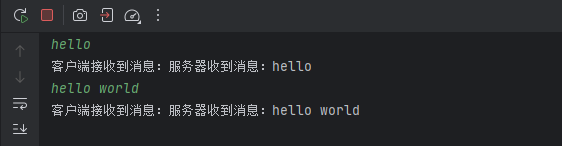
image-20260120145358221
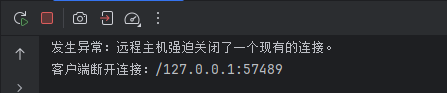
image-20260120145501315
三、最后
通过这个简单的案例,我们可以看到Netty的基本使用流程:
- 创建线程组:
EventLoopGroup用于管理网络事件的处理线程 - 配置启动参数:通过
ServerBootstrap或Bootstrap配置网络参数 - 添加处理器:在
ChannelInitializer中添加各种Handler处理器 - 启动服务:绑定端口或连接服务端
Netty的核心概念是Channel(通道)和Handler(处理器),通过Handler链可以灵活地实现各种功能,如编解码、日志、业务处理等。
学习Netty让我深刻体会到,网络编程虽然复杂,但有了Netty这样的框架,开发者可以专注于业务逻辑,而不用过多关注底层的网络细节。Netty的Reactor模型和异步非阻塞IO,让它在高并发场景下表现出色。不过,Netty的学习曲线相对陡峭,需要理解NIO、多线程等知识,建议先打好基础再深入学习。总的来说,Netty是构建高性能网络应用的不二之选,值得深入研究。
我是半月,祝你幸福!!!
原创声明:本文系作者授权腾讯云开发者社区发表,未经许可,不得转载。
如有侵权,请联系 cloudcommunity@tencent.com 删除。
原创声明:本文系作者授权腾讯云开发者社区发表,未经许可,不得转载。
如有侵权,请联系 cloudcommunity@tencent.com 删除。
评论
登录后参与评论
推荐阅读
目录
腾讯云开发者

Copyright © 2013 - 2026 Tencent Cloud. All Rights Reserved. 腾讯云 版权所有
深圳市腾讯计算机系统有限公司 ICP备案/许可证号:粤B2-20090059 ![]() 粤公网安备44030502008569号
粤公网安备44030502008569号
腾讯云计算(北京)有限责任公司 京ICP证150476号 | 京ICP备11018762号