个人博客支持留言评论,来看看 Hexo Diversity 主题如何实现的!
原创
个人博客支持留言评论,来看看 Hexo Diversity 主题如何实现的!
原创
huazie
发布于 2025-07-22 23:23:22
发布于 2025-07-22 23:23:22

📖 前言
经过前面几篇文章《博客框架-Hexo》的介绍,相信大家已经能够创建属于自己的个人博客,并将 Hexo Diversity 主题应用到自己的博客中了。
那么,接下来就跟着 Huazie 一起深入了解下 Diversity 是如何支持留言评论的?
🗨️ 评论架构
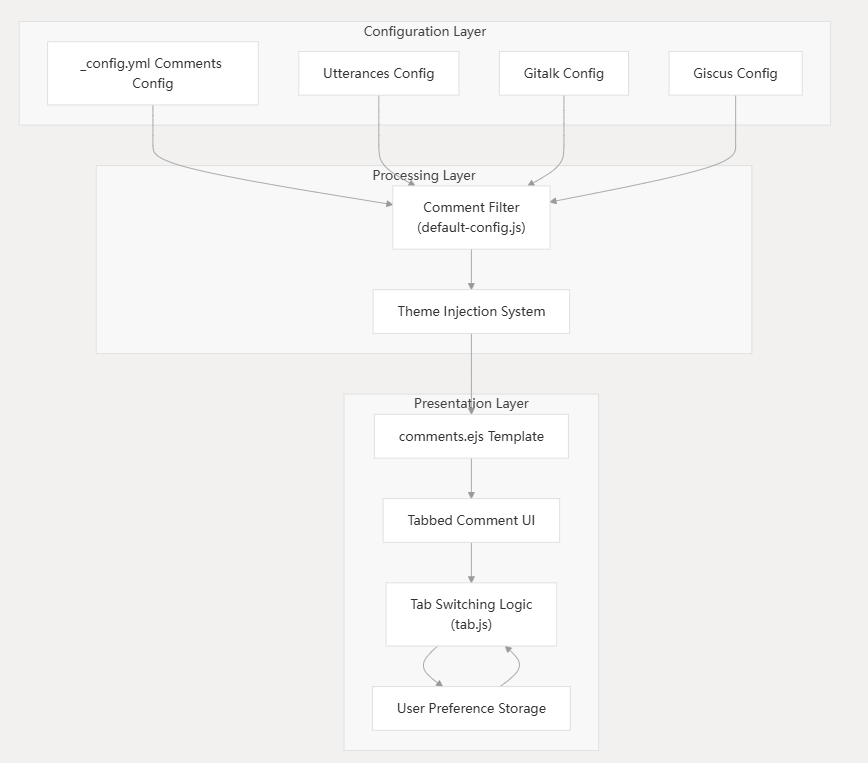
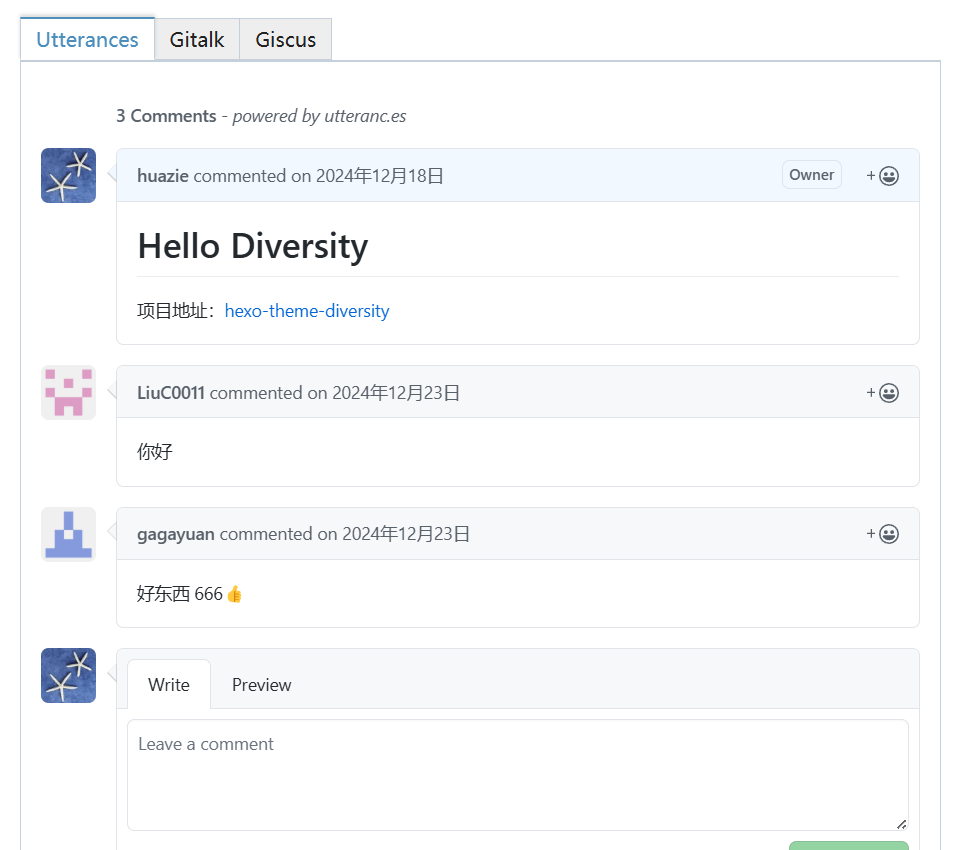
Diversity 主题采用模块化方案集成多种评论系统。用户可启用一个或多个系统,当启用多个时,系统将以标签页形式呈现,允许访客选择自己偏好的评论系统。
在深入了解之前,我们先来看看 Diversity V2.3.4 目前集成的评论系统都有哪些?
Utterance:一个由开源社区构建的评论插件,它提供了一种在博客、文章或任何静态网站上添加互动式评论功能的高效解决方案。它所有的评论数据存储于用户指定的GitHub公开仓库的Issues中,每个网页对应一个Issue,评论即Issue下的留言。更多信息查看:utteranc.esGitalk:一个基于GitHub Issue和Preact开发的现代评论插件。它允许网站访客使用GitHub账号登录并发表评论,所有评论数据都储存在相应的GitHub仓库中。更多信息查看:gitalk.github.ioGiscus:一个利用 GitHub Discussions 实现的评论系统,它所有的评论数据存储于 GitHub 公开仓库的 Discussions(讨论区)中,每个网页对应一个 Discussion,评论即 Discussion 下的回复。
相信大家也看到了,Huazie 选用的评论系统均是深度整合 GitHub 生态,只需要登录 GitHub 账号就可以留言!
相较于传统评论工具需要自建数据库(犹如养了一只"吞金兽",既费钱又得天天操心服务器维护),或是忍受满屏广告的第三方服务,基于GitHub开发的评论系统展现出了它们的优势:
- 无需独立服务器支持
- 零维护成本
- 界面纯净无广告
📄 实现细节
1. 评论相关配置
1.1 通用评论配置
主评论系统配置位于 _config.yml 文件中:
comments:
  style: tabs
  active:
  storage: true
  lazyload: false
  nav:
    #utterances:
    #  text: Utterances
    #  order: 0
    #gitalk:
    #  order: 1
配置项说明
style: 多评论系统的显示方式(目前 Diversity V2.3.5 版本仅支持tabs标签页模式)active: 默认激活的评论系统名称(需与下方独立配置的评论系统名一致)storage: 是否通过浏览器本地存储记录访客上次选择的评论系统lazyload: 是否延迟加载评论系统(提升页面性能)nav: 自定义标签页导航栏的显示文本和顺序
1.2 评论系统配置
每个评论系统均有独立的配置区块,需根据具体评论系统填写参数。
同样这些配置也位于 _config.yml 文件中,详见如下:
Utterance 配置
utterances:
  enable: false
  loading: true
  repo: user-name/repo-name
  issue_term: pathname
  theme: github-light
  dark: github-dark
Gitalk 配置
gitalk:
  enable: false
  github_id:
  repo:
  client_id:
  client_secret:
  admin_user:
  distraction_free_mode: true
  proxy: https://cors-anywhere.azm.workers.dev/https://github.com/login/oauth/access_token
  issue_term: pathname
  language:
Giscus 配置
giscus:
  enable: false
  loading: true
  repo: your-username/your-repo-name
  repo_id:
  category:
  category_id:
  mapping: pathname
  term:
  strict: 0
  reactions_enabled: 1
  emit_metadata: 0
  theme: light
  dark: dark
  lang:
  input_position: bottom
  data_loading: lazy
针对上述三个评论系统的配置项说明,需要的朋友请翻看 Diversity 主题项目 的 README 文件。
2. 评论系统渲染
评论系统的渲染由 comments.ejs 模板处理,该模板支持单一和多个评论系统的配置。
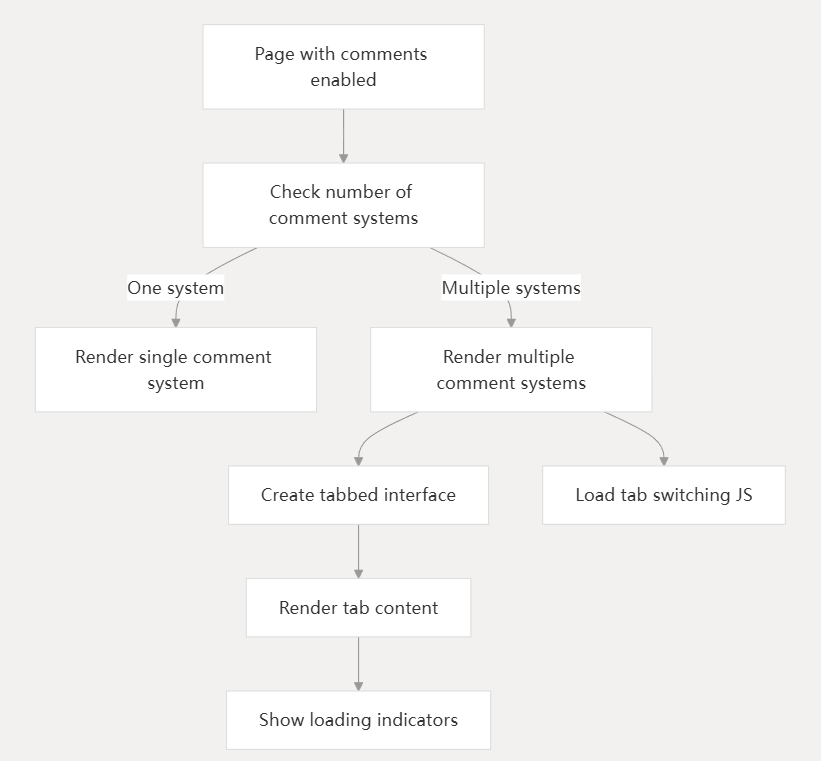
2.1 单评论系统
当仅启用一个评论系统时,模板会直接渲染该评论系统,不显示标签页。在评论系统加载过程中,可选择性显示加载提示符。
2.2 多评论系统
当启用多个评论系统时,模板会创建带标签页的交互界面,包含以下功能:
- 标签导航栏:为每个启用的评论系统提供切换按钮
- 标签内容区域:分别加载各评论系统
- 可选功能:为每个评论系统显示独立加载提示符
- JavaScript 脚本:处理标签页切换逻辑及用户偏好设置存储
标签页样式由 tabs.styl 中定义的 CSS 控制,支持对激活态、悬停态和未激活态提供视觉反馈。
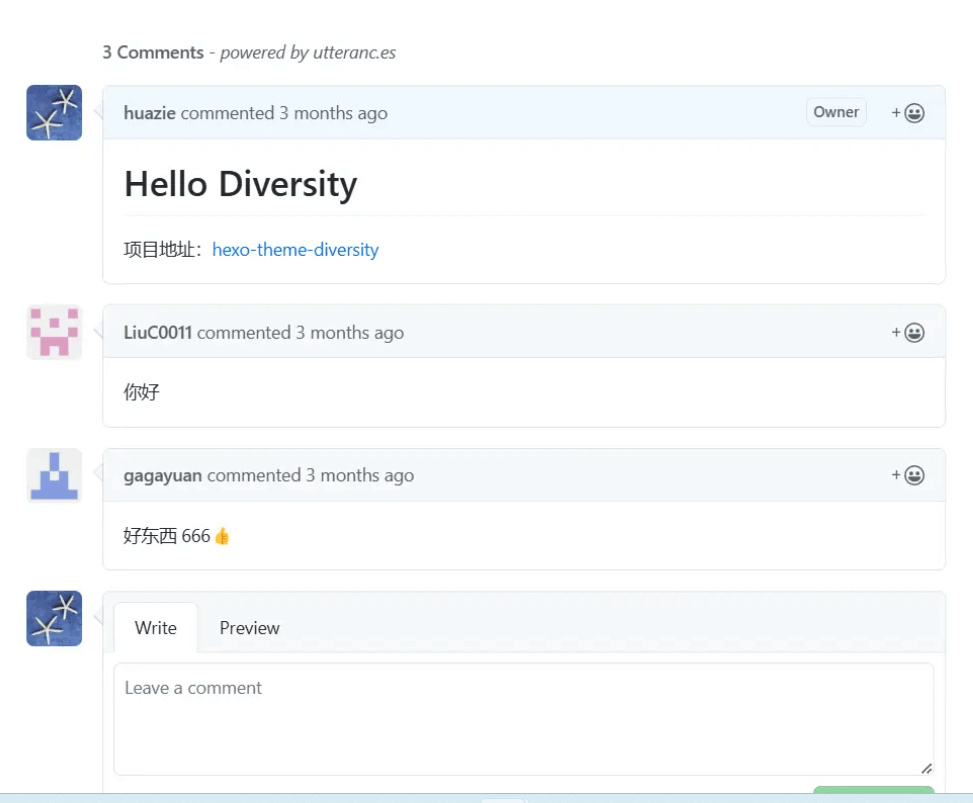
3. 集成 Utterances
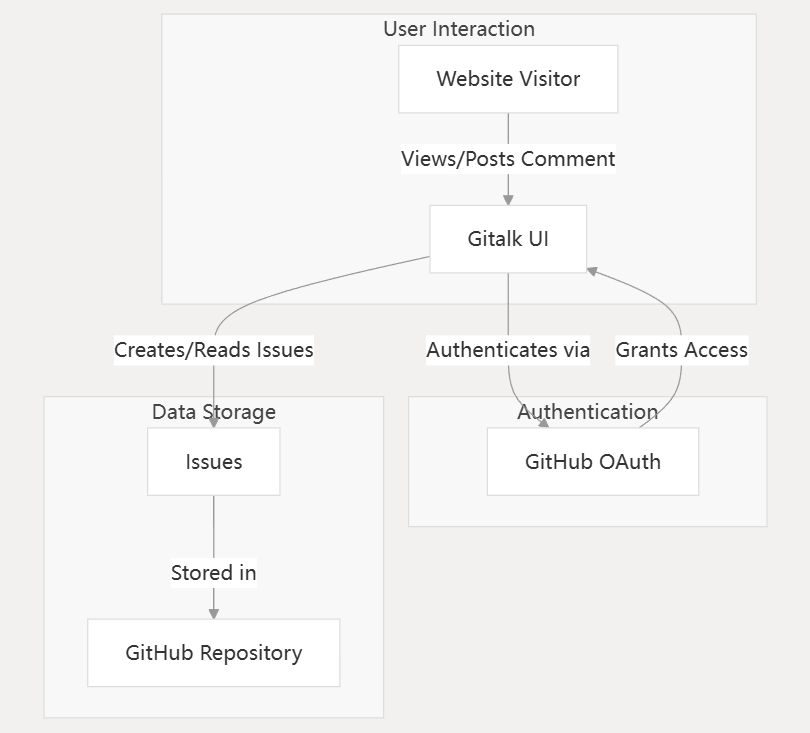
Utterances 是一款开源的评论系统,其采用 GitHub Issues 作为后端存储机制。当读者在您的博客文章下方留言时,实际上是在您指定的代码仓库中创建或回复 GitHub Issues。

3.1 工作流程
下面我们通过一幅流程示意图,来详细描述 Utterances 评论系统从配置到显示的完整工作流程【配置文件 → 前端逻辑 → API 交互 → 界面渲染】,如下:
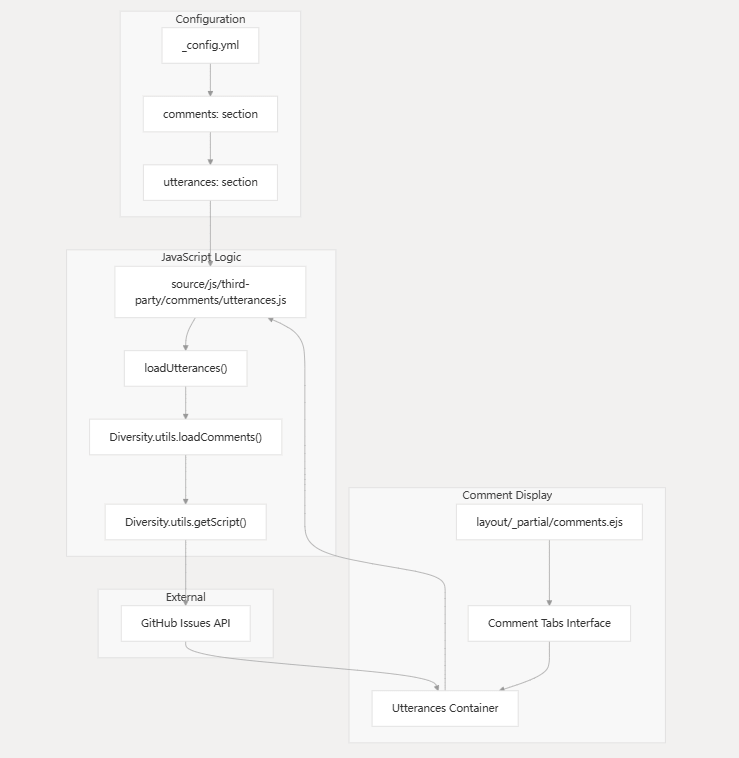
3.2 加载与运行机制
Utterances 的加载流程遵循以下步骤【详细查看 source/js/third-party/comments/utterances.js】:
- 触发加载:页面加载时,事件监听器触发
loadUtterances()函数 - 状态提示:显示加载指示器
- 容器准备:通过
Diversity.utils.loadComments()工具方法初始化评论容器 - 脚本加载:从
_config.yml读取配置参数,动态加载 Utterances 脚本 - 数据获取:Utterances 与 GitHub API 通信,加载当前页面对应的评论数据
- 完成处理:加载完成后,Utterances 发送
resize消息。主题捕获该消息并隐藏加载指示器
3.3 涉及代码
添加 Utterances 评论系统相关的Diversity主题注入过滤器
'use strict';

const path = require('path');

// 添加 Utterances 评论系统相关的Diversity主题注入过滤器
hexo.extend.filter.register('theme_inject', injects => {
    const config = hexo.theme.config.utterances;
    // 没有启用 Utterances
    if (!config.enable) return;

    // 没有配置GitHub仓库所有者和名称
    if (!config.repo) {
        hexo.log.error('utterances.repo can\'t be null.');
        return;
    }

    // comment 视图添加 utterances
    injects.comment.raw('utterances', '<div class="comments utterances-container"></div>', {}, { cache: true });

    // pageEnd 视图添加 utterances
    injects.pageEnd.file('utterances', path.join(hexo.theme_dir, 'layout/_third-party/comments/utterances.ejs'));
});
这里主要做两件事:
- 往
comment视图添加 utterances 的div层。这里可以通过 comments.ejs 模板查看如下代码【其中inject_item就是injects.comment中的一个元素】:
<%- partial(inject_item.layout, inject_item.locals, inject_item.options) %>- 往
pageEnd视图添加 utterances 布局。这里也是查看 comments.ejs中的代码:
<%- diversity_inject('pageEnd') %>Utterances 布局
<%- diversity_data('utterances', theme.utterances, {
  js : 'https://utteranc.es/client.js'
}) %>
<%- js('js/third-party/comments/utterances') %>
这里加载两部分内容:
Utterances的评论系统配置【参见1.2中的内容】Utterances评论系统加载与运行的脚本文件【参见3.2中的内容】
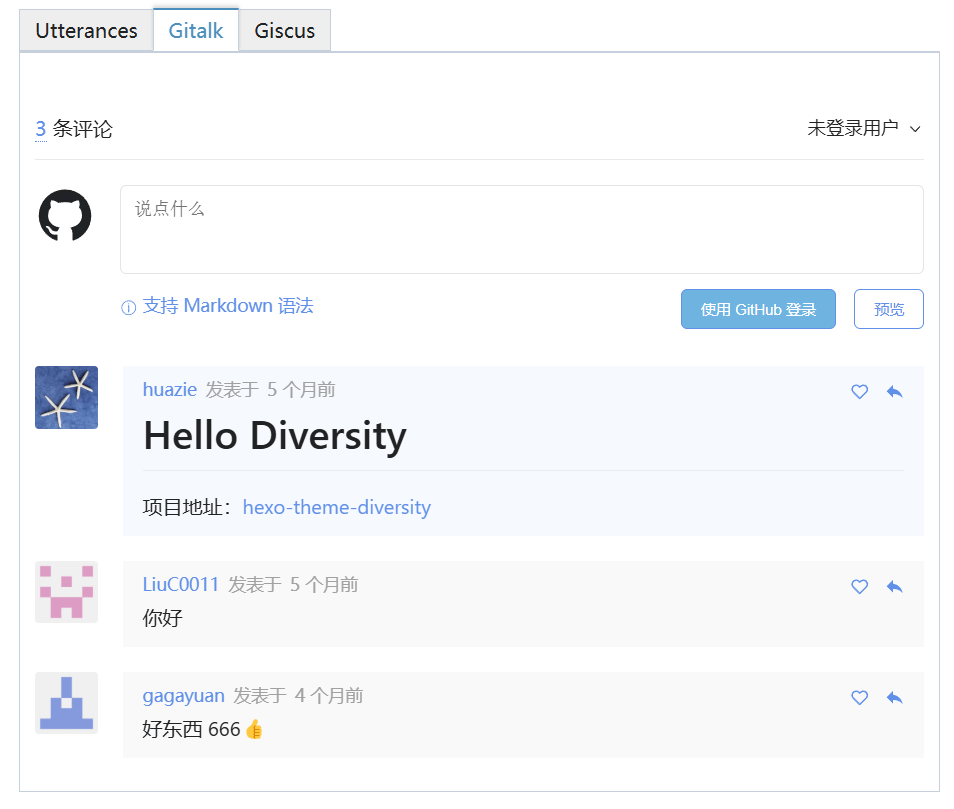
4. 集成 Gitalk
Gitalk 同样采用 GitHub Issues 作为评论存储的后端系统。当正确配置后,我们博客中的每个页面都会自动关联到一个 GitHub Issue,所有评论将存储并管理在该 Issue 中。
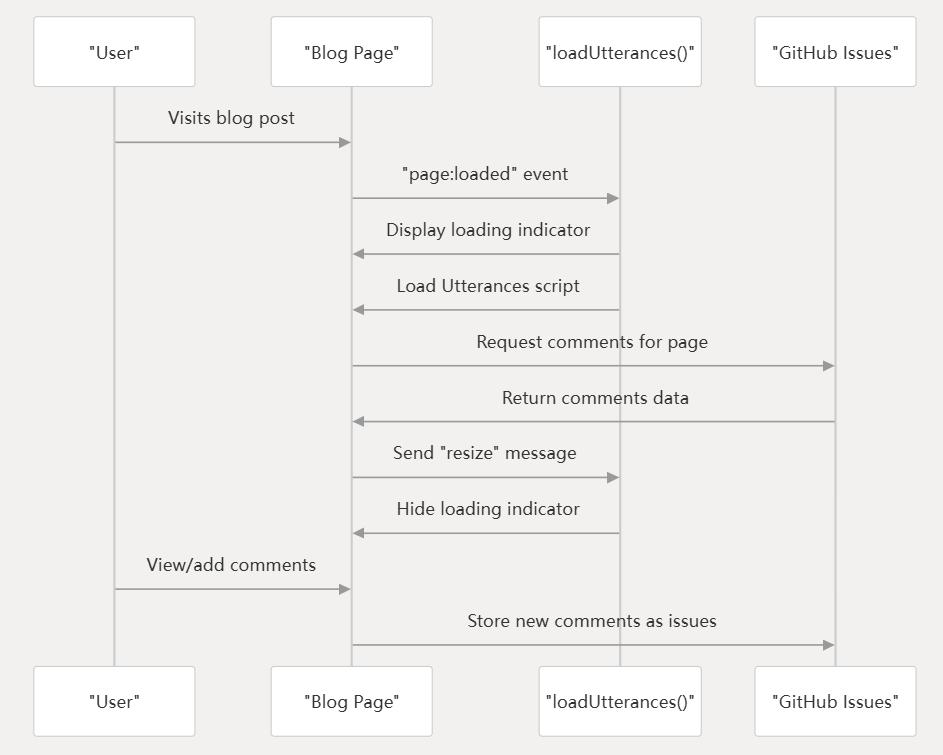
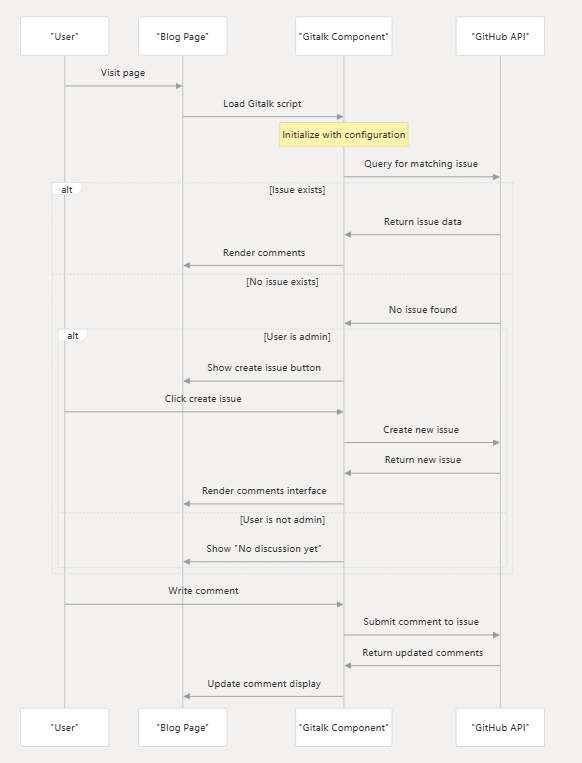
4.1 工作流程
如下是一幅描述 Gitalk 评论系统工作流程 的交互时序图,展示了从用户访问到评论加载的完整闭环过程。
4.2 加载与运行机制
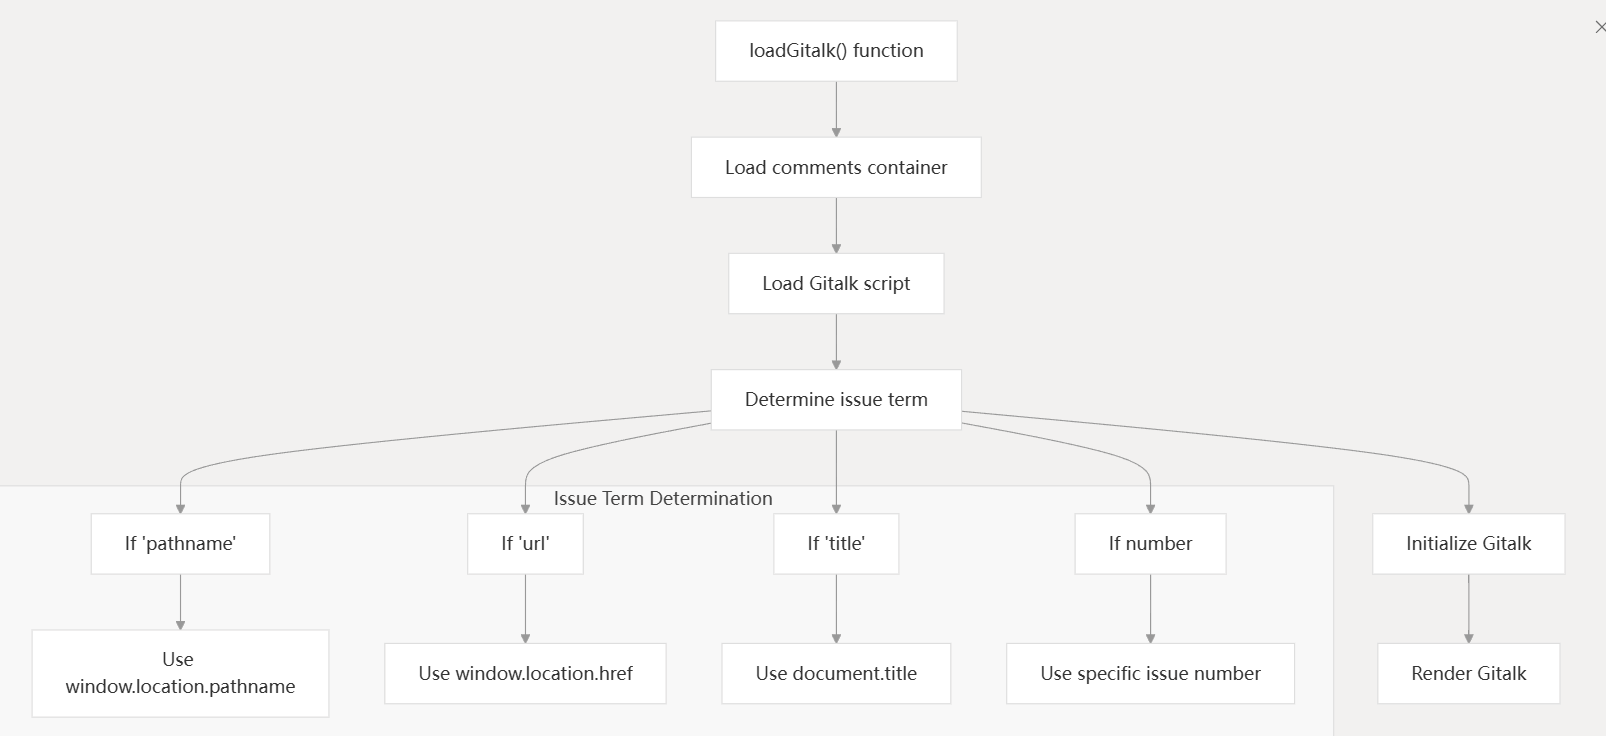
Gitalk 的加载流程遵循以下步骤【详细查看 source/js/third-party/comments/gitalk.js】:
- 触发加载 :当页面加载完成(
page:loaded事件)或切换配色方案(color-scheme:refresh事件)时,触发loadGitalk()函数。 - 容器准备 :调用
Diversity.utils.loadComments('.gitalk-container')初始化 Gitalk 评论容器(.gitalk-container元素)。 - 脚本加载 :动态加载 Gitalk 脚本(
gitalk.js),通过Diversity.utils.getScript()注入,并检查全局变量window.Gitalk是否已存在(避免重复加载)。 - 生成 Issue 标识 :根据
_config.yml中的issue_term配置,生成唯一标识gitalkId:pathname:使用当前页面的路径(如/posts/hello-world)。url:使用完整页面 URL(含域名)。title:使用页面标题(document.title)。- 自定义数字:若配置为数字(如
42),直接赋值给number变量。
📌 日志输出:若
gitalkId有效,控制台会打印日志(如"GitHub issue label is [/posts/hello-world]")。
- 初始化 Gitalk 实例
- 从
_config.yml读取配置参数,构建confgObj对象:- GitHub OAuth 认证:
clientID和clientSecret。 - 仓库信息:
repo(仓库名)、owner(GitHub 用户名)。 - 管理员:
admin指定可管理评论的 GitHub 用户。 - 唯一标识:
id(基于gitalkId)或number(自定义 Issue 编号)。 - 代理配置:
proxy(用于绕过 CORS,可选)。 - 无干扰模式:
distractionFreeMode(隐藏无关按钮)。 - 语言:
language(若配置)。
- GitHub OAuth 认证:
- 创建 Gitalk 实例并渲染到容器:
- 从
const gitalk = new Gitalk(confgObj);
gitalk.render(document.querySelector('.gitalk-container'));- 数据获取与渲染 :Gitalk 通过 GitHub API 访问指定仓库的 Issues:
- 根据
id或number匹配对应的 Issue(不存在时会自动创建)。 - 加载该 Issue 下的评论数据并渲染到页面。
- 根据
⚠️ 注意:若
proxy 未配置,可能因** GitHub API** 的 CORS 限制导致加载失败。
4.3 GitHub OAuth 应用配置
我们要使用 Gitalk,需要创建 GitHub OAuth 应用,并用它来进行授权 Gitalk 访问 Github Issues。
有关内容,网上很多,后续有时间 Huazie 专门写篇配置指南,这里不再赘述。
4.4 涉及代码
添加 Gitalk 评论系统相关的Diversity主题注入过滤器
'use strict';

const path = require('path');

// 添加 Gitalk 评论系统相关的Diversity主题注入过滤器
hexo.extend.filter.register('theme_inject', injects => {
    const config = hexo.theme.config.gitalk;
    // 没有启用 Gitalk
    if (!config.enable) return;

    // 没有配置GitHub 仓库所有者
    if (!config.repo) {
        hexo.log.error('gitalk.repo can\'t be null.');
        return;
    }

    // 没有配置GitHub 仓库所有者
    if (!config.github_id) {
        hexo.log.error('gitalk.github_id can\'t be null.');
        return;
    }

    // 没有配置GitHub 应用客户端 ID
    if (!config.client_id) {
        hexo.log.error('gitalk.client_id can\'t be null.');
        return;
    }

    // 没有配置GitHub 应用客户端密钥
    if (!config.client_secret) {
        hexo.log.error('gitalk.client_secret can\'t be null.');
        return;
    }

    // comment 视图添加 gitalk
    injects.comment.raw('gitalk', '<div class="comments gitalk-container"></div>', {}, { cache: true });

    // pageEnd 视图添加 gitalk
    injects.pageEnd.file('gitalk', path.join(hexo.theme_dir, 'layout/_third-party/comments/gitalk.ejs'));
});
这里也是主要做两件事:
- 往
comment视图添加 gitalk 的div层。 - 往
pageEnd视图添加 gitalk 布局。
Gitalk 布局
<%- css('https://unpkg.com/gitalk/dist/gitalk.css') %>
<style>.gt-container .gt-comment-body { color: var(--text-color) !important; }</style>
<%- diversity_data('gitalk', theme.gitalk, {
  js : 'https://unpkg.com/gitalk/dist/gitalk.min.js'
}) %>
<%- js('js/third-party/comments/gitalk') %>
这里加载三部分内容:
Gitalk的 CSS 样式文件和自定义样式部分Gitalk的评论系统配置【参见1.2中的内容】Gitalk评论系统加载与运行的脚本文件【参见4.2中的内容】
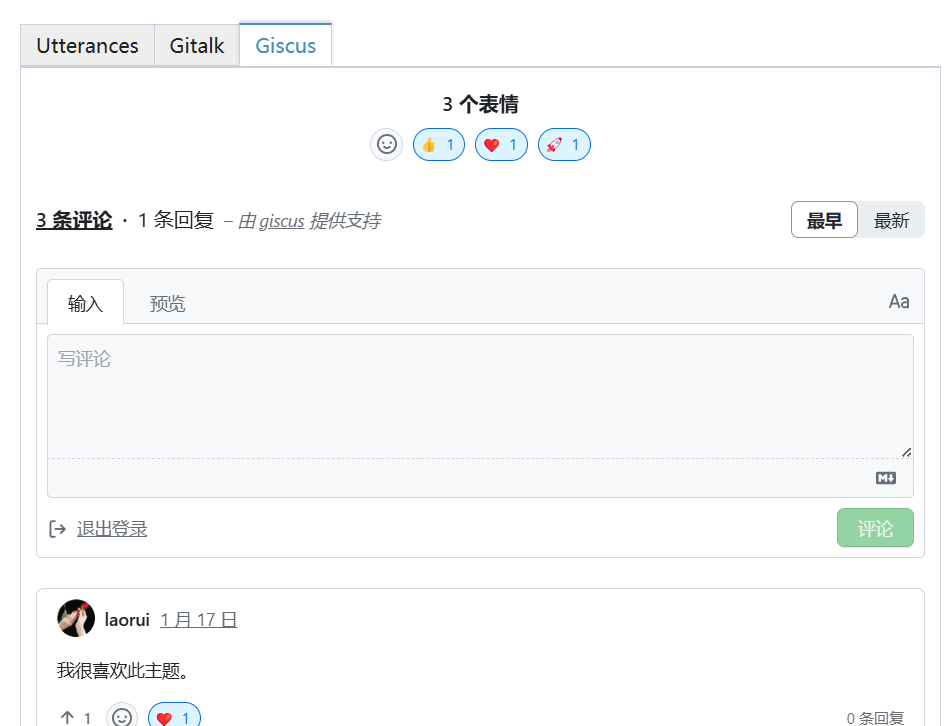
5. 集成 Giscus
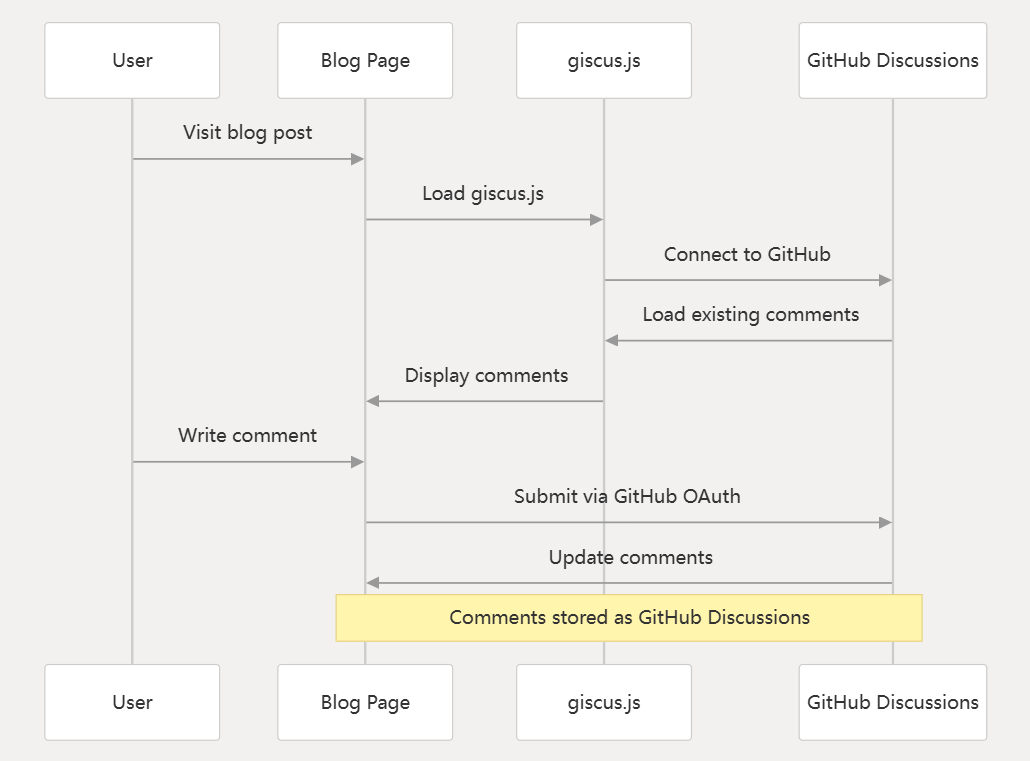
Giscus 和上述俩个评论系统不一样,它是利用 GitHub Discussions 功能来存储和管理所有评论。
5.1 工作流程
如下是一幅描述 Giscus 评论系统的交互时序图,展示了用户、博客页面、Giscus 脚本和 GitHub Discussions 之间的交互流程。
5.2 加载与运行机制
Giscus 的加载流程遵循以下步骤【详细查看 source/js/third-party/comments/giscus.js】:
- 触发加载 :当页面加载完成(
page:loaded事件)或切换配色方案(color-scheme:refresh事件)时,触发loadGiscus()函数。 - 状态提示 :显示加载指示器(
loadingElement移除hidden类)。 - 容器准备 :调用
Diversity.utils.loadComments('.giscus')初始化 Giscus 评论容器(.giscus元素)。 - 脚本加载
- 从
_config.yml读取 Giscus 配置参数(如repo、category、theme等)。 - 动态加载 Giscus 脚本(
giscus.js),并注入以下属性:- GitHub 仓库信息(
data-repo、data-repo-id)。 - Discussions 分类(
data-category、data-category-id)。 - 主题映射(
data-mapping)和页面匹配规则(data-term)。 - 界面配置(语言
data-lang、输入框位置data-input-position等)。 - 动态主题(根据
isDarkMode()切换data-theme)。
- GitHub 仓库信息(
- 从
- 数据获取
- Giscus 脚本通过 GitHub API 连接关联的 Discussions 仓库。
- 根据当前页面的 URL 或
data-term规则匹配对应的 Discussion,加载评论数据。
- 完成处理
- Giscus 的 iframe 加载完成后,通过
window.postMessage发送消息(e.data.giscus)。 - 主题捕获该消息,隐藏加载指示器(
loadingElement添加hidden类)。
- Giscus 的 iframe 加载完成后,通过
5.3 涉及代码
添加 Giscus 评论系统相关的Diversity主题注入过滤器
'use strict';

const path = require('path');

// 添加 Giscus 评论系统相关的Diversity主题注入过滤器
hexo.extend.filter.register('theme_inject', injects => {
    const config = hexo.theme.config.giscus;
    // 没有启用 Giscus
    if (!config.enable) return;

    // 没有配置GitHub仓库名称
    if (!config.repo) {
        hexo.log.error('giscus.repo can\'t be null.');
        return;
    }

    // comment 视图添加 giscus
    injects.comment.raw('giscus', '<div class="comments giscus-container"><div class="giscus"></div></div>', {}, { cache: true });

    // pageEnd 视图添加 giscus
    injects.pageEnd.file('giscus', path.join(hexo.theme_dir, 'layout/_third-party/comments/giscus.ejs'));
});
这里主要做两件事:
- 往
comment视图添加 giscus 的div层。 - 往
pageEnd视图添加 giscus 布局。
Giscus 布局
<%- diversity_data('giscus', theme.giscus, {
  js : 'https://giscus.app/client.js'
}) %>
<%- js('js/third-party/comments/giscus') %>
这里加载两部分内容:
Giscus的评论系统配置【参见1.2中的内容】Giscus评论系统加载与运行的脚本文件【参见5.2中的内容】
🖥️ 展示效果
1. 单评论系统展示
2. 多评论系统展示
📈 后续目标
集成更多的评论系统,比如:
Gitment:一款基于 GitHub Issues 的轻量级评论系统,由开发者 imsun 开发,无需后端代码即可集成到网页中,尤其适合静态博客(如 GitHub Pages)或技术文档站点。Vssue:支持多平台(GitHub、GitLab 等),适合多代码托管用户。
当然,如果还有其他评论系统,不管是不是基于 GitHub Issues ,都可以作为后续更新考虑,欢迎大家评论区补充哈!
另外,标签页展示多个评论系统,也可以后续支持下拉框选择评论系统;
📝 结语
Diversity 主题提供灵活易用的评论系统集成方案,该方案深受 NexT 主题启发,主要特性包括:
- 多平台支持:兼容
Utterances、Gitalk和Giscus评论系统 - 标签页交互:支持多评论系统标签页切换界面
- 偏好记忆功能:自动保存用户选择的评论系统偏好
- 加载状态提示:增强用户体验的加载指示器
- 可定制化配置:支持导航文本自定义与排序调整
你还在等什么,赶快来接入 Diversity 主题来体验体验吧!
有任何问题,欢迎来评论区和我互动哦!
原创声明:本文系作者授权腾讯云开发者社区发表,未经许可,不得转载。
如有侵权,请联系 cloudcommunity@tencent.com 删除。
原创声明:本文系作者授权腾讯云开发者社区发表,未经许可,不得转载。
如有侵权,请联系 cloudcommunity@tencent.com 删除。
评论
登录后参与评论
推荐阅读
目录
腾讯云开发者

Copyright © 2013 - 2026 Tencent Cloud. All Rights Reserved. 腾讯云 版权所有
深圳市腾讯计算机系统有限公司 ICP备案/许可证号:粤B2-20090059 ![]() 粤公网安备44030502008569号
粤公网安备44030502008569号
腾讯云计算(北京)有限责任公司 京ICP证150476号 | 京ICP备11018762号