86. [HarmonyOS NEXT 实战案例十八] 日历日程视图网格布局(上)
原创86. [HarmonyOS NEXT 实战案例十八] 日历日程视图网格布局(上)
原创
HarmonyOS NEXT 实战案例十八 日历日程视图网格布局(上)
项目已开源,开源地址: https://gitcode.com/nutpi/HarmonyosNextCaseStudyTutorial , 欢迎fork & star
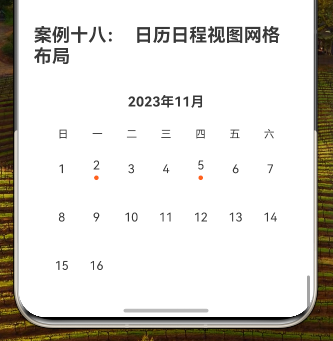
效果演示

1. 概述
日历是许多应用程序中常见的UI组件,用于展示日期和相关事件。在本教程中,我们将学习如何使用HarmonyOS NEXT的GridRow和GridCol组件实现一个简洁、美观的日历日程视图网格布局。
本教程将涵盖以下内容:
- 日历数据结构设计
- 整体布局实现
- 星期标题行实现
- 日期网格实现
- 事件标记显示
- GridRow和GridCol组件配置详解
- 布局效果分析
2. 日历数据结构设计
首先,我们需要定义日历数据的结构。对于日历视图,我们需要两种数据:星期标题和日期数据。
interface dateType {
    date: string;   // 日期字符串
    hasEvent: boolean; // 是否有事件标记
}
这个接口定义了日期的基本结构,包含两个属性:
date:字符串类型,表示日期hasEvent:布尔类型,表示该日期是否有事件
3. 数据准备
接下来,我们准备日历所需的数据:
private days: string[] = ['日', '一', '二', '三', '四', '五', '六']
private dates: dateType[] = [
    { date: '1', hasEvent: false },
    { date: '2', hasEvent: true },
    { date: '3', hasEvent: false },
    { date: '4', hasEvent: false },
    { date: '5', hasEvent: true },
    { date: '6', hasEvent: false },
    { date: '7', hasEvent: false },
    { date: '8', hasEvent: false },
    { date: '9', hasEvent: false },
    { date: '10', hasEvent: false },
    { date: '11', hasEvent: false },
    { date: '12', hasEvent: false },
    { date: '13', hasEvent: false },
    { date: '14', hasEvent: false },
    { date: '15', hasEvent: false },
    { date: '16', hasEvent: false },
]
在这个示例中,我们创建了两个数组:
days:包含星期几的标题(日、一、二、三、四、五、六)dates:包含16天的日期数据,其中第2天和第5天标记为有事件
4. 整体布局实现
现在,我们开始实现日历日程视图的整体布局:
build() {
    Column() {
        // 月份标题
        GridRow({ columns: 1 }) {
            GridCol({ span: 1 }) {
                Text('2023年11月')
                    .fontSize(18)
                    .fontWeight(FontWeight.Bold)
                    .margin({ bottom: 16 })
                    .width('100%')
                    .textAlign(TextAlign.Center)
            }
        }

        // 星期标题
        GridRow({ columns: 7 }) {
            // 星期标题内容
        }

        // 日期网格
        GridRow({ columns: 7, gutter: 4 }) {
            // 日期网格内容
        }
    }
    .width('100%')
    .padding(16)
}
整体布局使用一个Column组件作为容器,包含三个主要部分:
- 月份标题:显示当前月份(2023年11月)
- 星期标题行:显示星期几的标题
- 日期网格:显示日期和事件标记
整个Column容器设置了100%的宽度和16的内边距,确保内容在屏幕上有适当的边距。
5. 月份标题实现
月份标题使用单列的GridRow和GridCol组件,确保标题居中显示:
// 月份标题
GridRow({ columns: 1 }) {
    GridCol({ span: 1 }) {
        Text('2023年11月')
            .fontSize(18)
            .fontWeight(FontWeight.Bold)
            .margin({ bottom: 16 })
            .width('100%')
            .textAlign(TextAlign.Center)
    }
}
在这个实现中:
- GridRow的columns设置为1,表示只有一列
- GridCol的span设置为1,表示占据整个列宽
- Text组件显示月份标题,使用18的字体大小和粗体样式,使其在视觉上更加突出
- 设置底部边距为16,与下方的星期标题行保持适当的间距
- 设置文本居中对齐,使标题在视觉上更加平衡
6. 星期标题行实现
星期标题行使用7列的GridRow和GridCol组件,每列显示一个星期几的标题:
// 星期标题
GridRow({ columns: 7 }) {
    ForEach(this.days, (day: string) => {
        GridCol({ span: 1 }) {
            Text(day)
                .fontSize(14)
                .textAlign(TextAlign.Center)
                .padding(8)
        }
    })
}
在这个实现中:
- GridRow的columns设置为7,表示有7列,对应一周7天
- 使用ForEach循环遍历days数组,为每个星期几创建一个GridCol
- 每个GridCol的span设置为1,表示占据一列的宽度
- Text组件显示星期几的标题,使用14的字体大小和居中对齐
- 设置内边距为8,确保文本有足够的空间
7. 日期网格实现
日期网格也使用7列的GridRow和GridCol组件,但添加了间距和更复杂的内容:
// 日期网格
GridRow({ columns: 7, gutter: 4 }) {
    ForEach(this.dates, (date: dateType) => {
        GridCol({ span: 1 }) {
            Column() {
                Text(date.date)
                    .fontSize(16)
                    .textAlign(TextAlign.Center)

                if (date.hasEvent) {
                    Circle()
                        .width(6)
                        .height(6)
                        .fill('#FF5722')
                        .margin({ top: 4 })
                }
            }
            .padding(8)
            .backgroundColor('#FFFFFF')
            .borderRadius(4)
            .height(60)
            .justifyContent(FlexAlign.Center)
        }
    })
}
在这个实现中:
- GridRow的columns设置为7,表示有7列,对应一周7天
- GridRow的gutter设置为4,表示列之间的间距为4
- 使用ForEach循环遍历dates数组,为每个日期创建一个GridCol
- 每个GridCol的span设置为1,表示占据一列的宽度
- 在每个GridCol中,使用Column组件创建垂直布局,包含以下元素:
- Text组件显示日期,使用16的字体大小和居中对齐
- 如果日期有事件(hasEvent为true),则显示一个小圆点作为事件标记
- 为Column添加样式:
- 内边距为8,提供足够的内容间距
- 白色背景色,使日期在视觉上更加突出
- 4的圆角,使日期格子看起来更加现代化
- 固定高度为60,确保所有日期格子大小一致
- 使用justifyContent(FlexAlign.Center)使内容垂直居中
8. GridRow和GridCol组件配置详解
在这个日历日程视图布局中,我们使用了GridRow和GridCol组件的多种配置:
8.1 月份标题的GridRow配置
GridRow({ columns: 1 })columns: 1:设置网格为单列布局,这意味着标题将占据整个行宽
8.2 星期标题行的GridRow配置
GridRow({ columns: 7 })columns: 7:设置网格为7列布局,对应一周7天
8.3 日期网格的GridRow配置
GridRow({ columns: 7, gutter: 4 })columns: 7:设置网格为7列布局,对应一周7天gutter: 4:设置列之间的间距为4,使日期格子之间有适当的分隔
8.4 GridCol配置
在所有三个部分中,GridCol的配置都很简单:
GridCol({ span: 1 })span: 1:设置列跨度为1,表示每个元素占据一列的宽度
这种配置在日历视图中非常合适,因为每个星期几和每个日期都应该占据相等的空间。
9. 布局效果分析
这种日历日程视图的网格布局具有以下特点:
- 清晰的层次结构:月份标题、星期标题行和日期网格形成明确的视觉层次,使用户能够快速理解页面结构
- 均匀的网格布局:7列的网格布局完美对应一周7天,创建了一个直观的日历视图
- 事件标记:通过小圆点标记有事件的日期,使用户能够一目了然地看到哪些日期有安排
- 适当的间距和分隔:日期格子之间的间距和每个格子的内边距确保了内容不会过于拥挤,提高了可读性
- 一致的视觉样式:所有日期格子使用相同的大小、背景色和圆角,创建一致的视觉体验
10. 完整代码
以下是日历日程视图网格布局的完整代码:
// 日历日程视图网格布局
interface dateType {
    date: string;
    hasEvent: boolean;
}

@Component
export struct CalendarGrid {
    private days: string[] = ['日', '一', '二', '三', '四', '五', '六']
    private dates: dateType[] = [
        { date: '1', hasEvent: false },
        { date: '2', hasEvent: true },
        { date: '3', hasEvent: false },
        { date: '4', hasEvent: false },
        { date: '5', hasEvent: true },
        { date: '6', hasEvent: false },
        { date: '7', hasEvent: false },
        { date: '8', hasEvent: false },
        { date: '9', hasEvent: false },
        { date: '10', hasEvent: false },
        { date: '11', hasEvent: false },
        { date: '12', hasEvent: false },
        { date: '13', hasEvent: false },
        { date: '14', hasEvent: false },
        { date: '15', hasEvent: false },
        { date: '16', hasEvent: false },
    ]

    build() {
        Column() {
            // 月份标题
            GridRow({ columns: 1 }) {
                GridCol({ span: 1 }) {
                    Text('2023年11月')
                        .fontSize(18)
                        .fontWeight(FontWeight.Bold)
                        .margin({ bottom: 16 })
                        .width('100%')
                        .textAlign(TextAlign.Center)
                }
            }

            // 星期标题
            GridRow({ columns: 7 }) {
                ForEach(this.days, (day: string) => {
                    GridCol({ span: 1 }) {
                        Text(day)
                            .fontSize(14)
                            .textAlign(TextAlign.Center)
                            .padding(8)
                    }
                })
            }

            // 日期网格
            GridRow({ columns: 7, gutter: 4 }) {
                ForEach(this.dates, (date: dateType) => {
                    GridCol({ span: 1 }) {
                        Column() {
                            Text(date.date)
                                .fontSize(16)
                                .textAlign(TextAlign.Center)

                            if (date.hasEvent) {
                                Circle()
                                    .width(6)
                                    .height(6)
                                    .fill('#FF5722')
                                    .margin({ top: 4 })
                            }
                        }
                        .padding(8)
                        .backgroundColor('#FFFFFF')
                        .borderRadius(4)
                        .height(60)
                        .justifyContent(FlexAlign.Center)
                    }
                })
            }
        }
        .width('100%')
        .padding(16)
    }
}
11. 日历网格布局的技巧
11.1 使用固定列数
日历视图是使用固定列数(7列)的绝佳例子,因为一周恰好有7天。这种自然的对应关系使得网格布局非常适合日历视图。
11.2 使用gutter属性分隔日期格子
在日期网格中,我们使用了gutter属性来添加列之间的间距:
GridRow({ columns: 7, gutter: 4 })这种方法比使用margin更加简洁,因为gutter会自动应用于所有列之间,确保间距的一致性。
11.3 使用条件渲染显示事件标记
我们使用条件渲染来显示事件标记:
if (date.hasEvent) {
    Circle()
        .width(6)
        .height(6)
        .fill('#FF5722')
        .margin({ top: 4 })
}
这种方法只在有事件的日期下方显示小圆点,使界面更加清晰,不会因为过多的视觉元素而显得混乱。
11.4 使用固定高度确保一致性
为日期格子设置固定高度可以确保所有格子大小一致,即使某些格子有事件标记,而其他格子没有:
.height(60)这种方法创造了一个整齐、均匀的网格,提升了整体美感。
12. 总结
在本教程中,我们学习了如何使用HarmonyOS NEXT的GridRow和GridCol组件实现日历日程视图的网格布局。这个例子展示了网格布局系统在创建规则、均匀的UI结构时的强大功能。
原创声明:本文系作者授权腾讯云开发者社区发表,未经许可,不得转载。
如有侵权,请联系 cloudcommunity@tencent.com 删除。
原创声明:本文系作者授权腾讯云开发者社区发表,未经许可,不得转载。
如有侵权,请联系 cloudcommunity@tencent.com 删除。

