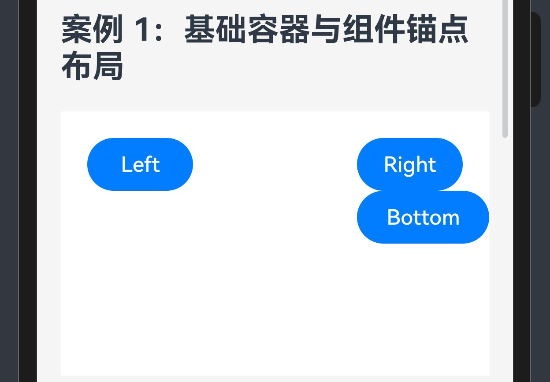
44.[HarmonyOS NEXT RelativeContainer案例一] 掌握组件锚点布局:打造灵活精准的UI定位系统
44.[HarmonyOS NEXT RelativeContainer案例一] 掌握组件锚点布局:打造灵活精准的UI定位系统

项目已开源,开源地址: https://gitcode.com/nutpi/HarmonyosNextCaseStudyTutorial , 欢迎fork & star
效果演示

1. 引言
在HarmonyOS NEXT的UI开发中,精确控制组件位置是构建复杂界面的关键。RelativeContainer作为一种强大的布局容器,通过锚点系统提供了精确定位能力,使开发者能够创建出灵活且精准的UI布局。本教程将详细讲解如何使用RelativeContainer的锚点布局功能,帮助你掌握这一核心技术。
2. RelativeContainer锚点布局概述
锚点布局是RelativeContainer的核心特性,它允许开发者通过定义组件之间的相对位置关系来构建UI。每个组件可以相对于容器边界或其他组件进行定位,从而实现复杂的布局效果。
2.1 锚点布局的核心概念
- 锚点(Anchor): 用于定位的参考点,可以是容器本身或其他组件
- 对齐规则(AlignRules): 定义组件如何相对于锚点对齐
- 组件ID: 为组件分配唯一标识,使其可以被其他组件作为锚点引用
3. 案例分析:基础容器与组件锚点布局
3.1 完整代码
@Component
export struct AnchorLayout {
    build() {
        RelativeContainer() {
            // 左上按钮
            Button('Left')
                .width(80)
                .height(40)
                .alignRules({
                    top: { anchor: "__container__", align: VerticalAlign.Top },
                    left: { anchor: "__container__", align: HorizontalAlign.Start }
                })
                .id("btnLeft")

            // 右上按钮
            Button('Right')
                .width(80)
                .height(40)
                .alignRules({
                    top: { anchor: "__container__", align: VerticalAlign.Top },
                    right: { anchor: "__container__", align: HorizontalAlign.End }
                })
                .id("btnRight")
            // 底部按钮(基于左上按钮底部和右上按钮左侧定位)

            Button('Bottom')
                .width(100)
                .height(40)
                .alignRules({
                    top: { anchor: "btnLeft", align: VerticalAlign.Bottom  },
                    left: { anchor: "btnRight", align: HorizontalAlign.Start  },
                    right: { anchor: "parent", align: HorizontalAlign.End }
                })
        }
        .width('100%')
        .height(200)
        .padding(20)
    }
}
3.2 代码详解
3.2.1 RelativeContainer容器设置
RelativeContainer() {
    // 子组件
}
.width('100%')
.height(200)
.padding(20)
这部分代码创建了一个RelativeContainer容器,并设置了以下属性:
属性 | 值 | 说明 |
|---|---|---|
width | ‘100%’ | 容器宽度为父容器的100% |
height | 200 | 容器高度为200vp |
padding | 20 | 容器内边距为20vp |
这些设置确保了容器有足够的空间来容纳子组件,并且与父容器边缘保持适当的距离。
3.2.2 左上按钮设置
Button('Left')
    .width(80)
    .height(40)
    .alignRules({
        top: { anchor: "__container__", align: VerticalAlign.Top },
        left: { anchor: "__container__", align: HorizontalAlign.Start }
    })
    .id("btnLeft")
左上按钮的关键属性设置:
属性 | 值 | 说明 |
|---|---|---|
width | 80 | 按钮宽度为80vp |
height | 40 | 按钮高度为40vp |
alignRules.top | { anchor: “container”, align: VerticalAlign.Top } | 按钮顶部对齐容器顶部 |
alignRules.left | { anchor: “container”, align: HorizontalAlign.Start } | 按钮左侧对齐容器左侧 |
id | “btnLeft” | 为按钮分配ID,使其可以被其他组件引用 |
这里使用了特殊锚点__container__,它代表RelativeContainer容器本身。通过设置top和left规则,按钮被定位在容器的左上角。
3.2.3 右上按钮设置
Button('Right')
    .width(80)
    .height(40)
    .alignRules({
        top: { anchor: "__container__", align: VerticalAlign.Top },
        right: { anchor: "__container__", align: HorizontalAlign.End }
    })
    .id("btnRight")
右上按钮的关键属性设置:
属性 | 值 | 说明 |
|---|---|---|
width | 80 | 按钮宽度为80vp |
height | 40 | 按钮高度为40vp |
alignRules.top | { anchor: “container”, align: VerticalAlign.Top } | 按钮顶部对齐容器顶部 |
alignRules.right | { anchor: “container”, align: HorizontalAlign.End } | 按钮右侧对齐容器右侧 |
id | “btnRight” | 为按钮分配ID,使其可以被其他组件引用 |
与左上按钮类似,右上按钮也使用__container__作为锚点,但通过设置right规则而非left规则,使按钮定位在容器的右上角。
3.2.4 底部按钮设置
Button('Bottom')
    .width(100)
    .height(40)
    .alignRules({
        top: { anchor: "btnLeft", align: VerticalAlign.Bottom  },
        left: { anchor: "btnRight", align: HorizontalAlign.Start  },
        right: { anchor: "parent", align: HorizontalAlign.End }
    })
底部按钮的关键属性设置:
属性 | 值 | 说明 |
|---|---|---|
width | 100 | 按钮宽度为100vp |
height | 40 | 按钮高度为40vp |
alignRules.top | { anchor: “btnLeft”, align: VerticalAlign.Bottom } | 按钮顶部对齐左上按钮底部 |
alignRules.left | { anchor: “btnRight”, align: HorizontalAlign.Start } | 按钮左侧对齐右上按钮左侧 |
alignRules.right | { anchor: “parent”, align: HorizontalAlign.End } | 按钮右侧对齐父容器右侧 |
这里展示了锚点布局的强大之处:底部按钮使用了其他两个按钮作为锚点,实现了复杂的相对定位。具体来说:
- 顶部对齐左上按钮的底部,实现垂直方向的相对定位
- 左侧对齐右上按钮的左侧,实现水平方向的相对定位
- 右侧对齐父容器右侧,确保按钮宽度能够延伸到容器右边界
4. 锚点布局的关键技术点
4.1 锚点类型
在RelativeContainer中,可以使用以下几种锚点:
锚点类型 | 说明 |
|---|---|
container | 代表RelativeContainer容器本身 |
parent | 与__container__等效,代表父容器 |
组件ID | 引用具有特定ID的其他组件 |
4.2 对齐方式
对齐方式定义了组件如何相对于锚点对齐:
方向 | 对齐方式 | 说明 |
|---|---|---|
水平方向 | HorizontalAlign.Start | 左对齐 |
水平方向 | HorizontalAlign.Center | 水平居中 |
水平方向 | HorizontalAlign.End | 右对齐 |
垂直方向 | VerticalAlign.Top | 顶部对齐 |
垂直方向 | VerticalAlign.Center | 垂直居中 |
垂直方向 | VerticalAlign.Bottom | 底部对齐 |
4.3 多重锚点规则
一个组件可以同时设置多个锚点规则,例如:
- top + left:定位在左上角
- top + right:定位在右上角
- bottom + left:定位在左下角
- bottom + right:定位在右下角
- left + right:水平拉伸,宽度由两个锚点之间的距离决定
- top + bottom:垂直拉伸,高度由两个锚点之间的距离决定
5. 实际应用场景
锚点布局在以下场景中特别有用:
- 复杂表单布局:标签和输入框的精确对齐
- 自适应卡片设计:内容根据容器大小自动调整位置
- 悬浮按钮定位:相对于屏幕边缘或其他UI元素定位
- 动态内容布局:当某些内容可能显示或隐藏时,其他内容能够自动调整位置
6. 总结
RelativeContainer的锚点布局系统提供了强大而灵活的组件定位能力,通过本教程的学习,你应该能够:
- 理解锚点布局的核心概念和工作原理
- 掌握使用容器和其他组件作为锚点的技巧
- 应用多重锚点规则创建复杂布局
- 在实际项目中灵活运用锚点布局解决UI定位问题
锚点布局虽然概念简单,但通过组合使用可以实现极其复杂的布局效果,是HarmonyOS NEXT UI开发中不可或缺的技术。通过持续实践和探索,你将能够充分发挥RelativeContainer的潜力,创建出精确、灵活且美观的用户界面。

