Apipost自动化测试:零代码!3步搞定!
原创
Apipost自动化测试:零代码!3步搞定!
原创
多吃核桃
发布于 2025-04-18 14:26:30
发布于 2025-04-18 14:26:30
Apipost自动化测试:零代码!3步搞定!
“测试1小时,改Bug一整天”, 传统手动测试不仅耗时费力,还容易遗漏关键场景,导致线上事故频发。目前,全球Top 10的科技公司中,90%的团队早已抛弃手动测试,转向更智能的解决方案——自动化测试!
不过,许多人对自动化测试的认知仍停留在“高门槛”“复杂代码”的误区中。
自从上手Apipost,发现并非如此: 无需写一行代码,三步操作即可实现全流程自动化测试,小白也能10分钟上手。
快速上手
1. 新建测试用例
打开Apipost,点击“新建测试用例”,给你的测试任务起个名字,比如“用户登录接口测试”。
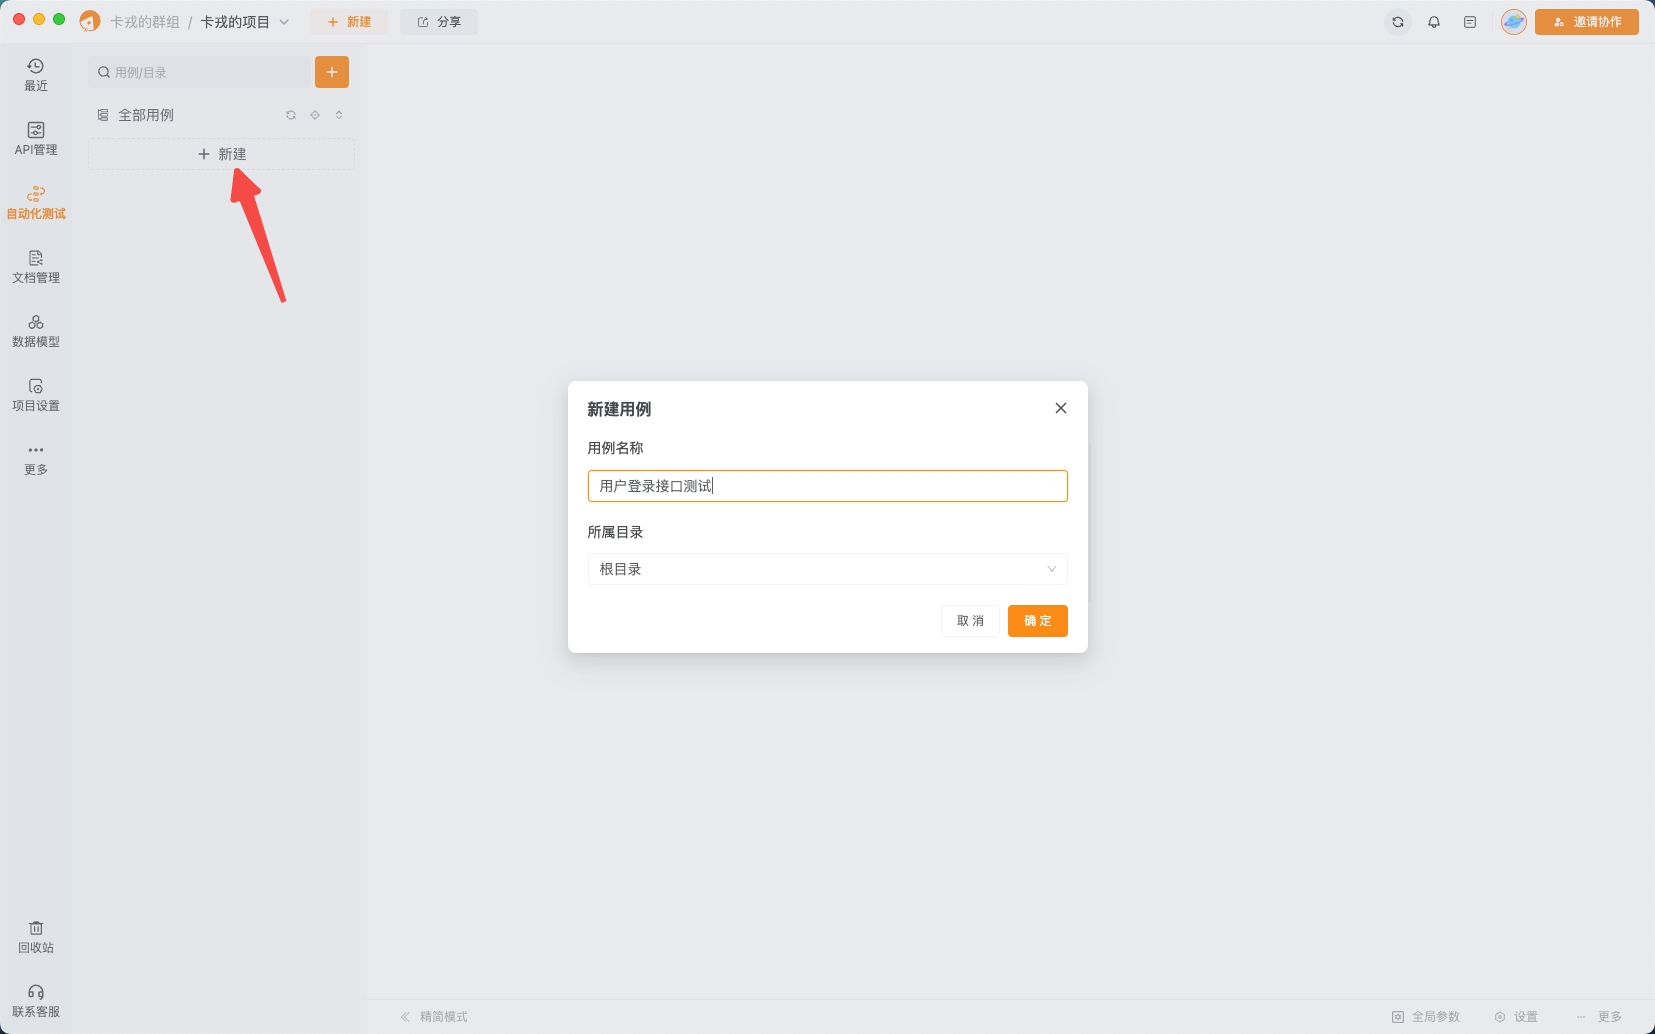
img_v3_02kv_6677f145-0a00-4ffd-8c59-eba19c28f42g.jpg
2. 编排测试用例
在测试用例中,你可以像搭积木一样,把接口拖拽进来。比如,先添加“用户登录接口”,再添加“获取用户信息接口”。
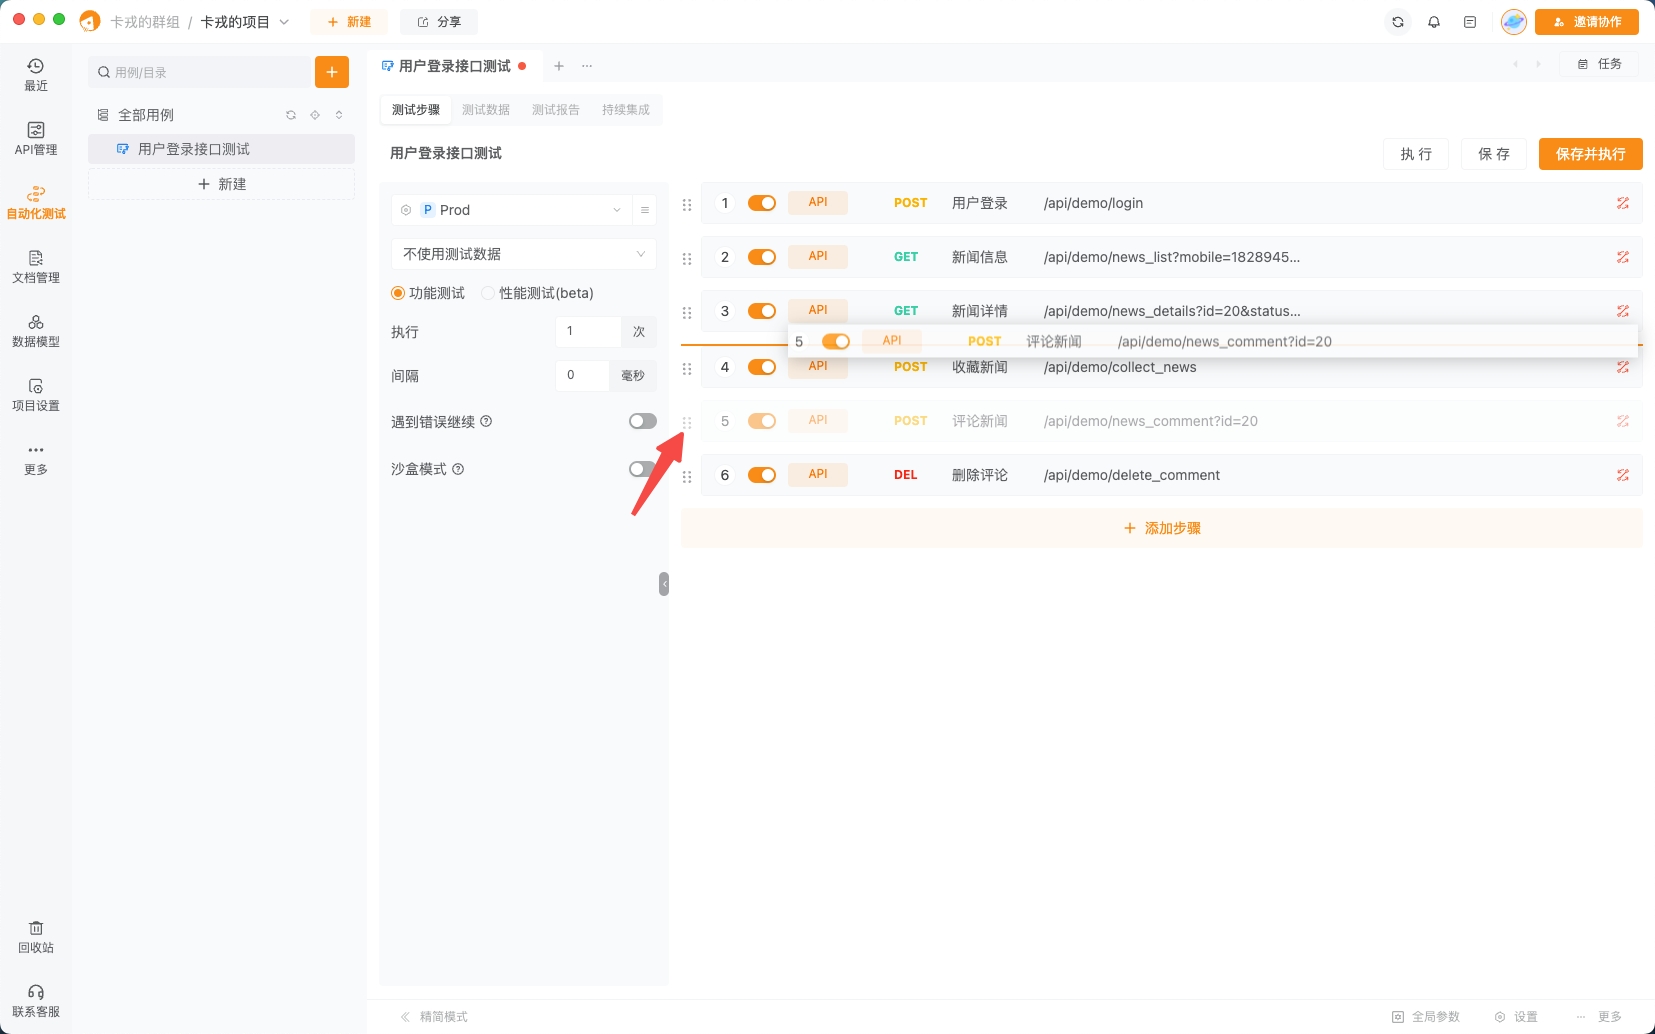
img_v3_02kv_db54b31f-8cfe-446e-aa52-9cc6a80a26eg.jpg
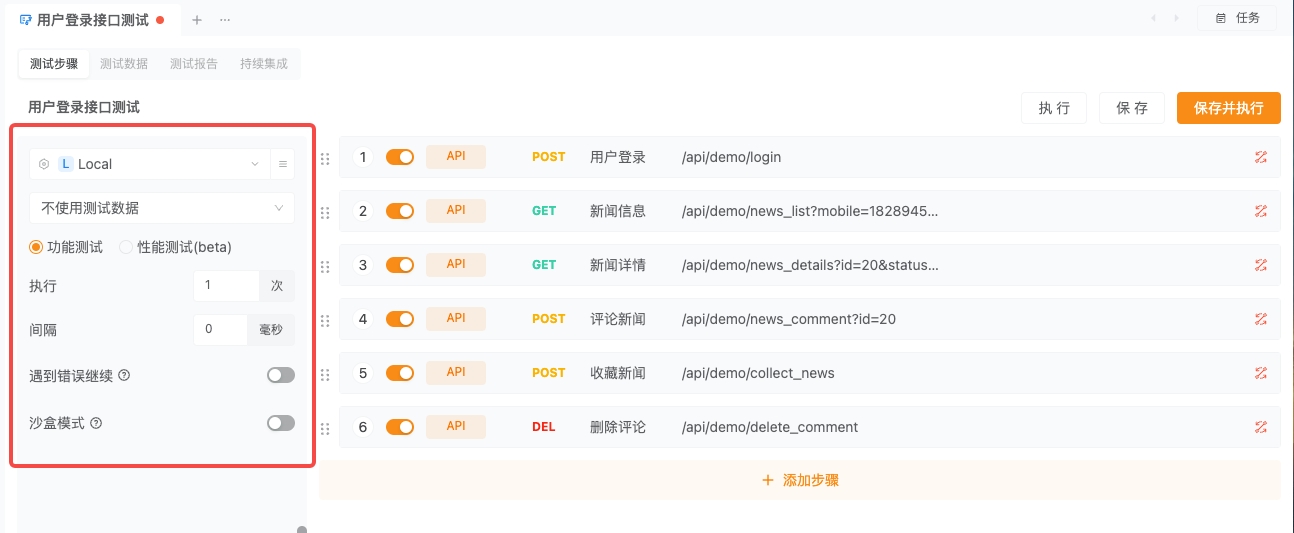
3. 设置测试条件
- 测试环境:从下拉菜单中选择你的测试环境(比如开发环境、预发布环境)。
- 执行轮次:设置跑多少次测试,比如跑5次验证稳定性。
- 间隔时长:每次测试之间隔多久,比如设置为3秒。undefined
 img_v3_02kv_bb639aa2-75ce-4e88-a673-5cc6a0281cag.jpg
- 生成测试报告undefined 点击“保存并执行”,Apipost会自动生成一份详细的测试报告,包括接口响应时间、断言结果、失败原因等。undefined
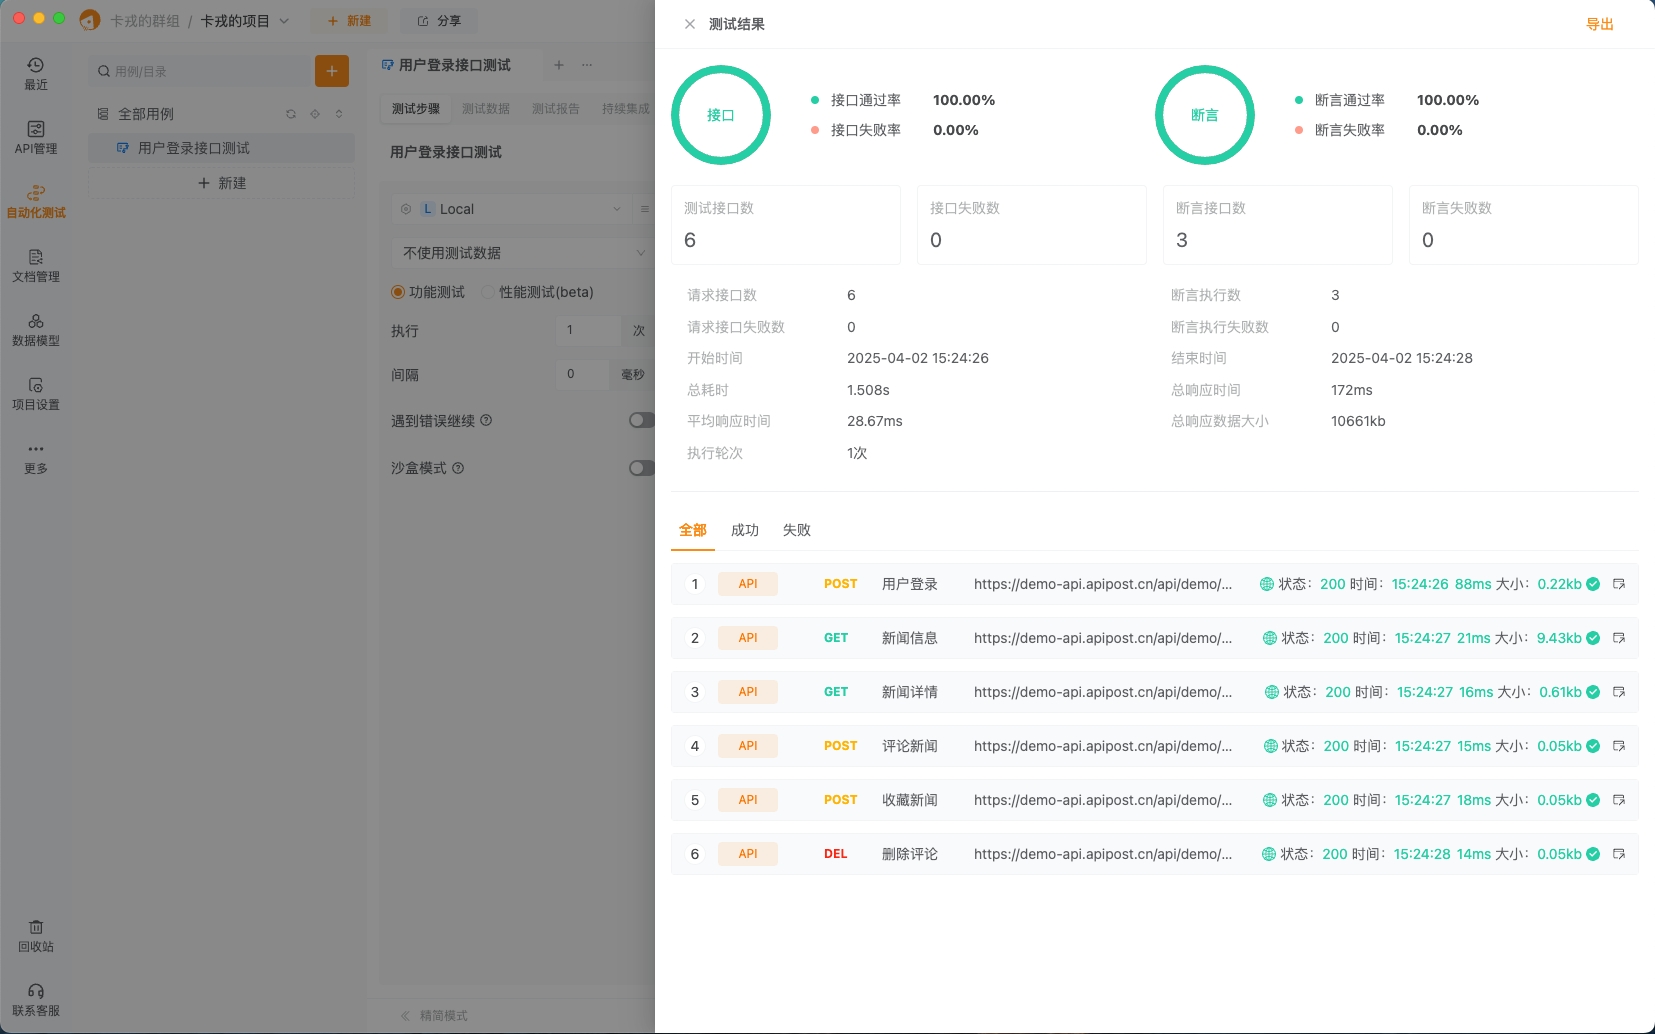 img_v3_02kv_ea660a32-4032-43a8-921b-43a6b98455ag.jpg
使用测试数据
1. 测试数据的创建:从零到一的蜕变
1.1 上传测试数据文件
- 打开 Apipost,进入测试用例编辑页面,点击左侧的“测试数据”。
- 点击“新建测试数据”,选择“上传文件”,支持 CSV 和 TXT 格式。
- 示例:准备一个 CSV 文件,包含用户登录所需的
username和password字段。
  username,password
  test01@apipost.cn,123456
test02@apipost.cn,789012- 上传后,Apipost 会自动解析文件内容,你可以在右侧预览数据。
 img_v3_02kv_5154a458-2885-4cc6-8913-38b25a8e582g.jpg
1.2 环境隔离:不同环境不同数据
- 在 Apipost 中,支持为每个环境单独配置测试数据。例如:
- 开发环境使用
local_users.csv。 - 生产环境使用
prod_users.csv。
- 开发环境使用
- 切换环境时,系统会自动识别对应环境的测试数据。
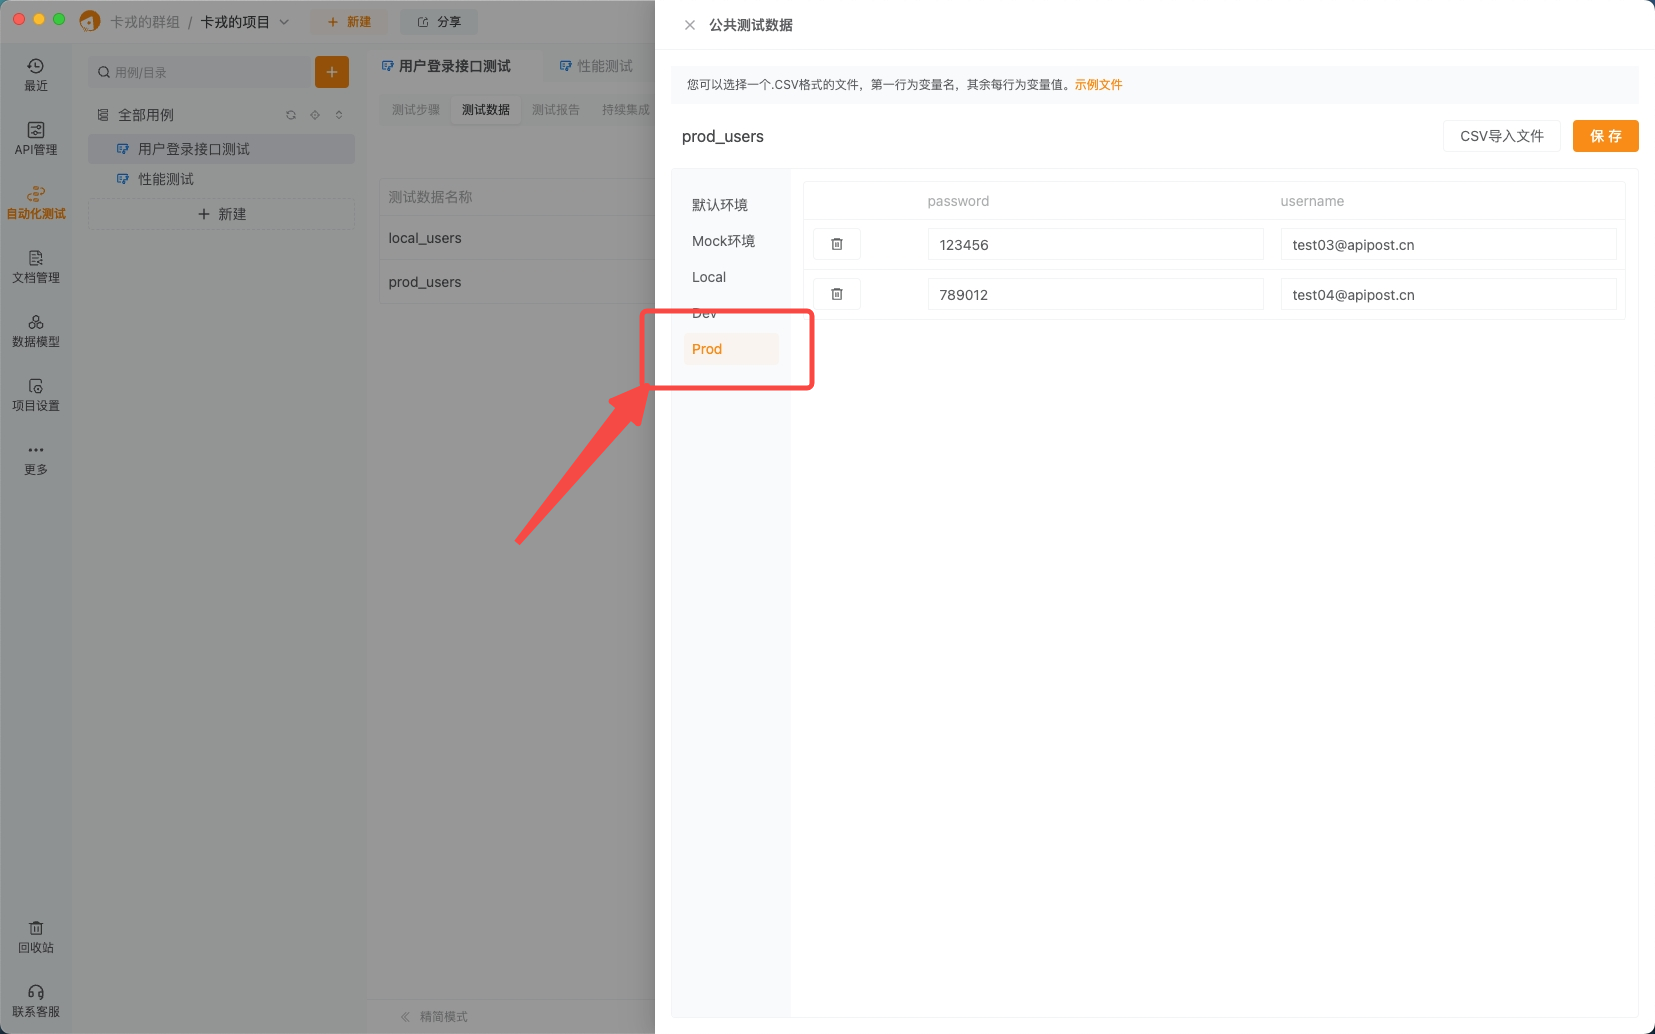 image.png
2. 测试数据的使用:让数据“活”起来
2.1 参数化接口请求
- 编辑接口时,将请求参数设置为变量,例如
{{username}}和{{password}}。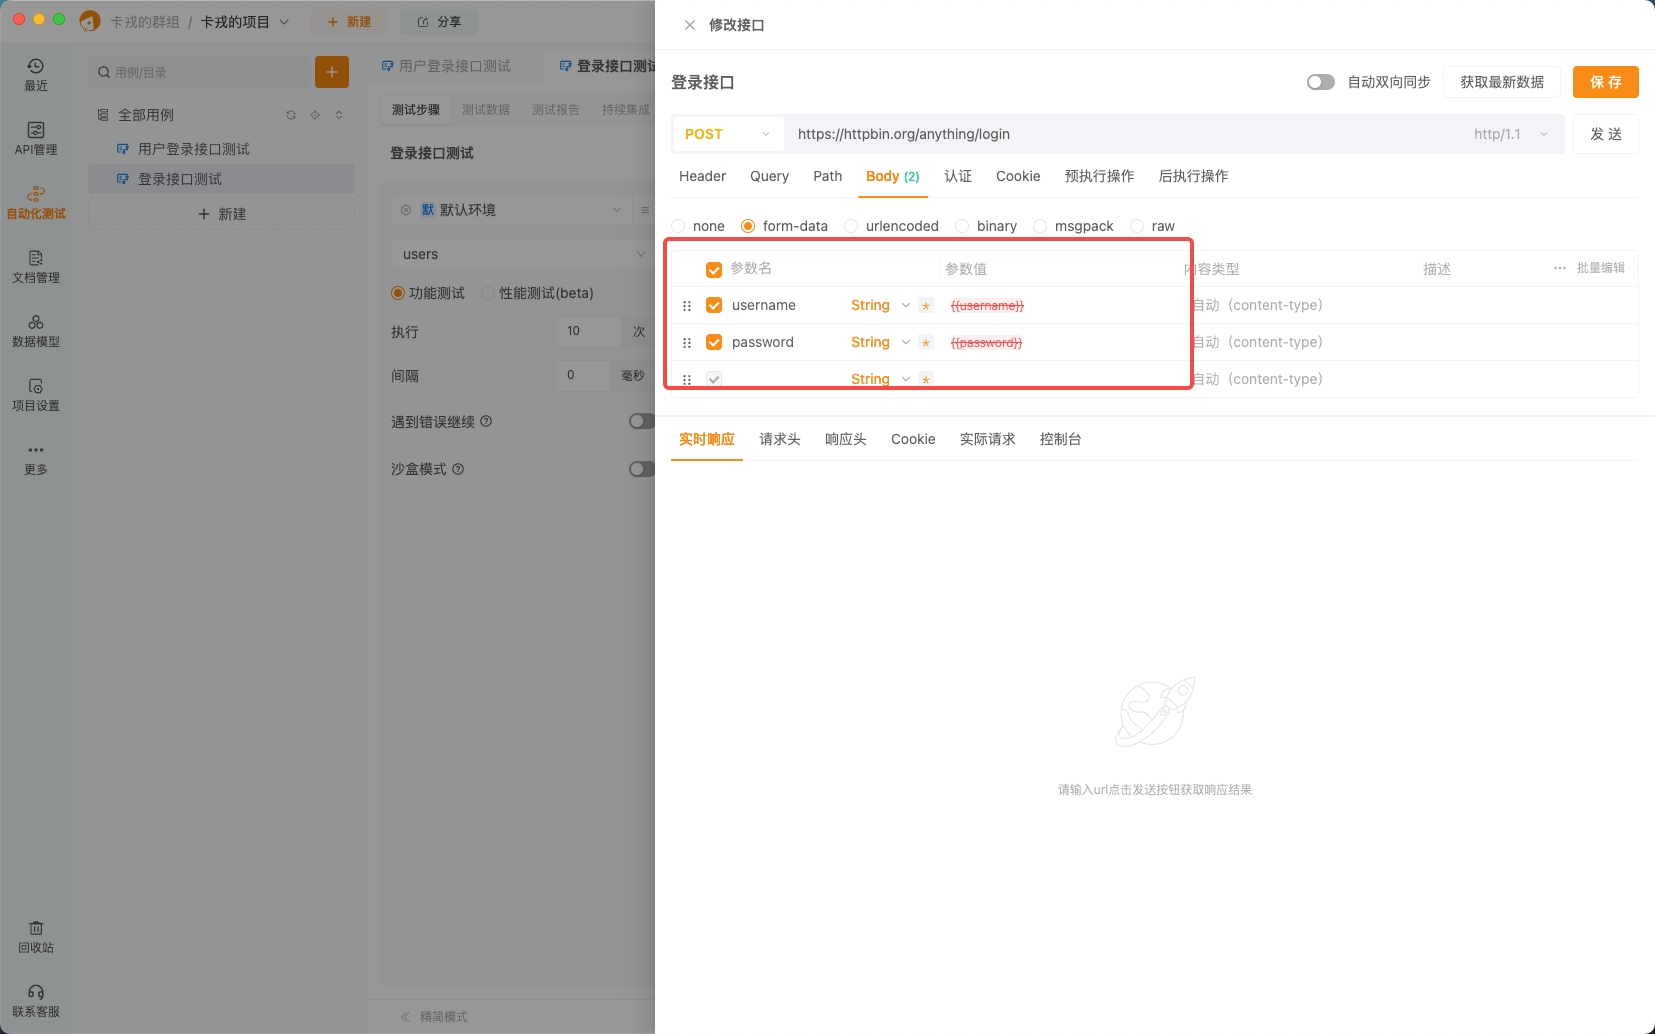 img_v3_02kv_3a93f026-fe3b-4a88-80b3-e1be2325649g.jpg
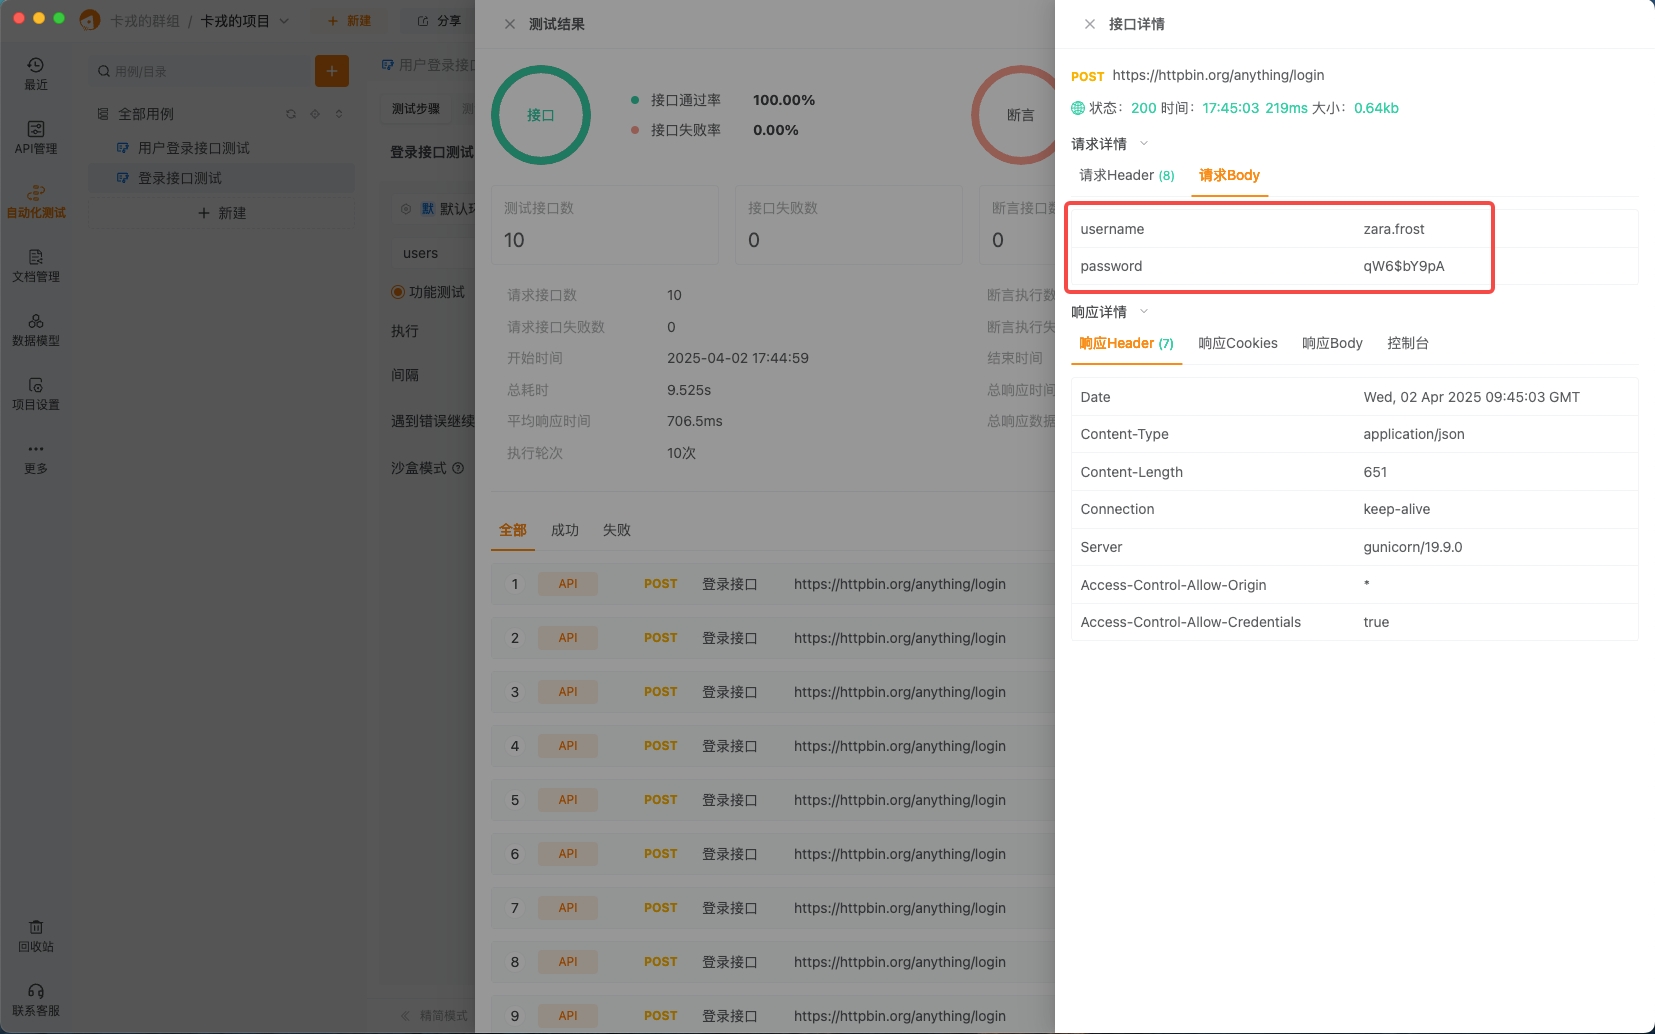
 - 在测试条件中选择刚创建的测试数据,Apipost 会自动将数据填充到接口中。
 img_v3_02kv_6aec69a5-d988-463b-9ed4-3a1d8bcd782g.jpg
2.2 循环控制器与测试数据的结合
- 添加“循环控制器”,选择“完成所有测试数据的迭代”模式。
- 设置循环间隔为 1 秒,确保每次请求之间有足够的时间。
- 在循环体内调用接口,使用
{{username}}和{{password}}引用数据。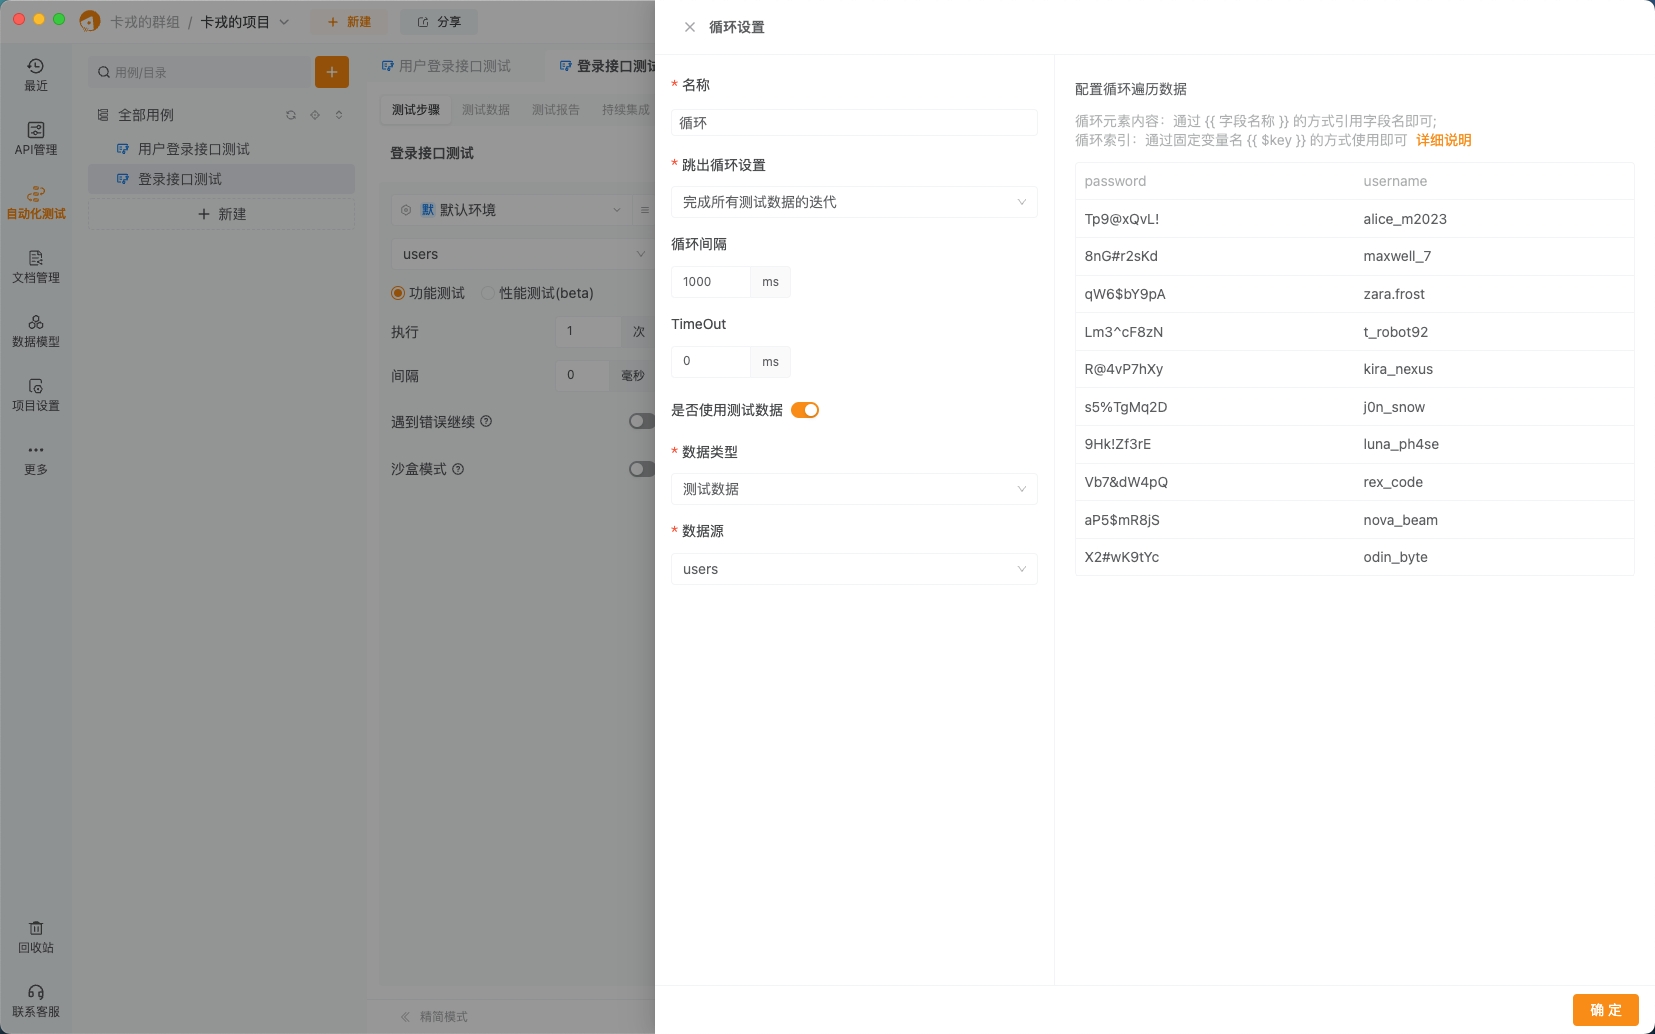 img_v3_02kv_c4733a12-b222-4b71-8540-de843c80ffeg.jpg
2.3 动态数据提取与再利用
- 如果接口返回的数据是数组格式(如用户列表),可以通过 JSONPath 表达式提取数据。
{
  "code": 200,
  "success": true,
  "msg": "Data generated successfully",
  "timestamp": "2023-09-20T14:30:00Z",
  "data": [
    {
      "id": "e3f5a7b1-9c2d-4f8a-b6c0-1d8e9f2a7b3c",
      "username": "alice_m2023",
      "password": "Tp9@xQvL!",
      "created_at": "2023-09-20T14:00:00Z"
    },
    {
      "id": "a2b4c6d8-e0f1-4a3b-9c5d-7e9f1a2b3c4d",
      "username": "maxwell_7",
      "password": "8nG#r2sKd",
      "created_at": "2023-09-20T14:05:00Z"
    },
    {
      "id": "5d7f9a1b-3c8e-4a2d-9b0f-6e1a3b5c7d9e",
      "username": "zara.frost",
      "password": "qW6$bY9pA",
      "created_at": "2023-09-20T14:10:00Z"
    },
    {
      "id": "8e1a3b5c-7d9e-4f2a-b6c0-9d8e7f1a2b3c",
      "username": "t_robot92",
      "password": "Lm3^cF8zN",
      "created_at": "2023-09-20T14:15:00Z"
    },
    {
      "id": "1a2b3c4d-5e6f-7a8b-9c0d-1e2f3a4b5c6d",
      "username": "kira_nexus",
      "password": "R@4vP7hXy",
      "created_at": "2023-09-20T14:20:00Z"
    }
  ]
  }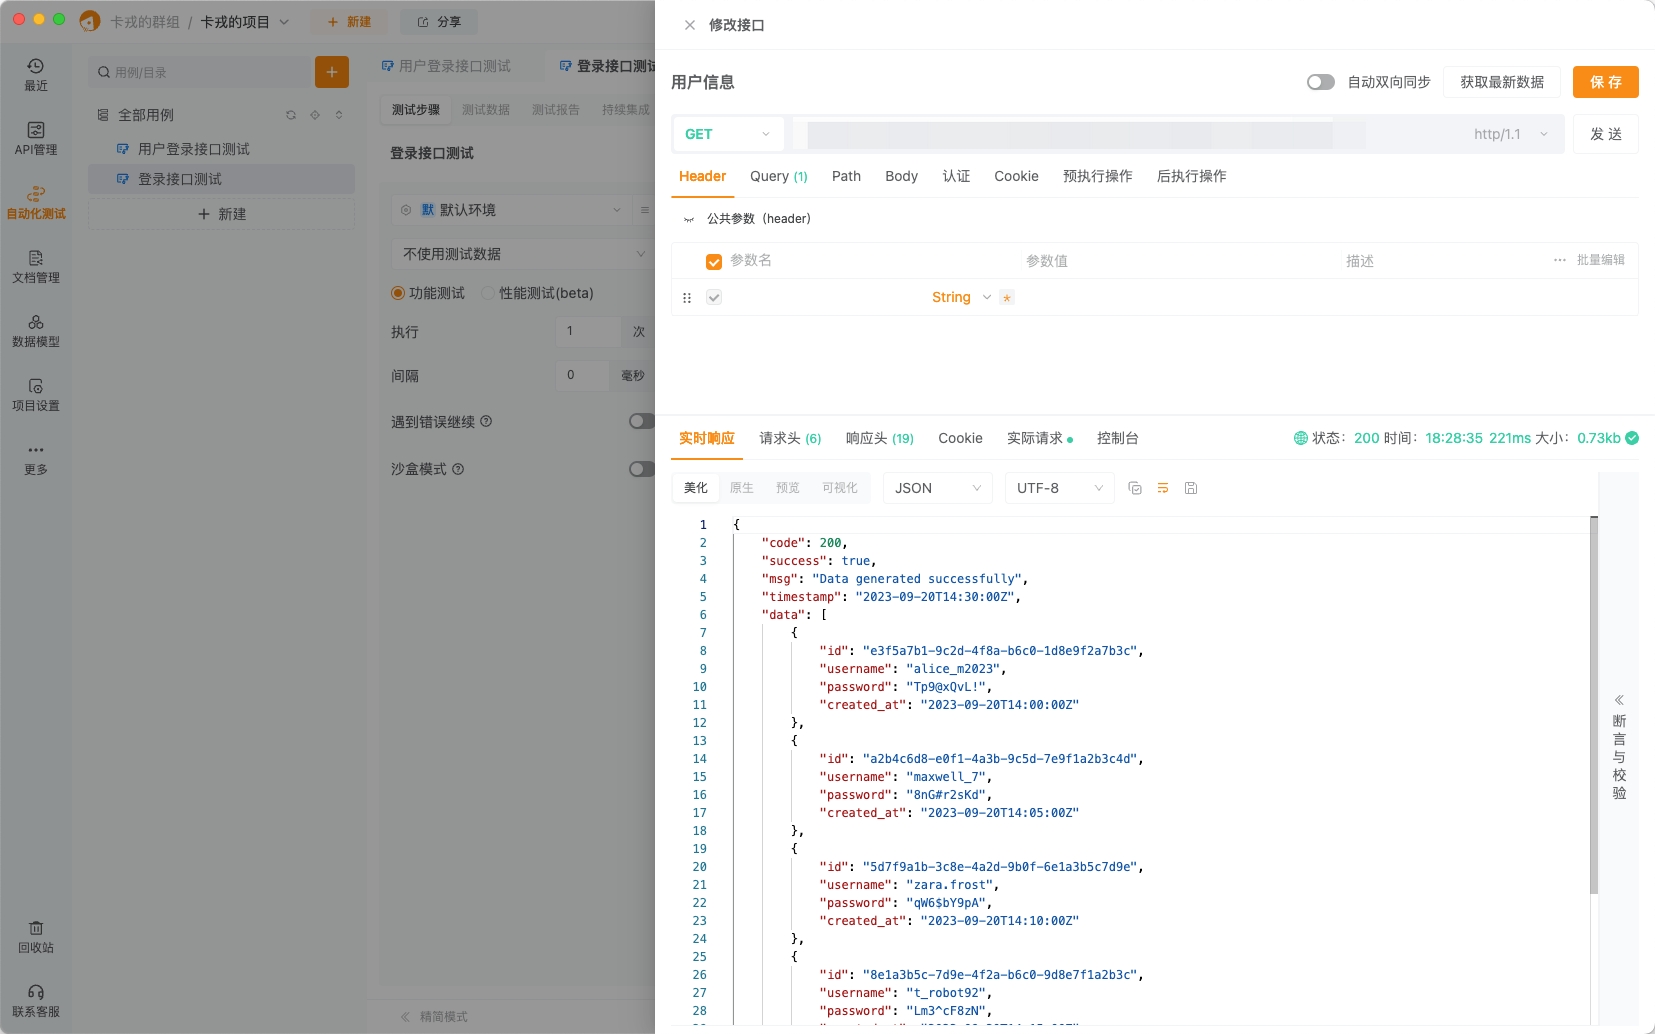
img_v3_02kv_da9d9e50-d8c8-48cd-9911-5215c083adeg.jpg
- 使用
$.data提取数组。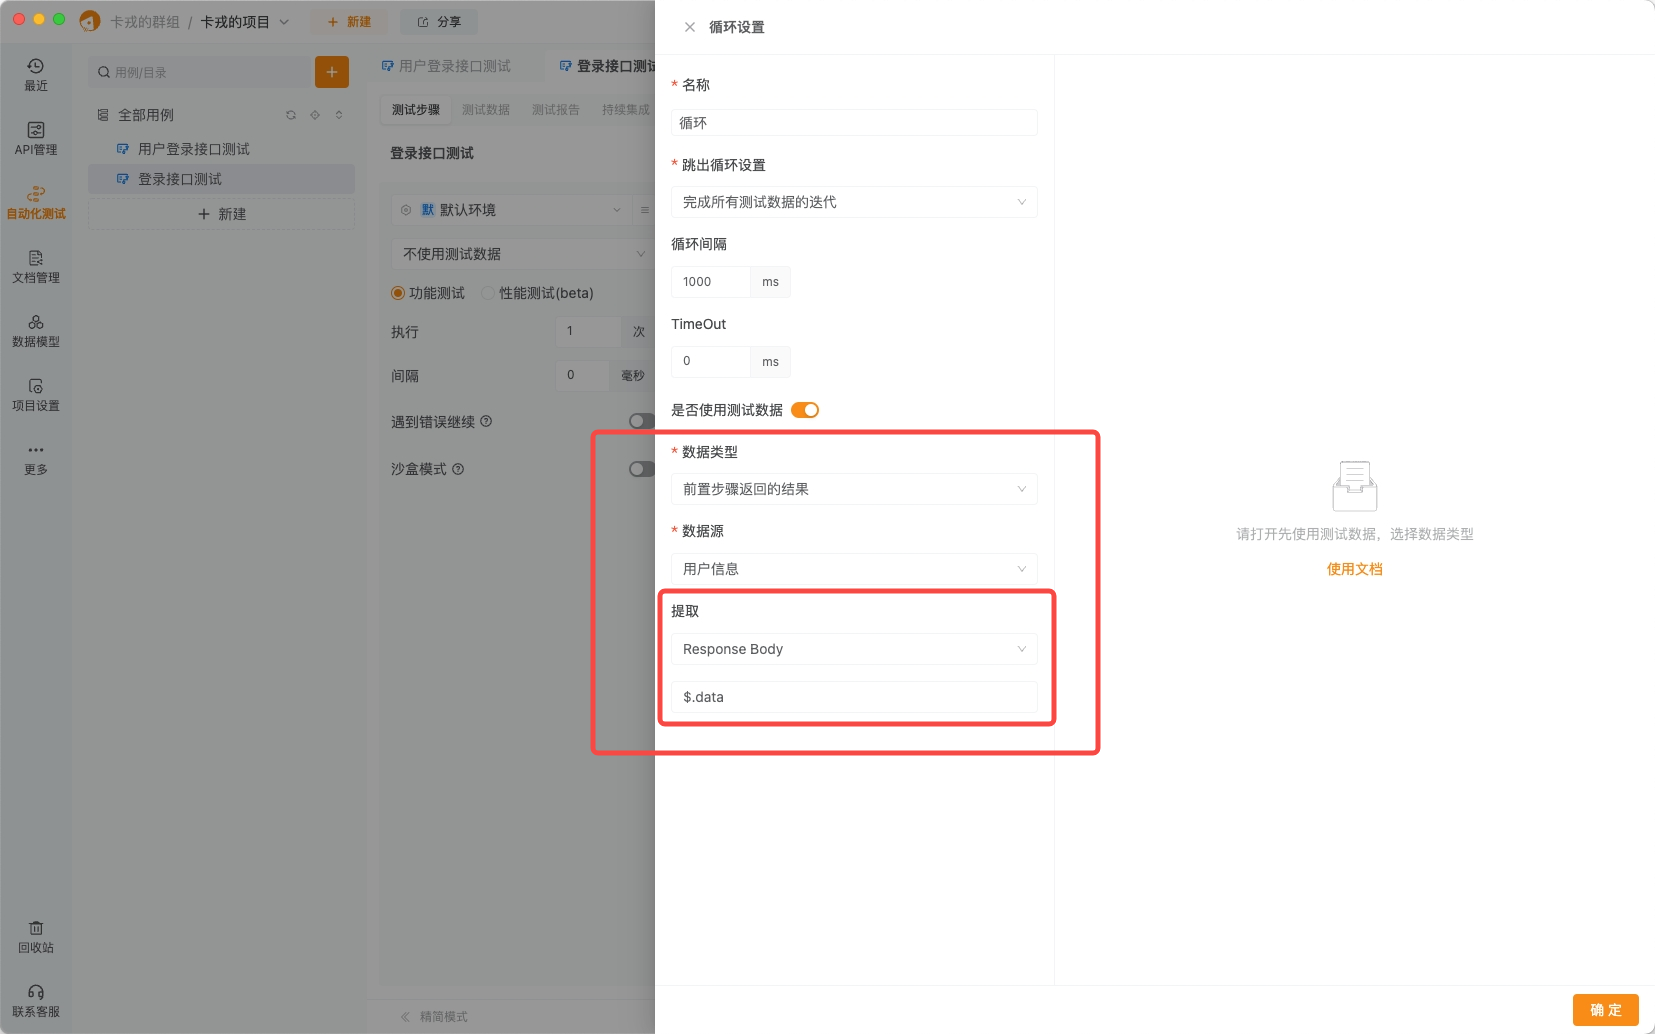 image.png
 - 然后在后续接口中通过使用
{{username}}和{{password}}引用数据。 image.png
性能测试实战
性能问题是接口测试的“隐形杀手”。Apipost的性能测试功能,能帮你快速定位瓶颈!
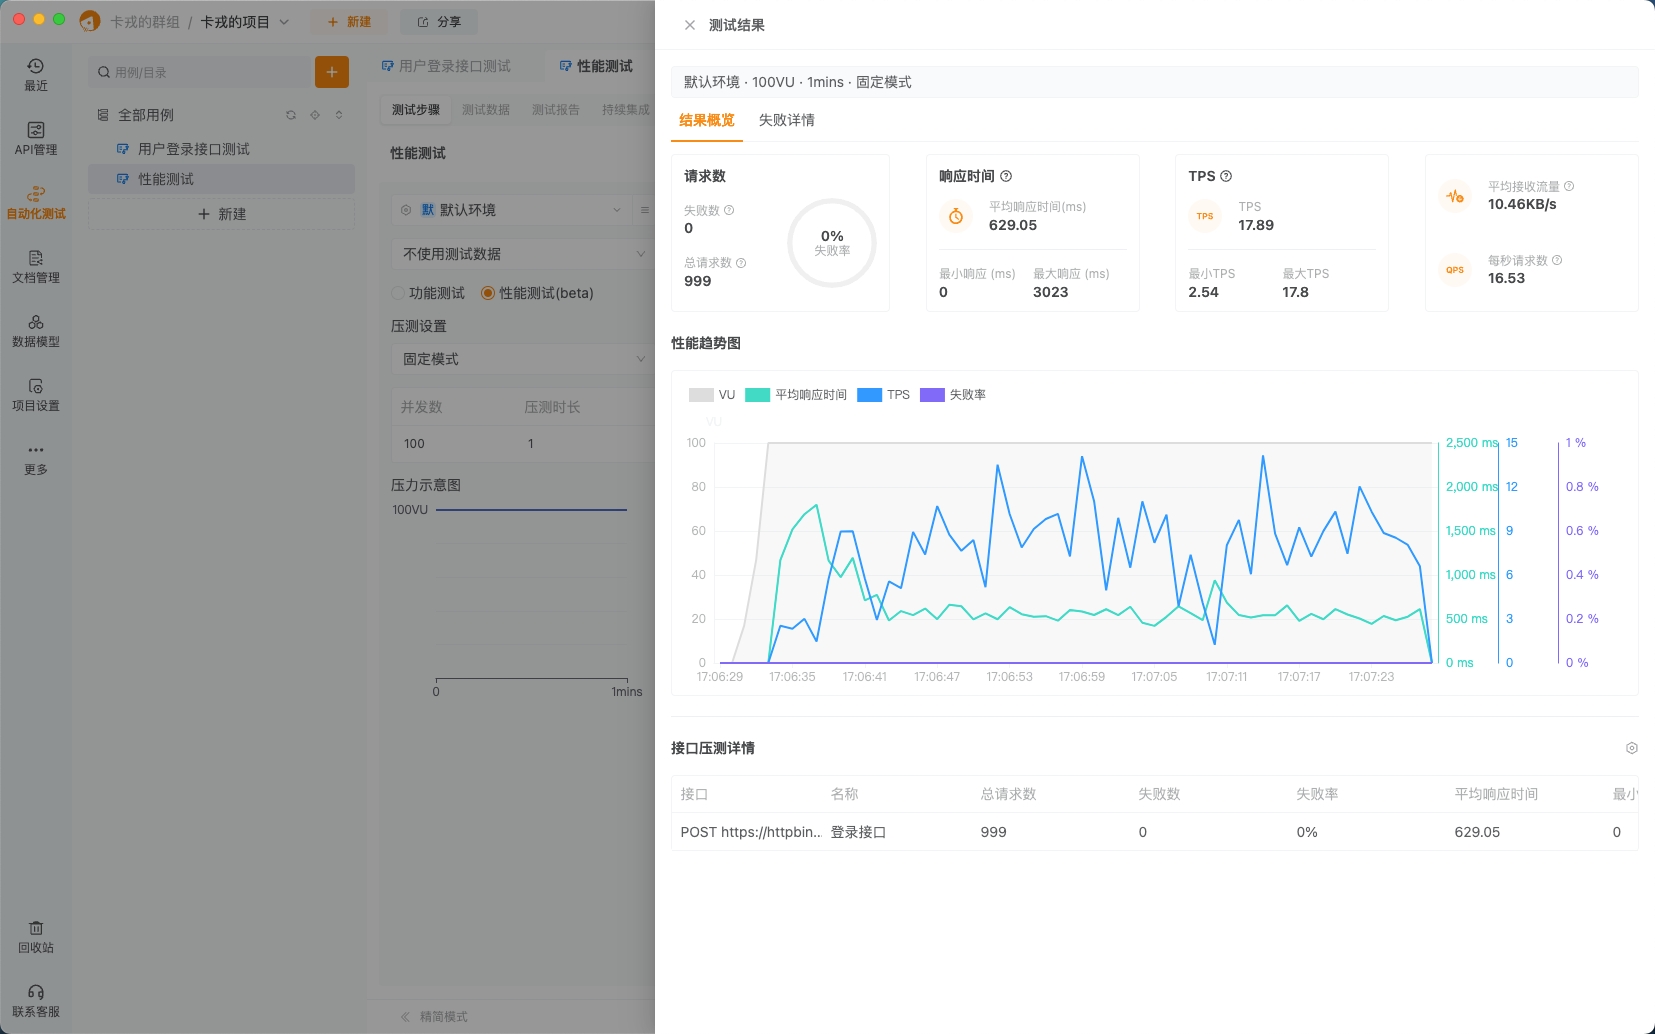
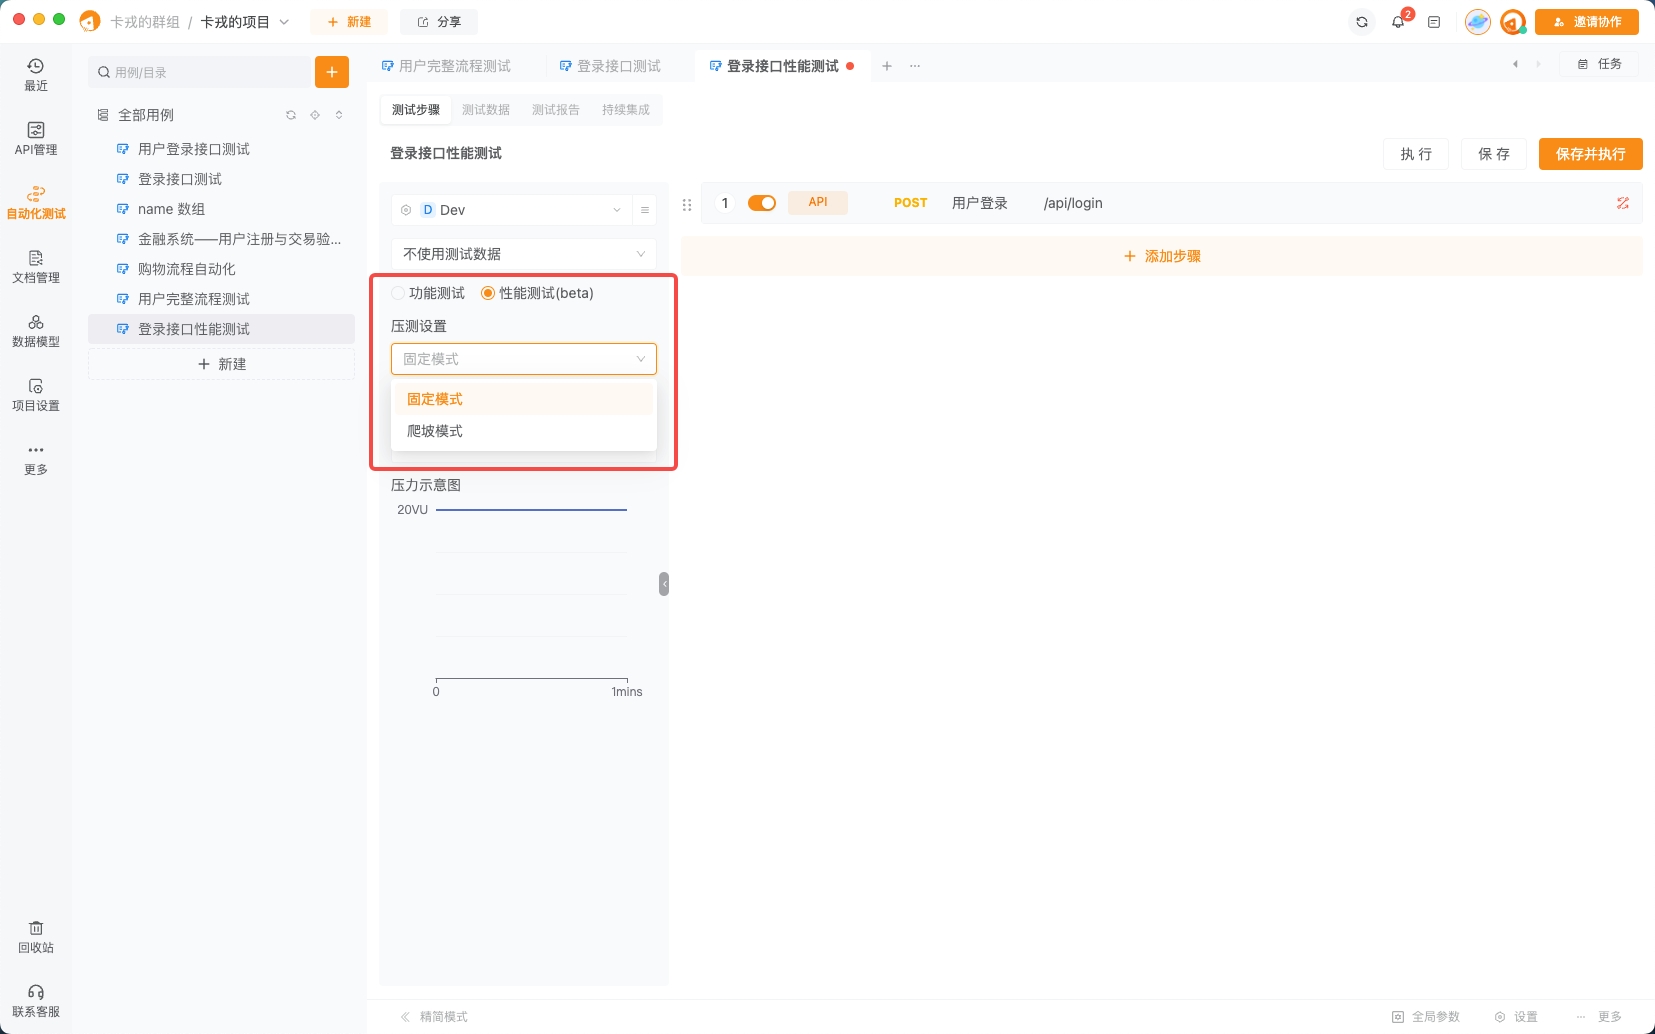
1. 固定模式压测
- 设置并发数为100,模拟100个用户同时登录。
- 查看压测报告中的“平均响应时间”和“失败率”,判断接口是否能扛住高并发。undefined
 img_v3_02kv_758742a6-4830-4cf8-b3ac-fb6bb69e53fg.jpg
2. 爬坡模式压测
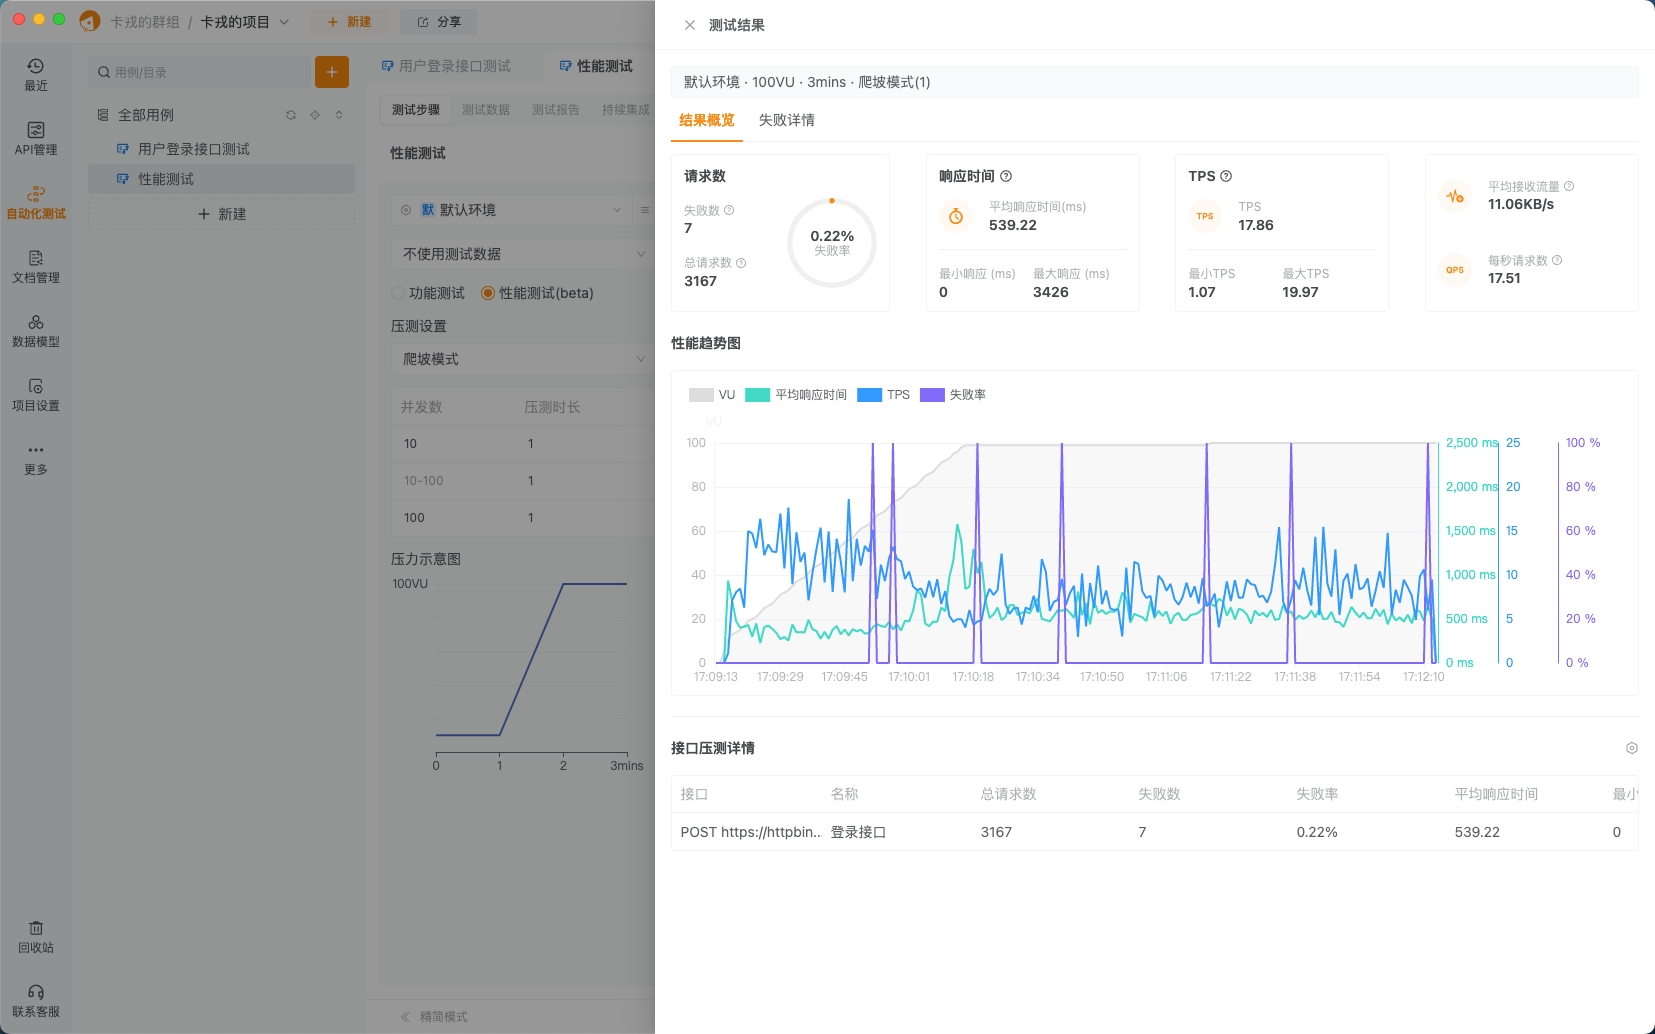
- 从10个并发开始,逐步增加到100个并发,观察接口性能的变化趋势。
- 如果响应时间突然飙升,说明接口在某个并发点出现了性能问题。undefined
 img_v3_02kv_823484c7-d34c-4736-8b09-e1296866286g.jpg
CICD实战指南,从安装到集成
1. Apipost CLI工具:自动化测试的“发动机”
1.1 安装 CLI 工具
- 打开终端,运行以下命令安装 Apipost CLI:
npm install -g apipost-cli-pro- 如果你之前安装过旧版本的
apipost-cli,请先卸载:
npm uninstall -g apipost-cli1.2 生成 CICD 命令
- 进入你的测试用例页面。
- 点击“持续集成”,新建--Apipost Cli,系统会自动生成一个唯一的运行链接和 Token。
- 复制生成的命令,例如:
apipost run "https://open.apipost.net/open/ci/automated_testing?ci_id=xxx&token=xxx" -r html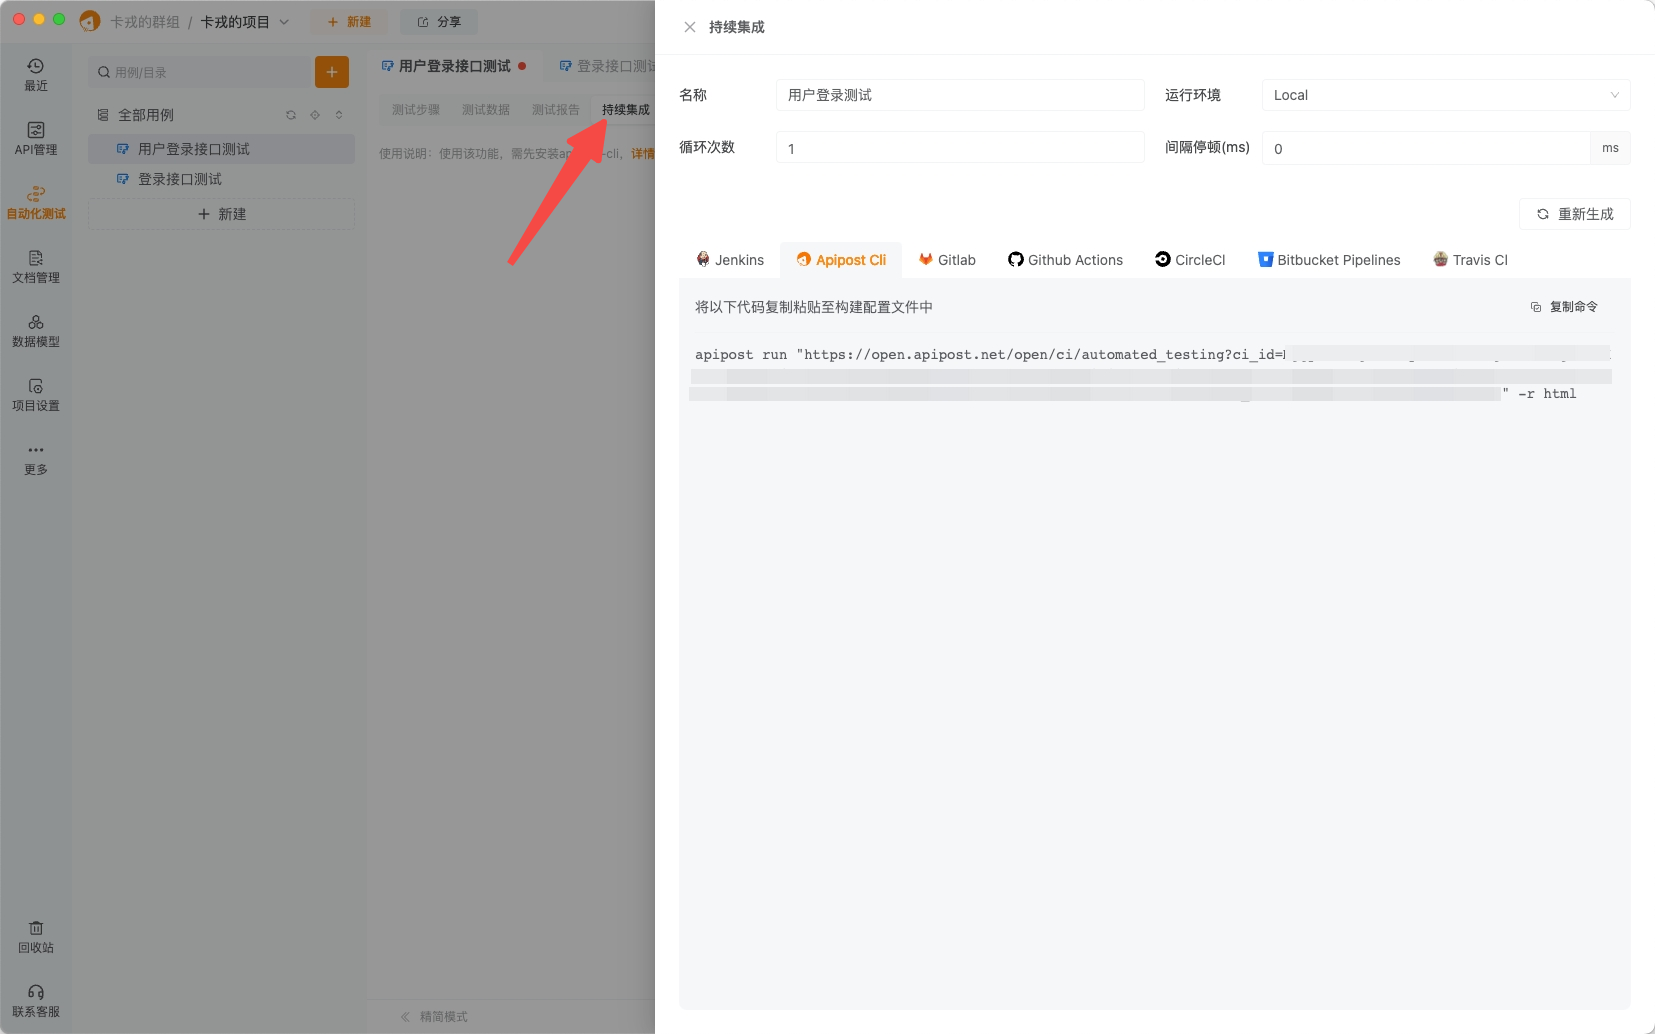
image.png
2. 集成到 CI/CD 流程:让测试成为流水线的一部分
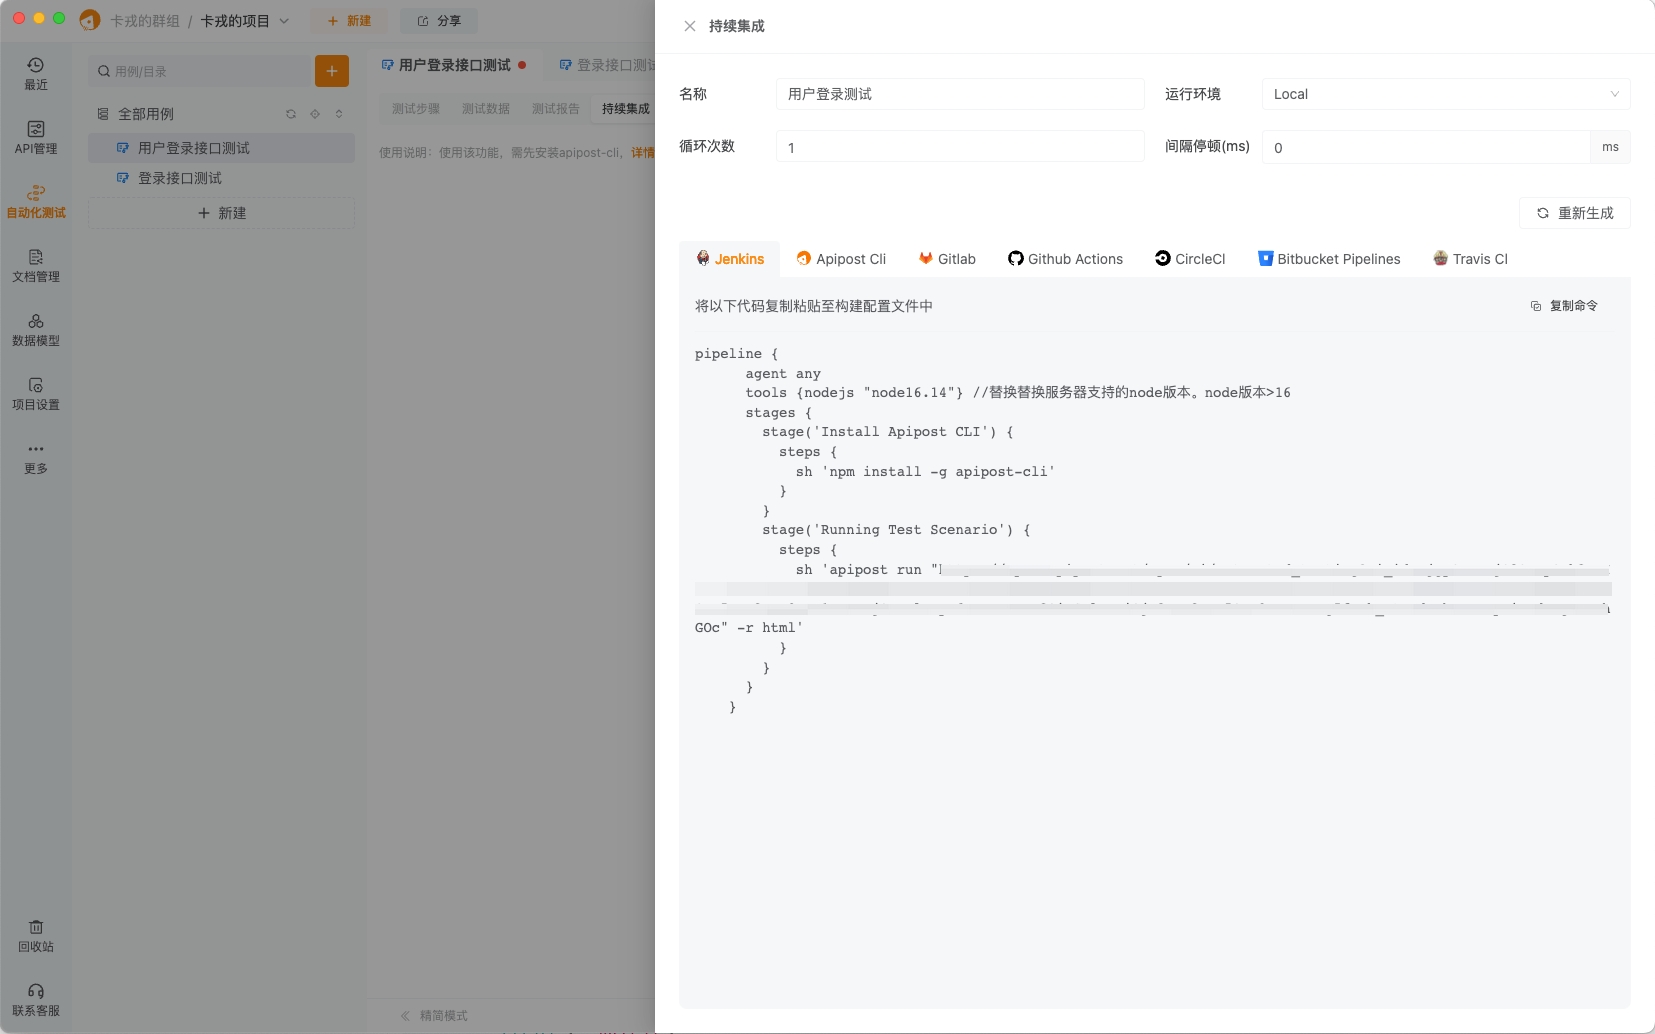
2.1 Jenkins 集成
- 在 Jenkins 项目配置中,添加一个新的“执行 shell”步骤。
- 粘贴刚才生成的 CICD 命令,确保在代码提交后自动触发测试。
- 示例配置:
pipeline {
      agent any
      tools {nodejs "node16.14"} //替换替换服务器支持的node版本。node版本>16
      stages {
        stage('Install Apipost CLI') {
          steps {
            sh 'npm install -g apipost-cli'
          }
        }
        stage('Running Test Scenario') {
          steps {
            sh 'apipost run "https://open.apipost.net/open/ci/automated_testing?ci_id=xxx&token=xxx" -r html'
          }
        }
      }
    }
img_v3_02kv_4db49360-59a1-43f8-988d-bcbc3d5b4c1g.jpg
2.2 GitHub Actions 集成
- 在项目根目录下创建
.github/workflows/test.yml文件。 - 添加以下内容:
  name: Automated API Tests

  on: [push, pull_request]

  jobs:
  build:
    runs-on: ubuntu-latest

    steps:
    - uses: actions/checkout@v3

    - name: Setup Node.js environment
      uses: actions/setup-node@v2
      with:
        node-version: '14'

    - name: Install Apipost CLI
      run: npm install -g apipost-cli

    - name: Running Test Scenario
      run: apipost run "https://open.apipost.net/open/ci/automated_testing?ci_id=xxx&token=xxx" -r html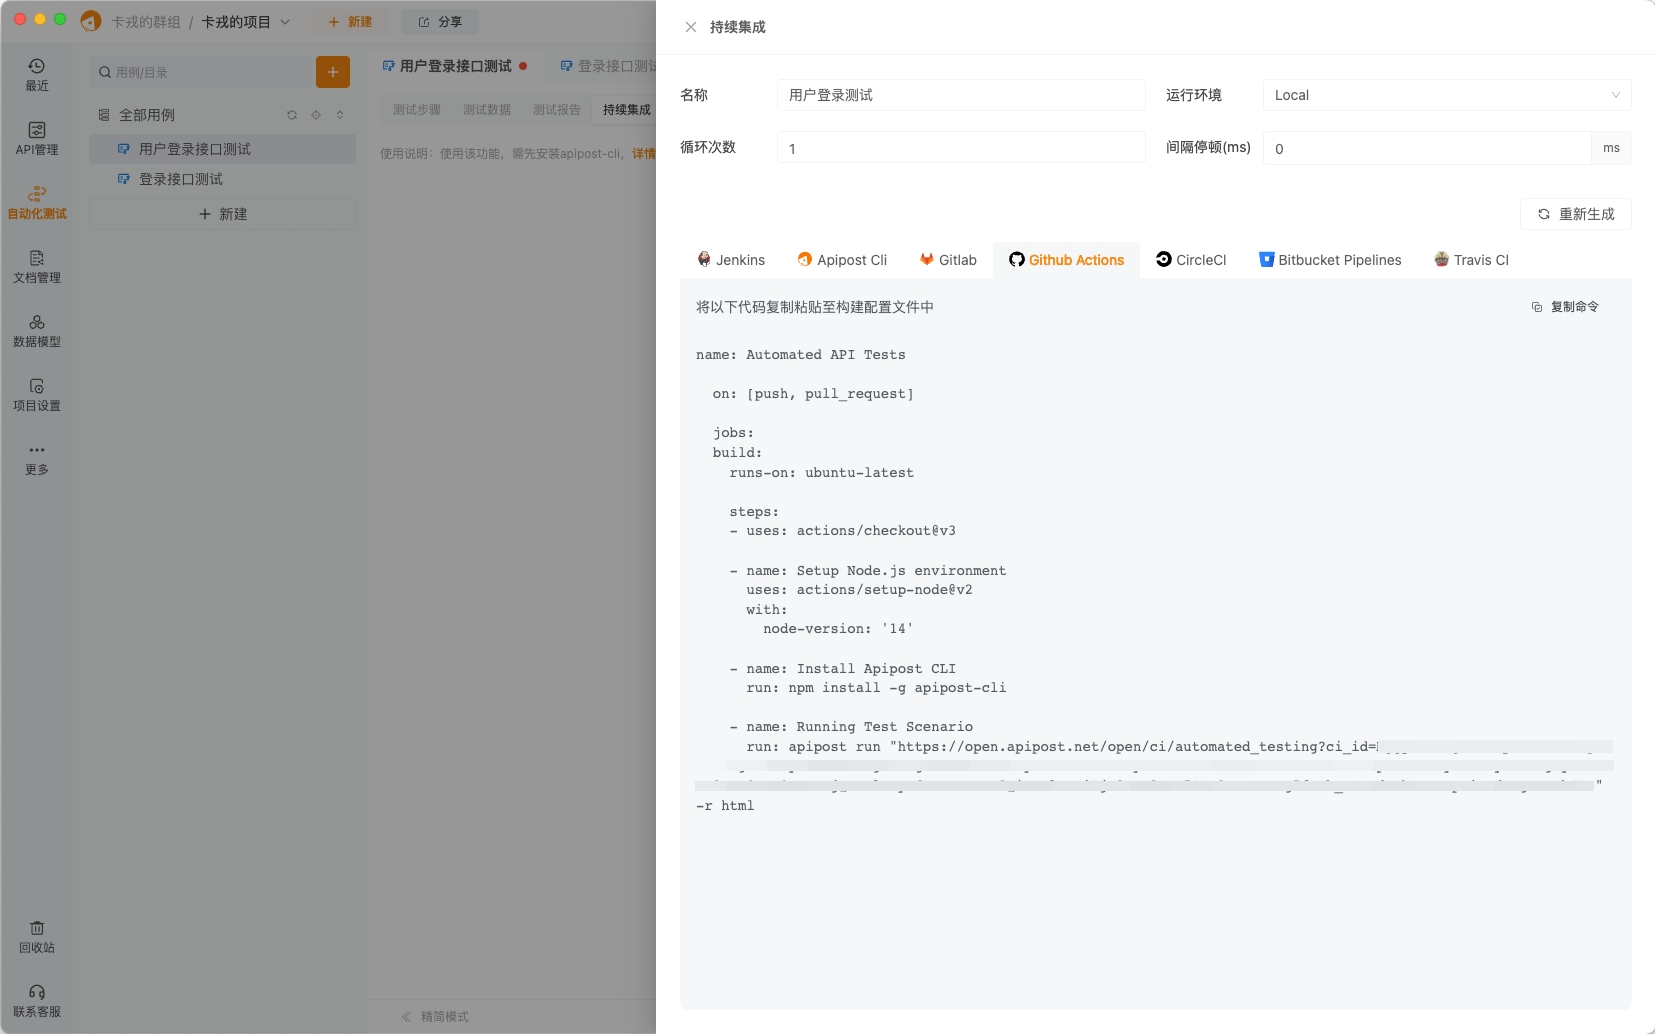
img_v3_02kv_a6948a91-bb67-405c-9fd3-807a4e4869bg.jpg
实战场景:用户充值查询系统
场景描述
假设我们有一个用户管理系统,包含以下四个接口:
- 用户注册接口:允许新用户注册。
- 用户登录接口:验证用户凭据并返回认证token。
- 用户充值接口:允许用户为账户充值。
- 查询账户信息接口:查询用户的账户余额和充值历史。
我们将使用Apipost对这些接口进行自动化测试,确保系统的稳定性和可靠性。
自动化测试流程设计
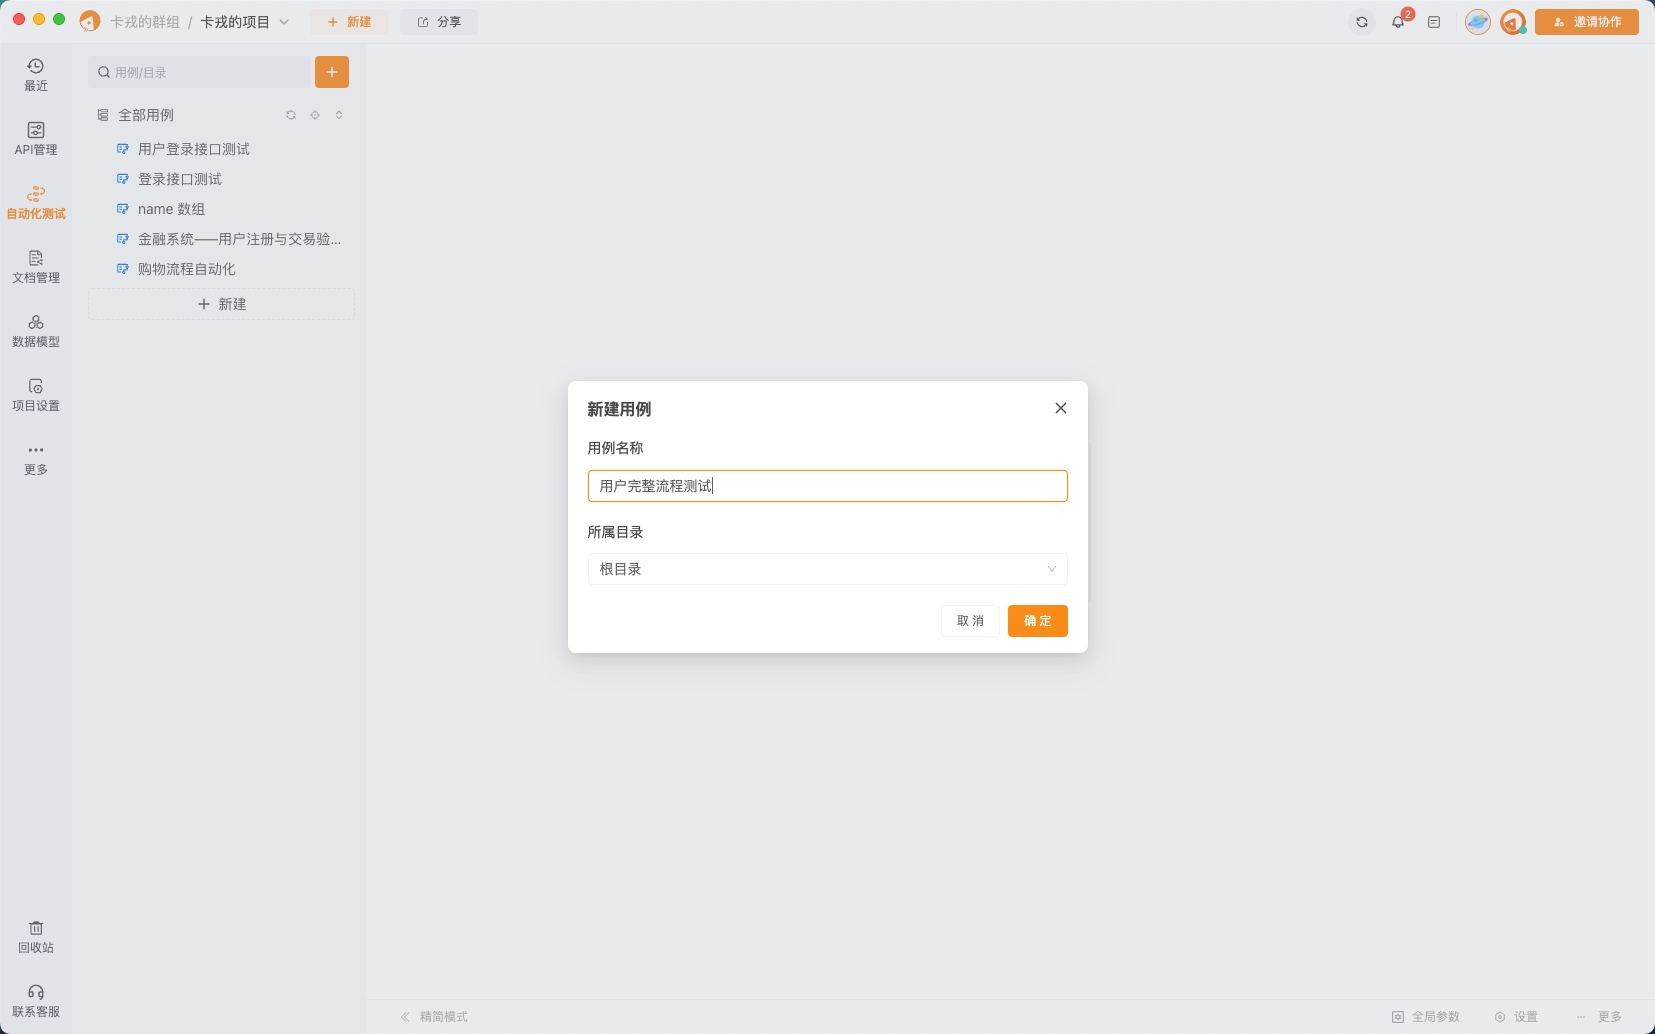
1. 创建测试用例
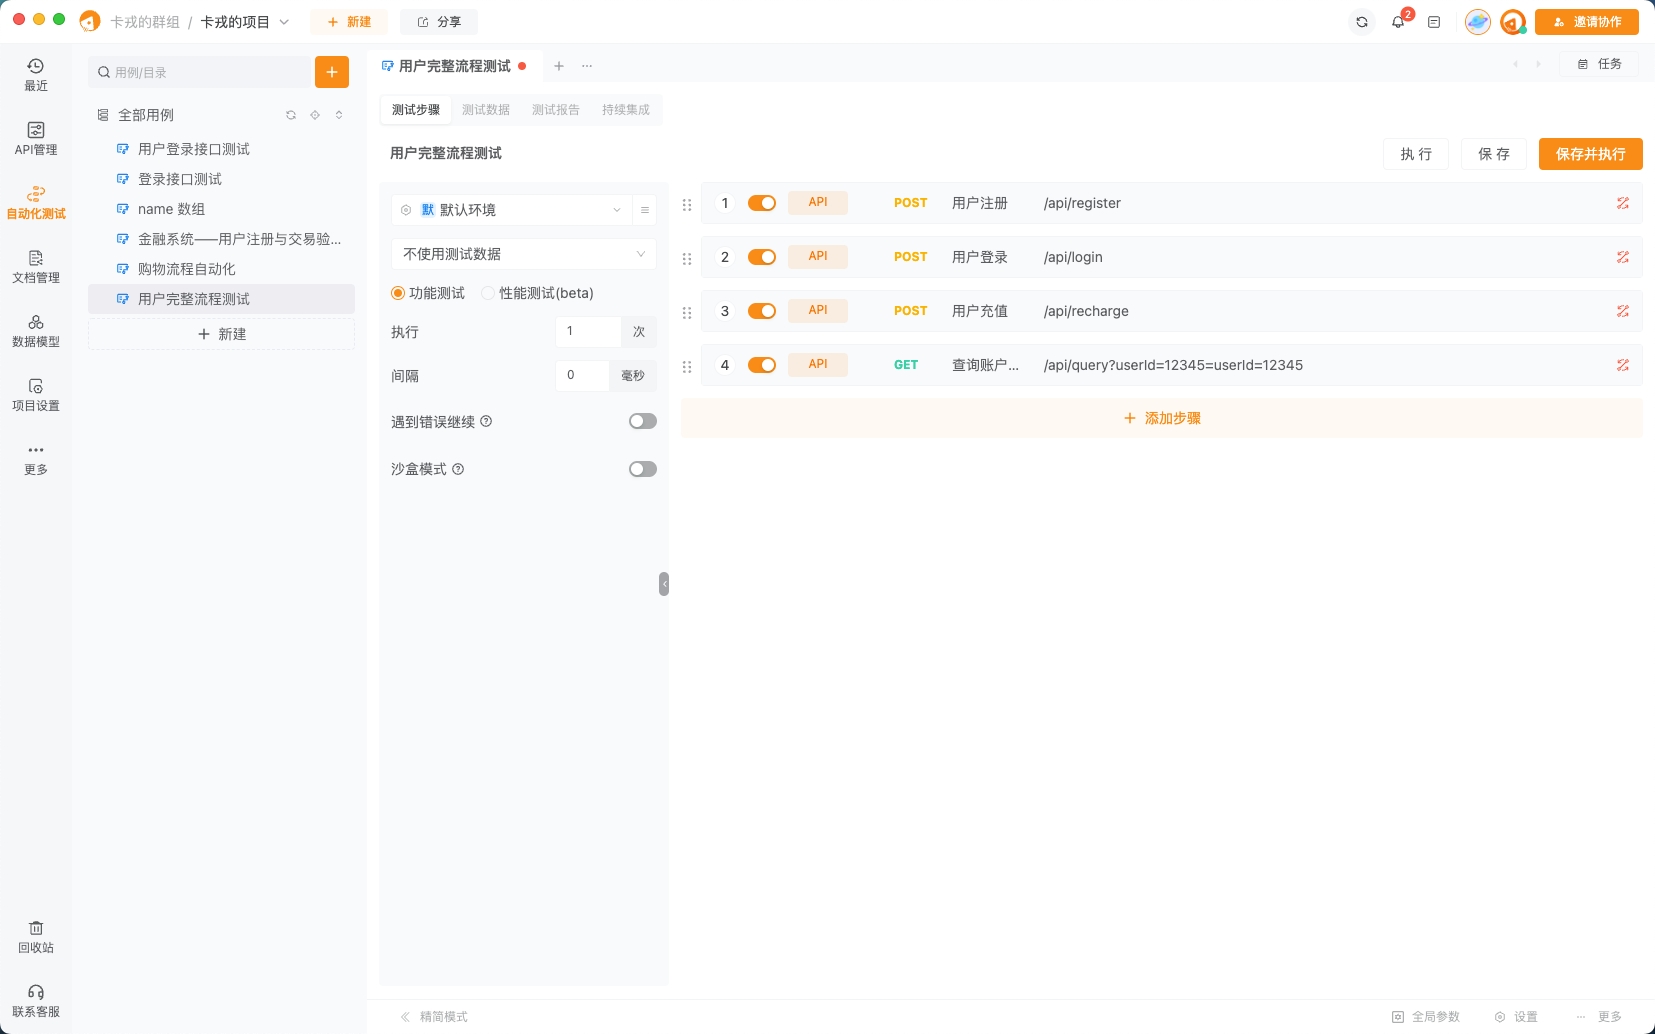
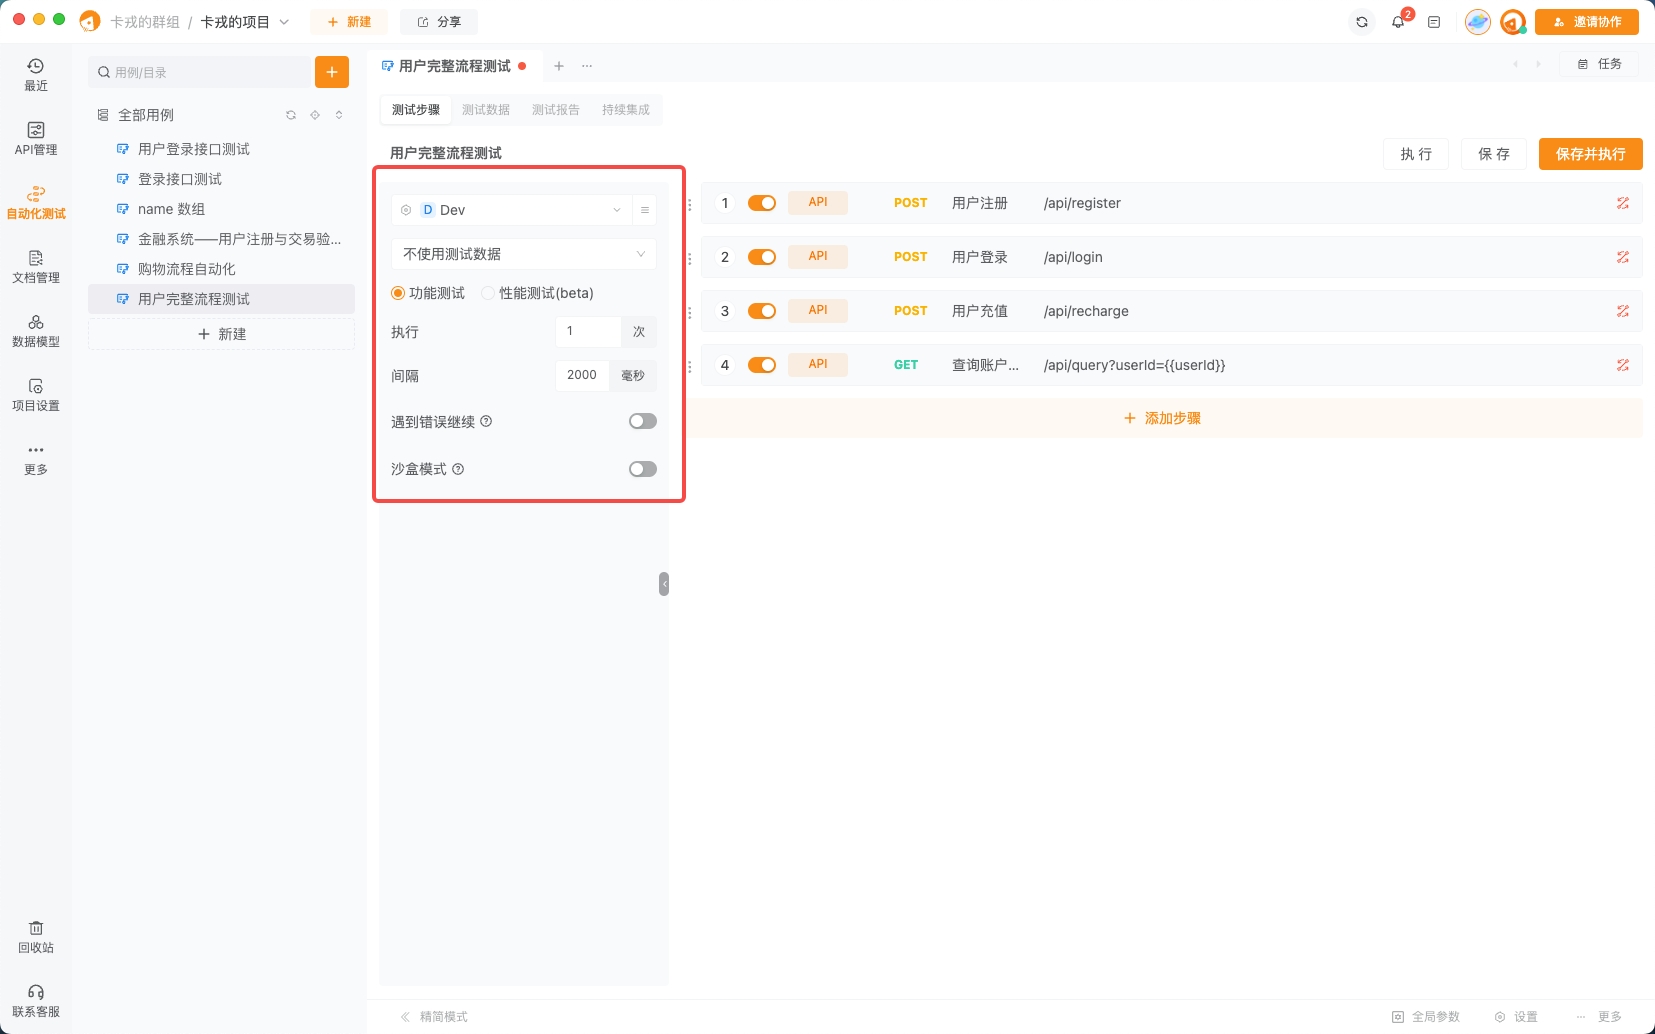
打开Apipost,点击“新建测试用例”,给测试任务起个名字,比如“用户完整流程测试”。
img_v3_02l0_4cb353dc-63fe-4a4e-9262-70efd2a442eg.jpg
2. 添加接口并编排顺序
按照以下顺序将接口拖拽到测试用例中:
- 用户注册接口
- 用户登录接口
- 用户充值接口
- 查询账户信息接口
 img_v3_02l0_30d0209e-41e9-4c69-89e2-b8185d619a4g.jpg
3. 设置请求参数和动态数据提取
- 用户注册接口:
- 请求参数:
 {
      "username": "test_user",
      "email": "test_user_@example.com",
      "password": "Test@123"
    }
img_v3_02l0_9ebaff1b-ce42-4414-8d3b-3af17965012g.jpg
- 断言:
- 响应状态码为200。
- 响应体中包含
"status": "success"。 - 提取
userId并存储为全局变量。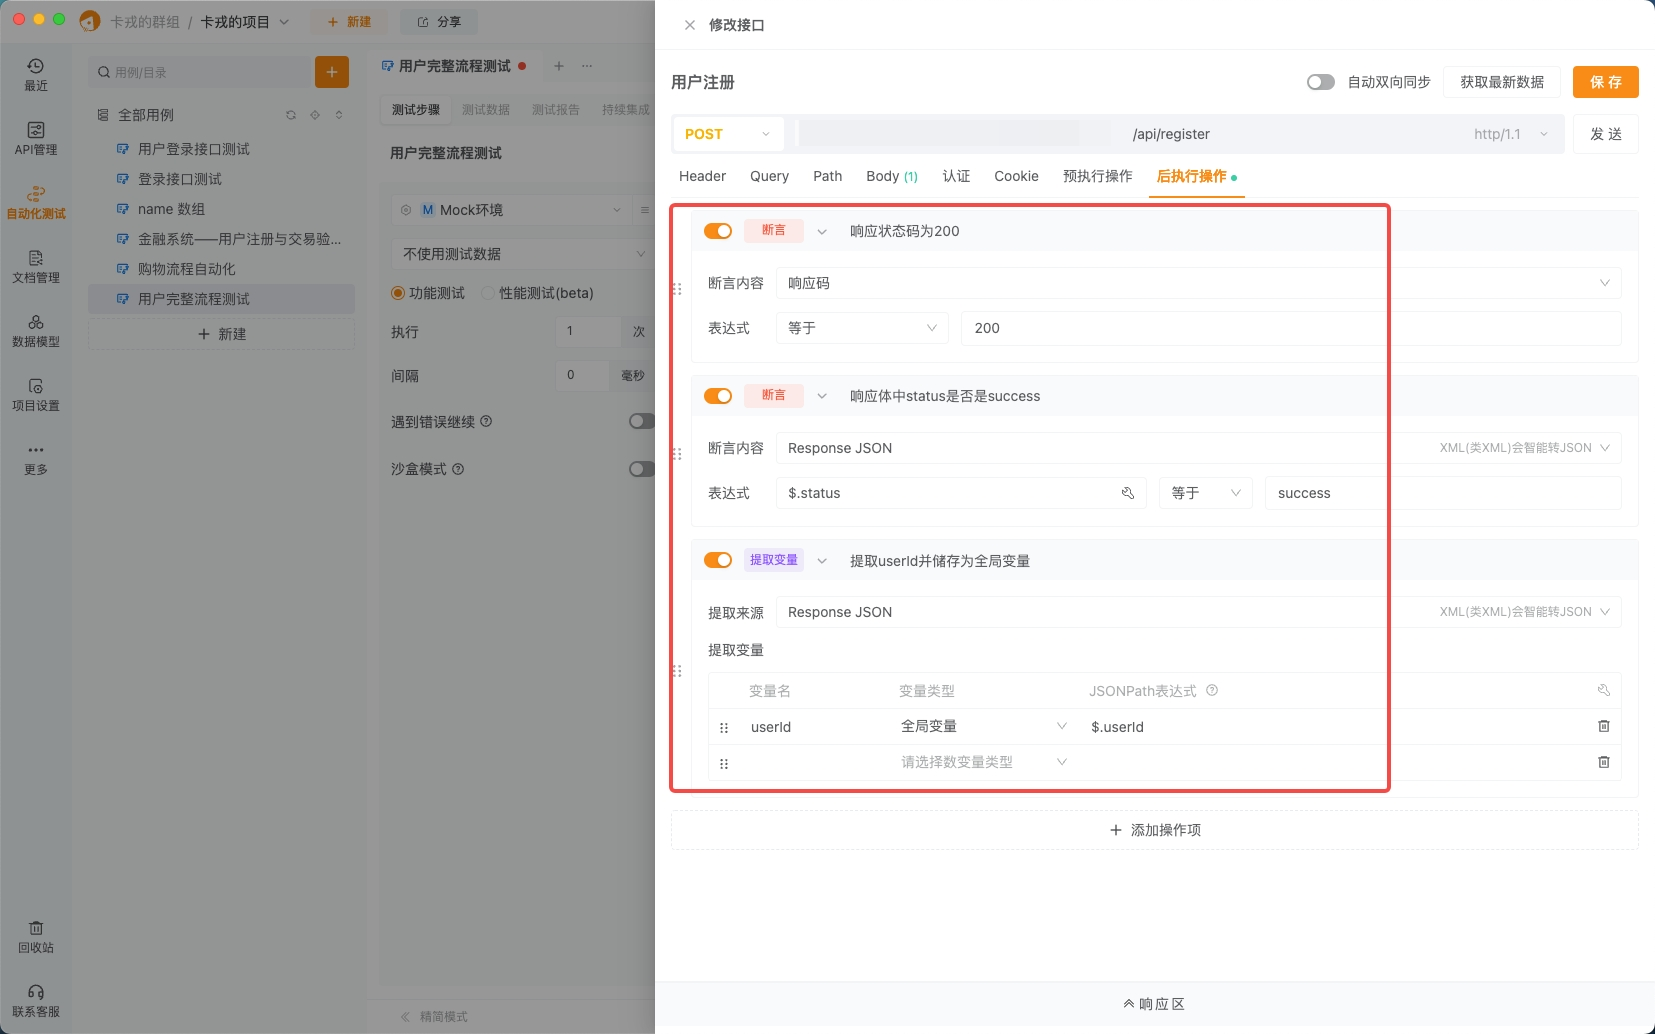 image.png
- 用户登录接口:
- 请求参数:
{
      "username": "test_user",
      "password": "Test@123"
}- 断言:
- 响应状态码为200。
- 响应体中包含
"token"字段。 - 提取
token并存储为全局变量。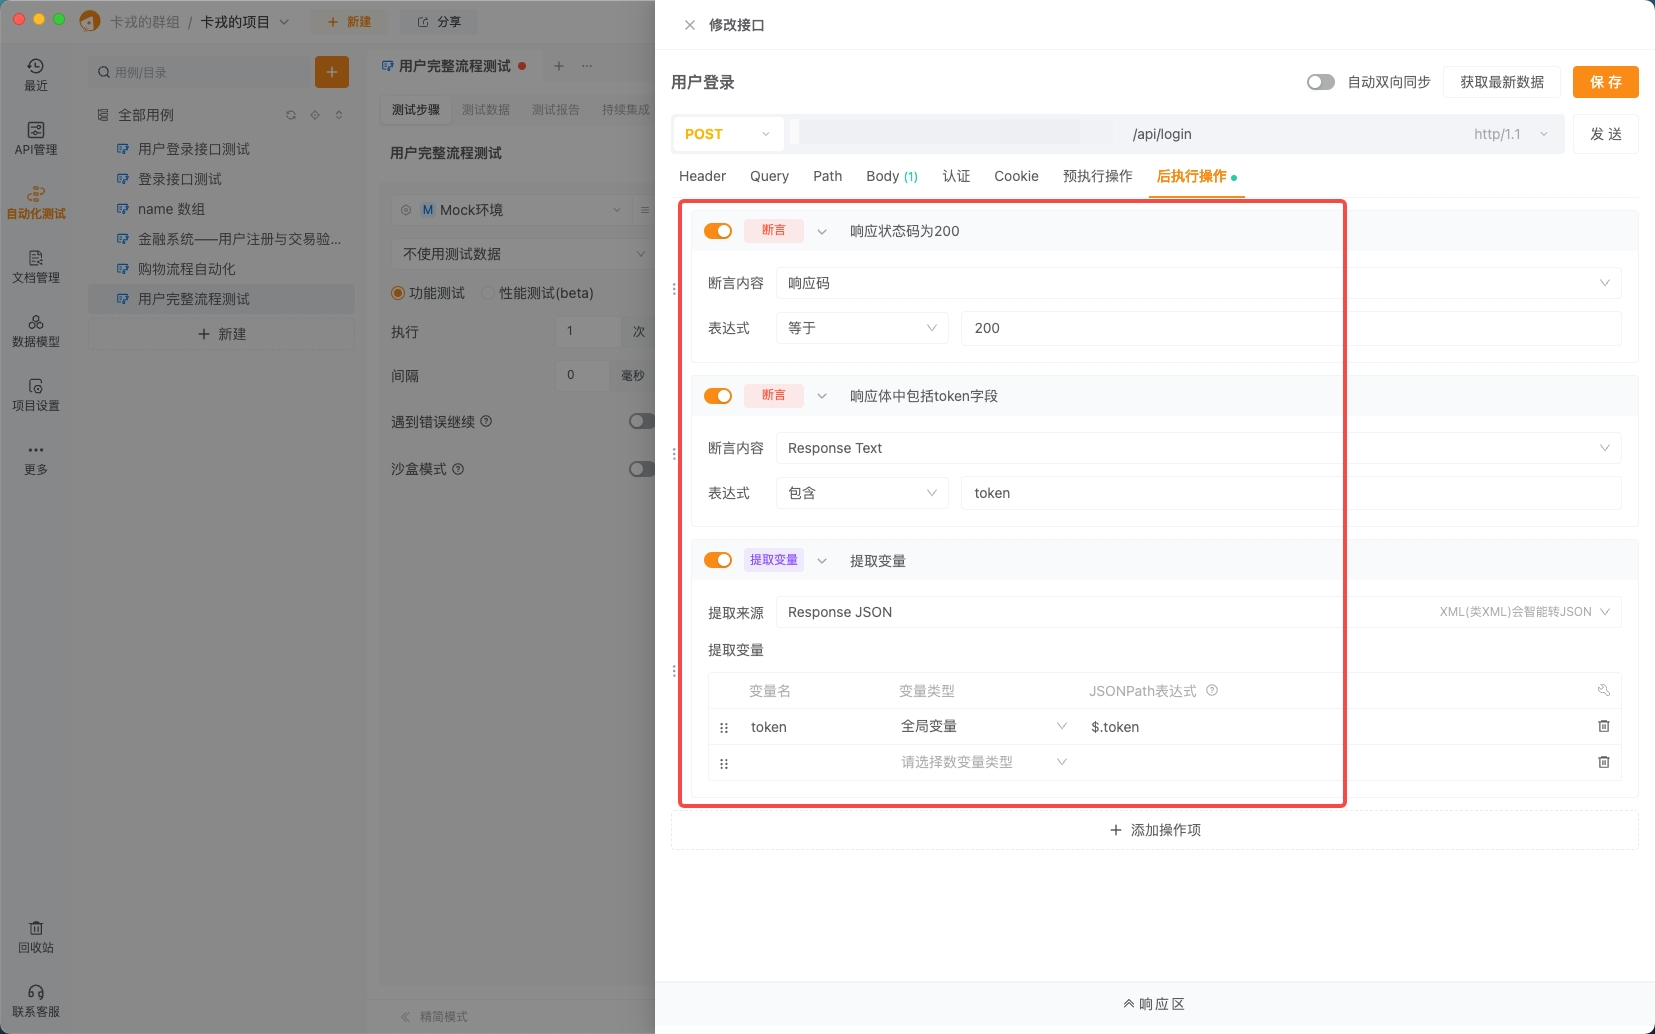 image.png
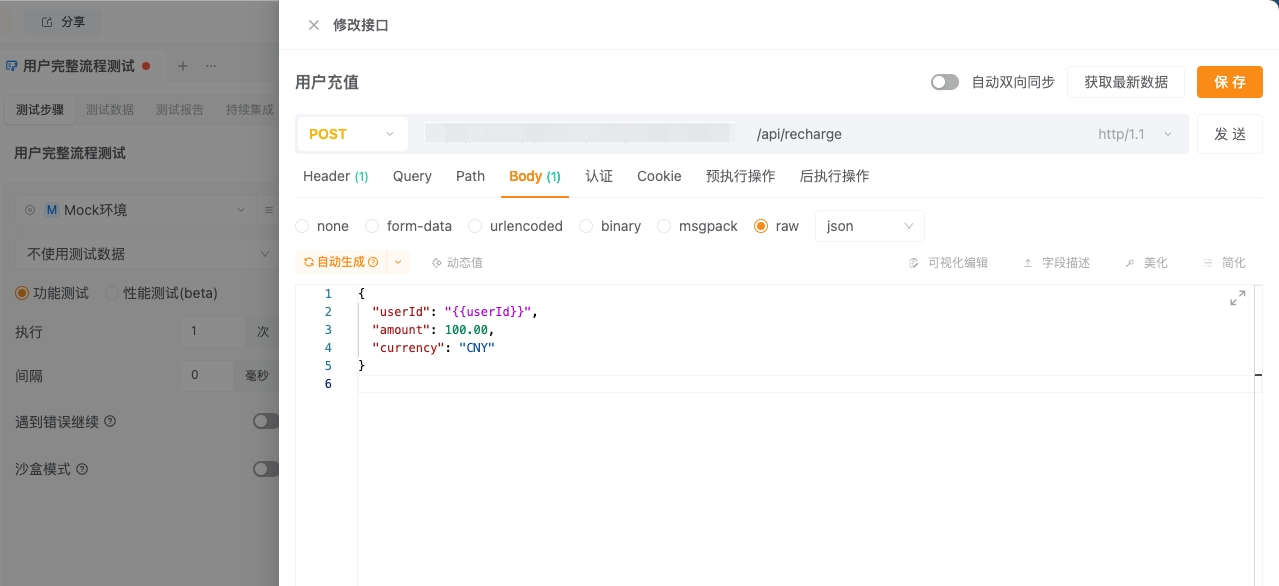
- 用户充值接口:
- 请求头:
http
    Authorization: Bearer {{token}}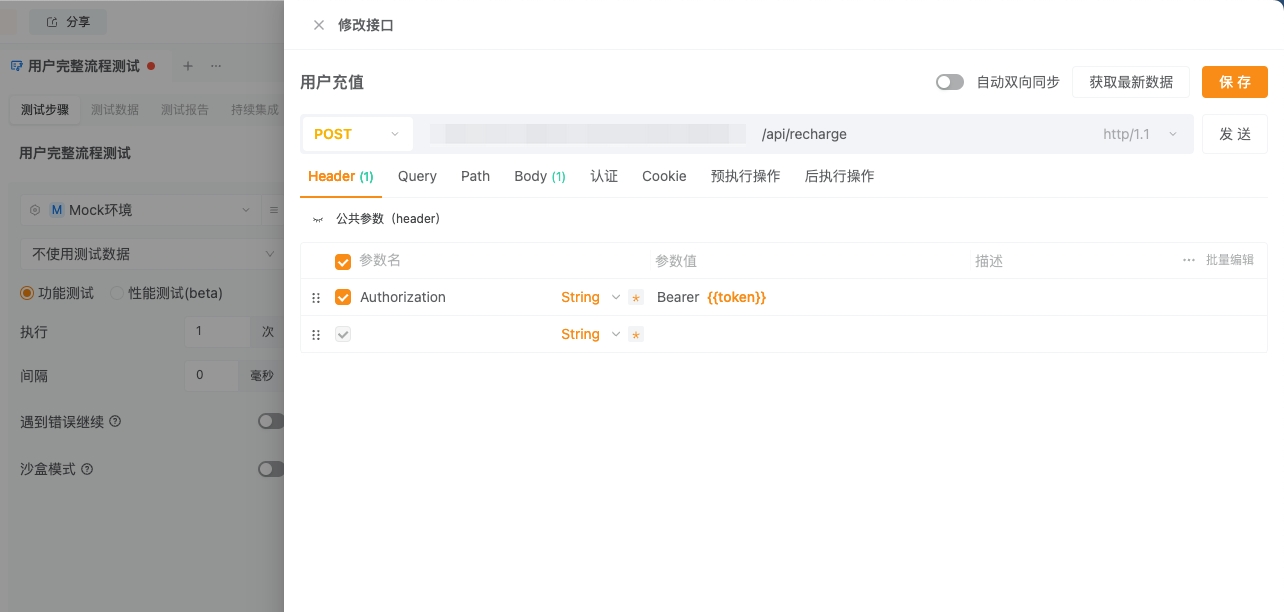
img_v3_02l0_40e613c5-3c3b-4b09-853c-06ac14d084ag.jpg
- 请求参数:
 {
      "userId": "{{userId}}",
      "amount": 100.00,
      "currency": "CNY"
}- 断言:
- 响应状态码为200。
- 响应体中包含
"transactionId"字段。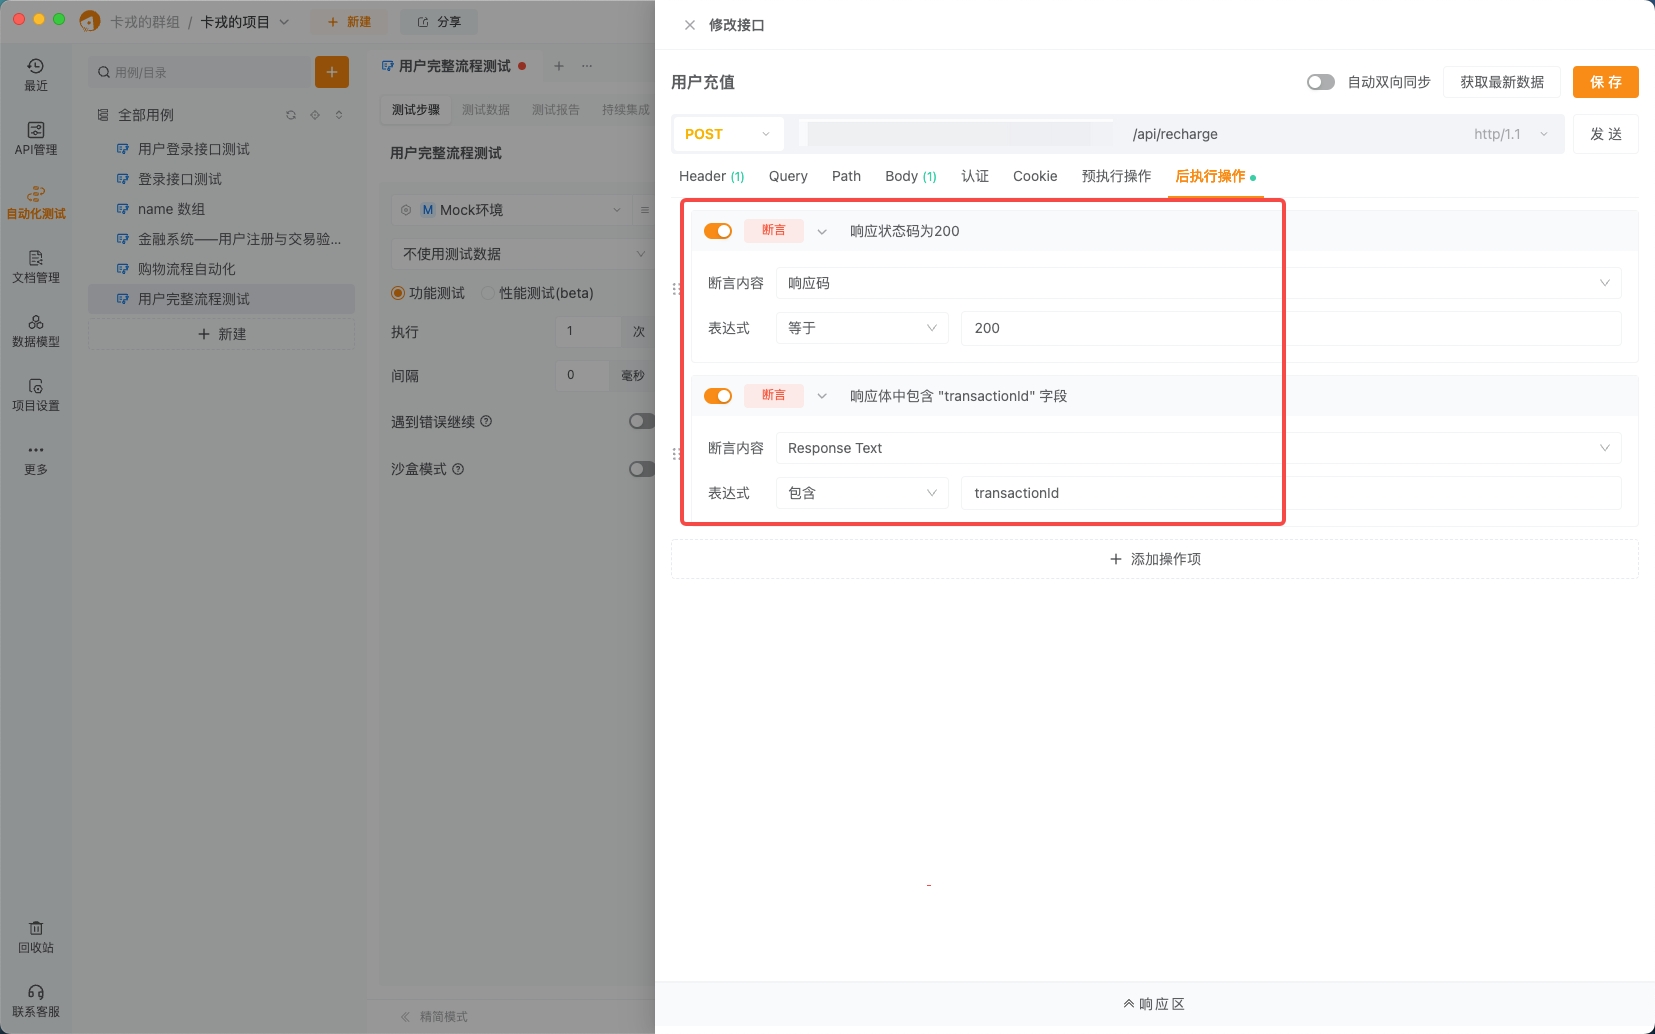 img_v3_02l0_5c61b880-5a13-4ff8-b9dc-91757853167g.jpg
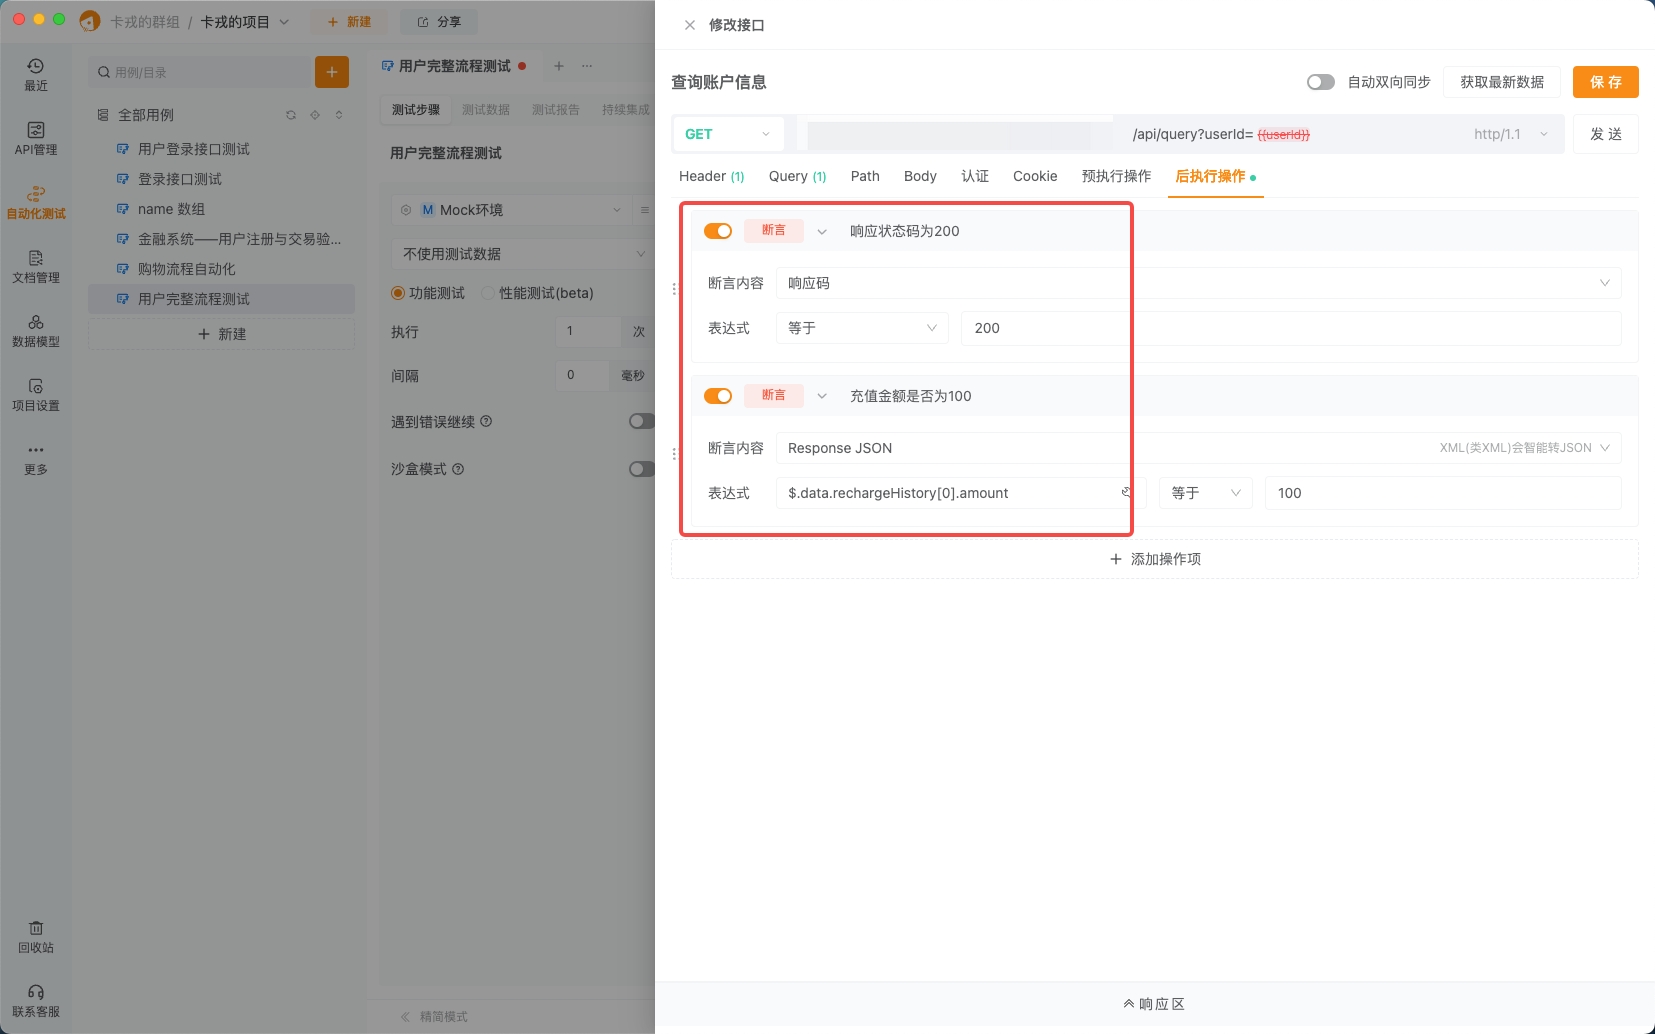
- 查询账户信息接口:
- 请求头:
http
Authorization: Bearer {{token}}- 查询参数:
http
userId={{userId}}- 断言:
- 响应状态码为200。
- 充值金额是否为100。
 img_v3_02l0_0fb8e8a4-264e-4c64-8f72-588bd9f155ag.jpg
4. 设置测试条件
- 测试环境:选择你的测试环境(如开发环境)。
- 执行轮次:设置为1次(完整流程测试)。
- 间隔时长:设置为2秒(确保接口响应稳定)。
 img_v3_02l0_83abe2ea-4450-41e3-88ea-784dfbd5775g.jpg
5. 生成测试报告
点击“保存并执行”,Apipost会自动生成一份详细的测试报告,包括接口响应时间、断言结果、失败原因等。
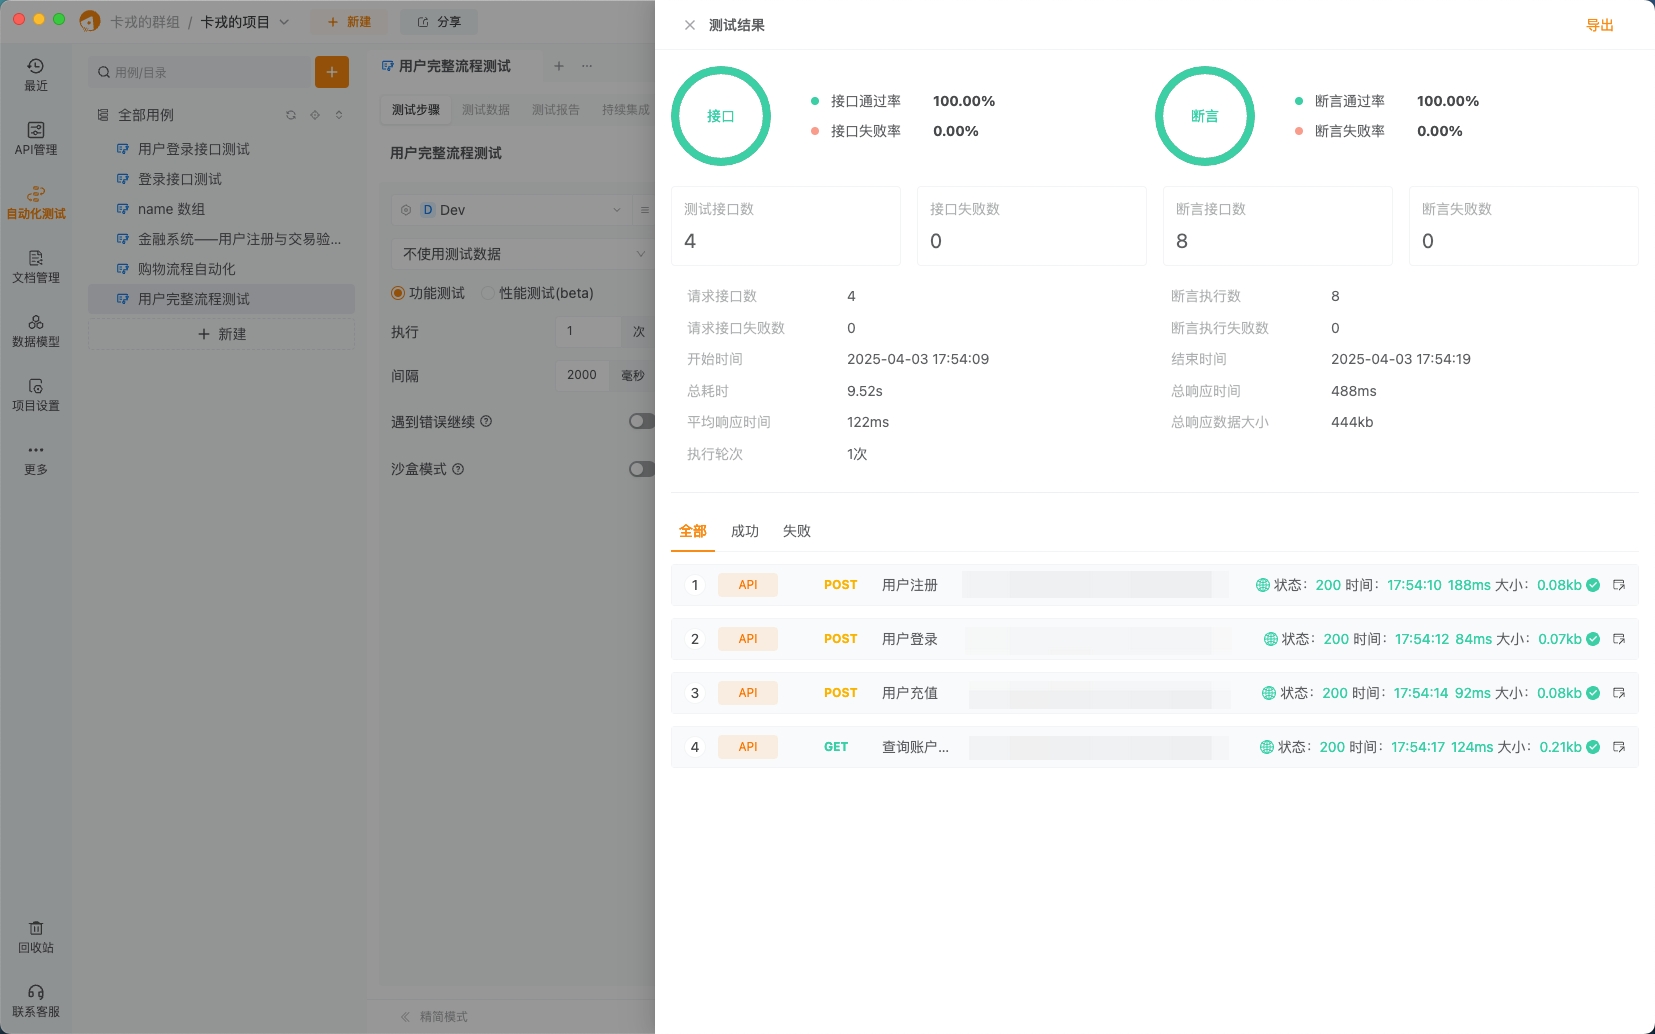
img_v3_02l0_08c92193-ce1a-4318-b9d5-bf42c48f28eg.jpg
动态数据提取与再利用
在测试过程中,我们使用了动态数据提取功能,将注册接口返回的userId和登录接口返回的token存储为全局变量,并在后续接口中引用这些变量。这种方式不仅减少了重复输入数据的工作量,还确保了测试数据的一致性和准确性。
性能测试
为了验证接口在高并发场景下的性能,我们可以在登录接口上进行性能测试:
- 固定模式压测:设置并发数为100,模拟100个用户同时登录。
- 爬坡模式压测:从10个并发开始,逐步增加到100个并发,观察接口性能的变化趋势。
 img_v3_02l0_bb72746d-ef9c-467c-8f07-5aff373bfd9g.jpg
CI/CD集成
将测试用例集成到CI/CD流程中,确保每次代码提交后自动触发测试:
- Jenkins集成:在Jenkins项目配置中,添加执行shell步骤,粘贴Apipost生成的CICD命令。
- GitHub Actions集成:在项目根目录下创建
.github/workflows/test.yml文件,添加安装Apipost CLI和运行测试命令的步骤。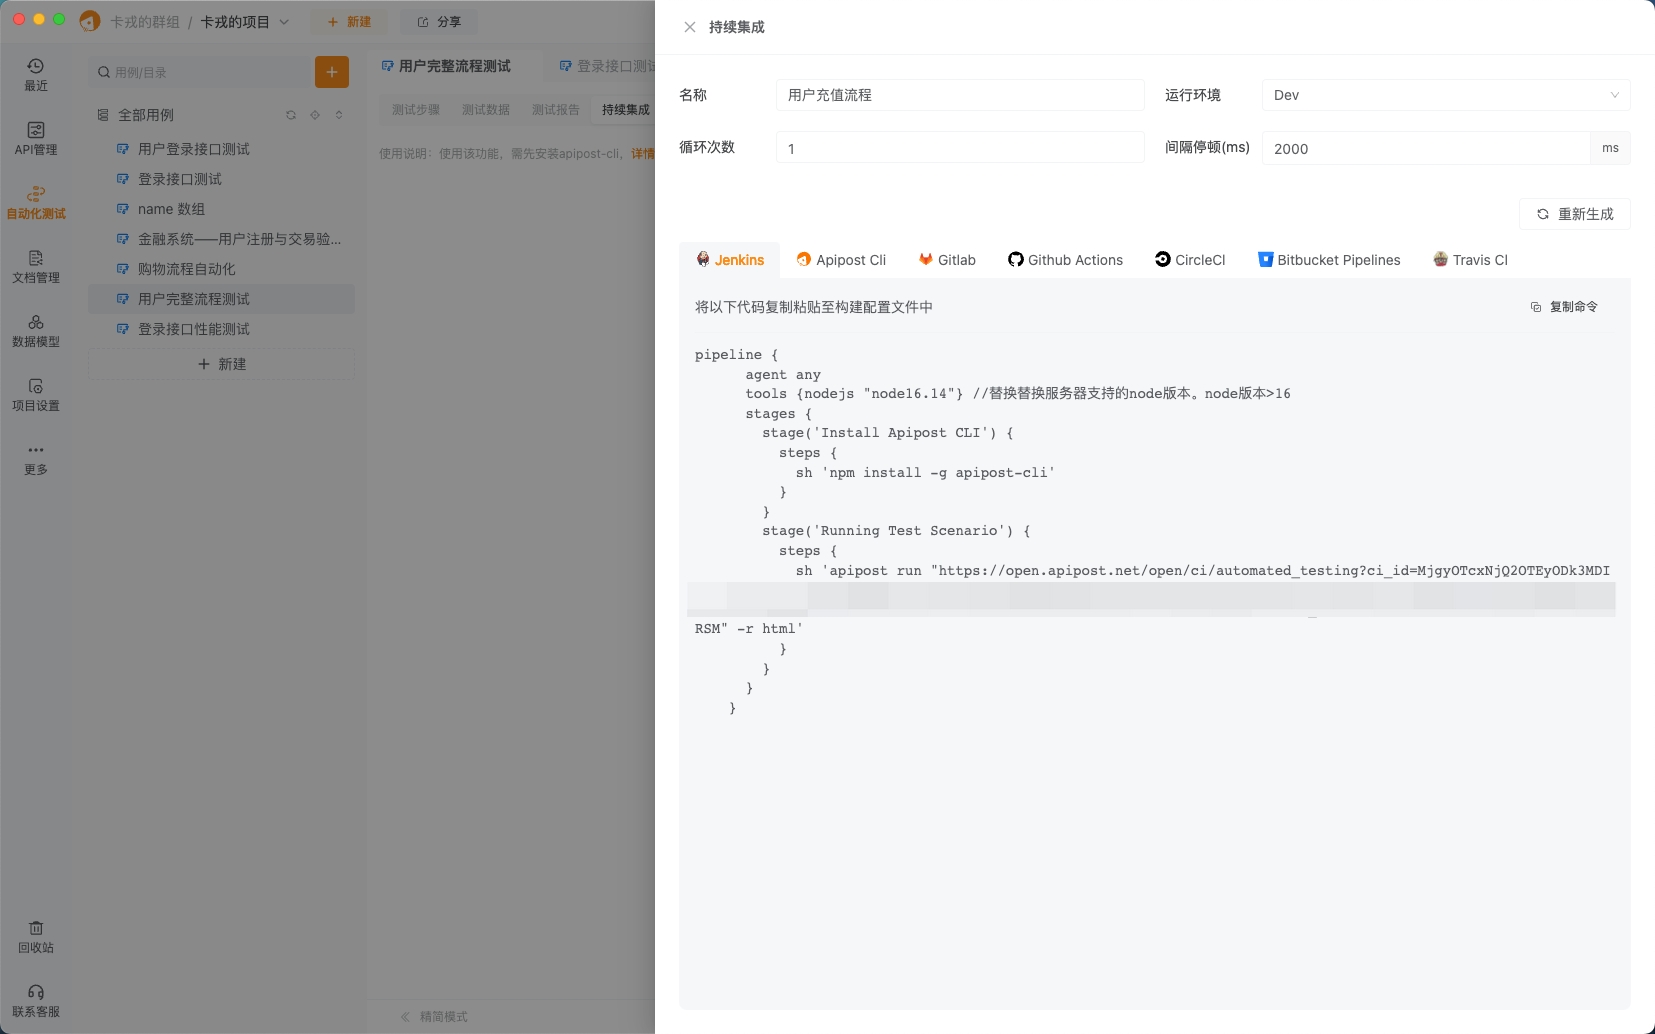 img_v3_02l0_44d883c4-5216-49e6-ae27-cae273927afg.jpg
Apipost自动化测试的核心优势
- 零代码:拖拽式编排,小白友好;
- 全场景覆盖:接口测试、性能压测、数据驱动一网打尽;
- CI/CD集成:一键生成CLI命令,无缝对接Jenkins、GitLab!
原创声明:本文系作者授权腾讯云开发者社区发表,未经许可,不得转载。
如有侵权,请联系 cloudcommunity@tencent.com 删除。
原创声明:本文系作者授权腾讯云开发者社区发表,未经许可,不得转载。
如有侵权,请联系 cloudcommunity@tencent.com 删除。
评论
登录后参与评论
推荐阅读
目录
腾讯云开发者

Copyright © 2013 - 2026 Tencent Cloud. All Rights Reserved. 腾讯云 版权所有
深圳市腾讯计算机系统有限公司 ICP备案/许可证号:粤B2-20090059 ![]() 粤公网安备44030502008569号
粤公网安备44030502008569号
腾讯云计算(北京)有限责任公司 京ICP证150476号 | 京ICP备11018762号