Junit


Junit单元测试
简介:本文主要讲解,如何使用Eclipse,进行单元测试。
1.准备工作:搭建实验环境(Eclipse+Junit+Ant)
Eclipse:http://www.eclipse.org/
JUnit:http://www.junit.org/
Ant:http://ant.apache.org/
说明:Eclipse 从 3.2 版开始,支持 JUnit4。
Ant 是基于 Java 的开源构建工具。Eclipse 中已经集成了 Ant。
2.新建项目(MyFirstJUnitSample),并进行相关设置
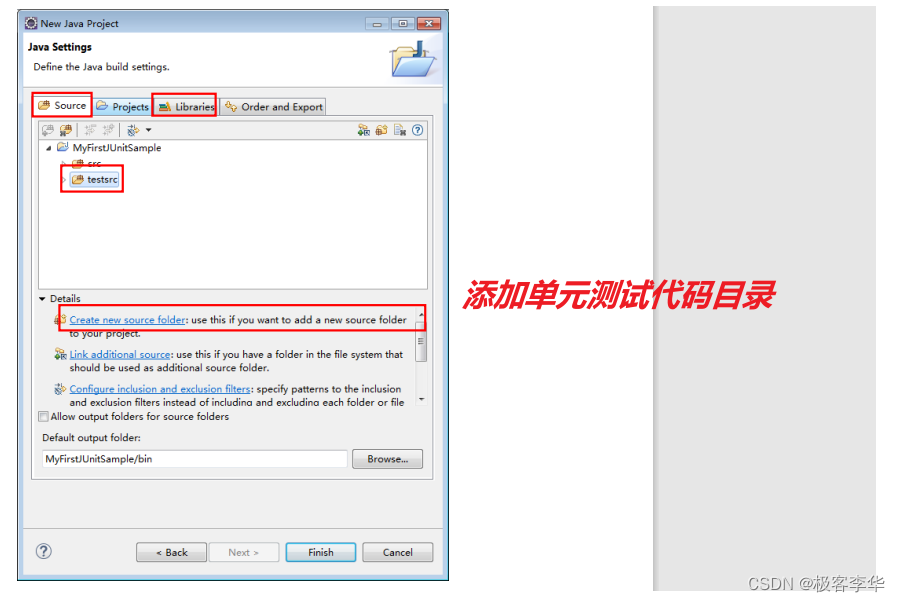
“文件”→“New”→“ Java Project”,打开“New Java Project”窗口。

(1)新建单元测试代码目录(testsrc) 在“Source” 选项卡中单击“create new source folder”,创建新的 source folder——testsrc (testsrc 用于放测试代码)然后单击 finish。
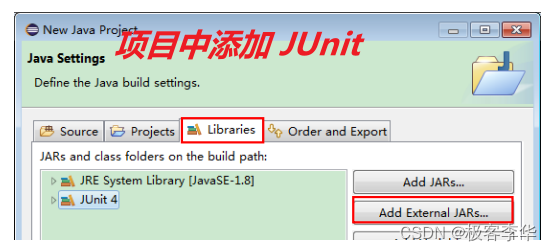
(2)把 JUnit 引入当前项目库中
在“Libraries”选项卡中单击“Add Library…”,选择“JUnit”,然后单击“Next”,选择 版本“JUnit4”,单击“Finish”,完成 JUnit 的引入。
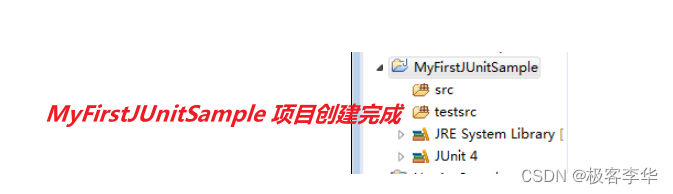
单击“Finish”。
3.编写 Calulator 类
在项目中的 src 目录中新建 myclass 包,在 myclass 包中添加 Calculator 类,代码如下:
//Calculator.java
package myclass;
public class Calculator {
private static int result; //静态变量,用于存储运行结果
 public void add(int n) {
 result= result + n;
 }

 public void substract(int n) {
 result =result - 1; //Bug: 正确的应该是 result =result-n
 }

 public void multiply(int n) {
 } //此方法尚未写好
 public void divide(int n) {
 result =result / n;
 }

 public void square(int n) {
 result = n * n;
 }

 public void squareRoot(int n) {
 for (;; ) {} //Bug : 死循环
 }

 public void clear() { // 将结果清零
 result = 0;
 }

 public int getResult() {
 return result; }
4.编写 Calculator 类的第一个测试类 CalculatorTest,生成 JUnit 测试框架。
该测试类包括四个测试方法,分别对应测试 Calculator 的 add、substract、 multiple、divide 方法。
步骤如下:
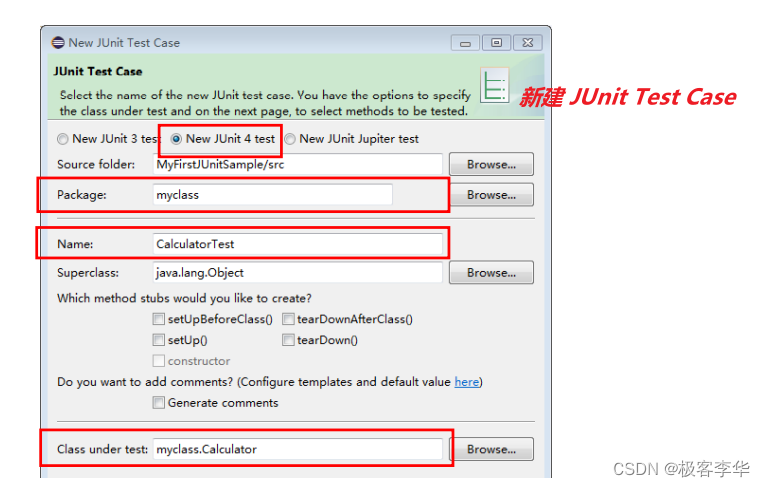
(1)首先,在项目中的 testsrc 中新建 myclass 包。右键单击 Calculator 类,选择“New”→“JUnit Test Case”。在窗口(如图 7 所示)中可看到:测 试类的 Name 为 CalculatorTest, 被测试类“ Class under test ” 为 myclass.Calculator。
将“Source Folder”指定为 MyFirstJUnitSample/testsrc(即:指定 JUnit 测试类的源代码放在 testsrc 目录中,与项目的被测试类分开。)
(2)单击“Next”,如图 8 所示。选择需要测试的方法,然后单击“Finish”。
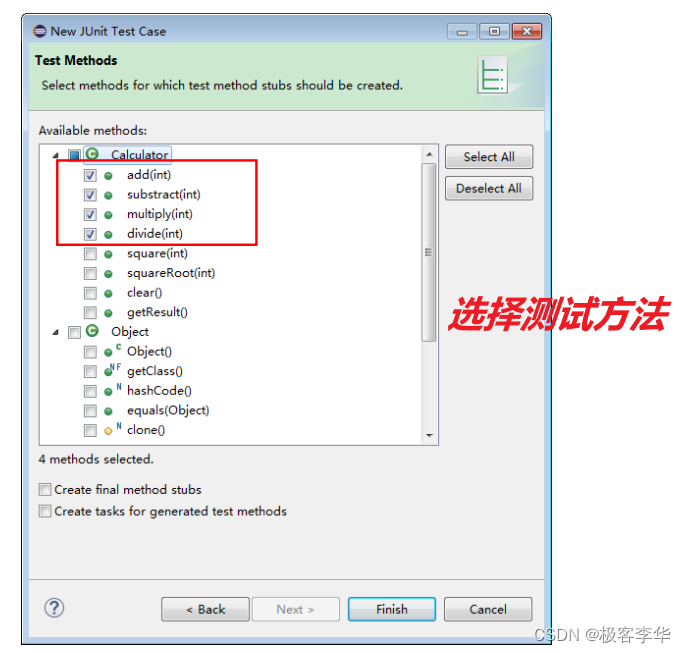
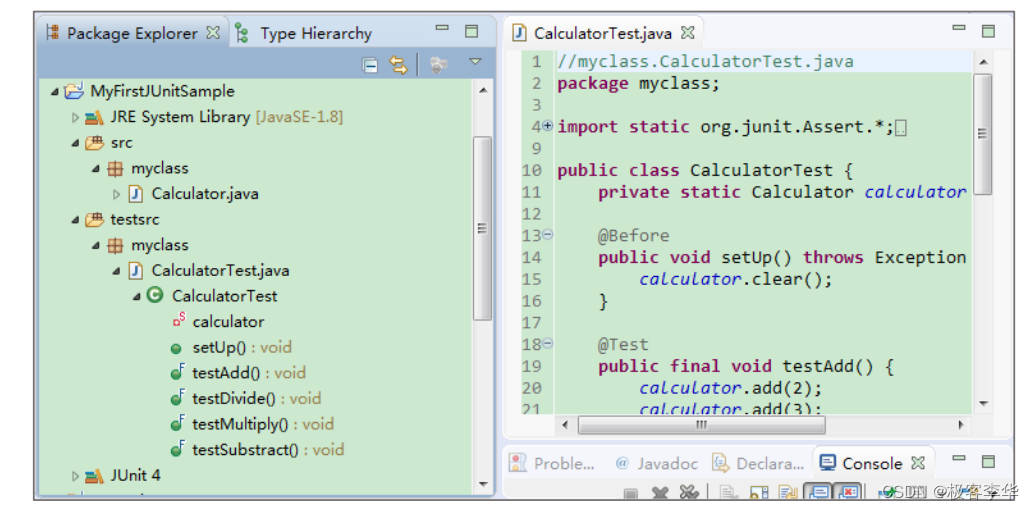
Junit 将自动生成测试类 CalculatorTest 的测试框架,结果如下
//myclass.CalculatorTest.java
package myclass;
import static org.junit.Assert.*;
import org.junit.Before;
import org.junit.Test;
public class CalculatorTest {
    @Before
    public void setUp() throws Exception {
    }
    @Test
    public void testAdd() {
    fail("Not yet implemented");
    }
    @Test
    public void testSubstract() {
    fail("Not yet implemented");
    }
    @Test
    public void testMultiply() {
    fail("Not yet implemented");
    }
    @Test
    public void testDivide() {
    fail("Not yet implemented");
    }
}
(3)对 CalculatorTest 中自动生成的代码进行修改,结果如下:
//myclass.CalculatorTest.java
package myclass;
import static org.junit.Assert.*;
import org.junit.Before;
import org.junit.Ignore;
import org.junit.Test;
public class CalculatorTest {
    private static Calculator calculator = new Calculator();
    @Before
    public void setUp() throws Exception {
    	calculator.clear();
    }
    @Test
    public final void testAdd() {
        calculator.add(2);
        calculator.add(3);
        assertEquals(5, calculator.getResult());
    }
    @Test
    public final void testSubstract() {
    calculator.add(10);
    calculator.substract(2);
    assertEquals(8, calculator.getResult());
    }
    @Ignore("Multiply() Not yet implemented")
    @Test
    public final void testMultiply() {
    	fail("Not yet implemented");
    }
    @Test
    public final void testDivide() {
        calculator.add(8);
        calculator.divide(2);
        assertEquals(4, calculator.getResult());
    }
}
5.运行测试
(1)在测试类“CalculatorTest.java”上单击右键,在弹出 的菜单中选择“Run As”→“JUnit Test”。运行结果如图 10 所示。进度条是红 色表示发现错误,具体的测试结果在进度条上面有表示。
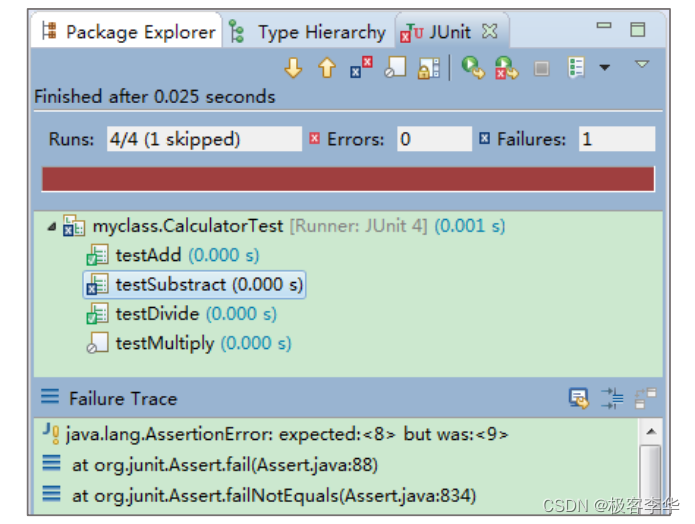
发现 Calculator 类的 Substract 方法代码有问题,去修改,改正错误。
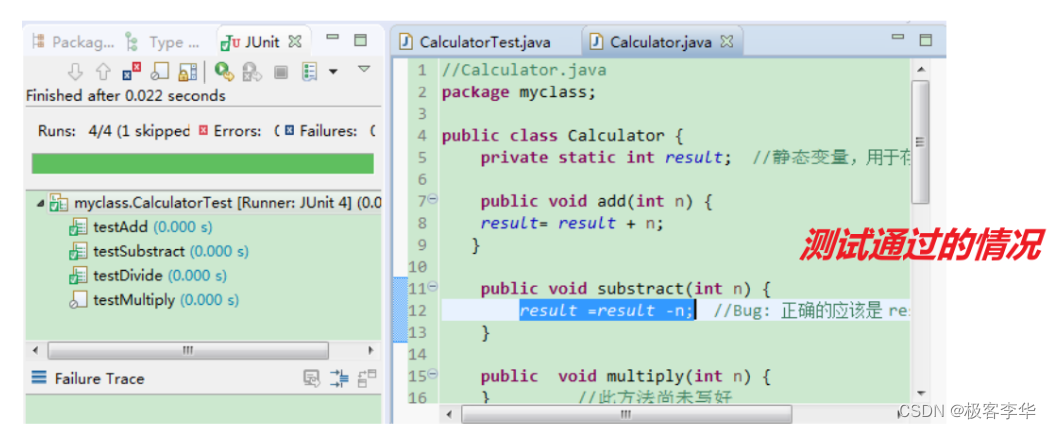
(2)修改 Calculator 后,重新运行测试,查看测试结果。
(3)进一步完善测试用例 在测试类 CalculatorTest 中添加测试方法,增加 SquareRoot 方法的测试、 以及对 divide 方法除 0 时是否抛出异常的测试。
@Test(timeout = 1000)
public void testSquareRoot() {
    calculator.squareRoot(4);
    assertEquals(2, calculator.getResult());
}
@Test(expected = ArithmeticException.class)
public void divideByZero() {
    calculator.divide(0);
}
6.编写 Calculator 类的第二个测试类 CalculatorAdvancedTest.该测试类测试 Calculator 类的 square 方法。(此案例中,演示了参数测试)
说明:参数化测试是 JUnit 3 不具备的功能。
JUnit4 中参数化测试要点:
(1) 测试类必须由 Parameterized 测试运行器修饰
(2) 准备数据。数据的准备必须在一个方法中进行,该方法须满足条件:
⚫ 该方法必须由 Parameters 注解修饰
⚫ 该方法必须是 public static
⚫ 该方法必须返回 Collection 类型
⚫ 该方法没有参数
⚫ 该方法名字不做要求
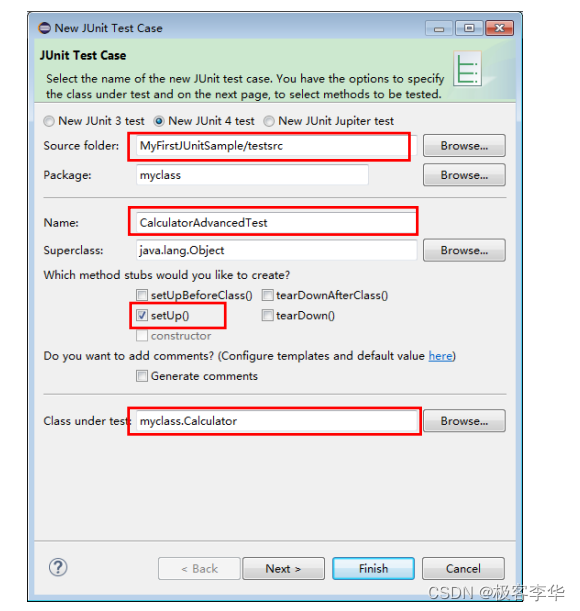
步骤: 右键单击“Calculator”类,在弹出的菜单中选择“New”→“JUnit Test Case”。如下图修改“Source Folder” 为“testsrc”,测试类的 Name 为“CalculatorAdvancedTest”。单击“Next”,在 Test Mothods 列表中选 择“square”方法。单击“Finish”即可。
CalculatorAdvancedTest.java 的代码如下:
//CalculatorAdvancedTest.java
package myclass;
import static org.junit.Assert.*;
import java.util.Arrays;
import java.util.Collection;
import org.junit.Before;
import org.junit.Test;
import org.junit.runner.RunWith;
import org.junit.runners.Parameterized;
import org.junit.runners.Parameterized.Parameters;
/**
* 参数化测试的类必须由Parameterized测试运行器修饰
*/
@RunWith(Parameterized.class)
public class CalculatorAdvancedTest {
private static Calculator calculator=new Calculator();
private int param;
private int result;
/**
*
*准备数据
*/
@Parameters public static Collection<Object[]> data(){
return Arrays.asList(new Object[][] {{2,4},{0,0},{-3,9}});
}
//构造函数,对变量进行初始化
public CalculatorAdvancedTest(int param,int result){
this.param=param;
this.result=result;
}
@Before
public void setUp() throws Exception {
calculator.clear();
}
@Test
public void testSquare() {
calculator.square(param);
assertEquals(result,calculator.getResult());
}
}
运行 CalculatorAdvancedTest 测试类。

测试结果通过。
本文参与 腾讯云自媒体同步曝光计划,分享自作者个人站点/博客。
原始发表:2023-09-14,如有侵权请联系 cloudcommunity@tencent.com 删除
评论
登录后参与评论
推荐阅读
目录
腾讯云开发者

Copyright © 2013 - 2026 Tencent Cloud. All Rights Reserved. 腾讯云 版权所有
深圳市腾讯计算机系统有限公司 ICP备案/许可证号:粤B2-20090059 ![]() 粤公网安备44030502008569号
粤公网安备44030502008569号
腾讯云计算(北京)有限责任公司 京ICP证150476号 | 京ICP备11018762号