Clang Static Analyzer

Clang Static Analyzer

用户1423082
发布于 2024-12-31 20:23:12
发布于 2024-12-31 20:23:12
关于Clang Static Analyzer
Clang 静态分析器是一款源代码分析工具,可查找 C、C++ 和 Objective-C 程序中的错误。它基于符号执行技术实现了路径敏感的程序间分析。
安装
这个直接安装llvm整套就可以获得了
可以通过https://apt.llvm.org/ 或者 https://mirrors.tuna.tsinghua.edu.cn/help/llvm-apt/ 指引安装,但是清华的源只含64位的包,需要大约140行的REPO_NAME,在deb后面添加[arch=amd64],这样就只会下载64的包了
root@vm:~# cat llvm.sh  | grep -n 64
142:    REPO_NAME="deb [arch=amd64] ${BASE_URL}/${CODENAME}/  llvm-toolchain${LINKNAME}${LLVM_VERSION_STRING} main"
我当时安装默认安装的时llvm-18,所以我添加了bin的路径到PATH
export PATH="$PATH:/usr/lib/llvm-18/bin"我是放在~/.bashrc文件里面
测试
使用文件:
https://github.com/hardik05/Damn_Vulnerable_C_Program/blob/master/dvcp.c
root@vm:~/cppaudit/testcode# scan-build clang -c dvcp.c
scan-build: Using '/usr/lib/llvm-18/bin/clang' for static analysis
dvcp.c:62:5: warning: Attempt to free released memory [unix.Malloc]
   62 |                                 free(buff1);
      |                                 ^~~~~~~~~~~
dvcp.c:67:14: warning: Use of memory after it is freed [unix.Malloc]
   67 |                                         buff1[0]='a';
      |                                         ~~~~~~~~^
dvcp.c:90:9: warning: Value stored to 'OOBR' during its initialization is never read [deadcode.DeadStores]
   90 |                         char OOBR = buff3[size3];
      |                              ^~~~   ~~~~~~~~~~~~
dvcp.c:91:9: warning: Value stored to 'OOBR_heap' during its initialization is never read [deadcode.DeadStores]
   91 |                         char OOBR_heap = buff4[size3];
      |                              ^~~~~~~~~   ~~~~~~~~~~~~
dvcp.c:104:16: warning: Potential leak of memory pointed to by 'buff4' [unix.Malloc]
  104 |                         int size4 = img.width * img.height;
      |                                     ^~~
dvcp.c:114:12: warning: Potential leak of memory pointed to by 'buff5' [unix.Malloc]
  114 |                                 }while(buff5);
      |                                        ^~~~~
6 warnings generated.
scan-build: Analysis run complete.
scan-build: 6 bugs found.
scan-build: Run 'scan-view /tmp/scan-build-2024-09-22-025530-11924-1' to examine bug reports.可以看到默认是输出html报告到/tmp/scan-build-XXX目录,我们可以使用-o进行指定目录
常用选项
-o <directory>:指定输出报告的目录。如果不指定,报告将默认保存在 /tmp 下的一个目录中。
-v:增加输出的详细程度。
-V:在构建完成后自动在浏览器中打开分析结果。
打开html报告,比命令行的好看很多
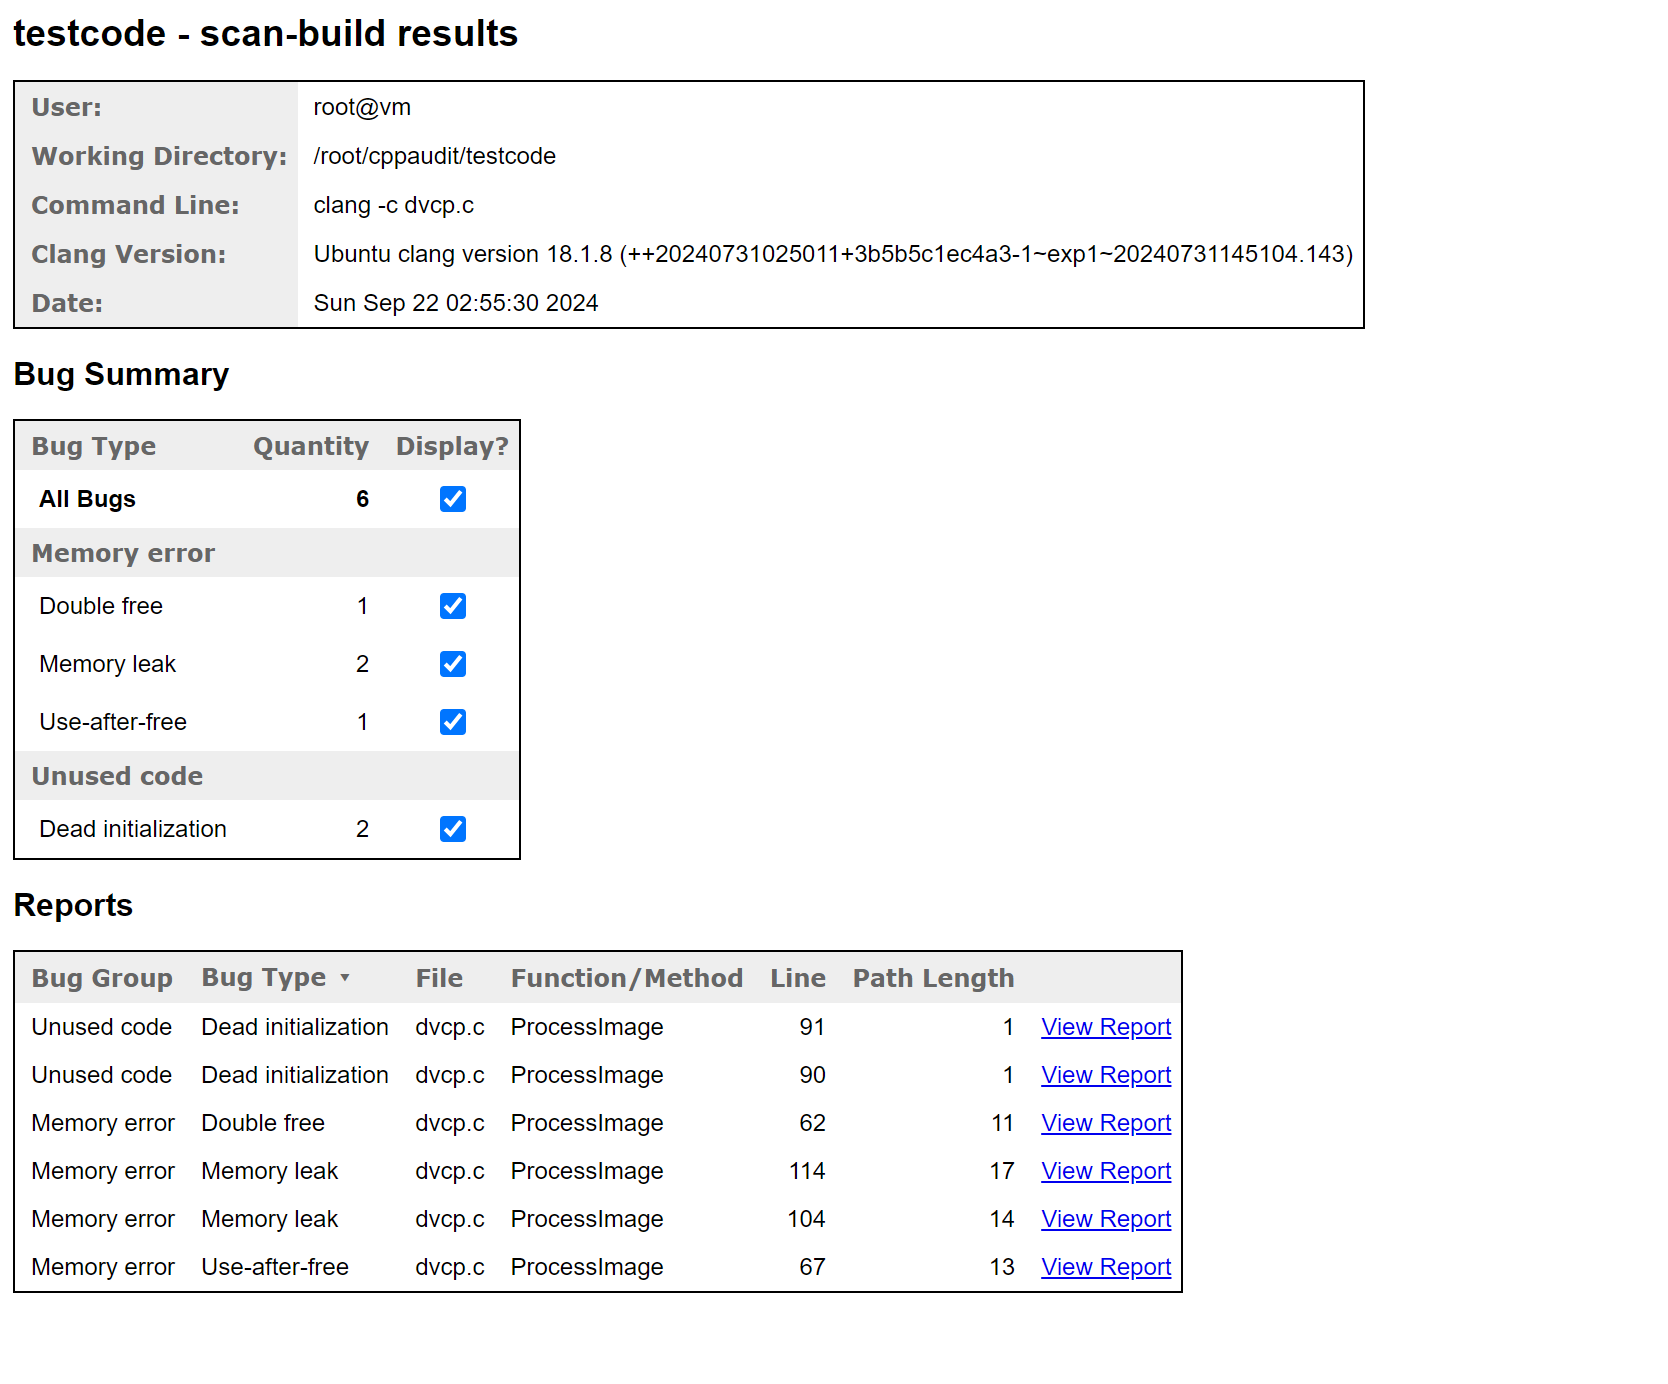
可以看到这个比上一篇用的cppcheck查找多多了,毕竟使用了符号执行技术
官方建议
- 第一个Always Analyze a Project in its “Debug” Configuration
大多数项目都可以在启用断言的“调试”模式下构建。静态分析器会拾取断言来修剪不可行的路径,这在某些情况下可以大大减少工具发出的误报(虚假错误报告)的数量。 使用scan-build工具的–force-analyze-debug-code标志,该标志将自动启用断言。
- 调试 scan-build 时使用详细输出 scan-build 使用一个 -v 选项来输出有关它正在做什么的详细内容;两个 -v 选项会输出更多信息。将 scan-build 的输出重定向到文本文件(确保重定向标准错误)对于提交针对 scan-build 或分析器的错误报告非常有用,因为我们可以看到传递给分析器的确切选项(和文件)。要获得更易懂的日志,请不要执行并行编译。
- 通过 scan-build 运行 ‘./configure’ 如果分析的项目使用 autoconf 生成的configure脚本,您可能需要通过scan-build运行configure脚本才能分析该项目。例子 scan-build ./configure scan-build –keep-cc make configure也需要通过scan-build运行的原因是因为scan-build通过干预编译器来扫描源文件。目前,这种插入是通过scan-build临时将环境变量CC设置为ccc-analyzer来完成的。 ccc-analyzer程序就像一个假编译器,将其命令行参数转发给编译器以执行常规编译,并使用clang来执行静态分析。
- fdsf项目审计
假如是整个项目审计,可以
scan-build make -j4而对于cmake的
scan-build cmake -DCMAKE_C_COMPILER=clang -DCMAKE_CXX_COMPILER=clang++ ..
scan-build make
CodeChecker
根据llvm官方描述,CodeChecker 得到了更积极的维护,提供了与流行编译器的多个版本一起使用的启发式方法,并且它还附带了一个基于 Web 的 GUI,用于查看、过滤、分类和抑制结果。
官方安装指引:https://github.com/Ericsson/codechecker/#Install-guide
犹豫我已经装过clang了,我自己修改了下:
sudo apt-get install cppcheck g++ build-essential curl gcc-multilib git python3-dev python3-venv python3-setuptools

# Install nodejs dependency for web. In case of Debian/Ubuntu you can use the
# following commands. For more information see the official docs:
# https://nodejs.org/en/download/package-manager/
curl -sL https://deb.nodesource.com/setup_16.x | sudo -E bash -
sudo apt-get install -y nodejs

# Check out CodeChecker source code.
git clone https://github.com/Ericsson/CodeChecker.git --depth 1 ~/codechecker
cd ~/codechecker

# Create a Python virtualenv and set it as your environment.
# NOTE: if you want to develop CodeChecker, use the `venv_dev` target instead
# of `venv`.
make venv
source $PWD/venv/bin/activate

# [Optional] If you want to use external authentication methods (LDAP / PAM)
# follow the instructions in
# docs/web/authentication.md#external-authentication-methods

# Build and install a CodeChecker package.
make package

# For ease of access, add the build directory to PATH.
export PATH="$PWD/build/CodeChecker/bin:$PATH"

cd ..
参考
https://clang.llvm.org/docs/ClangStaticAnalyzer.html https://clang-analyzer.llvm.org/ https://apt.llvm.org/ https://mirrors.tuna.tsinghua.edu.cn/help/llvm-apt/ https://github.com/Ericsson/codechecker/#Install-guide
本文参与 腾讯云自媒体同步曝光计划,分享自作者个人站点/博客。
原始发表:2024-09-23,如有侵权请联系 cloudcommunity@tencent.com 删除
评论
登录后参与评论
推荐阅读
目录
腾讯云开发者

Copyright © 2013 - 2026 Tencent Cloud. All Rights Reserved. 腾讯云 版权所有
深圳市腾讯计算机系统有限公司 ICP备案/许可证号:粤B2-20090059 ![]() 粤公网安备44030502008569号
粤公网安备44030502008569号
腾讯云计算(北京)有限责任公司 京ICP证150476号 | 京ICP备11018762号