MYSQLg高级-------分库分表之核心Sharding-Proxy 简介

MYSQLg高级-------分库分表之核心Sharding-Proxy 简介

默 语
发布于 2024-11-20 10:03:40
发布于 2024-11-20 10:03:40
Sharding-Proxy
Sharding-Proxy 简介
1 、定位为透明的数据库代理端
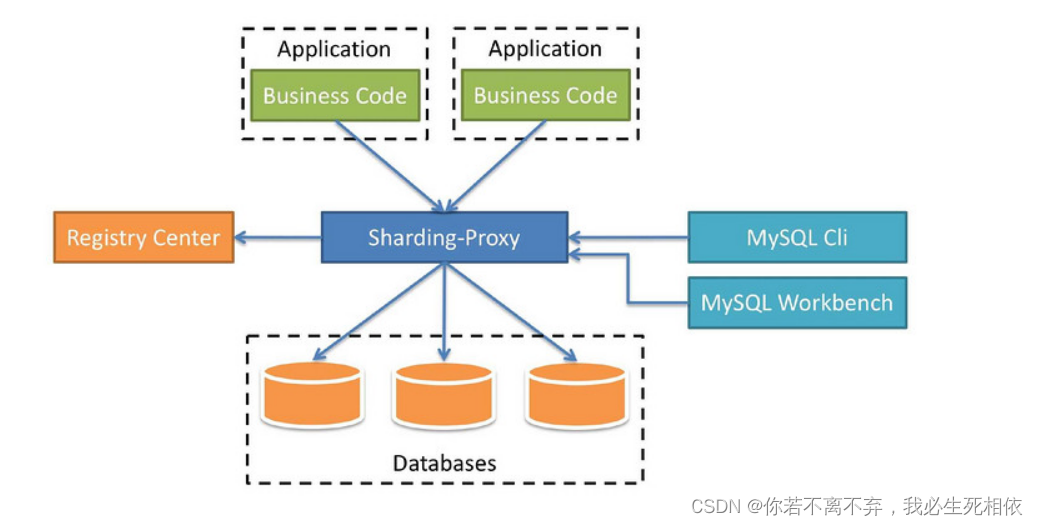
ShardingSphere-Proxy 是 Apache ShardingSphere 的第二个产品。 它定位为透明化的数据库代理端,通过实现数据库二进制协议,对异构语言提供支持。 目前提供 MySQL 和 PostgreSQL 协议,透明化数据库操作,对 DBA 更加友好。
ShardingSphere-Proxy 的优势在于对异构语言的支持,以及为 DBA 提供可操作入口。
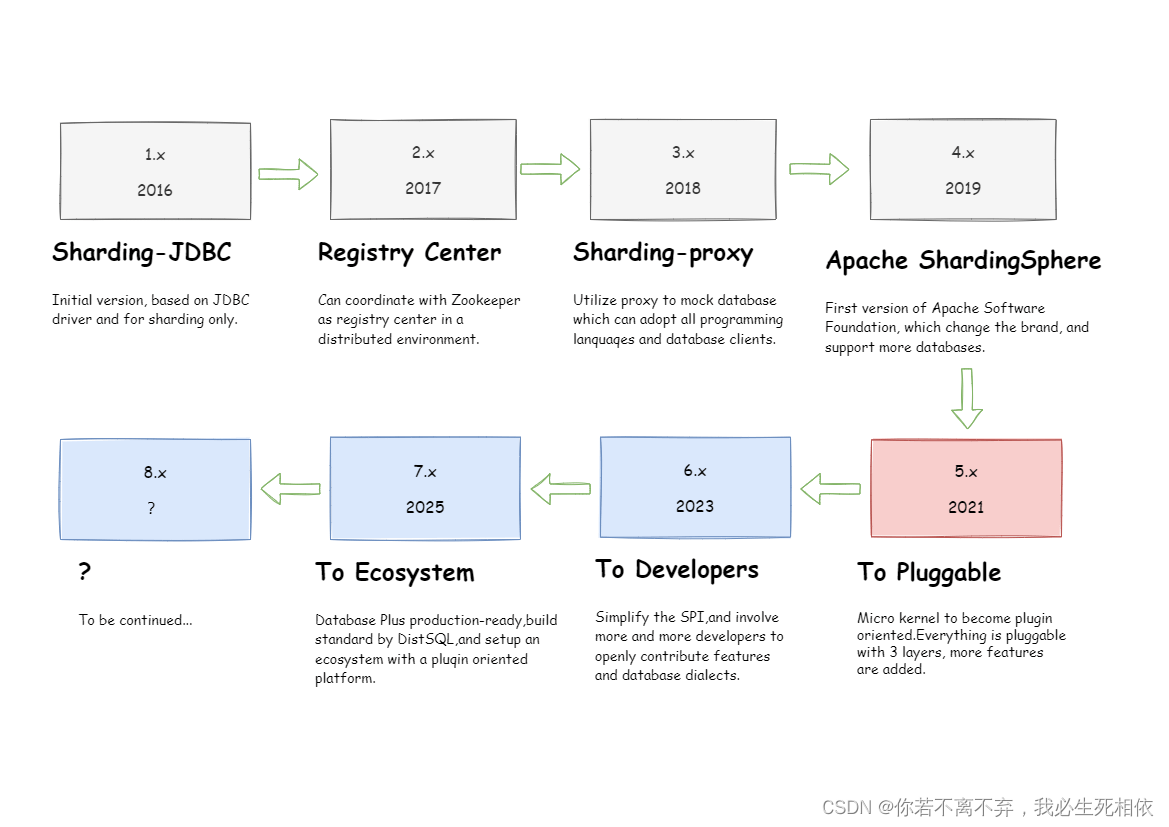
产品定位 构建异构数据库上层生态和标准 Apache ShardingSphere 产品定位为 Database Plus,旨在构建异构数据库上层的标准和生态。 它关注如何充分合理地利用数据库的计算和存储能力,而并非实现一个全新的数据库。 ShardingSphere 站在数据库的上层视角,关注他们之间的协作多于数据库自身。
在原有关系型数据库基础上提供扩展和增强 Apache ShardingSphere 旨在充分合理地在分布式的场景下利用关系型数据库的计算和存储能力, 并非实现一个全新的关系型数据库。 关系型数据库当今依然占有巨大市场份额,是企业核心系统的基石,未来也难于撼动,我们更加注重在原有基础上提供增量,而非颠覆。
统一管控的多端接入 Apache ShardingSphere 是多接入端共同组成的生态圈。 通过混合使用 ShardingSphere-JDBC 和 ShardingSphere-Proxy,并采用同一注册中心统一配置分片策略,能够灵活的搭建适用于各种场景的应用系统,使得架构师更加自由地调整适合于当前业务的最佳系统架构。
线路规划
2 、 Sharding-Proxy 独立应用,需要安装服务,进行分库分表或者读写分离配置,启动使用
3 、安装 ( 1 )下载安装软件
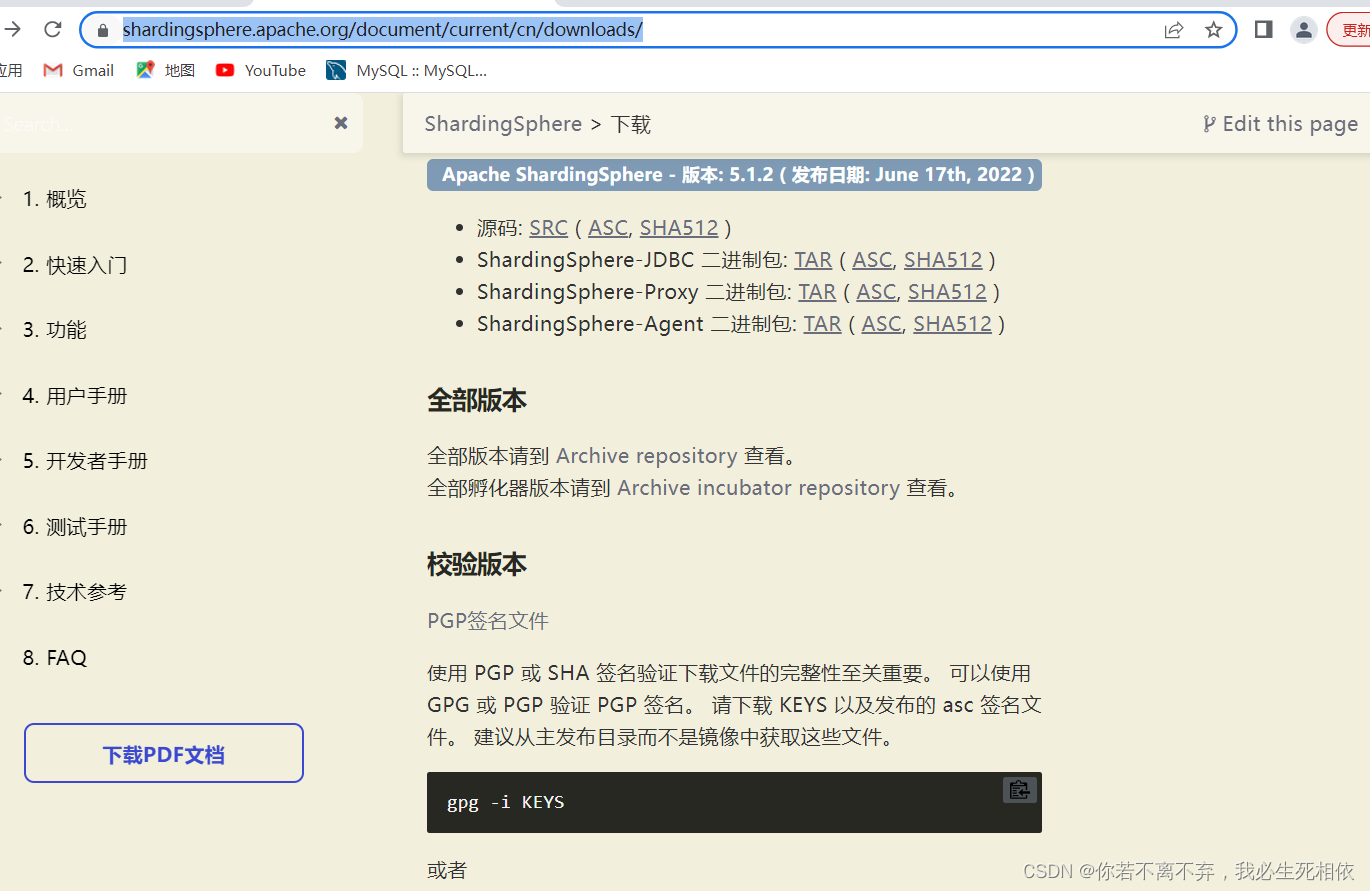
https://shardingsphere.apache.org/document/current/cn/downloads/
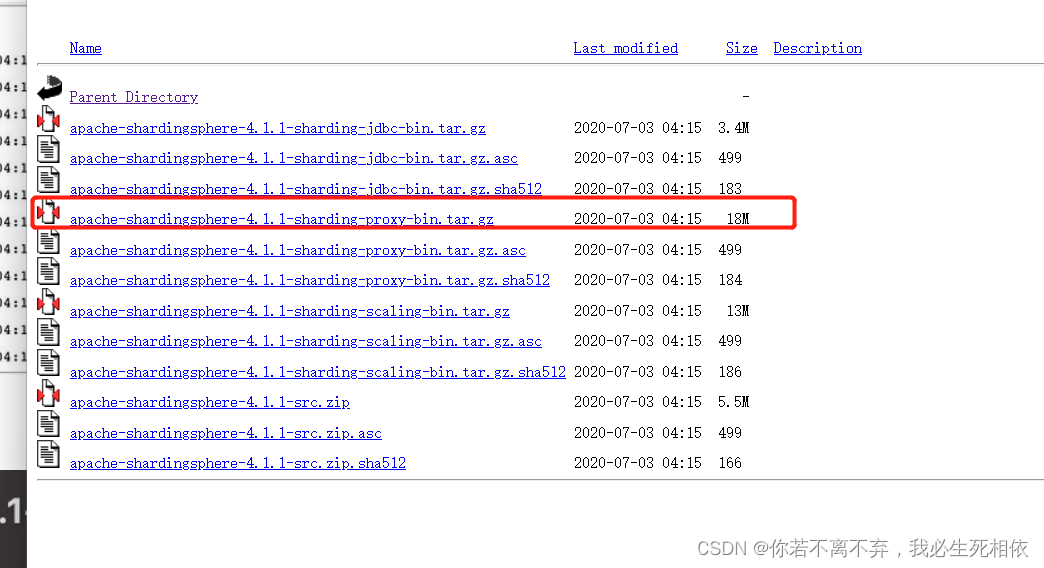
https://archive.apache.org/dist/shardingsphere/
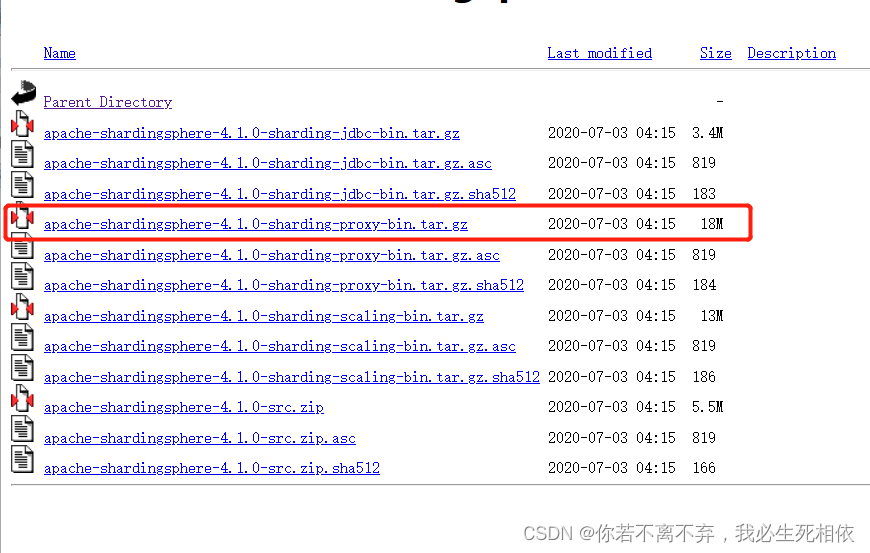
( 2 )把下载之后压缩文件,解压,启动bin目录启动文件就可以了
Sharding-Proxy 配置(分表)
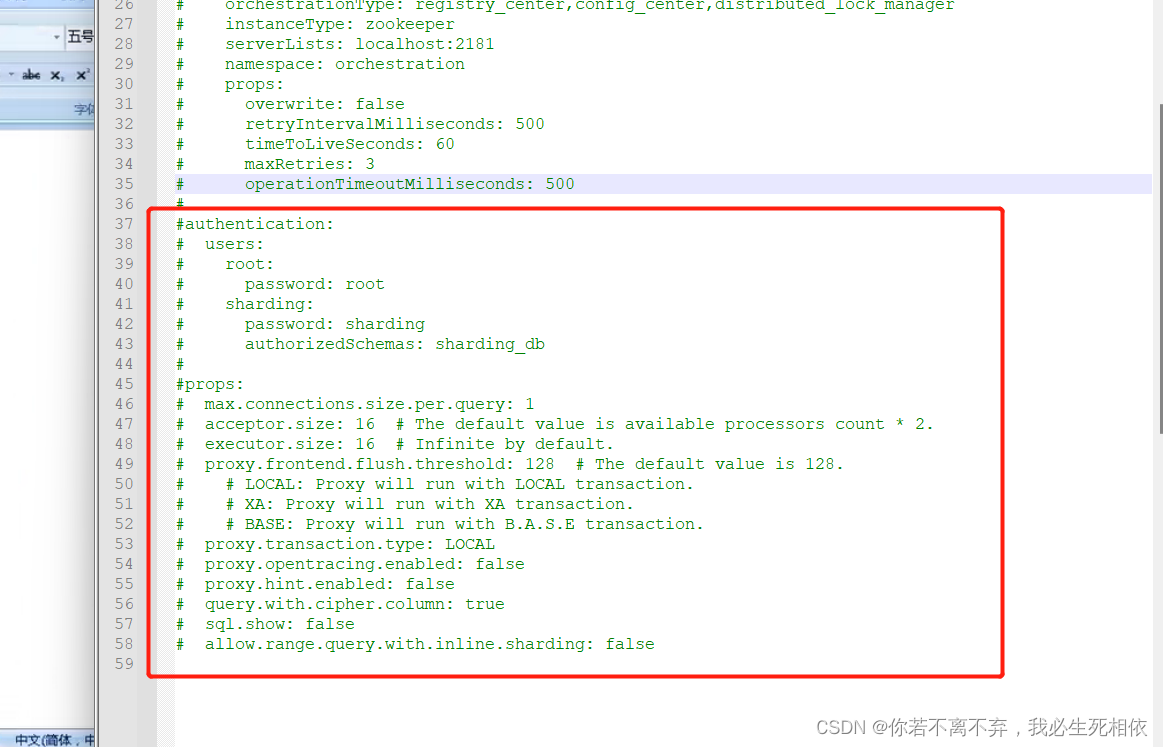
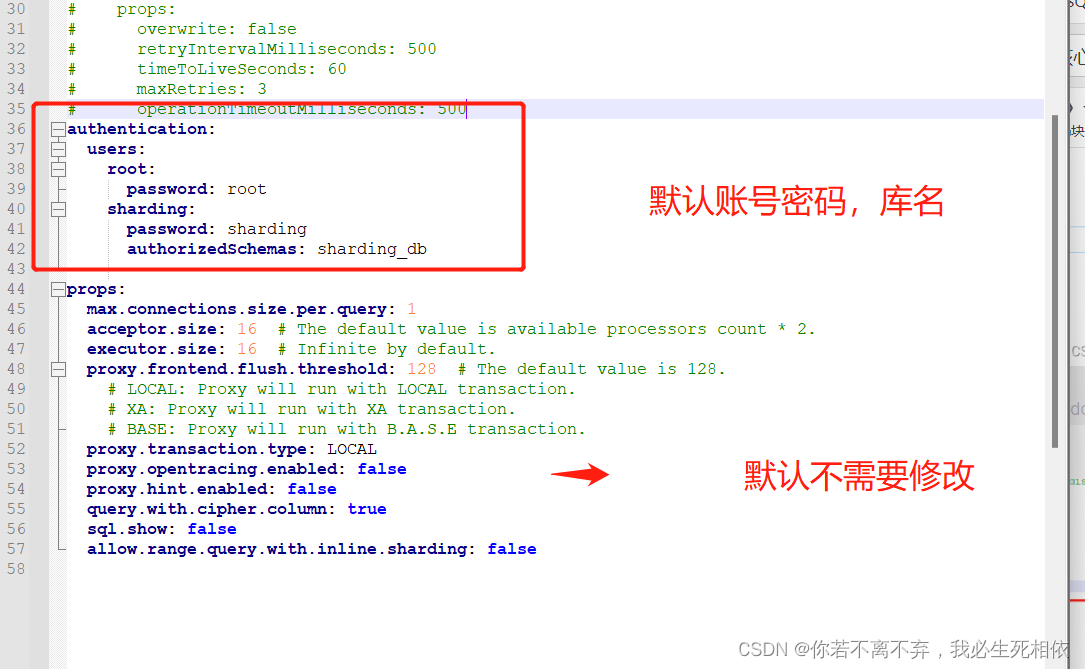
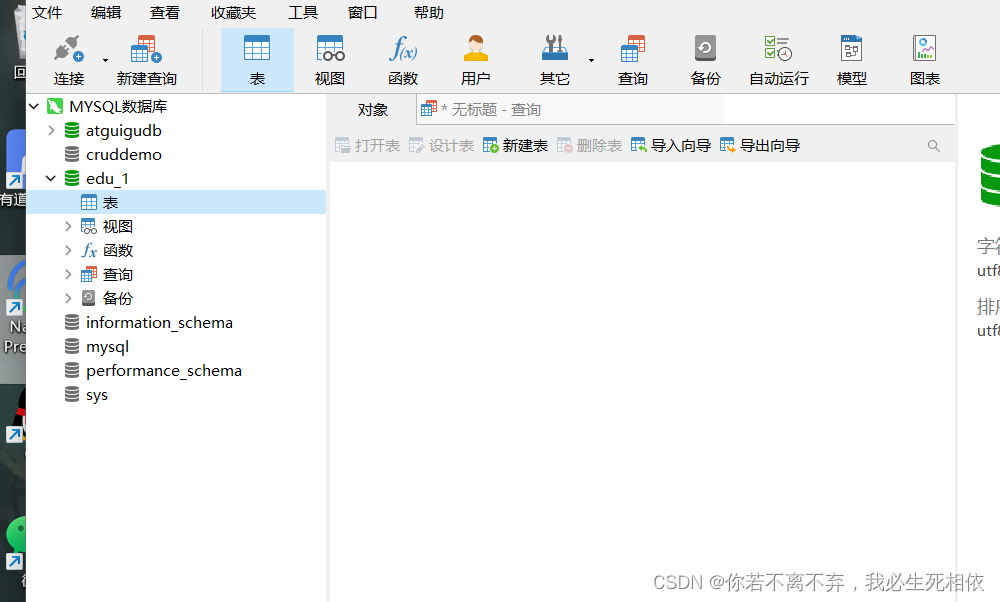
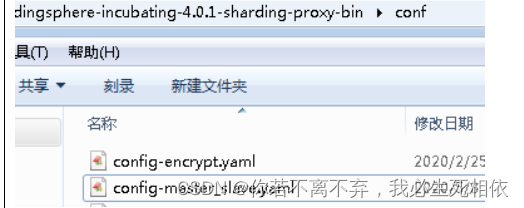
1 、进入 conf 目录,修改文件 server.yaml ,打开两段内容注释
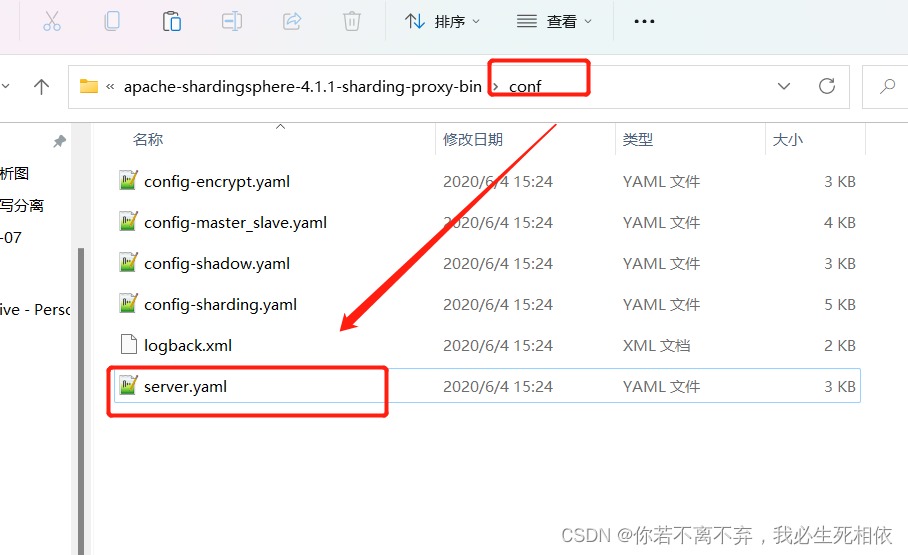
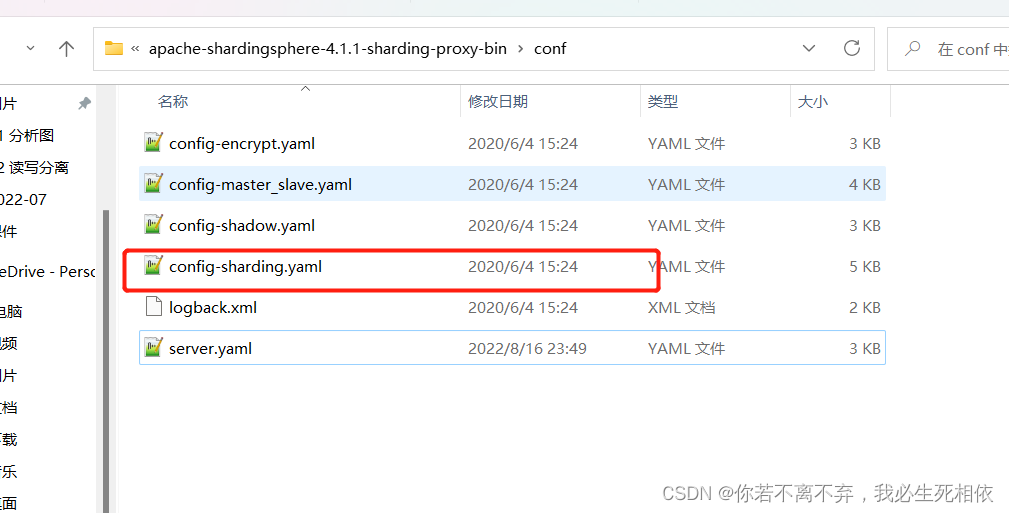
2 、进入 conf 目录,修改 config-sharding.yaml
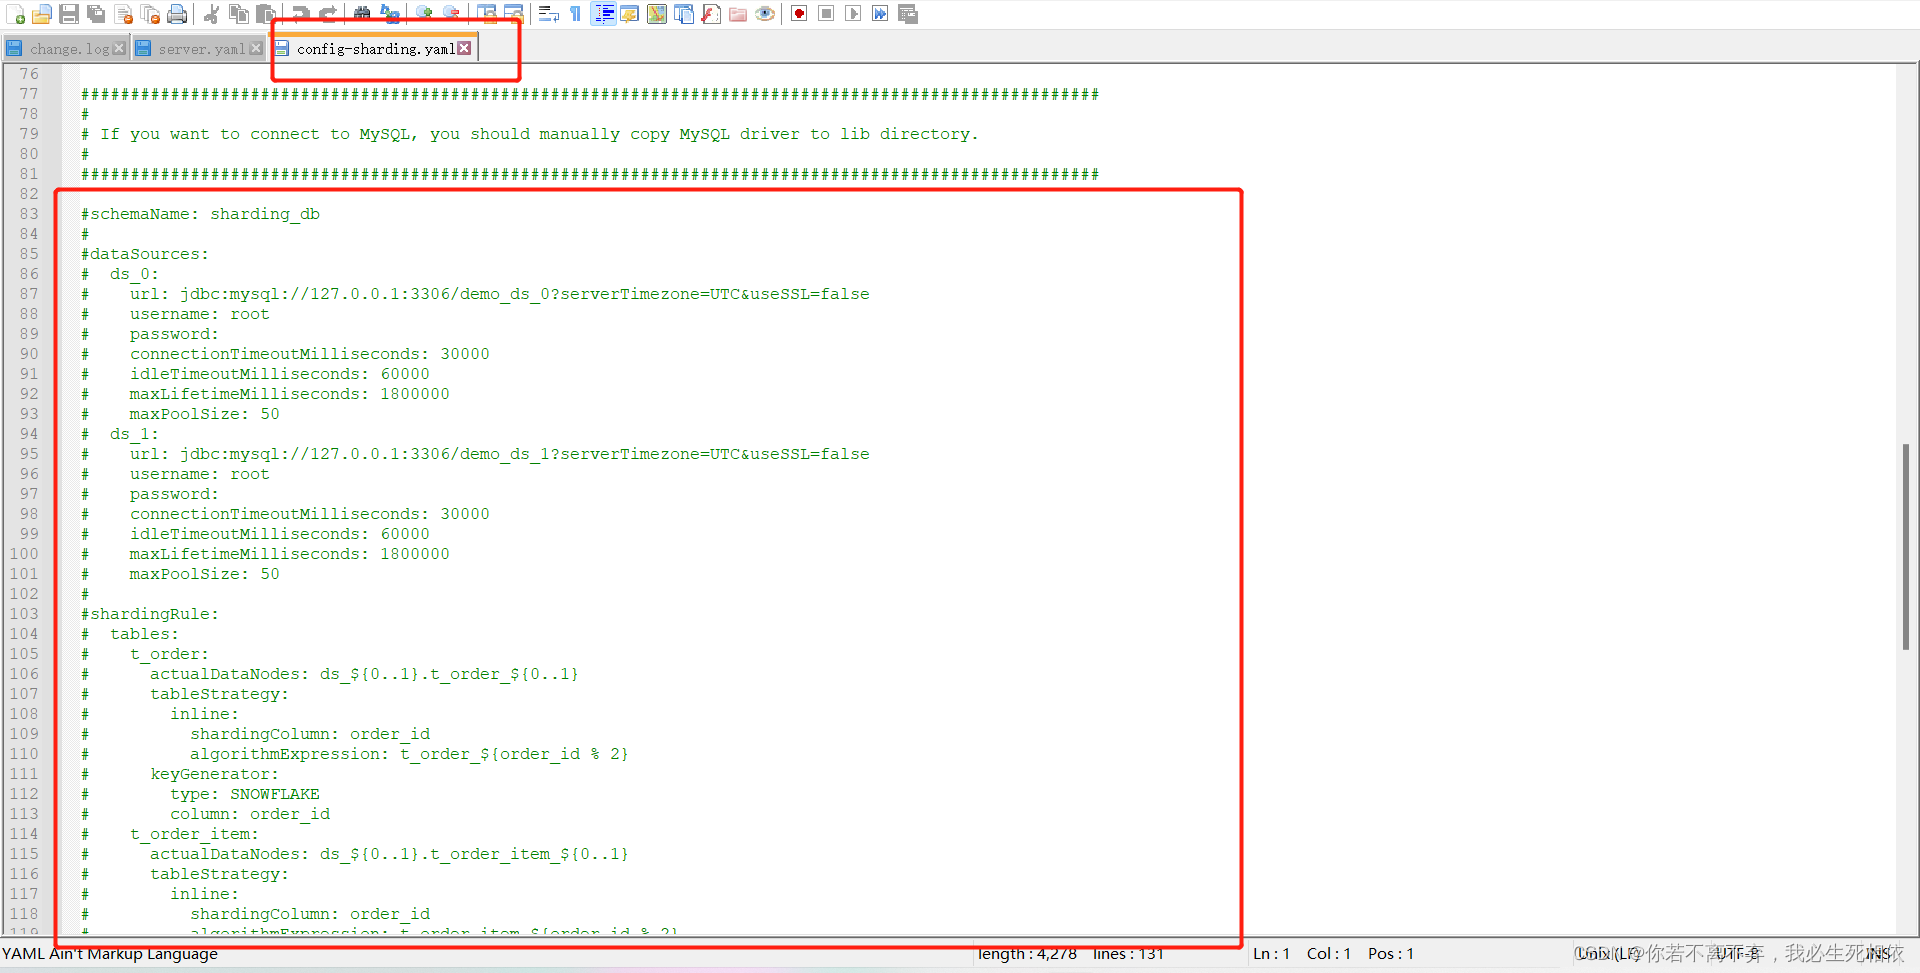
在这里插入图片描述
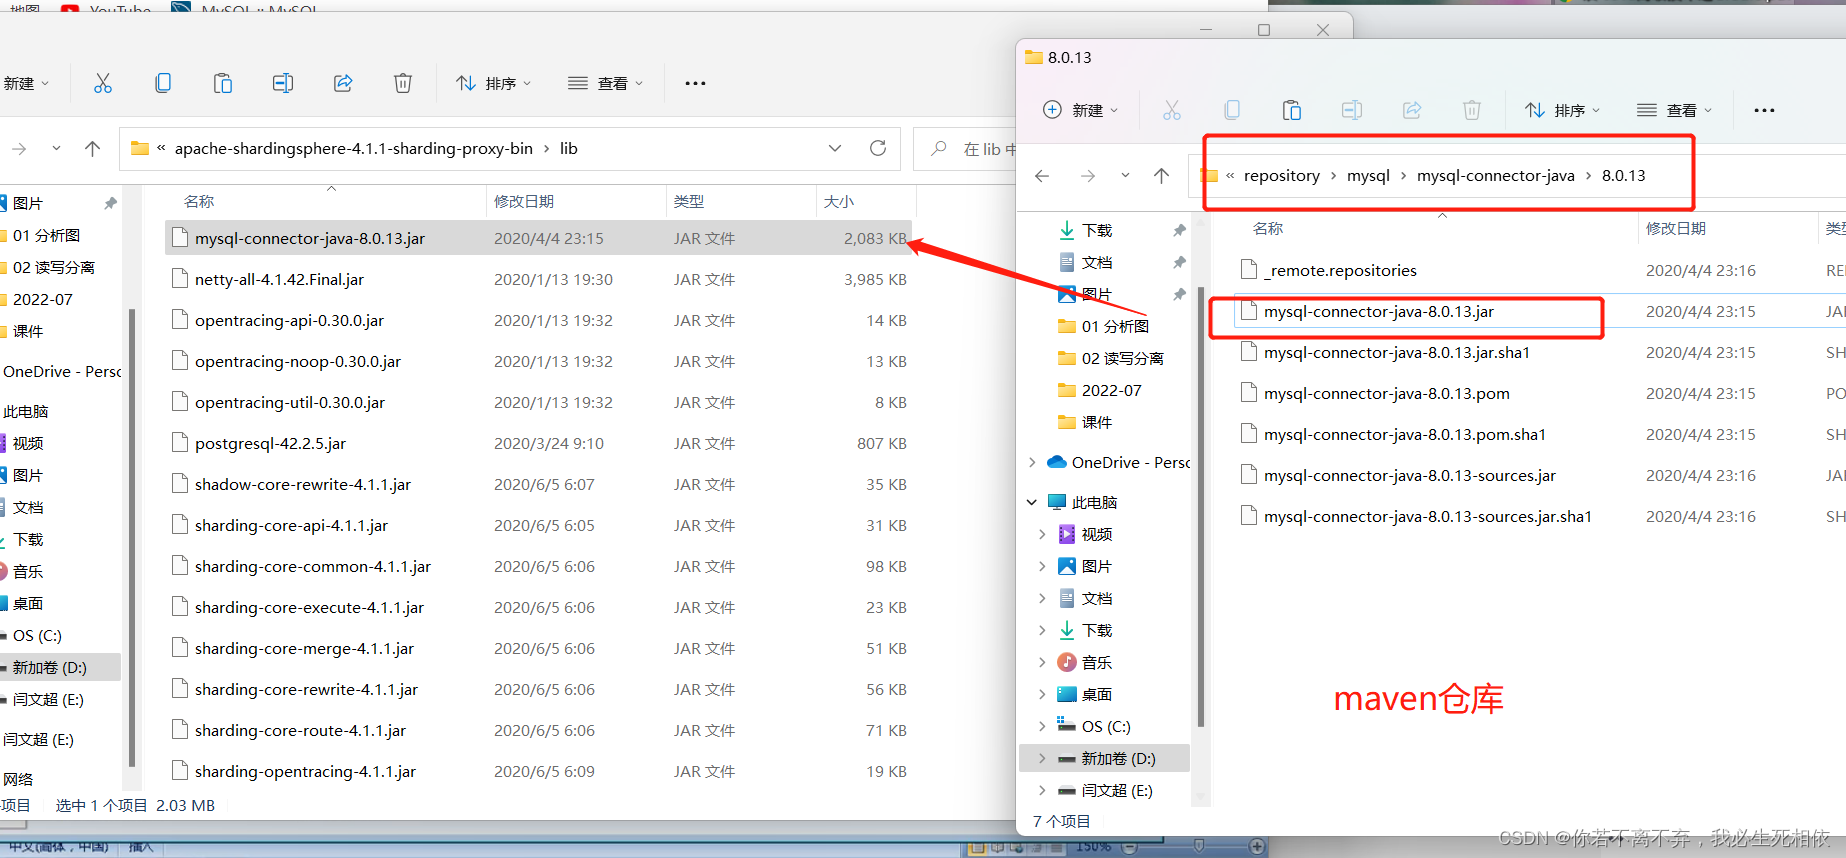
( 1 )复制mysql驱动jar包到lib目录

去manven中找 把mysql驱动jar 放到lib
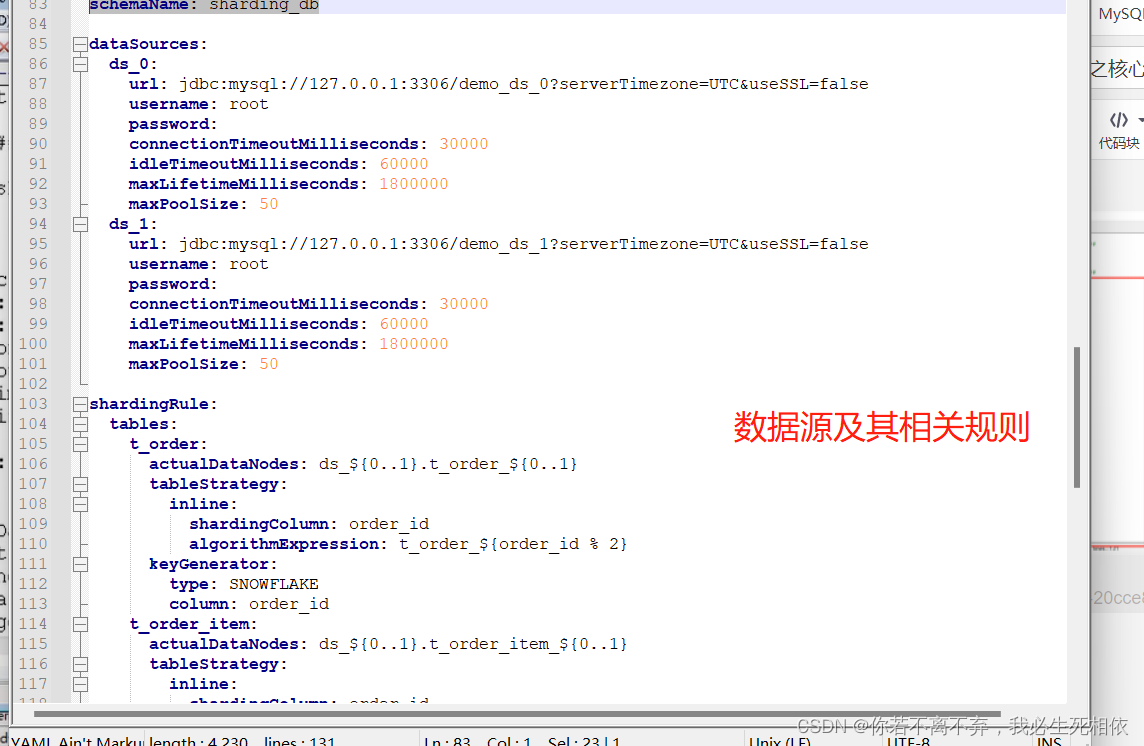
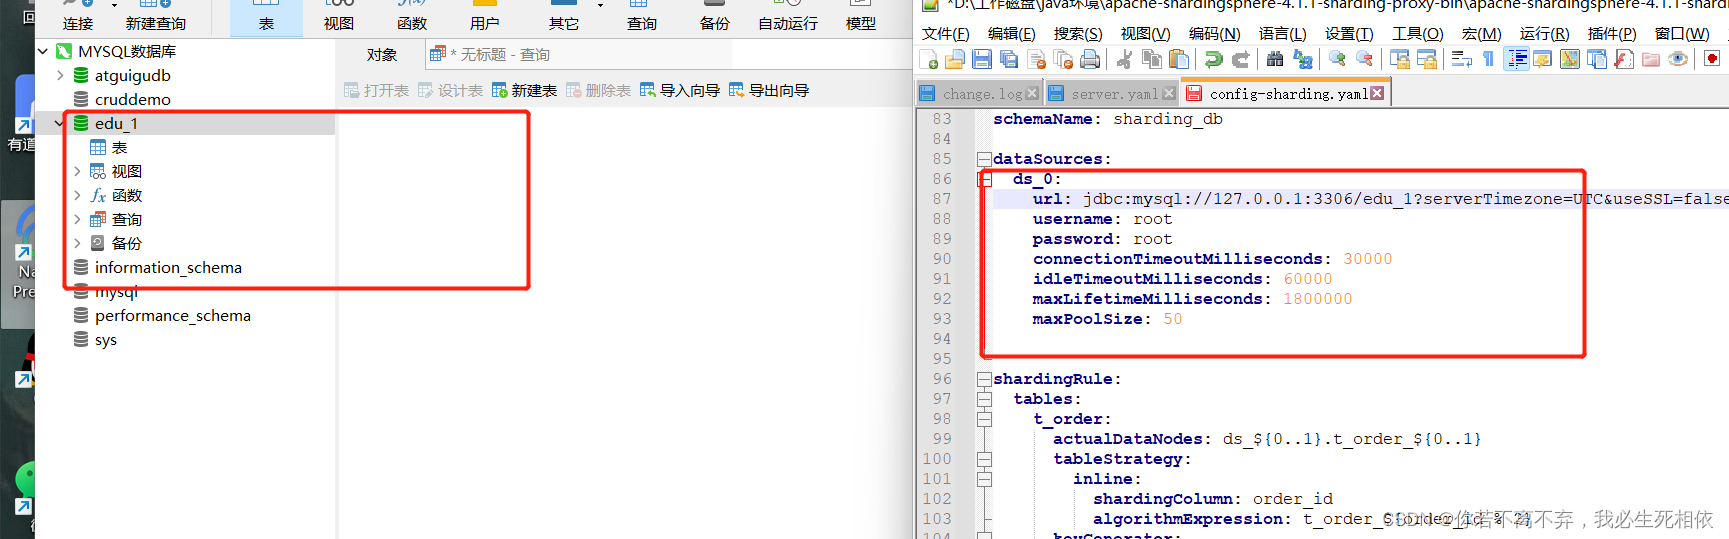
(2 )配置分库分表规则
打开注释
schemaName: sharding_db 数据库,名字
在这里插入图片描述
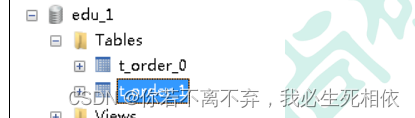
全的可直接复制,一个库一个表
#
# Licensed to the Apache Software Foundation (ASF) under one or more
# contributor license agreements. See the NOTICE file distributed with
# this work for additional information regarding copyright ownership.
# The ASF licenses this file to You under the Apache License, Version 2.0
# (the "License"); you may not use this file except in compliance with
# the License. You may obtain a copy of the License at
#
# http://www.apache.org/licenses/LICENSE-2.0
#
# Unless required by applicable law or agreed to in writing, software
# distributed under the License is distributed on an "AS IS" BASIS,
# WITHOUT WARRANTIES OR CONDITIONS OF ANY KIND, either express or implied.
# See the License for the specific language governing permissions and
# limitations under the License.
#
######################################################################################################
#
# Here you can configure the rules for the proxy.
# This example is configuration of sharding rule.
#
# If you want to use sharding, please refer to this file;
# if you want to use master-slave, please refer to the config-master_slave.yaml.
#
######################################################################################################
#
#schemaName: sharding_db
#
#dataSources:
# ds_0:
# url: jdbc:postgresql://127.0.0.1:5432/demo_ds_0?serverTimezone=UTC&useSSL=false
# username: postgres
# password: postgres
# connectionTimeoutMilliseconds: 30000
# idleTimeoutMilliseconds: 60000
# maxLifetimeMilliseconds: 1800000
# maxPoolSize: 50
# ds_1:
# url: jdbc:postgresql://127.0.0.1:5432/demo_ds_1?serverTimezone=UTC&useSSL=false
# username: postgres
# password: postgres
# connectionTimeoutMilliseconds: 30000
# idleTimeoutMilliseconds: 60000
# maxLifetimeMilliseconds: 1800000
# maxPoolSize: 50
#
#shardingRule:
# tables:
# t_order:
# actualDataNodes: ds_${0..1}.t_order_${0..1}
# tableStrategy:
# inline:
# shardingColumn: order_id
# algorithmExpression: t_order_${order_id % 2}
# keyGenerator:
# type: SNOWFLAKE
# column: order_id
# t_order_item:
# actualDataNodes: ds_${0..1}.t_order_item_${0..1}
# tableStrategy:
# inline:
# shardingColumn: order_id
# algorithmExpression: t_order_item_${order_id % 2}
# keyGenerator:
# type: SNOWFLAKE
# column: order_item_id
# bindingTables:
# - t_order,t_order_item
# defaultDatabaseStrategy:
# inline:
# shardingColumn: user_id
# algorithmExpression: ds_${user_id % 2}
# defaultTableStrategy:
# none:
######################################################################################################
#
# If you want to connect to MySQL, you should manually copy MySQL driver to lib directory.
#
######################################################################################################
schemaName: sharding_db
dataSources:
ds_0:
url: jdbc:mysql://127.0.0.1:3306/edu_1?serverTimezone=UTC&useSSL=false
username: root
password: root
connectionTimeoutMilliseconds: 30000
idleTimeoutMilliseconds: 60000
maxLifetimeMilliseconds: 1800000
maxPoolSize: 50
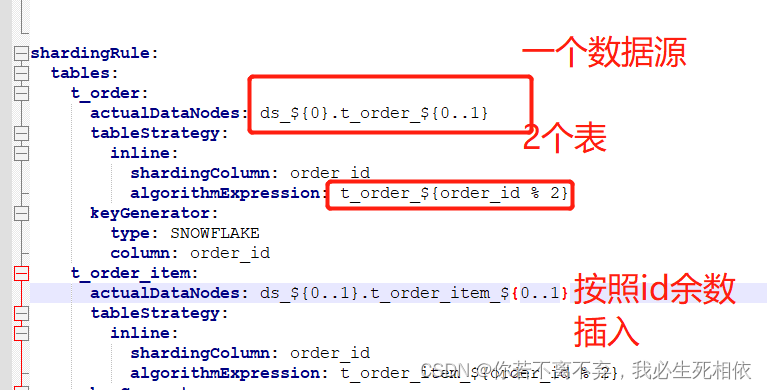
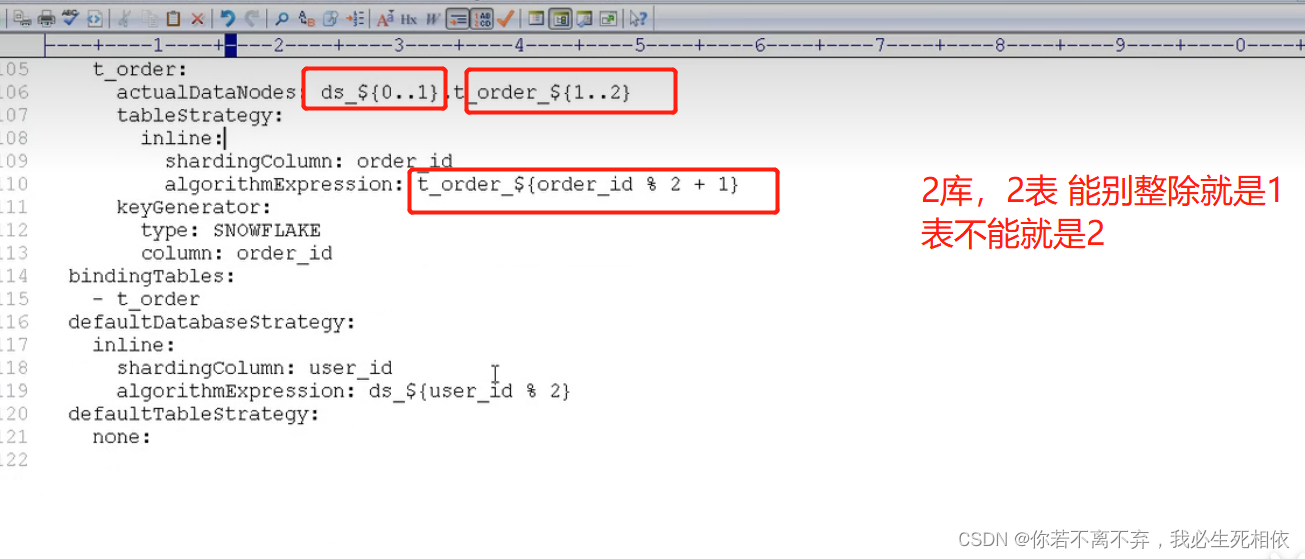
shardingRule:
tables:
t_order:
actualDataNodes: ds_${0}.t_order_${0..1}
tableStrategy:
inline:
shardingColumn: order_id
algorithmExpression: t_order_${order_id % 2}
keyGenerator:
type: SNOWFLAKE
column: order_id
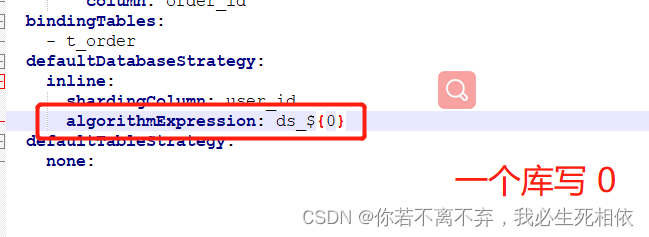
bindingTables:
- t_order
defaultDatabaseStrategy:
inline:
shardingColumn: user_id
algorithmExpression: ds_${0}
defaultTableStrategy:
none:3 、启动 Sharding-Proxy 服务
Linux操作系统请运行bin/start.sh,Windows操作系统请运行bin/start.bat启动Sharding-Proxy
( 1 )Sharding-Proxy默认端口号 3307
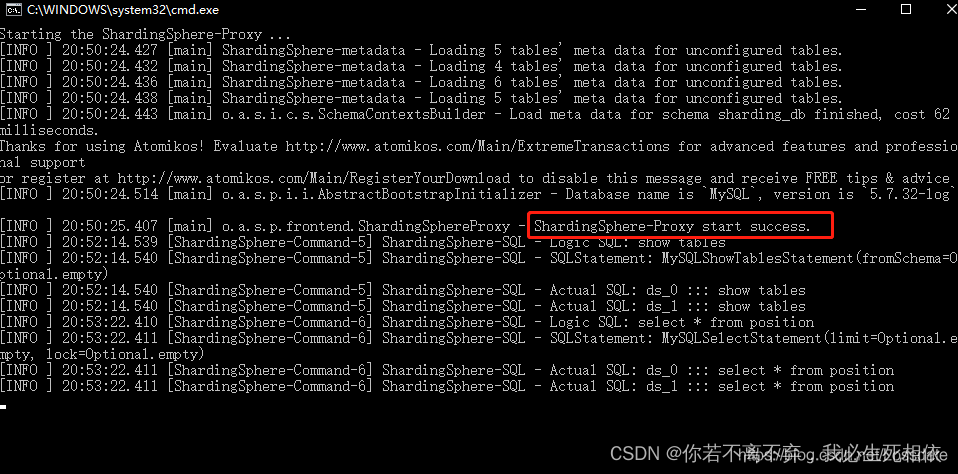
4 、通过 Sharding-Proxy 启动端口进行连接
( 1 )打开cmd窗口连接Sharding-Proxy,连接方式和连接mysql一样的 ( 2 )进行sql命令操作看到只有一个库
如: mysql -h 127.0.0.1 -P 3307 -u root -p root
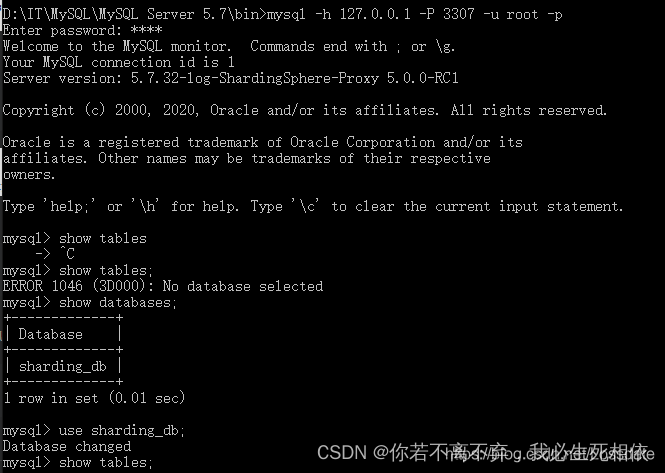
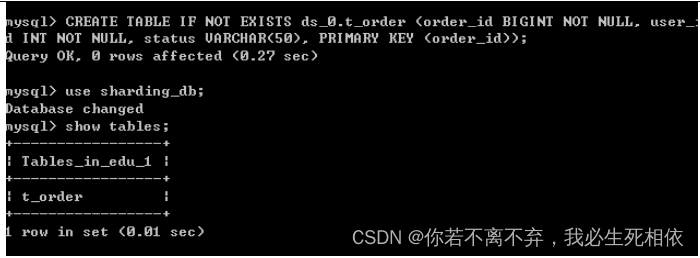
( 3 )在sharding_db数据库创建表
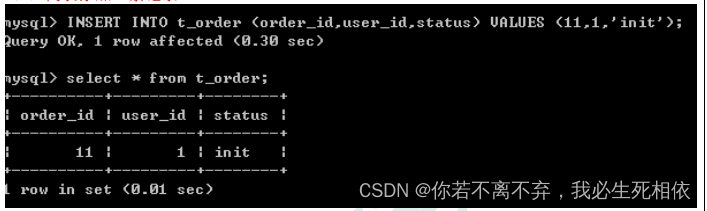
( 4 )向表添加一条记录
注意事项 1)Sharding-Proxy 默认不支持hint,如需支持,请在conf/server.yaml中,将props的属性proxy.hint.enabled设置为true。在Sharding-Proxy中,HintShardingAlgorithm的泛型只能是 String类型 2)Sharding-Proxy默认使用3307端口,可以通过启动脚本追加参数作为启动端口号。如: bin/start.sh 3308 3)Sharding-Proxy使用conf/server.yaml配置注册中心、认证信息以及公用属性 4)Sharding-Proxy支持多逻辑数据源,每个以"config-"做前缀命名yaml配置文件,即为一个逻辑数据源
5 、回到本地 3306 端口实际数据库中,看到已经创建好了表和添加数据
Sharding-Proxy 配置(分库)
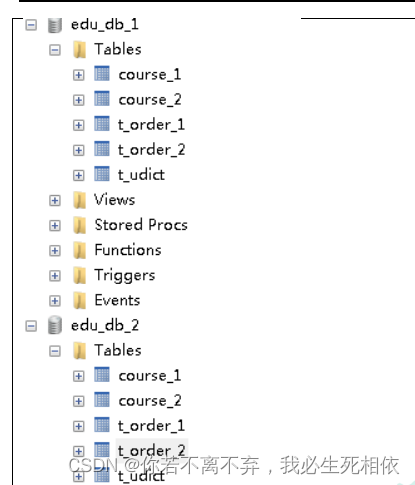
1 、创建两个数据库

2 、找到 conf 目录, config-sharding.yaml
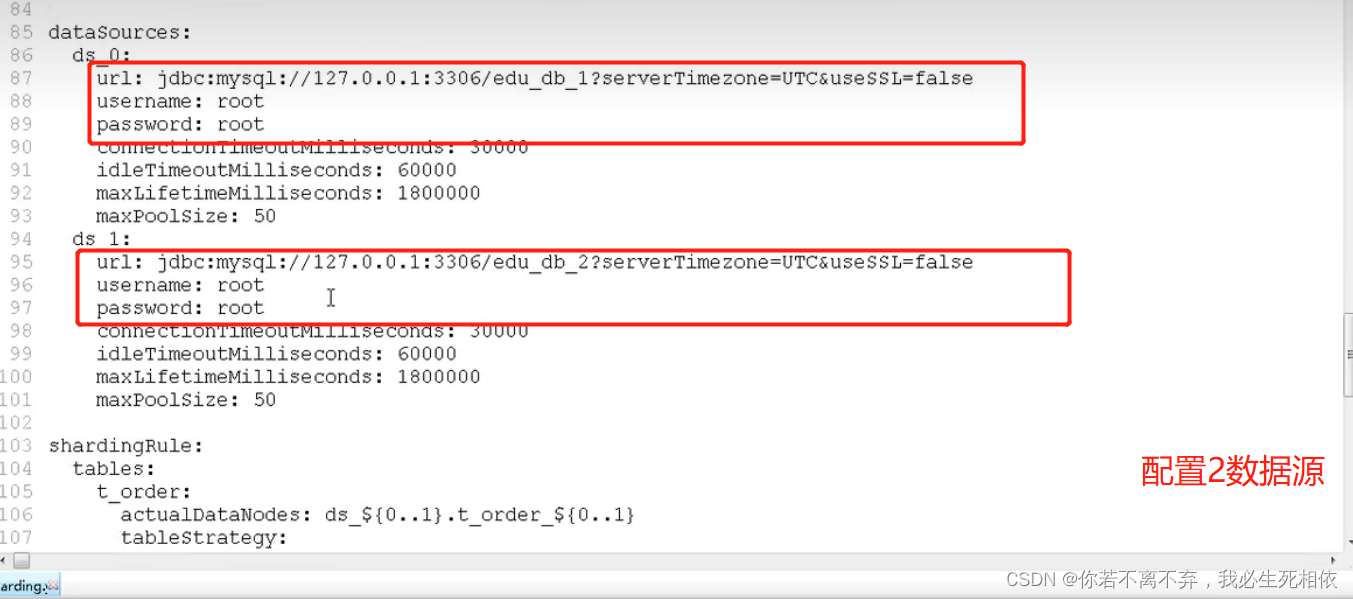
schemaName: sharding_db
dataSources:
ds_0:
url: jdbc:mysql://127.0.0.1:3306/edu_db_1?serverTimezone=UTC&useSSL=false
username: root
password: root
connectionTimeoutMilliseconds: 30000
idleTimeoutMilliseconds: 60000
maxLifetimeMilliseconds: 1800000
maxPoolSize: 50
ds_1:
url: jdbc:mysql://127.0.0.1:3306/edu_db_2?serverTimezone=UTC&useSSL=false
username: root
password: root
connectionTimeoutMilliseconds: 30000
idleTimeoutMilliseconds: 60000
maxLifetimeMilliseconds: 1800000
maxPoolSize: 50
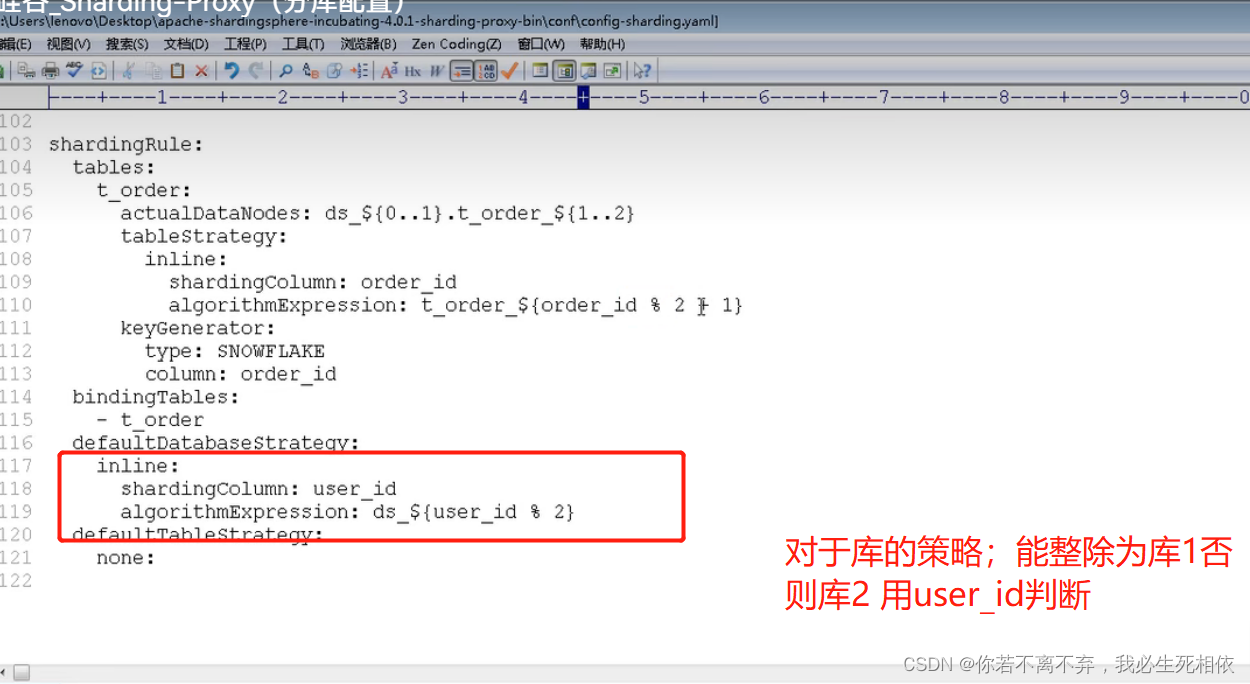
shardingRule:
tables:
t_order:
actualDataNodes: ds_${0..1}.t_order_${1..2}
tableStrategy:
inline:
shardingColumn: order_id
algorithmExpression: t_order_${order_id % 2 + 1}
keyGenerator:
type: SNOWFLAKE
column: order_id
bindingTables:
t_order
defaultDatabaseStrategy:
inline:
shardingColumn: user_id
algorithmExpression: ds_${user_id % 2}
defaultTableStrategy:
none:3 、启动 Sharding-Proxy 服务

4 、打开 cmd 仓库,连接 Sharding-Proxy 服务

( 1 )创建数据库表,向表添加记录

( 2 )连接本地 3306 的MySql数据库服务器,表已经创建出来,表里面有数据
Sharding-Proxy 配置(读写分离)
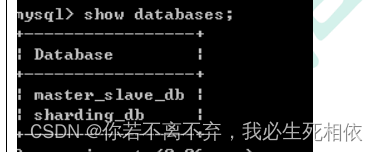
1 、创建三个数据

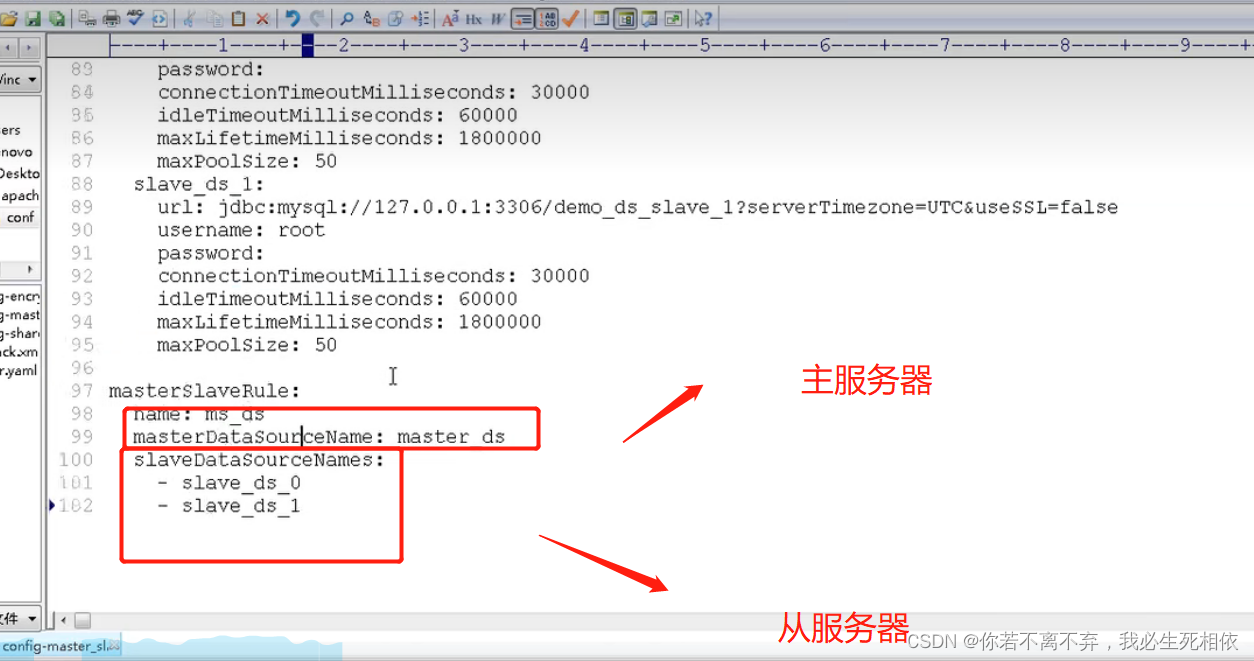
2 、修改 conf 里面配置文件, config-master-slave.yaml
第一个主服务器,后面是从服务器
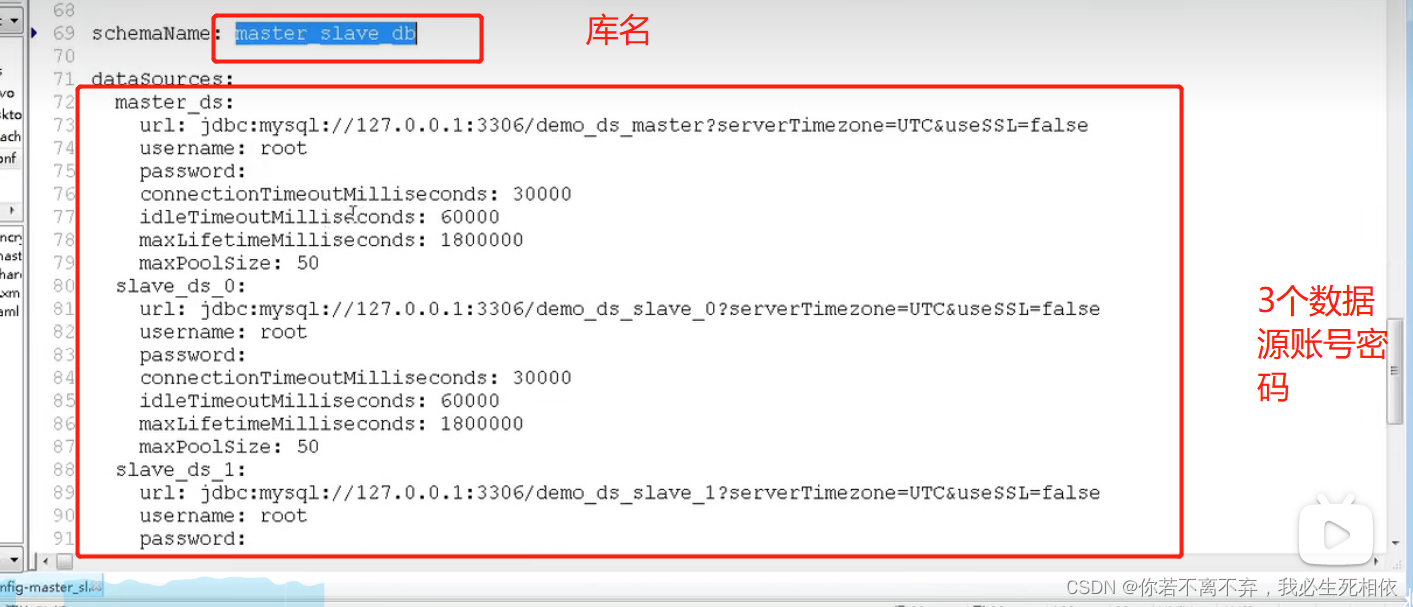
schemaName: master_slave_db
dataSources:
master_ds:
url: jdbc:mysql://127.0.0.1:3306/demo_ds_master?serverTimezone=UTC&useSSL=false
username: root
password: root
connectionTimeoutMilliseconds: 30000
idleTimeoutMilliseconds: 60000
maxLifetimeMilliseconds: 1800000
maxPoolSize: 50
slave_ds_0:
url: jdbc:mysql://127.0.0.1:3306/demo_ds_slave_0?serverTimezone=UTC&useSSL=false
username: root
password: root
connectionTimeoutMilliseconds: 30000
idleTimeoutMilliseconds: 60000
maxLifetimeMilliseconds: 1800000
maxPoolSize: 50
slave_ds_1:
url: jdbc:mysql://127.0.0.1:3306/demo_ds_slave_1?serverTimezone=UTC&useSSL=false
username: root
password: root
connectionTimeoutMilliseconds: 30000
idleTimeoutMilliseconds: 60000
maxLifetimeMilliseconds: 1800000
maxPoolSize: 50
masterSlaveRule:
name: ms_ds
masterDataSourceName: master_ds
slaveDataSourceNames:
slave_ds_0
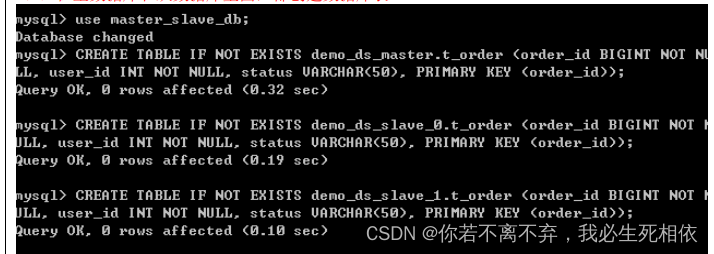
slave_ds_13 、启动 Sharding-Proxy 服务

4 、通过 cmd 连接 Sharding-Proxy ,进行创建表和添加记录操作
( 1 )在主数据库和从数据库里面,都创建数据库表
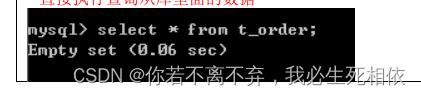
( 2 )向表添加记录,不指定向哪个库添加 把添加数据添加到主数据库里面(查询默认去查从库是查不到的)

( 3 )查询数据库表数据,不指定查询哪个库 (查询默认去查从库是查不到的随机去查从库的数据)
在springboot里操作sharding-proxy
pom
<dependency>
    <groupId>org.springframework.boot</groupId>
    <artifactId>spring-boot-starter-jdbc</artifactId>
</dependency>

<dependency>
    <groupId>org.springframework.boot</groupId>
    <artifactId>spring-boot-starter-data-jpa</artifactId>
</dependency>

<dependency>
    <groupId>org.springframework.boot</groupId>
    <artifactId>spring-boot-starter-test</artifactId>
    <scope>test</scope>
</dependency>

<dependency>
    <groupId>mysql</groupId>
    <artifactId>mysql-connector-java</artifactId>
</dependency>

<dependency>
    <groupId>junit</groupId>
    <artifactId>junit</artifactId>
    <version>4.13.1</version>
    <scope>test</scope>
</dependency>
application.properties
spring.datasource.url=jdbc:mysql://localhost:3307/sharding_db
spring.datasource.driver-class-name=com.mysql.jdbc.Driver
spring.datasource.username=root
spring.datasource.password=root
position实体类
@Entity
@Table(name="position")
public class Position implements Serializable {

    @Id
    @Column(name = "id")
    @GeneratedValue(strategy = GenerationType.IDENTITY)
    private long id;

    @Column(name = "name")
    private String name;

    @Column(name = "salary")
    private String salary;

    @Column(name = "city")
    private String city;

    //getter and setter ...
}
dao
public interface PositionRepository extends JpaRepository<Position,Long> {
}
启动类
@SpringBootApplication
public class RunBoot {
}
测试类
@RunWith(SpringRunner.class)
@SpringBootTest(classes = RunBoot.class)
public class TestPosition {

    @Resource
    private PositionRepository positionRepository;

    @Test
    public void test1(){
        List<Position> list = positionRepository.findAll();
        list.forEach(position -> System.out.println(position.getId()+" "+position.getName()+" "+position.getSalary()));
    }

    @Test
    public void test2(){
        Position position = new Position();
        position.setName("Tom");
        position.setSalary("20000");
        position.setCity("Shanghai");
        positionRepository.save(position);
    }
}
本文参与 腾讯云自媒体同步曝光计划,分享自作者个人站点/博客。
原始发表:2022-12-27,如有侵权请联系 cloudcommunity@tencent.com 删除
评论
登录后参与评论
推荐阅读
目录
腾讯云开发者

Copyright © 2013 - 2026 Tencent Cloud. All Rights Reserved. 腾讯云 版权所有
深圳市腾讯计算机系统有限公司 ICP备案/许可证号:粤B2-20090059 ![]() 粤公网安备44030502008569号
粤公网安备44030502008569号
腾讯云计算(北京)有限责任公司 京ICP证150476号 | 京ICP备11018762号