MYSQLg高级-------分库分表之核心Sharding-JDBC

MYSQLg高级-------分库分表之核心Sharding-JDBC

默 语
发布于 2024-11-20 10:00:55
发布于 2024-11-20 10:00:55
Sharding-JDBC
1.Sharding-JDBC 简介
1 、是轻量级的java框架,是增强版的JDBC驱动

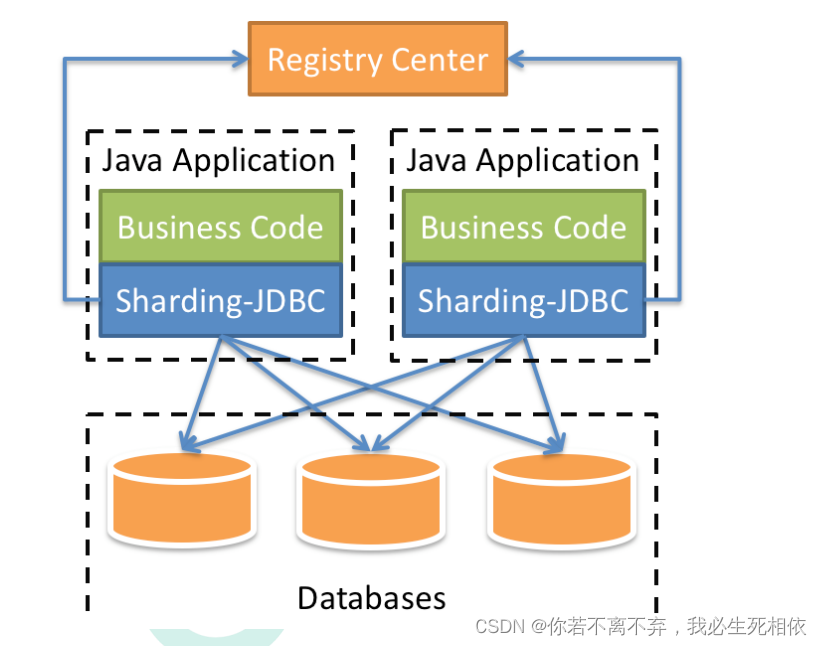

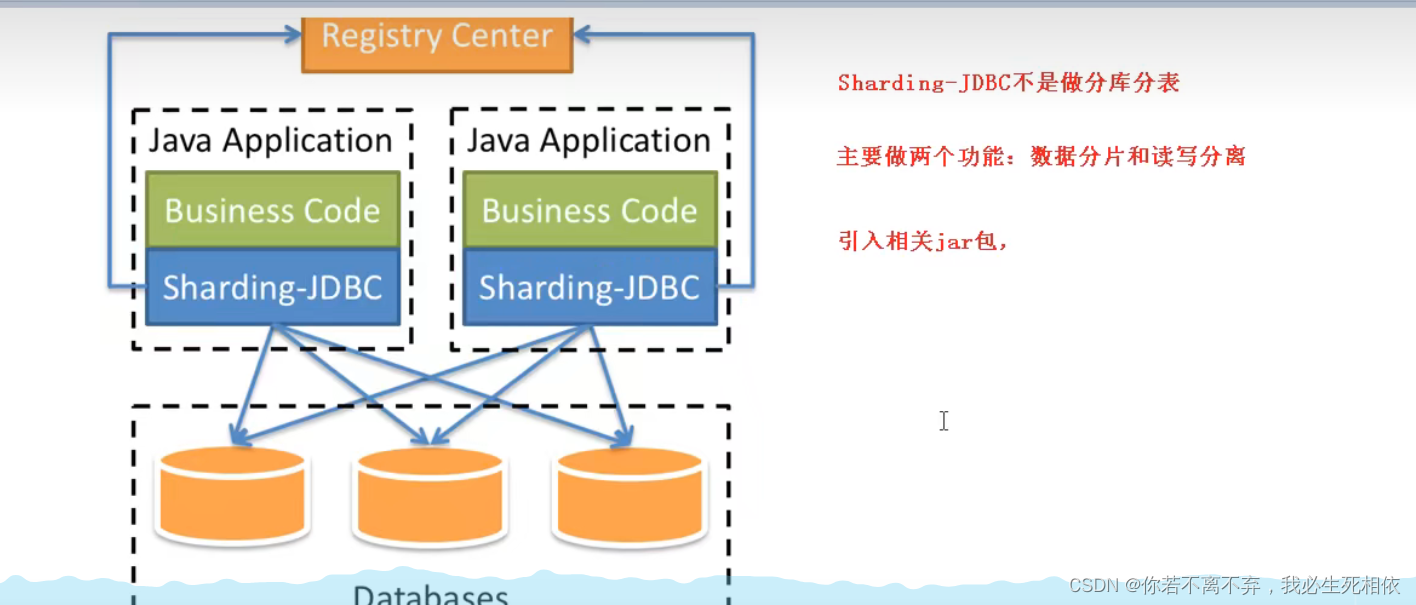
2 、Sharding-JDBC ( 1 )主要目的是:简化对分库分表之后数据相关操作
2. Sharding-JDBC 实现水平分表
1 、搭建环境
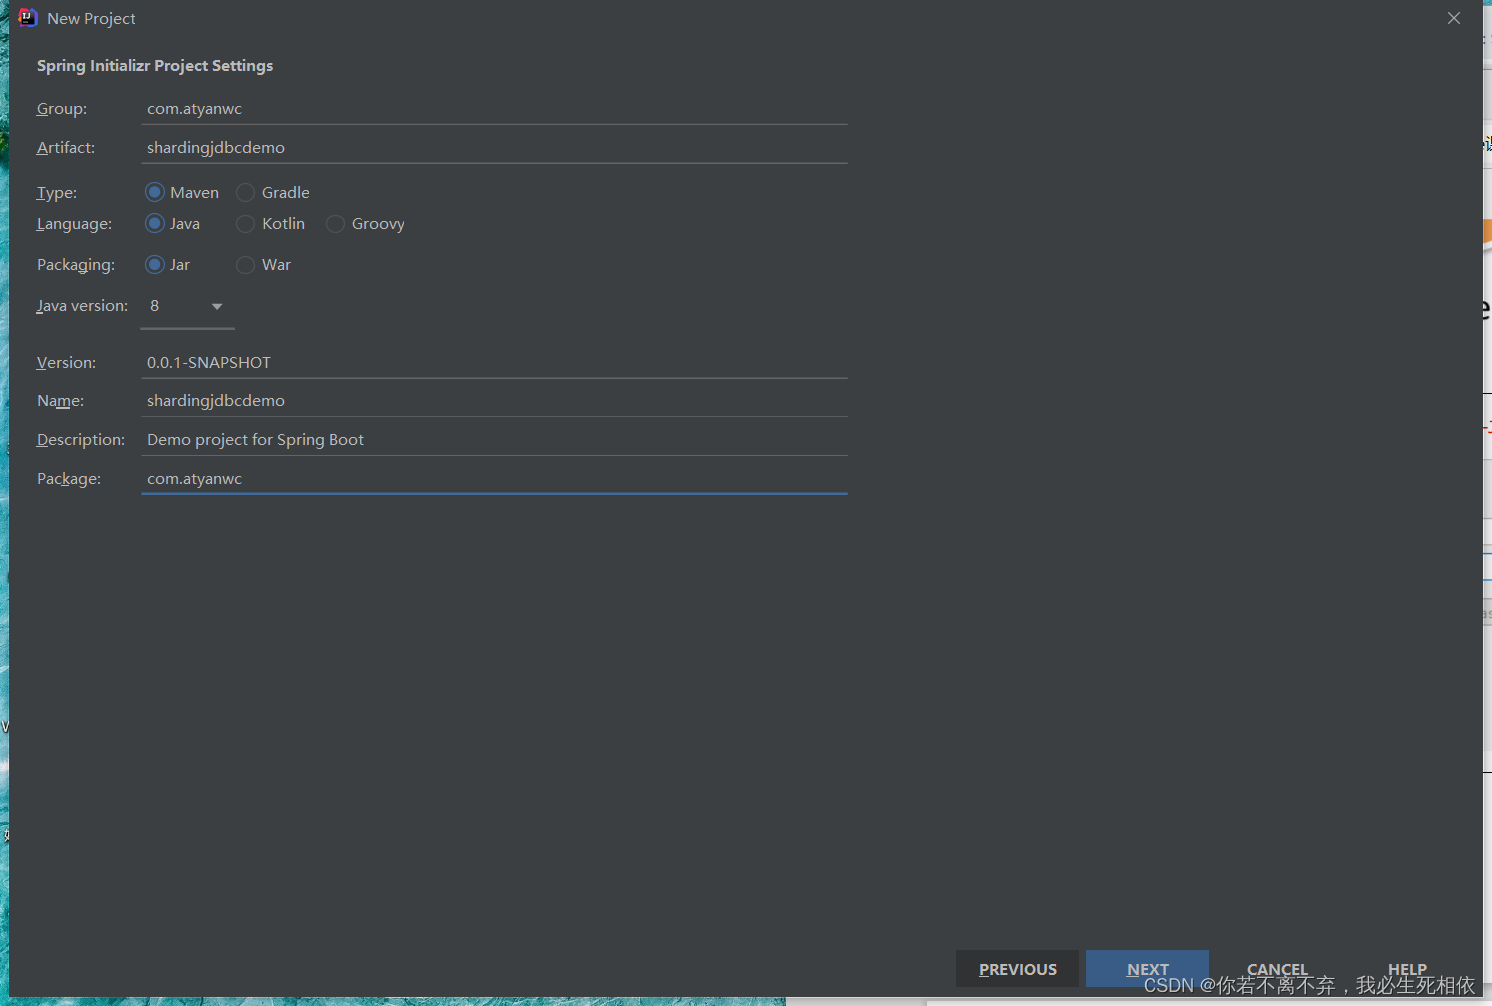
( 1 ) 技术:SpringBoot 2.2.1+ MyBatisPlus + Sharding-JDBC + Druid连接池 ( 2 ) 创建SpringBoot工程
( 3 ) 修改工程SpringBoot版本 2.2.2
  <parent>
        <groupId>org.springframework.boot</groupId>
        <artifactId>spring-boot-starter-parent</artifactId>
        <version>2.2.2.RELEASE</version>
        <relativePath/> <!-- lookup parent from repository -->
    </parent>
( 4 ) 引入需要的依赖
<?xml version="1.0" encoding="UTF-8"?>
<project xmlns="http://maven.apache.org/POM/4.0.0" xmlns:xsi="http://www.w3.org/2001/XMLSchema-instance"
         xsi:schemaLocation="http://maven.apache.org/POM/4.0.0 https://maven.apache.org/xsd/maven-4.0.0.xsd">
    <modelVersion>4.0.0</modelVersion>
    <parent>
        <groupId>org.springframework.boot</groupId>
        <artifactId>spring-boot-starter-parent</artifactId>
        <version>2.2.2.RELEASE</version>
        <relativePath/> <!-- lookup parent from repository -->
    </parent>
    <groupId>com.atyanwc</groupId>
    <artifactId>shardingjdbcdemo</artifactId>
    <version>0.0.1-SNAPSHOT</version>
    <name>shardingjdbcdemo</name>
    <description>Demo project for Spring Boot</description>
    <properties>
        <java.version>1.8</java.version>
    </properties>
    <dependencies>

            <dependency>
                <groupId>org.springframework.boot</groupId>
                <artifactId>spring-boot-starter</artifactId>
            </dependency>
            <dependency>
                <groupId>org.springframework.boot</groupId>
                <artifactId>spring-boot-starter-test</artifactId>
            </dependency>
            <dependency>
                <groupId>com.alibaba</groupId>
                <artifactId>druid-spring-boot-starter</artifactId>
                <version>1.1.14</version>
            </dependency>
            <dependency>
                <groupId>mysql</groupId>
                <artifactId>mysql-connector-java</artifactId>
            </dependency>


        <dependency>
        <groupId>org.apache.shardingsphere</groupId>
        <artifactId>shardingsphere-jdbc-core-spring-boot-starter</artifactId>
        <version>5.0.0</version>
    </dependency>
            <dependency>
                <groupId>com.baomidou</groupId>
                <artifactId>mybatis-plus-boot-starter</artifactId>
                <version>3.3.1</version>
            </dependency>
            <dependency>
                <groupId>org.projectlombok</groupId>
                <artifactId>lombok</artifactId>
            </dependency>

    </dependencies>

    <build>
        <plugins>
            <plugin>
                <groupId>org.springframework.boot</groupId>
                <artifactId>spring-boot-maven-plugin</artifactId>
                <configuration>
                    <excludes>
                        <exclude>
                            <groupId>org.projectlombok</groupId>
                            <artifactId>lombok</artifactId>
                        </exclude>
                    </excludes>
                </configuration>
            </plugin>
        </plugins>
    </build>

</project>
2 、按照水平分表的方式,创建数据库和数据库表
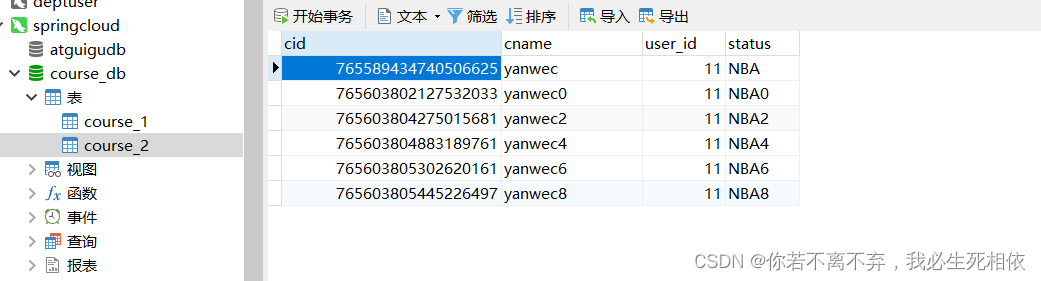
( 1 )创建数据库course_db ( 2 )在数据库创建两张表 course_1 和 course_ ( 3 )约定规则:如果添加课程id是偶数把数据添加course_1,如果奇数添加到course_
create database course_db;

use course_db;

create table course_1 (
    cid bigint(20) primary key ,
    cname varchar(50) not null,
    user_id bigint(20) not null ,
    status varchar(10) not null
) engine = InnoDB;

create table course_2 (
    cid bigint(20) primary key ,
    cname varchar(50) not null,
    user_id bigint(20) not null ,
    status varchar(10) not null
) engine = InnoDB;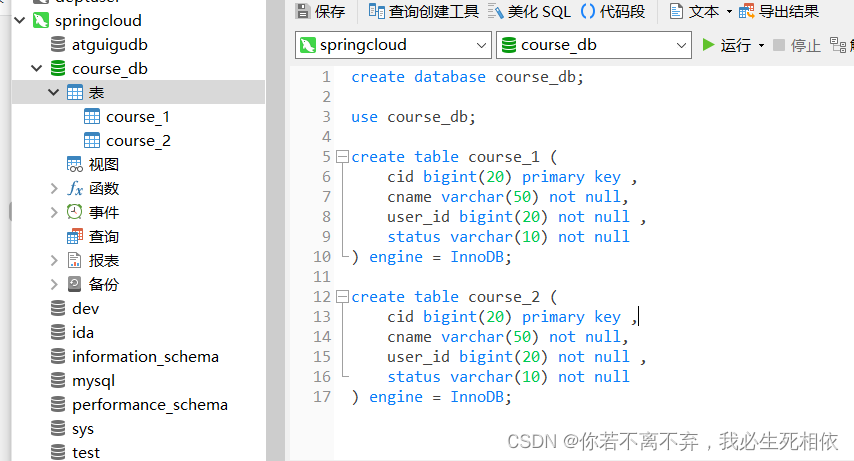
3 、编写代码实现对分库分表后数据的操作
( 1 )创建实体类,mapper
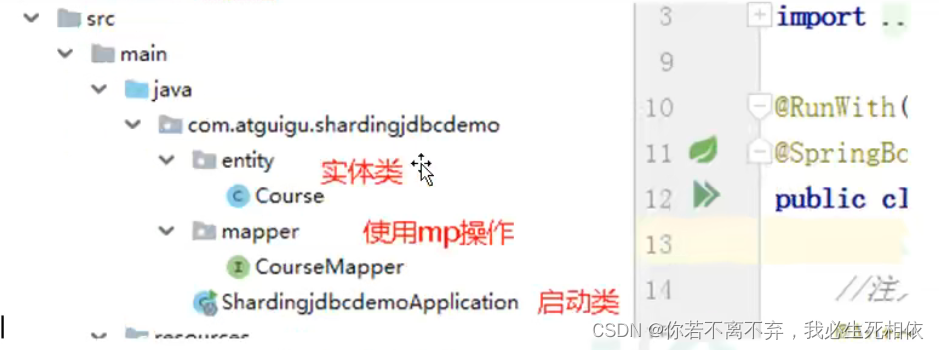
实体类:
@Data
public class Course {


    private Long cid;
    private String cname;
    private Long user_id;
    private String status;

}
Mapper
@Repository
public interface CourseMapper extends BaseMapper<Course> {
}
测试
    @Autowired
    private CourseMapper courseMapper;
    @Test
    void contextLoads() {
    }
4 、配置 Sharding-JDBC 分片策略
地址
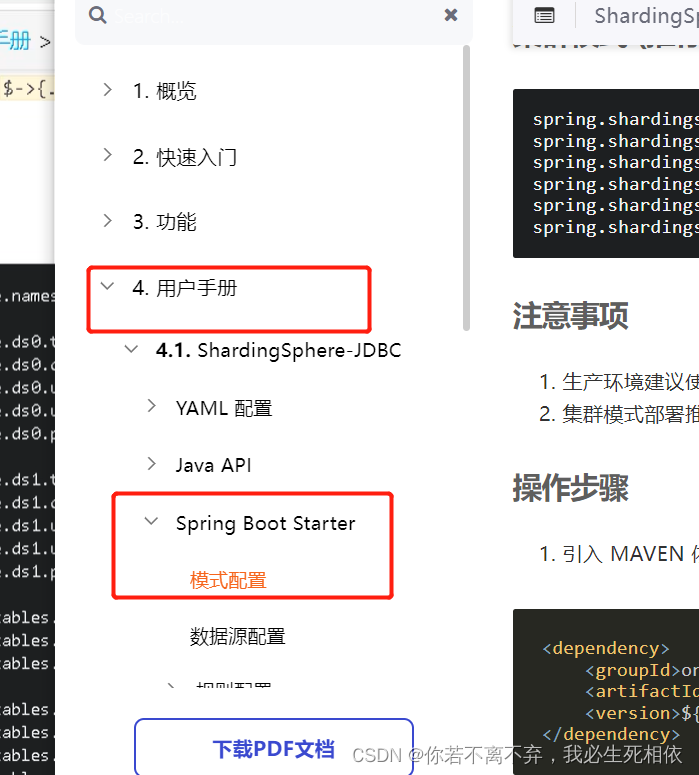
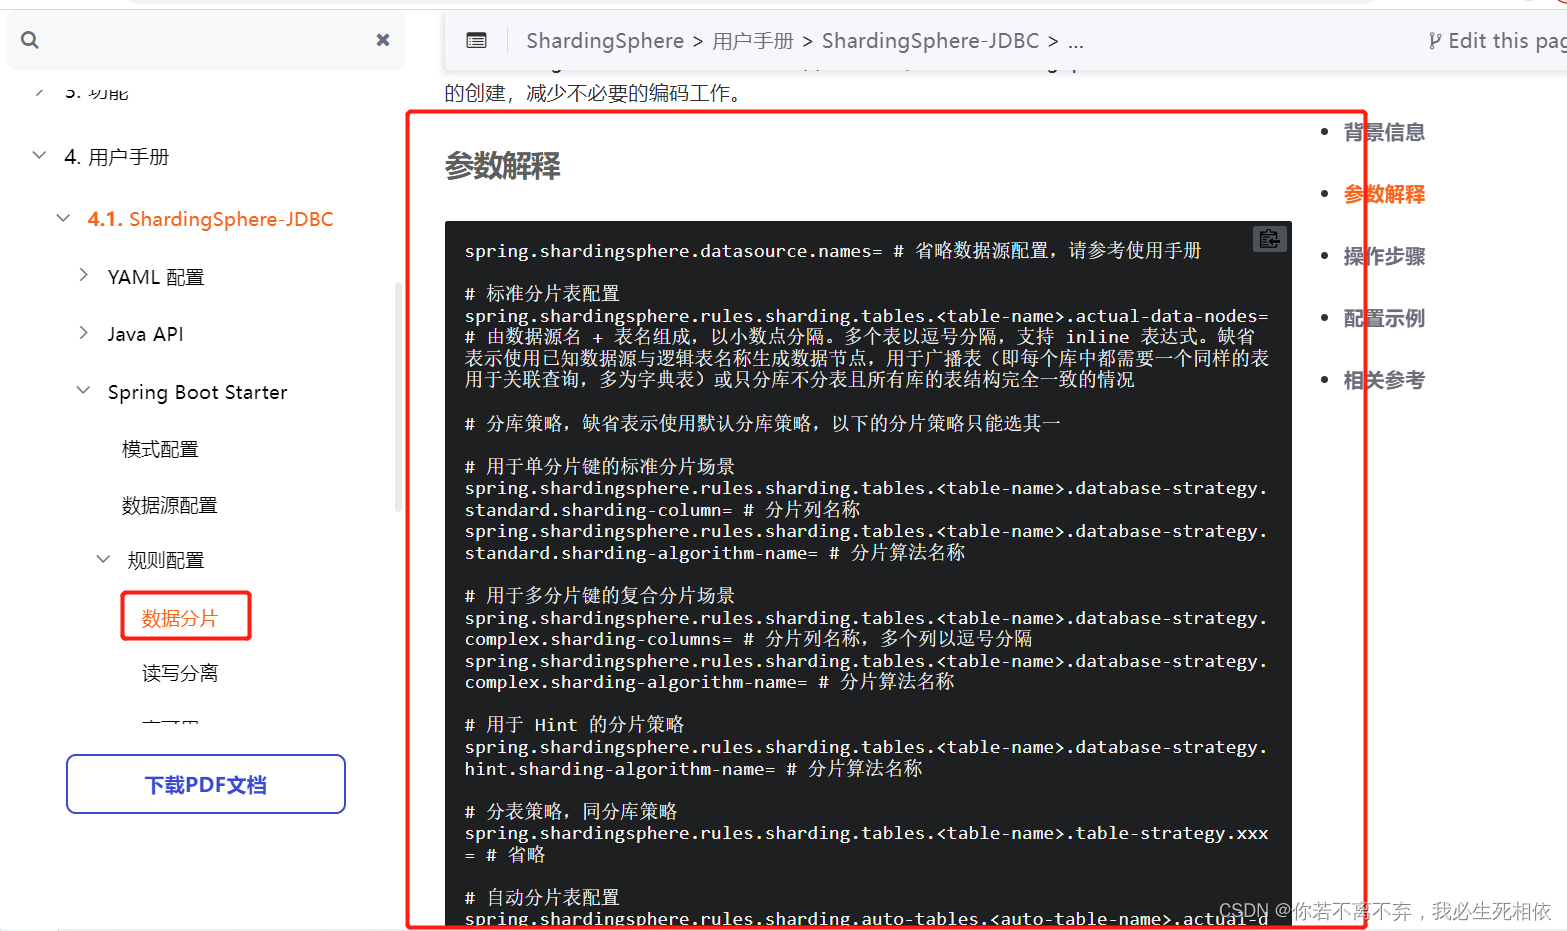

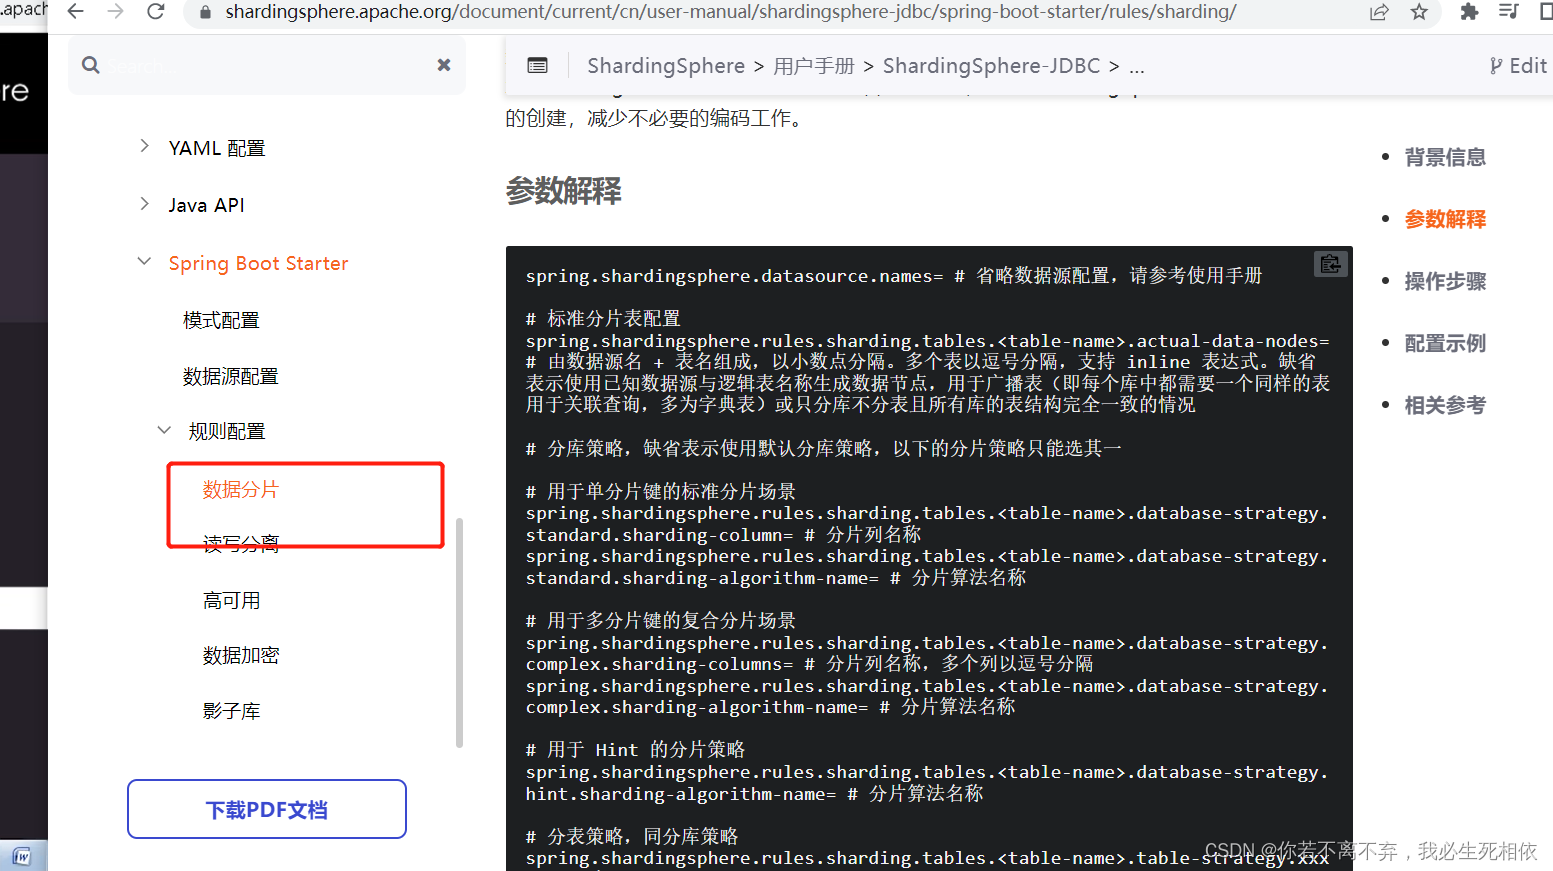
( 1 )在项目application.properties配置文件中进行配置
有错的
# sharding-jdbc 水平分表策略
# 配置数据源,给数据源起别名  m1 起的名字随意单要和下面的一致
spring.shardingsphere.datasource.names=m1

# 一个实体类对应两张表,覆盖
spring.main.allow-bean-definition-overriding=true

# 配置数据源的具体内容,包含连接池,驱动,地址,用户名,密码  druid单独配置
spring.shardingsphere.datasource.m1.type=com.alibaba.druid.pool.DruidDataSource
spring.shardingsphere.datasource.m1.driver-class-name=com.mysql.cj.jdbc.Driver
#高版本加入了时区
spring.shardingsphere.datasource.m1.url=jdbc:mysql://localhost:3306/course_db?serverTimezone=GMT%2B8
spring.shardingsphere.datasource.m1.username=root
spring.shardingsphere.datasource.m1.password=root

# 指定course表分布的情况,配置表在哪个数据库里,表的名称都是什么  course 表规则(暂时这么理解)  m1.course_$->{1..2}=m1.course_1,m1.course_2
spring.shardingsphere.sharding.tables.course.actual-data-nodes=m1.course_$->{1..2}

# 指定 course 表里面主键 cid 的生成策略| SNOWFLAKE 雪花算法生成一个唯一的字符串
spring.shardingsphere.sharding.tables.course.key-generator.column=cid
spring.shardingsphere.sharding.tables.course.key-generator.type=SNOWFLAKE

# 配置分表策略    约定 cid 值偶数添加到 course_1 表,如果 cid 是奇数添加到 course_2 表
spring.shardingsphere.sharding.tables.course.table-strategy.inline.sharding-column=cid
#这部分理解起来比较复杂我这边就啰嗦下:course_$->{cid % 2 + 1}    course_也是相当于对应表空间m1.course_1
#cid 是他的主键的iD cid % 2 + 1  举例说明下: 当cid =(偶数)4/2余0 0+1=1 那么他的数据就在  course_1 中,上面指定了2个 1.course_$->{1..2}
#其余的结果就都匹配上面的 2 我理解的就是 不满足条件1 就都是条件2的东西
spring.shardingsphere.sharding.tables.course.table-strategy.inline.algorithm-expression=course_$->{cid % 2 + 1}

# 打开 sql 输出日志
spring.shardingsphere.props.sql.show=true
纠正版
<?xml version="1.0" encoding="UTF-8"?>
<project xmlns="http://maven.apache.org/POM/4.0.0" xmlns:xsi="http://www.w3.org/2001/XMLSchema-instance"
         xsi:schemaLocation="http://maven.apache.org/POM/4.0.0 https://maven.apache.org/xsd/maven-4.0.0.xsd">
    <modelVersion>4.0.0</modelVersion>
    <parent>
        <groupId>org.springframework.boot</groupId>
        <artifactId>spring-boot-starter-parent</artifactId>
        <version>2.1.4.RELEASE</version>
        <relativePath/> <!-- lookup parent from repository -->
    </parent>
    <groupId>com.atyanwc</groupId>
    <artifactId>shardingjdbcdemo</artifactId>
    <version>0.0.1-SNAPSHOT</version>
    <name>shardingjdbcdemo</name>
    <description>Demo project for Spring Boot</description>
    <properties>
        <java.version>1.8</java.version>
    </properties>
    <dependencies>

        <dependency>
            <groupId>org.springframework.boot</groupId>
            <artifactId>spring-boot-starter-web</artifactId>
        </dependency>
        <!--配置文件注入时使用后会有提示-->
        <dependency>
            <groupId>org.springframework.boot</groupId>
            <artifactId>spring-boot-configuration-processor</artifactId>
            <optional>true</optional>
        </dependency>
        <dependency>
            <groupId>org.junit.jupiter</groupId>
            <artifactId>junit-jupiter-api</artifactId>
            <scope>test</scope>
        </dependency>


            <dependency>
                <groupId>org.springframework.boot</groupId>
                <artifactId>spring-boot-starter</artifactId>
            </dependency>
            <dependency>
                <groupId>org.springframework.boot</groupId>
                <artifactId>spring-boot-starter-test</artifactId>
            </dependency>
            <dependency>
                <groupId>com.alibaba</groupId>
                <artifactId>druid-spring-boot-starter</artifactId>
                <version>1.1.14</version>
            </dependency>
            <dependency>
                <groupId>mysql</groupId>
                <artifactId>mysql-connector-java</artifactId>
            </dependency>

        <dependency>
            <groupId>org.apache.shardingsphere</groupId>
            <artifactId>sharding-jdbc-spring-boot-starter</artifactId>
            <version>4.0.0-RC1</version>
        </dependency>

            <dependency>
                <groupId>com.baomidou</groupId>
                <artifactId>mybatis-plus-boot-starter</artifactId>
                <version>3.3.1</version>
            </dependency>
            <dependency>
                <groupId>org.projectlombok</groupId>
                <artifactId>lombok</artifactId>
            </dependency>

    </dependencies>

    <build>
        <plugins>
            <plugin>
                <groupId>org.springframework.boot</groupId>
                <artifactId>spring-boot-maven-plugin</artifactId>
                <configuration>
                    <excludes>
                        <exclude>
                            <groupId>org.projectlombok</groupId>
                            <artifactId>lombok</artifactId>
                        </exclude>
                    </excludes>
                </configuration>
            </plugin>
        </plugins>
        <!--新增加入的 -->


        <resources>


            <resource>

                <!--指定根目录 到源文件夹 一般如下-->

                <directory>src/main/java</directory>

                <includes>

                    <include>**/*.yml</include>

                    <include>**/*.yaml</include>

                    <include>**/*.xml</include>

                    <include>**/*.properties</include>

                </includes>

                <filtering>false</filtering>

            </resource>

            <resource> <!--指定根目录 到源文件夹 一般如下-->

                <directory>src/main/resources</directory>

                <includes>

                    <include>**/*.yml</include>

                    <include>**/*.yaml</include>

                    <include>**/*.xml</include>

                    <include>**/*.properties</include>

                </includes>
                <filtering>false</filtering>
            </resource>
        </resources>
   <!--新增加入的 -->
    </build>


</project>
5 、编写测试代码
@RunWith(SpringRunner.class)
@SpringBootTest
public class ShardingjdbcdemoApplicationTests {

//注入mapper
@Autowired
private CourseMapper courseMapper;

//添加课程的方法
@Test
public void addCourse() {
for(int i= 1 ;i<= 10 ;i++) {
Course course = new Course();
course.setCname("java"+i);
course.setUserId(100L);
course.setCstatus("Normal"+i);
courseMapper.insert(course);
}
}
( 1 )上面测试代码执行,报错了
这边我犯错了:研究了很久是jar冲突导致的这个问题大家可得注意了; 报错是这样的:
***************************
APPLICATION FAILED TO START
***************************

Description:

Failed to configure a DataSource: 'url' attribute is not specified and no embedded datasource could be configured.

Reason: Failed to determine a suitable driver class


Action:

Consider the following:
 If you want an embedded database (H2, HSQL or Derby), please put it on the classpath.
 If you have database settings to be loaded from a particular profile you may need to activate it (no profiles are currently active).
扫描不到我尝试了网上全部的方式: 解决思路
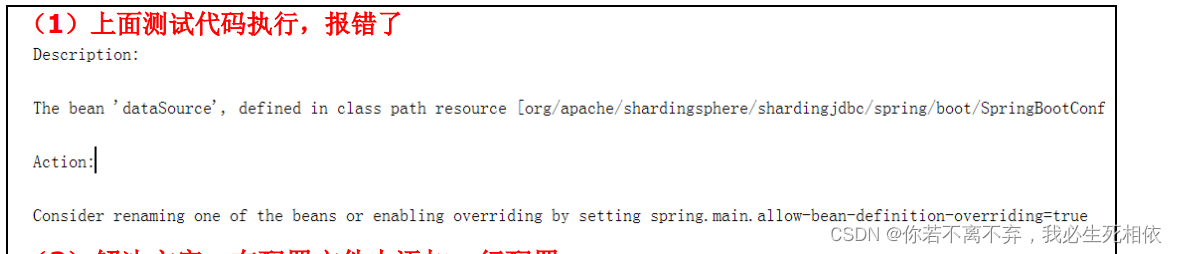
( 2 )解决方案,在配置文件中添加一行配置
# 一个实体类对应两张表,覆盖
```sql
spring.main.allow-bean-definition-overriding=true
新增数据
package com.atyanwc;

import com.atyanwc.entity.Course;
import com.atyanwc.mapper.CourseMapper;
import org.junit.jupiter.api.Test;
import org.springframework.beans.factory.annotation.Autowired;
import org.springframework.boot.test.context.SpringBootTest;
import org.springframework.test.context.junit4.SpringRunner;

@RunWith(SpringRunner.class)
@SpringBootTest
class ShardingjdbcdemoApplicationTests {


    @Autowired
    private CourseMapper courseMapper;

    @Test
    public void addCourse() {

        for (int i = 0; i < 10; i++) {
            Course course = new Course();
            course.setCname("yanwec"+i);
            course.setStatus("NBA"+i);
            course.setUser_id(11l);
            courseMapper.insert(course);
        }

    }

}
特别说明: 对于主键生成策略,本文配置只是针对user表,但实际car表在插入数据的时候,也被使用了雪花算法,虽然car使用了主键自增策略。
配置文件的内容
#这部分理解起来比较复杂我这边就啰嗦下: course_$->{cid % 2 + 1}    course_也是相当于对应表空间m1.course_1
#cid 是他的主键的iD cid % 2 + 1  举例说明下: 当cid =(偶数)4/2余0 0+1=1 那么他的数据就在  course_1 中 上面指定了2个 1.course_$->{1..2}
#其余的结果就都匹配上面的 2 我理解的就是 不满足条件1 就都是条件2的东西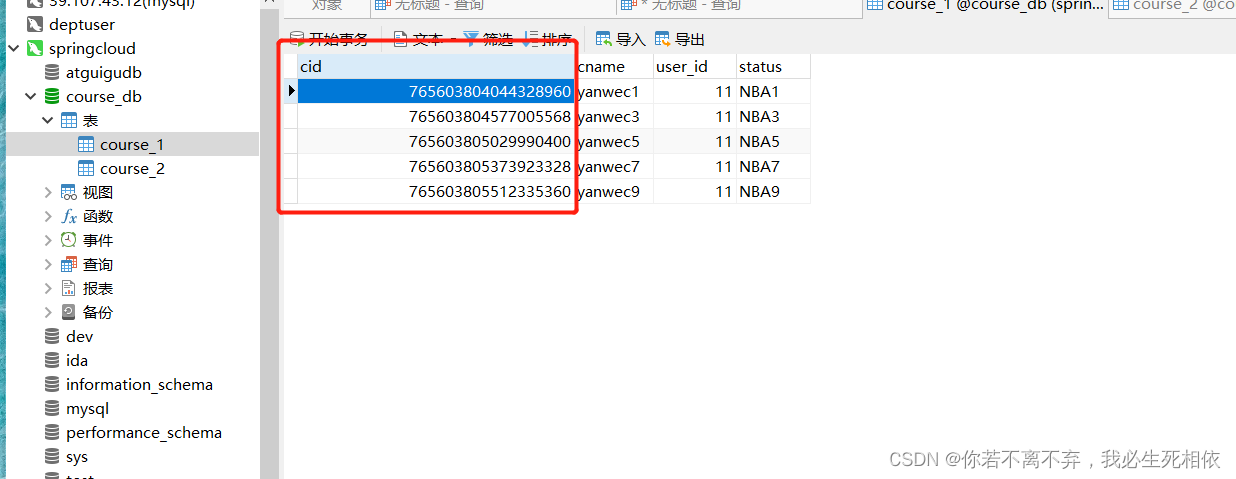
  @Test
    public void selectCid() {

      QueryWrapper<Course> wrapper = new QueryWrapper<>();
      wrapper.eq("cid",765603805302620161L);
      Course byId = courseMapper.selectOne(wrapper);
        System.out.println("id"+byId);

    }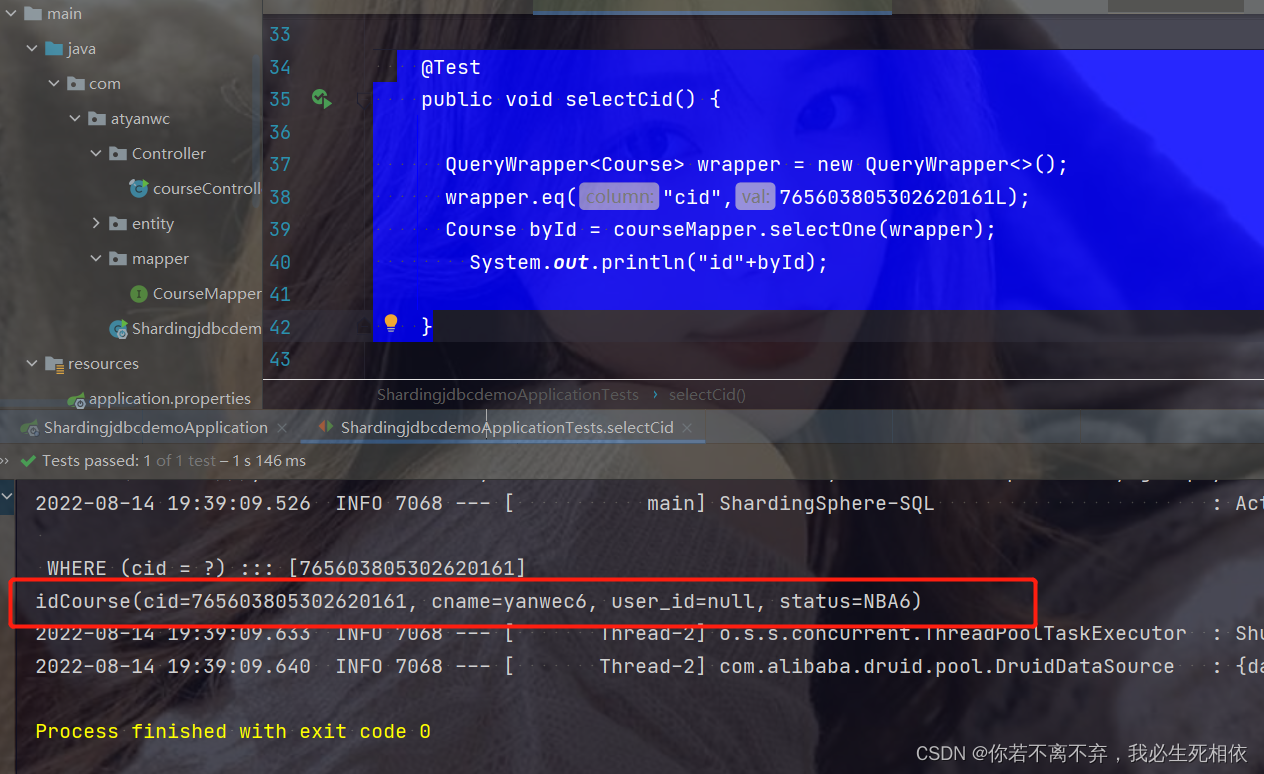
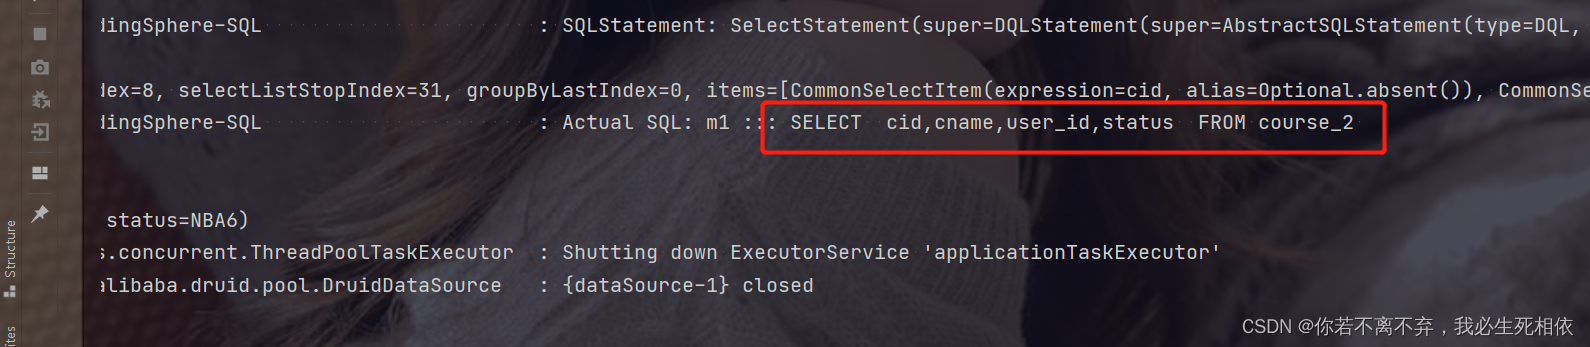
根据配置文件去查的表
3.Sharding-JDBC 实现水平分库
1 、需求分析
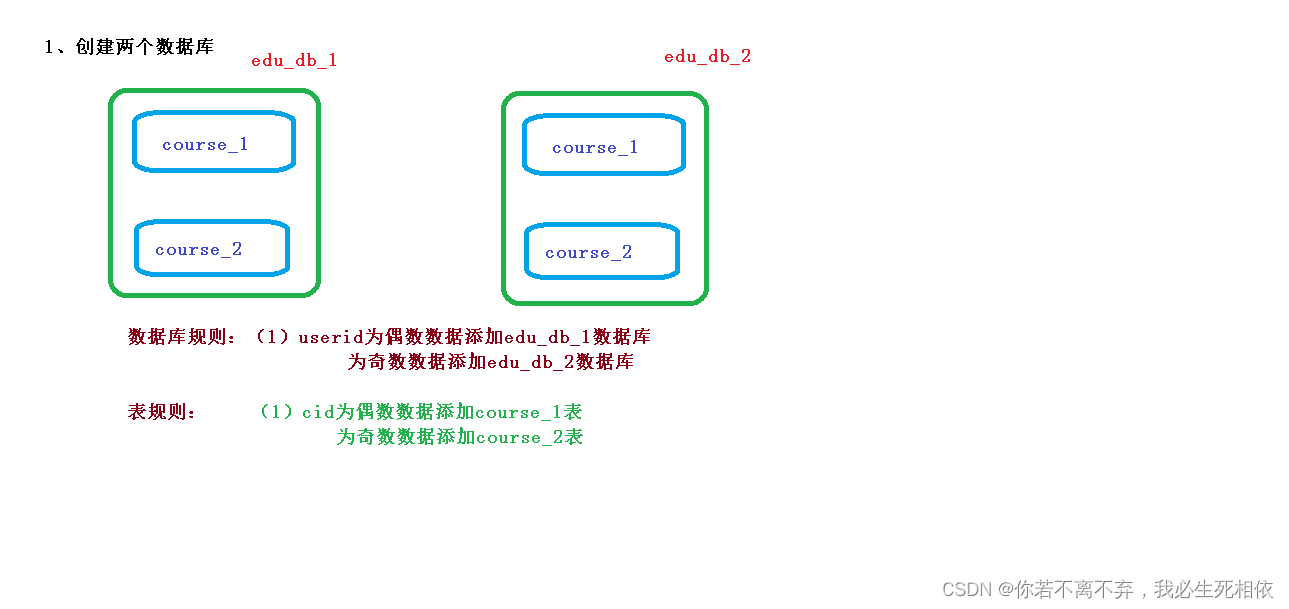
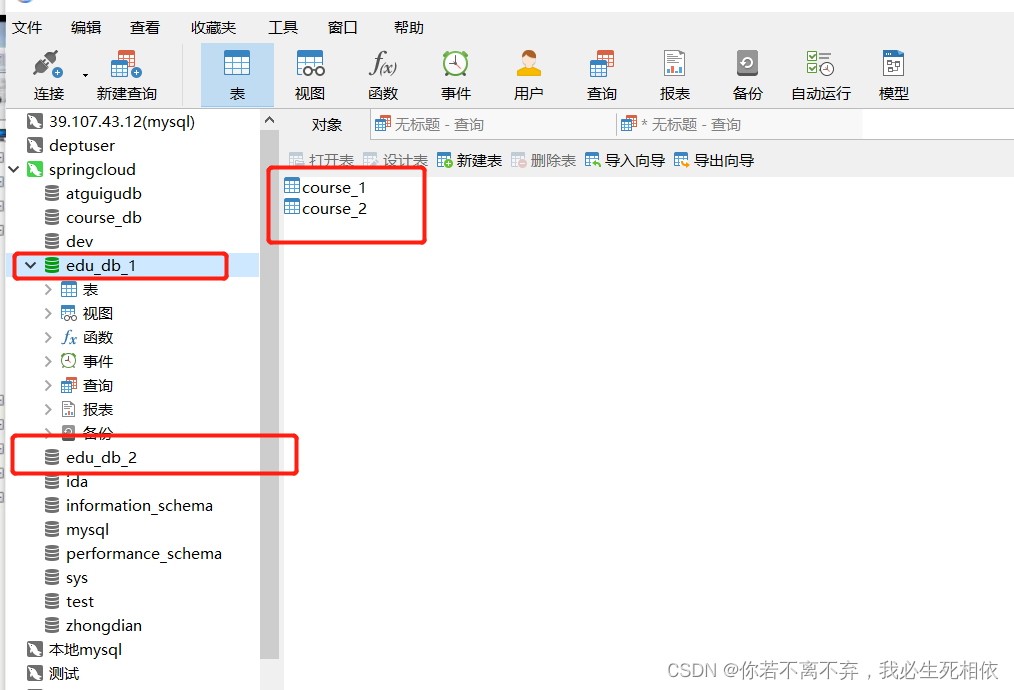
2 、创建数据库和表
create database edu_db_1;
create database edu_db_2;

use edu_db_1;

create table course_1 (
   `cid` bigint(20) primary key,
   `cname` varchar(50) not null,
   `user_id` bigint(20) not null,
   `status` varchar(10) not null
);

create table course_2 (
   `cid` bigint(20) primary key,
   `cname` varchar(50) not null,
   `user_id` bigint(20) not null,
   `status` varchar(10) not null
);

use edu_db_2;

create table course_1 (
   `cid` bigint(20) primary key,
   `cname` varchar(50) not null,
   `user_id` bigint(20) not null,
   `status` varchar(10) not null
);

create table course_2 (
   `cid` bigint(20) primary key,
   `cname` varchar(50) not null,
   `user_id` bigint(20) not null,
   `status` varchar(10) not null
);
3 、在 SpringBoot 配置文件配置数据库分片规则
shardingjdbc分片策略
# sharding-jdbc 水平分库分表策略
# 配置数据源,给数据源起别名
# 水平分库需要配置多个数据库
spring.shardingsphere.datasource.names=m1,m2

# 一个实体类对应两张表,覆盖
spring.main.allow-bean-definition-overriding=true

# 配置第一个数据源的具体内容,包含连接池,驱动,地址,用户名,密码
spring.shardingsphere.datasource.m1.type=com.alibaba.druid.pool.DruidDataSource
spring.shardingsphere.datasource.m1.driver-class-name=com.mysql.cj.jdbc.Driver
spring.shardingsphere.datasource.m1.url=jdbc:mysql://localhost:3306/edu_db_1?serverTimezone=GMT%2B8
spring.shardingsphere.datasource.m1.username=root
spring.shardingsphere.datasource.m1.password=root

# 配置第二个数据源的具体内容,包含连接池,驱动,地址,用户名,密码
spring.shardingsphere.datasource.m2.type=com.alibaba.druid.pool.DruidDataSource
spring.shardingsphere.datasource.m2.driver-class-name=com.mysql.cj.jdbc.Driver
spring.shardingsphere.datasource.m2.url=jdbc:mysql://localhost:3306/edu_db_2?serverTimezone=GMT%2B8
spring.shardingsphere.datasource.m2.username=root
spring.shardingsphere.datasource.m2.password=root

# 指定数据库分布的情况和数据表分布的情况
# m1 m2 (库)  course_1 course_2 (表)
spring.shardingsphere.sharding.tables.course.actual-data-nodes=m$->{1..2}.course_$->{1..2}

# 指定 course 表里面主键 cid 的生成策略 SNOWFLAKE
spring.shardingsphere.sharding.tables.course.key-generator.column=cid
spring.shardingsphere.sharding.tables.course.key-generator.type=SNOWFLAKE

# 指定分库策略    约定 user_id 值偶数添加到 m1 库,如果 user_id 是奇数添加到 m2 库
# 默认写法(所有的表的user_id)
#spring.shardingsphere.sharding.default-database-strategy.inline.sharding-column=user_id
#spring.shardingsphere.sharding.default-database-strategy.inline.algorithm-expression=m$->{user_id % 2 + 1}
# 指定只有course表的user_id
spring.shardingsphere.sharding.tables.course.database-strategy.inline.sharding-column=user_id
spring.shardingsphere.sharding.tables.course.database-strategy.inline.algorithm-expression=m$->{user_id % 2 + 1}

# 指定分表策略    约定 cid 值偶数添加到 course_1 表,如果 cid 是奇数添加到 course_2 表
spring.shardingsphere.sharding.tables.course.table-strategy.inline.sharding-column=cid
spring.shardingsphere.sharding.tables.course.table-strategy.inline.algorithm-expression=course_$->{cid % 2 + 1}

# 打开 sql 输出日志
spring.shardingsphere.props.sql.show=true
4 、编写测试方法
//======================测试水平分库=====================
//添加操作
@Test
public void addCourseDb() {
Course course = new Course();
course.setCname("javademo1");
//分库根据user_id
course.setUserId(111L);
course.setCstatus("Normal1");
courseMapper.insert(course);
}
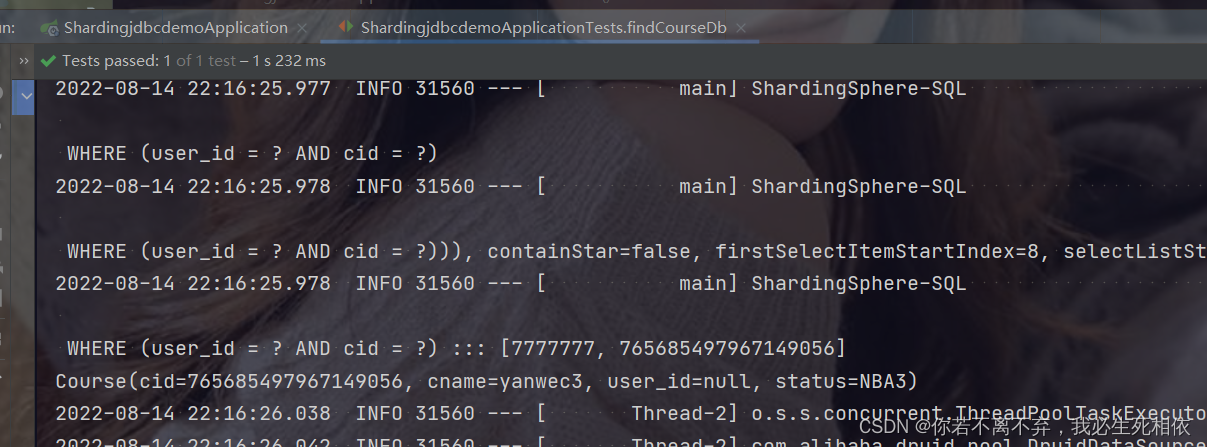
//查询操作
@Test
public void findCourseDb() {
QueryWrapper wrapper = new QueryWrapper<>();
//设置userid值
wrapper.eq("user_id",100L);
//设置cid值
wrapper.eq("cid",465162909769531393L);
Course course = courseMapper.selectOne(wrapper);
System.out.println(course);
}
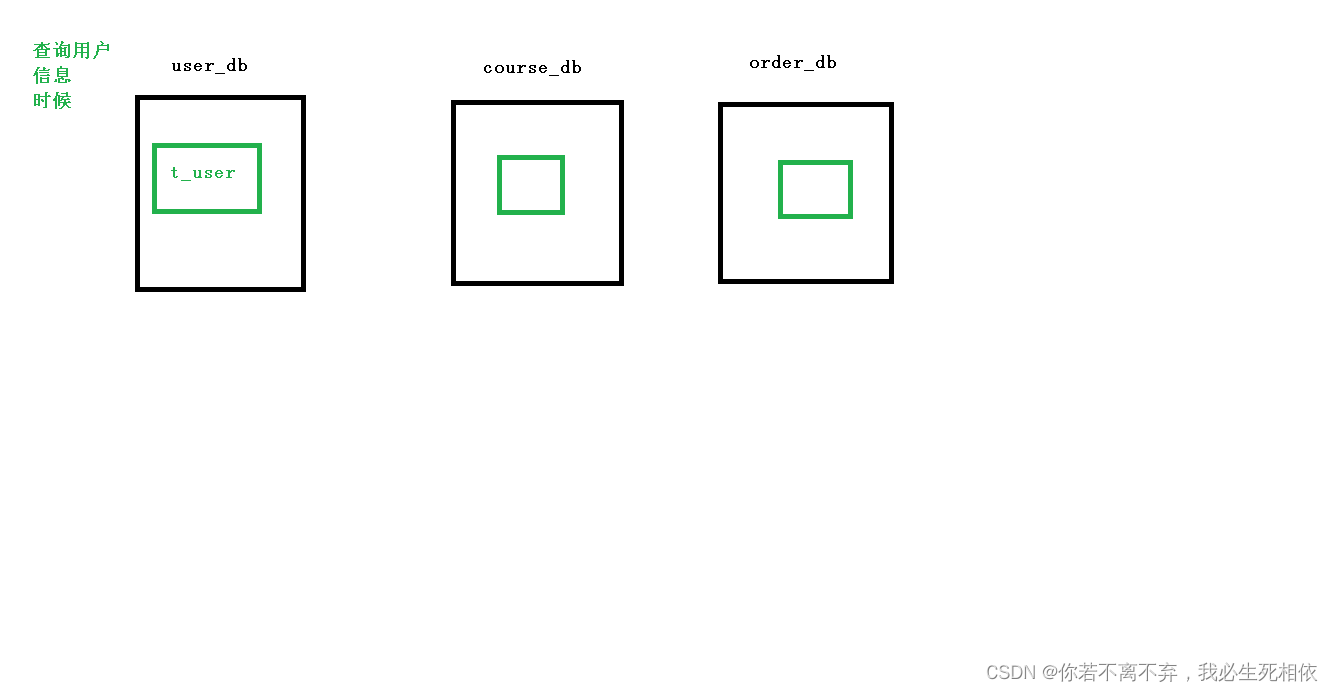
Sharding-JDBC 实现垂直分库
1 、需求分析
2 、创建数据库和表
create database user_db;

use user_db;

create table t_user(
   `user_id` bigint(20) primary key,
   `username` varchar(100) not null,
   `ustatus` varchar(100) not null
);
3 、编写操作代码
( 1 )创建user实体类和mapper
@Data
@TableName(value = "t_user") //指定数据库 表
public class User {

    private Long userId;
    private String username;
    private String ustatus;
}@Repository
public interface UserMapper extends BaseMapper<User> {
}( 2 )配置垂直分库策略
# sharding-jdbc 水平分库分表策略
# 配置数据源,给数据源起别名
# 水平分库需要配置多个数据库
# m0为用户数据库
spring.shardingsphere.datasource.names=m1,m2,m0

# 一个实体类对应两张表,覆盖
spring.main.allow-bean-definition-overriding=true

# 配置第一个数据源的具体内容,包含连接池,驱动,地址,用户名,密码
spring.shardingsphere.datasource.m1.type=com.alibaba.druid.pool.DruidDataSource
spring.shardingsphere.datasource.m1.driver-class-name=com.mysql.cj.jdbc.Driver
spring.shardingsphere.datasource.m1.url=jdbc:mysql://localhost:3306/edu_db_1?serverTimezone=GMT%2B8
spring.shardingsphere.datasource.m1.username=root
spring.shardingsphere.datasource.m1.password=root

# 配置第二个数据源的具体内容,包含连接池,驱动,地址,用户名,密码
spring.shardingsphere.datasource.m2.type=com.alibaba.druid.pool.DruidDataSource
spring.shardingsphere.datasource.m2.driver-class-name=com.mysql.cj.jdbc.Driver
spring.shardingsphere.datasource.m2.url=jdbc:mysql://localhost:3306/edu_db_2?serverTimezone=GMT%2B8
spring.shardingsphere.datasource.m2.username=root
spring.shardingsphere.datasource.m2.password=root

# 配置user数据源的具体内容,包含连接池,驱动,地址,用户名,密码
spring.shardingsphere.datasource.m0.type=com.alibaba.druid.pool.DruidDataSource
spring.shardingsphere.datasource.m0.driver-class-name=com.mysql.cj.jdbc.Driver
spring.shardingsphere.datasource.m0.url=jdbc:mysql://localhost:3306/user_db?serverTimezone=GMT%2B8
spring.shardingsphere.datasource.m0.username=root
spring.shardingsphere.datasource.m0.password=root

# 配置user_db数据库里面t_user  专库专表
spring.shardingsphere.sharding.tables.t_user.actual-data-nodes=m$->{0}.t_user
# 配置主键的生成策略
spring.shardingsphere.sharding.tables.t_user.key-generator.column=user_id
spring.shardingsphere.sharding.tables.t_user.key-generator.type=SNOWFLAKE
# 指定分表策略
spring.shardingsphere.sharding.tables.t_user.table-strategy.inline.sharding-column=user_id
spring.shardingsphere.sharding.tables.t_user.table-strategy.inline.algorithm-expression=t_user

# 指定course表分布的情况,配置表在哪个数据库里,表的名称都是什么  course 表规则(暂时这么理解)  m1.course_$->{1..2}=m1.course_1,m1.course_2
spring.shardingsphere.sharding.tables.course.actual-data-nodes=m1.course_$->{1..2}

# 指定 course 表里面主键 cid 的生成策略| SNOWFLAKE 雪花算法生成一个唯一的字符串
spring.shardingsphere.sharding.tables.course.key-generator.column=cid
spring.shardingsphere.sharding.tables.course.key-generator.type=SNOWFLAKE

# 配置分表策略    约定 cid 值偶数添加到 course_1 表,如果 cid 是奇数添加到 course_2 表
spring.shardingsphere.sharding.tables.course.table-strategy.inline.sharding-column=cid
#这部分理解起来比较复杂我这边就啰嗦下: course_$->{cid % 2 + 1}    course_也是相当于对应表空间m1.course_1
#cid 是他的主键的iD cid % 2 + 1  举例说明下: 当cid =(偶数)4/2余0 0+1=1 那么他的数据就在  course_1 中 上面指定了2个 1.course_$->{1..2}
#其余的结果就都匹配上面的 2 我理解的就是 不满足条件1 就都是条件2的东西
spring.shardingsphere.sharding.tables.course.table-strategy.inline.algorithm-expression=course_$->{cid % 2 + 1}
# 打开 sql 输出日志
spring.shardingsphere.props.sql.show=true
( 3 )编写测试代码
//注入user的mapper
 @Autowired
    private UserMapper userMapper;


//======================测试垂直分库==================
//todo ==================================垂直分库==========================================

    @Test
    public void addDict() {
        User dict = new User();
        dict.setUsername("Normal");
        dict.setUstatus("启用11");
        userMapper.insert(dict);
    }


    @Test
    public void deleteDict() {
        QueryWrapper<User> wrapper = new QueryWrapper<>();
        wrapper.eq("user_id", 765723049042378753L);
      //  userMapper.delete(wrapper);
        final User user = userMapper.selectOne(wrapper);
        System.out.println(user);
    }
}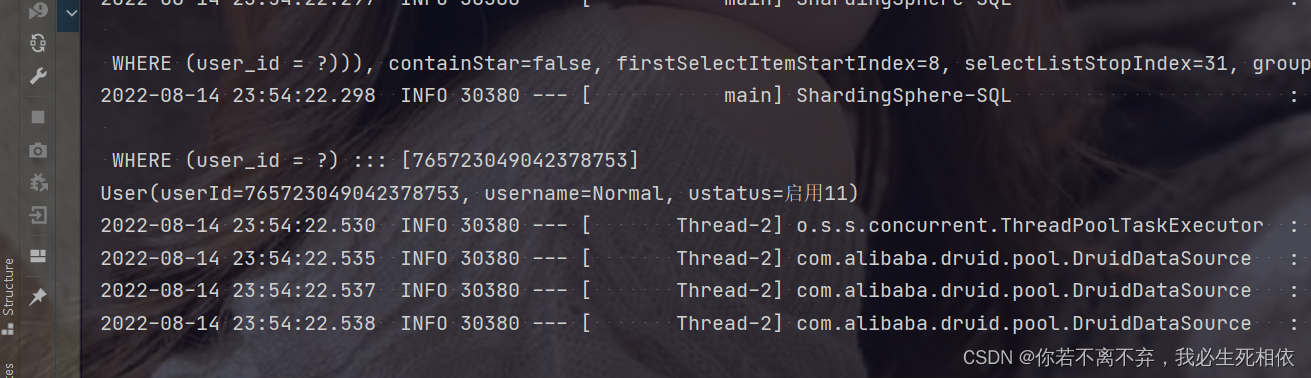
在这里插入图片描述
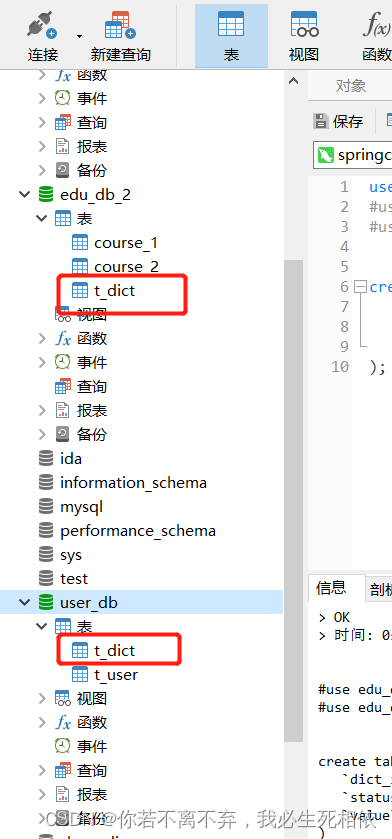
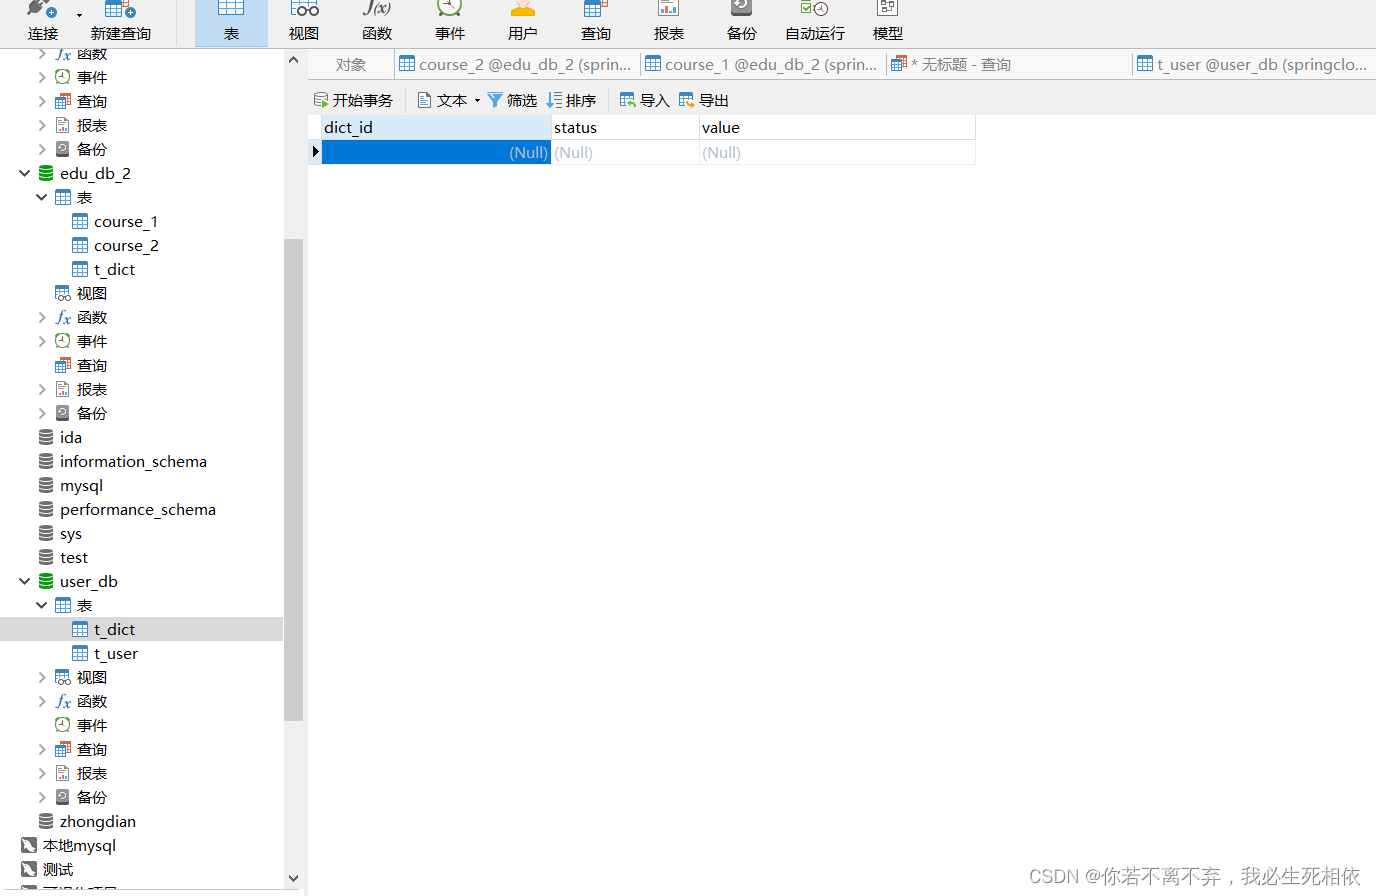
Sharding-JDBC 操作公共表
1 、公共表
( 1 )存储固定数据的表,表数据很少发生变化,查询时候经常进行关联 ( 2 )在每个数据库中创建出相同结构公共表
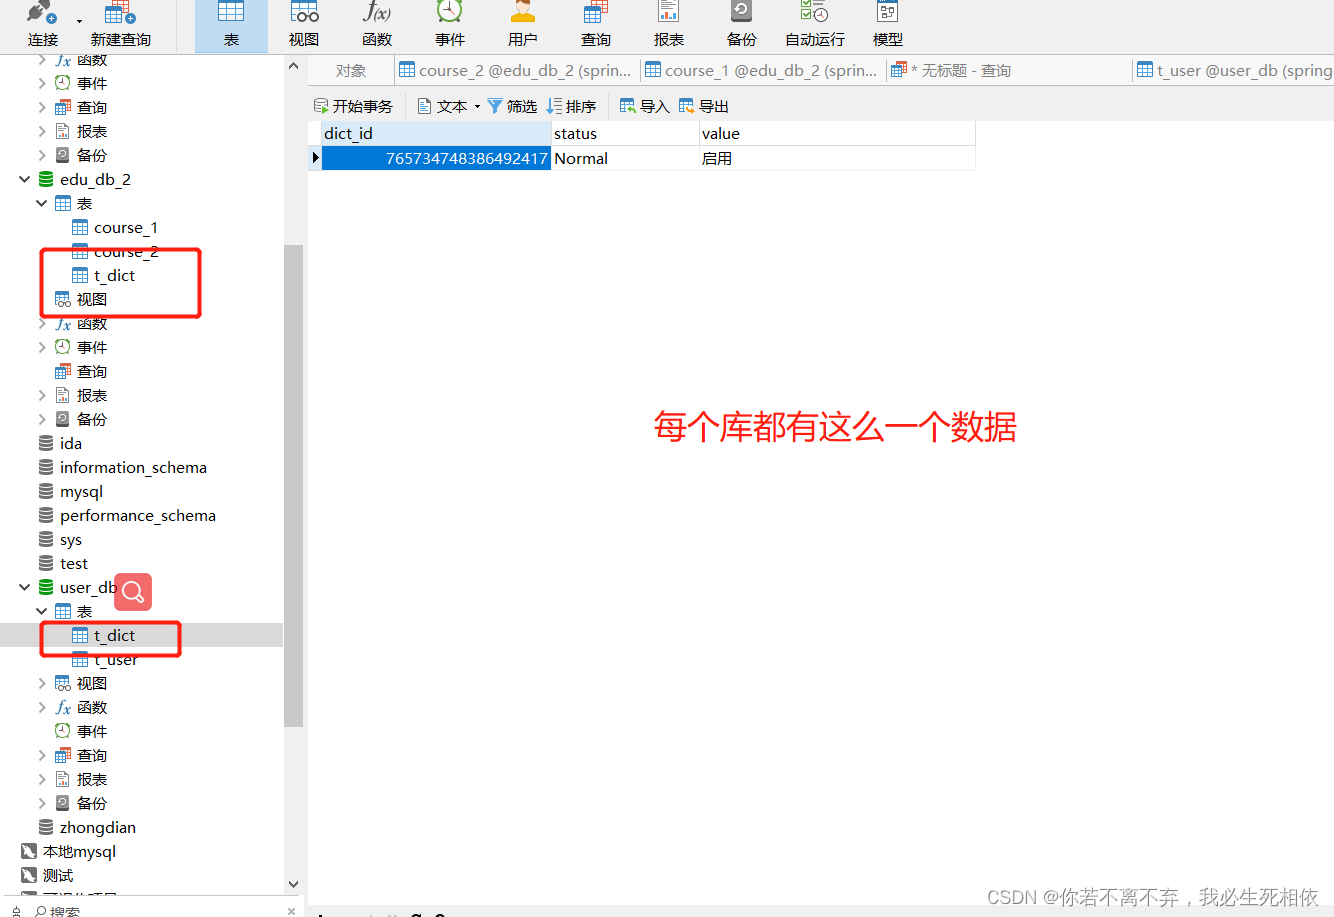
2 、在多个数据库都创建相同结构公共表
3个表分别添加
use user_db;
#use edu_db_1;
#use edu_db_2;


create table t_dict(
   `dict_id` bigint(20) primary key,
   `status` varchar(100) not null,
   `value` varchar(100) not null
);
3 、在项目配置文件application.properties进行公共表配置
配置公共表
spring.shardingsphere.sharding.broadcast-tables=t_udict
spring.shardingsphere.sharding.tables.t_udict.key-generator.column=dictid
spring.shardingsphere.sharding.tables.t_udict.key-generator.type=SNOWFLAKE
整体:
# sharding-jdbc 水平分库分表策略
# 配置数据源,给数据源起别名
# 水平分库需要配置多个数据库
# m0为用户数据库
spring.shardingsphere.datasource.names=m1,m2,m0

# 一个实体类对应两张表,覆盖
spring.main.allow-bean-definition-overriding=true

# 配置第一个数据源的具体内容,包含连接池,驱动,地址,用户名,密码
spring.shardingsphere.datasource.m1.type=com.alibaba.druid.pool.DruidDataSource
spring.shardingsphere.datasource.m1.driver-class-name=com.mysql.cj.jdbc.Driver
spring.shardingsphere.datasource.m1.url=jdbc:mysql://localhost:3306/edu_db_1?serverTimezone=GMT%2B8
spring.shardingsphere.datasource.m1.username=root
spring.shardingsphere.datasource.m1.password=root

# 配置第二个数据源的具体内容,包含连接池,驱动,地址,用户名,密码
spring.shardingsphere.datasource.m2.type=com.alibaba.druid.pool.DruidDataSource
spring.shardingsphere.datasource.m2.driver-class-name=com.mysql.cj.jdbc.Driver
spring.shardingsphere.datasource.m2.url=jdbc:mysql://localhost:3306/edu_db_2?serverTimezone=GMT%2B8
spring.shardingsphere.datasource.m2.username=root
spring.shardingsphere.datasource.m2.password=root

# 配置user数据源的具体内容,包含连接池,驱动,地址,用户名,密码
spring.shardingsphere.datasource.m0.type=com.alibaba.druid.pool.DruidDataSource
spring.shardingsphere.datasource.m0.driver-class-name=com.mysql.cj.jdbc.Driver
spring.shardingsphere.datasource.m0.url=jdbc:mysql://localhost:3306/user_db?serverTimezone=GMT%2B8
spring.shardingsphere.datasource.m0.username=root
spring.shardingsphere.datasource.m0.password=root


# 配置user_db数据库里面t_user  专库专表
spring.shardingsphere.sharding.tables.t_user.actual-data-nodes=m0.t_user
# 配置主键的生成策略
spring.shardingsphere.sharding.tables.t_user.key-generator.column=user_id
spring.shardingsphere.sharding.tables.t_user.key-generator.type=SNOWFLAKE
# 指定分表策略
spring.shardingsphere.sharding.tables.t_user.table-strategy.inline.sharding-column=user_id
spring.shardingsphere.sharding.tables.t_user.table-strategy.inline.algorithm-expression=t_user

# 指定数据库分布的情况和数据表分布的情况
# m1 m2   course_1 course_2
spring.shardingsphere.sharding.tables.course.actual-data-nodes=m$->{1..2}.course_$->{1..2}

# 指定 course 表里面主键 cid 的生成策略 SNOWFLAKE
spring.shardingsphere.sharding.tables.course.key-generator.column=cid
spring.shardingsphere.sharding.tables.course.key-generator.type=SNOWFLAKE

# 指定分库策略    约定 user_id 值偶数添加到 m1 库,如果 user_id 是奇数添加到 m2 库
# 默认写法(所有的表的user_id)
#spring.shardingsphere.sharding.default-database-strategy.inline.sharding-column=user_id
#spring.shardingsphere.sharding.default-database-strategy.inline.algorithm-expression=m$->{user_id % 2 + 1}
# 指定只有course表的user_id
spring.shardingsphere.sharding.tables.course.database-strategy.inline.sharding-column=user_id
spring.shardingsphere.sharding.tables.course.database-strategy.inline.algorithm-expression=m$->{user_id % 2 + 1}

# 指定分表策略    约定 cid 值偶数添加到 course_1 表,如果 cid 是奇数添加到 course_2 表
spring.shardingsphere.sharding.tables.course.table-strategy.inline.sharding-column=cid
spring.shardingsphere.sharding.tables.course.table-strategy.inline.algorithm-expression=course_$->{cid % 2 + 1}

# 公共表配置
spring.shardingsphere.sharding.broadcast-tables=t_dict
# 配置主键的生成策略
spring.shardingsphere.sharding.tables.t_dict.key-generator.column=dict_id
spring.shardingsphere.sharding.tables.t_dict.key-generator.type=SNOWFLAKE

# 打开 sql 输出日志
spring.shardingsphere.props.sql.show=true
4 、编写测试代码 ( 1 )创建新实体类和mapper
@Data
@TableName("t_dict")
public class Dict {
    private Long dictId;
    private String status;
    private String value;
}@Repository
public interface DictMapper extends BaseMapper<Dict> {
}( 2 )编写添加和删除方法进行测试
    //todo ==================================公共表==========================================
    @Autowired
    private DictMapper dictMapper;

    @Test
    public void addDict1() {
        Dict dict = new Dict();
        dict.setStatus("Normal");
        dict.setValue("启用");
        dictMapper.insert(dict);
    }

 @Test
    public void deleteDict1() {
        QueryWrapper<Dict> wrapper = new QueryWrapper<>();
        wrapper.eq("dict_id", 765734748386492417L);
        dictMapper.delete(wrapper);
    }
全部删除了
本文参与 腾讯云自媒体同步曝光计划,分享自作者个人站点/博客。
原始发表:2022-12-27,如有侵权请联系 cloudcommunity@tencent.com 删除
评论
登录后参与评论
推荐阅读
目录
腾讯云开发者

Copyright © 2013 - 2026 Tencent Cloud. All Rights Reserved. 腾讯云 版权所有
深圳市腾讯计算机系统有限公司 ICP备案/许可证号:粤B2-20090059 ![]() 粤公网安备44030502008569号
粤公网安备44030502008569号
腾讯云计算(北京)有限责任公司 京ICP证150476号 | 京ICP备11018762号