使用libreswan搭建IPSec VPN Site to Site 站点到站点云上配置

使用libreswan搭建IPSec VPN Site to Site 站点到站点云上配置

繁华是客
修改于 2024-11-07 21:23:38
修改于 2024-11-07 21:23:38
我们知道在Linux可以通过libreswan或者strongswan来配置站点到站点的IPSec 专用网络。
在云上配置会稍微不一样,因为我们云上是弹性IP。下面我以Rocky Linux为例使用libreswan 4.12版本演示配置
(libreswan 5开始去除了ipsec auto, ipsec verify等工具。)
我们先展示大致的拓扑:
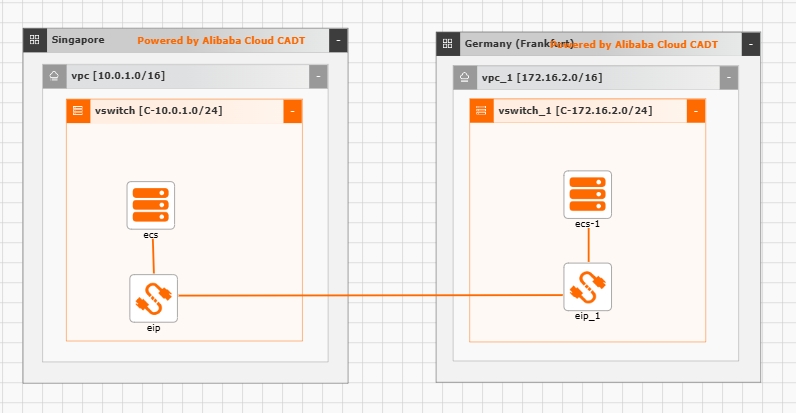
IPSEC-Site-to-Site
站点A 10.0.1.0/24;站点B 172.16.2.0/24
IPsec IP A1: 10.0.1.101
IPsec IP B1: 172.16.2.101
其他机器IP A2: 10.0.1.102
其他机器IP B2: 172.16.2.102
安装libreswan
Setup ipsec vpn server with libreswan
Setup ipsec site to site server with libreswan 2
如果使用Debian系列,除了需要wget下载获取最新版,tar -zxvf解压后还额外需要apt install其他依赖组件,然后make all, make install源码编译。可以参考解压后文件夹内的cat INSTALL的操作说明。 其中Debian系列除去安装说明中的依赖,还需要额外安装certutil,也就是apt-get install libnss3-tools才可以成功初始化NSS数据库。
如果make all有报错就看情况apt/dnf install。提示:如果是RHEL系列要确保有EPEL源。 详情请参考: libreswan 4.12 - How To Install Libreswan on Ubuntu 22.04|20.04 或参考GitHub libreswan中Readme说明。
dnf install libreswan -y初始化NSS数据库
ipsec initnss启用ipsec
systemctl enable ipsec系统及防火墙配置
系统配置 IP转发及禁用重定向
确保IP Forwarding为1
echo "net.ipv4.ip_forward = 1" >> /etc/sysctl.conf查看配置
cat /etc/sysctl.d/50-libreswan.conf结果应如下:
net.ipv6.conf.default.accept_redirects = 0
net.ipv6.conf.all.accept_redirects = 0
net.ipv4.conf.default.send_redirects = 0
net.ipv4.conf.default.accept_redirects = 0
net.ipv4.conf.all.send_redirects = 0
net.ipv4.conf.all.accept_redirects = 0
net.ipv4.conf.all.rp_filter = 0
配置立刻生效有两种方式,一种是sysctl -p,但是这个方式是只加载/etc/sysctl.conf的。
另一种方式是同时尝试加载/etc/sysctl.d/下的文件:
sysctl --system防火墙配置
在云上,确保安全组端口UDP 500和UDP 4500都在开放状态。
我们需要这些IP协议是允许的(不是端口):ESP Protocol (IP Protocol 50)和AH Protocol (IP Protocol 51)。
因为我们还需要配置IP masquerading(IP地址伪装),一种是使用iptables,也就是先禁用firewalld然后安装iptables。实际上现在的iptables也是使用nf_tables API来实现类似过时iptables的命令及效果。另一种更快速的方式就是直接使用firewalld。 首先我们先确保firewalld全部端口开放,然后再启用IP地址伪装。undefined
我们需要网段内全部机器都开启firewalld并启用IP地址伪装。
firewalld默认是使用Public Zone, 这个域默认是当你未设置开启端口时则拒绝。而trusted Zone则是全部默认开启。所以我们先切换为这个Zone。
如果使用Debian/Ubuntu系列,默认是ufw防火墙。他配置IP masquerading还是有点困难的。但是可以通过禁用ufw然后安装firewalld来实现。
systemctl enable firewalld.service --nowfirewall-cmd --get-default-zone
firewall-cmd --get-active-zonesfirewall-cmd --set-default-zone trusted# 如果选择trusted的话,本身其实完全开放的,是不需要以下两条命令的。
firewall-cmd --zone=public --permanent --add-port=1-65535/tcp
firewall-cmd --zone=public --permanent --add-port=1-65535/udpfirewall-cmd --add-masquerade --permanentfirewall-cmd --reloadfirewall-cmd --list-all结果如下:
trusted (active)
  target: ACCEPT
  icmp-block-inversion: no
  interfaces: eth0
  sources:
  services:
  ports:
  protocols:
  forward: yes
  masquerade: yes
  forward-ports:
  source-ports:
  icmp-blocks:
  rich rules:
ipsec.conf配置信息
leftid和rightid不能是内网ip, 所以配置为名字。
因为是云上,本机端配成内网ip, 然后加上leftnexthop=%defaultroute。
对端直接填写对端公网IP
ike和esp填写方式可以aes256-sha256;dh14或者aes256-sha256;modp2048
DH Group参考:
MODP

Diffie-Hellman Group 1 (768-bit)
Diffie-Hellman Group 2 (1024-bit)
Diffie-Hellman Group 5 (1536-bit)
Diffie-Hellman Group 14 (2048-bit)
Diffie-Hellman Group 15 (3072-bit)
ECP

Diffie-Hellman Group 19 (256-bit random)
Diffie-Hellman Group 20 (384-bit random)
Diffie-Hellman Group 21 (521-bit random)
ipsec.conf配置:
conn ecs
    type=tunnel

    left=10.0.1.101
    leftid=@ipsec-02
    leftnexthop=%defaultroute
    leftsubnet=10.0.1.0/24

    right=x.x.x.x
    #right 填写公网IP
    rightid=@ipsec-01
    rightsubnet=172.16.2.0/24
    #rightsubnet选择对端网段

    authby=secret
    auto=start
    dpddelay=60
    dpdtimeout=300
    dpdaction=restart
    # mobike=no
    # mobike默认是no, 这是问如果公网IP发生变化会不会自动重连。选择yes是会。
    ikev2=insist
    # 版本4(包含4.15)请继续使用ikev2=insist, libreswan版本5之后,请使用keyexchange=ikev2
    fragmentation=yes

    ike=aes256-sha256;dh14
    esp=aes256-sha256;dh14
    ikelifetime=86400s
    salifetime=86400s
对端则刚好相反。
我们还需要配置Pre-Shared Key 预共享密钥。(在工作生产环境,PSK容易被爆破,请使用证书验证。)
vim /etc/ipsec.secrets

%any %any : PSK "123456password"
%any代表全部,你也可以设置为local ip : PSK “123456password”
验证
验证ipsec配置
该方法仅限于libreswan 4, libreswan 5已删除该命令。你可以通过ipsec add <连接名> 来查看错误提示。
ipsec verify这里列表应该为全部OK状态,不能有rp_filter ENABLED状态。
Verifying installed system and configuration files

Version check and ipsec on-path                         [OK]
Libreswan 4.12
Checking for IPsec support in kernel                    [OK]
 NETKEY: Testing XFRM related proc values
         ICMP default/send_redirects                    [OK]
         ICMP default/accept_redirects                  [OK]
         XFRM larval drop                               [OK]
Pluto ipsec.conf syntax                                 [OK]
Checking rp_filter                                      [OK]
Checking that pluto is running                          [OK]
 Pluto listening for IKE on udp 500                     [OK]
 Pluto listening for IKE/NAT-T on udp 4500              [OK]
 Pluto ipsec.secret syntax                              [OK]
Checking 'ip' command                                   [OK]
Checking 'iptables' command                             [OK]
Checking 'prelink' command does not interfere with FIPS [OK]
Checking for obsolete ipsec.conf options                [OK]
如果遇到rp_filter是enabled的话,可以根据提示的文件夹,直接echo修改为0临时绕过。(重启失效)
echo 0 > /proc/sys/net/ipv4/conf/eth0/rp_filter
echo 0 > /proc/sys/net/ipv4/conf/ip_vti0/rp_filter
echo 0 > /proc/sys/net/ipv4/conf/lo/rp_filter
重启ipsec服务
ipsec restart# 验证ipsec连接
ipsec status
#不只是active变成1,同时IPsec SAs也需要出现连接才算成功,例如:
000 "ecs": 10.0.1.0/24===10.0.1.101[@ipsec-01]---10.0.1.253...57.23.248.32[@ipsec-02]===172.16.2.0/24; erouted; eroute owner: #3
000 "ecs": oriented; my_ip=unset; their_ip=unset; my_updown=ipsec _updown;
000 "ecs": xauth us:none, xauth them:none, my_username=[any]; their_username=[any]
000 "ecs": our auth:secret, their auth:secret, our autheap:none, their autheap:none;
000 "ecs": modecfg info: us:none, them:none, modecfg policy:push, dns:unset, domains:unset, cat:unset;
000 "ecs": sec_label:unset;
000 "ecs": ike_life: 86400s; ipsec_life: 86400s; ipsec_max_bytes: 2^63B; ipsec_max_packets: 2^63; replay_window: 128; rekey_margin: 540s; rekey_fuzz: 100%; keyingtries: 0;
000 "ecs": retransmit-interval: 500ms; retransmit-timeout: 60s; iketcp:no; iketcp-port:4500;
000 "ecs": initial-contact:no; cisco-unity:no; fake-strongswan:no; send-vendorid:no; send-no-esp-tfc:no;
000 "ecs": policy: IKEv2+PSK+ENCRYPT+TUNNEL+PFS+UP+IKE_FRAG_ALLOW+MOBIKE+ESN_NO+ESN_YES;
000 "ecs": v2-auth-hash-policy: none;
000 "ecs": conn_prio: 24,24; interface: eth0; metric: 0; mtu: unset; sa_prio:auto; sa_tfc:none;
000 "ecs": nflog-group: unset; mark: unset; vti-iface:unset; vti-routing:no; vti-shared:no; nic-offload:auto;
000 "ecs": our idtype: ID_FQDN; our id=@ipsec-01; their idtype: ID_FQDN; their id=@ipsec-02
000 "ecs": liveness: active; dpdaction:restart; dpddelay:60s; retransmit-timeout:60s
000 "ecs": nat-traversal: encaps:auto; keepalive:20s
000 "ecs": newest IKE SA: #2; newest IPsec SA: #3; conn serial: $1;
000 "ecs": IKE algorithms: AES_CBC_256-HMAC_SHA2_256-MODP2048
000 "ecs": IKEv2 algorithm newest: AES_CBC_256-HMAC_SHA2_256-MODP2048
000 "ecs": ESP algorithms: AES_CBC_256-HMAC_SHA2_256_128-MODP2048
000 "ecs": ESP algorithm newest: AES_CBC_256-HMAC_SHA2_256_128; pfsgroup=<Phase1>
000
000 Total IPsec connections: loaded 1, active 1
000
000 State Information: DDoS cookies not required, Accepting new IKE connections
000 IKE SAs: total(1), half-open(0), open(0), authenticated(1), anonymous(0)
000 IPsec SAs: total(1), authenticated(1), anonymous(0)
000
000 #2: "ecs":4500 STATE_V2_ESTABLISHED_IKE_SA (established IKE SA); REKEY in 86125s; REPLACE in 86395s; newest; idle;
000 #3: "ecs":4500 STATE_V2_ESTABLISHED_CHILD_SA (established Child SA); LIVENESS in 55s; REKEY in 86125s; REPLACE in 86395s; newest; eroute owner; IKE SA #2; idle;
000 #3: "ecs" esp.f43861@57.23.248.32 esp.4dfe174@10.0.1.101 tun.0@57.23.248.32 tun.0@10.0.1.101 Traffic: ESPin=0B ESPout=0B ESPmax=2^63B如果使用SSH Key去连接对端的话,除了要将私钥添加到 ~/.ssh/id_rsa 和设置好对端公钥外,还需要将权限降低为0400,否则默认他不会读取该文件。
chown 0400 ~/.ssh/id_rsa使用站点其他机器验证:(不使用云上路由表的情况下)
我们先
ip route查看一下目前IP路由的方式。
然后我们将对端的IP段添加到本机,并使用本端IPSec连接的机器作为网关。那么添加路由如下:
站点A:
sudo ip route add 172.16.2.0/24 via 10.0.1.101 dev eth0 metric 50metric 50是路由的优先级,默认是100, 越低则优先级越高,可以不填写。
通过以下命令可以得知特定IP走哪个路由,例如10.0.1.101:
ip route get 10.0.1.101
ip route get 10.0.1.102
持久化静态路由
RHEL系列:
随便新建一个文件在network-scripts,并命名为01-eth0
sudo nano /etc/sysconfig/network-scripts/01-eth0然后输入
172.16.2.0/24 via 10.0.1.101即可。
使用站点其他机器验证的时候,请断开连接后重连进行验证。无需验证IPsec A站点和B站点,直接验证IPsec A站点其他机器和IPsec B站点其他机器。
错误排查
# 状态及日志
systemctl status ipsec

# 查看日志
journalctl -xe |grep pluto
journalctl -xe |grep ipsec
#或
journalctl -xe# tcpdump
tcpdump -i any src 10.0.1.101 and host 172.16.2.102
tcpdump -i any src 10.0.1.101 and host not 47.100.x.x
tcpdump -n -i interface esp or udp port 500 or udp port 4500本文参与 腾讯云自媒体同步曝光计划,分享自作者个人站点/博客。
原始发表:2024-10-31 ,如有侵权请联系 cloudcommunity@tencent.com 删除
评论
登录后参与评论
推荐阅读
目录
腾讯云开发者

Copyright © 2013 - 2026 Tencent Cloud. All Rights Reserved. 腾讯云 版权所有
深圳市腾讯计算机系统有限公司 ICP备案/许可证号:粤B2-20090059 ![]() 粤公网安备44030502008569号
粤公网安备44030502008569号
腾讯云计算(北京)有限责任公司 京ICP证150476号 | 京ICP备11018762号