论文绘图复现 | 如何绘制带有误差线的堆叠柱状图
论文绘图复现 | 如何绘制带有误差线的堆叠柱状图
用户11172986
发布于 2024-10-15 12:51:24
发布于 2024-10-15 12:51:24
前言

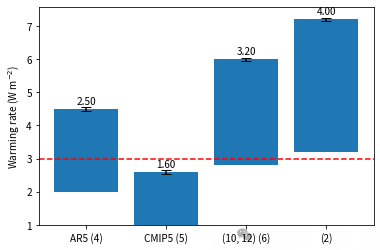
一位读者私信询问以上图片如何用python绘制
感觉有点意思,于是博主鼓捣鼓捣,做一期论文绘图复现
项目目标
绘制带有误差线的堆叠柱状图
项目方法
自定义函数绘制误差线,利用bar的bottom参数制作堆叠效果
第一版
import matplotlib.pyplot as plt

# 数据
categories = ['AR5 (4)', 'CMIP5 (5)', '(10, 12) (6)', '(2)']
warming_rates = [0.35, 0.4, 0.4, 0.45]
error_bars = [0.05, 0.05, 0.05, 0.05]
# 不同柱子的底部空白
bottom_values = [0.05, 0.1, 0.15, 0.2]

# 创建图形和轴对象
fig, ax = plt.subplots()

# 绘制柱状图,设置不同的底部空白
bars = ax.bar(categories, warming_rates, yerr=error_bars, bottom=bottom_values, capsize=5)

# 设置y轴标签
ax.set_ylabel('Warming rate (W m$^{-2}$)')

# 添加数据标签
for bar, bottom in zip(bars, bottom_values):
    height = bar.get_height()
    ax.annotate(f'{height:.2f}',
                xy=(bar.get_x() + bar.get_width() / 2, height + bottom),
                xytext=(0, 3),  # 3 points vertical offset
                textcoords="offset points",
                ha='center', va='bottom')

# 设置y轴的范围,确保底部空白可见
ax.set_ylim(bottom=0)


# 显示图形
plt.show()
第二版
import matplotlib.pyplot as plt

# 数据
categories = ['AR5 (4)', 'CMIP5 (5)', '(10, 12) (6)', '(2)']
warming_rates = [2.5, 1.6,3.2, 4.0]
error_bars = [0.05, 0.05, 0.05, 0.05]
# 不同柱子的底部空白
bottom_values = [2, 1, 2.8, 3.2]

# 创建图形和轴对象
fig, ax = plt.subplots()

# 绘制柱状图,设置不同的底部空白
bars = ax.bar(categories, warming_rates, yerr=error_bars, bottom=bottom_values, capsize=5)

# 在纵轴3的位置添加一条横虚线
ax.axhline(y=3, color='r', linestyle='--')

# 设置y轴标签
ax.set_ylabel('Warming rate (W m$^{-2}$)')

# 添加数据标签
for bar, bottom in zip(bars, bottom_values):
    height = bar.get_height()
    ax.annotate(f'{height:.2f}',
                xy=(bar.get_x() + bar.get_width() / 2, height + bottom),
                xytext=(0, 3),  # 3 points vertical offset
                textcoords="offset points",
                ha='center', va='bottom')


# 显示图形
plt.show()
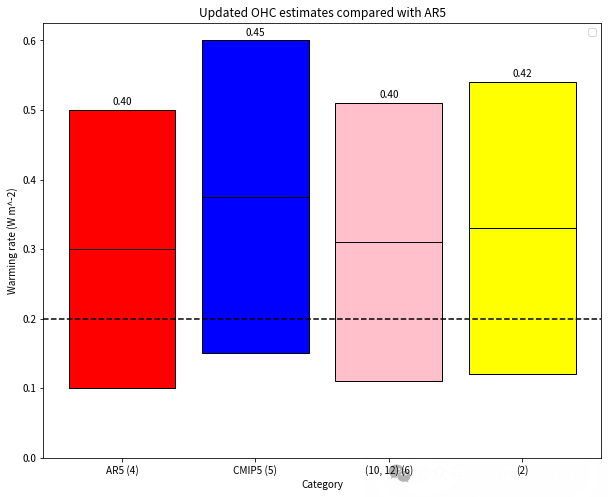
最终版
import matplotlib.pyplot as plt
import numpy as np

# 数据
categories = ['AR5 (4)', 'CMIP5 (5)', '(10, 12) (6)', '(2)']
warming_rates = [0.40, 0.45, 0.40, 0.42]
colors = ['red', 'blue', 'pink', 'yellow'] # 指定每个柱子的颜色

# 不同柱子的底部空白
bottom_values = [0.1, 0.15, 0.11, 0.12]

# 创建图形和轴对象
fig, ax = plt.subplots(figsize=(10, 8))

# 绘制柱状图,设置不同的底部空白和颜色
bars = []
for i, category in enumerate(categories):
    bar = ax.bar(i, warming_rates[i], bottom=bottom_values[i], color=colors[i], edgecolor='black', capsize=5)
    bars.append(bar)

# 在纵轴3的位置添加一条横虚线
ax.axhline(y=0.2, color='k', linestyle='--')

# 计算每个柱子的中间位置并绘制横线
for bar, bottom in zip(bars, bottom_values):
    middle_y = bar[0].get_height() / 2 + bottom
    x_start = bar[0].get_x()
    x_end = bar[0].get_x() + bar[0].get_width()
    ax.plot([x_start, x_end], [middle_y, middle_y], color='black', linewidth=1, linestyle='-')

# 设置y轴标签
ax.set_ylabel('Warming rate (W m$^{-2}$)')
# 设置y轴的范围,确保底部空白可见
ax.set_ylim(bottom=0)
# 添加数据标签
for bar, bottom in zip(bars, bottom_values):
    height = bar[0].get_height()
    ax.annotate(f'{height:.2f}',
                xy=(bar[0].get_x() + bar[0].get_width() / 2, height + bottom),
                xytext=(0, 3),  # 3 points vertical offset
                textcoords="offset points",
                ha='center', va='bottom')

# 设置x轴的刻度和标签
ax.set_xticks(np.arange(len(categories)))  # 设置刻度的位置
ax.set_xticklabels(categories)  # 设置刻度的标签

# 设置图表标题和标签
ax.set_title('Updated OHC estimates compared with AR5')
ax.set_xlabel('Category')
ax.set_ylabel('Warming rate (W m^-2)')
ax.legend()

# 显示图形
plt.show()No artists with labels found to put in legend. Note that artists whose label start with an underscore are ignored when legend() is called with no argument.
此时此刻恰如彼时彼刻

你学会了吗
本文参与 腾讯云自媒体同步曝光计划,分享自微信公众号。
原始发表:2024-10-15,如有侵权请联系 cloudcommunity@tencent.com 删除
评论
登录后参与评论
推荐阅读
目录

