ucore-lab1


RT
官方文档:gitbook
的github地址:github
准备工作:下载ucorelab在的master分支(注意不是main分支),需要用到的资料以及答案都在里面。
实验环境:
及更高版本
准备工作:
安装gcc:
sudo apt-get install build-essential
安装qemu:
sudo apt-get install qemu-system
涉及到的知识点:
- ,建议参考Heeler-Deer,以及博客
- gcc,gdb等的基本使用
- shell的基本使用,诸如diff,ld,readelf等命令
详细请参考ucorelab的官方文档
强烈建议在学堂在线看thu的ucore课程
知识点
先定一个小目标,学一学doxygen以及binutils的相关工具
meld
先sudo apt-get install meld,然后就可以用了
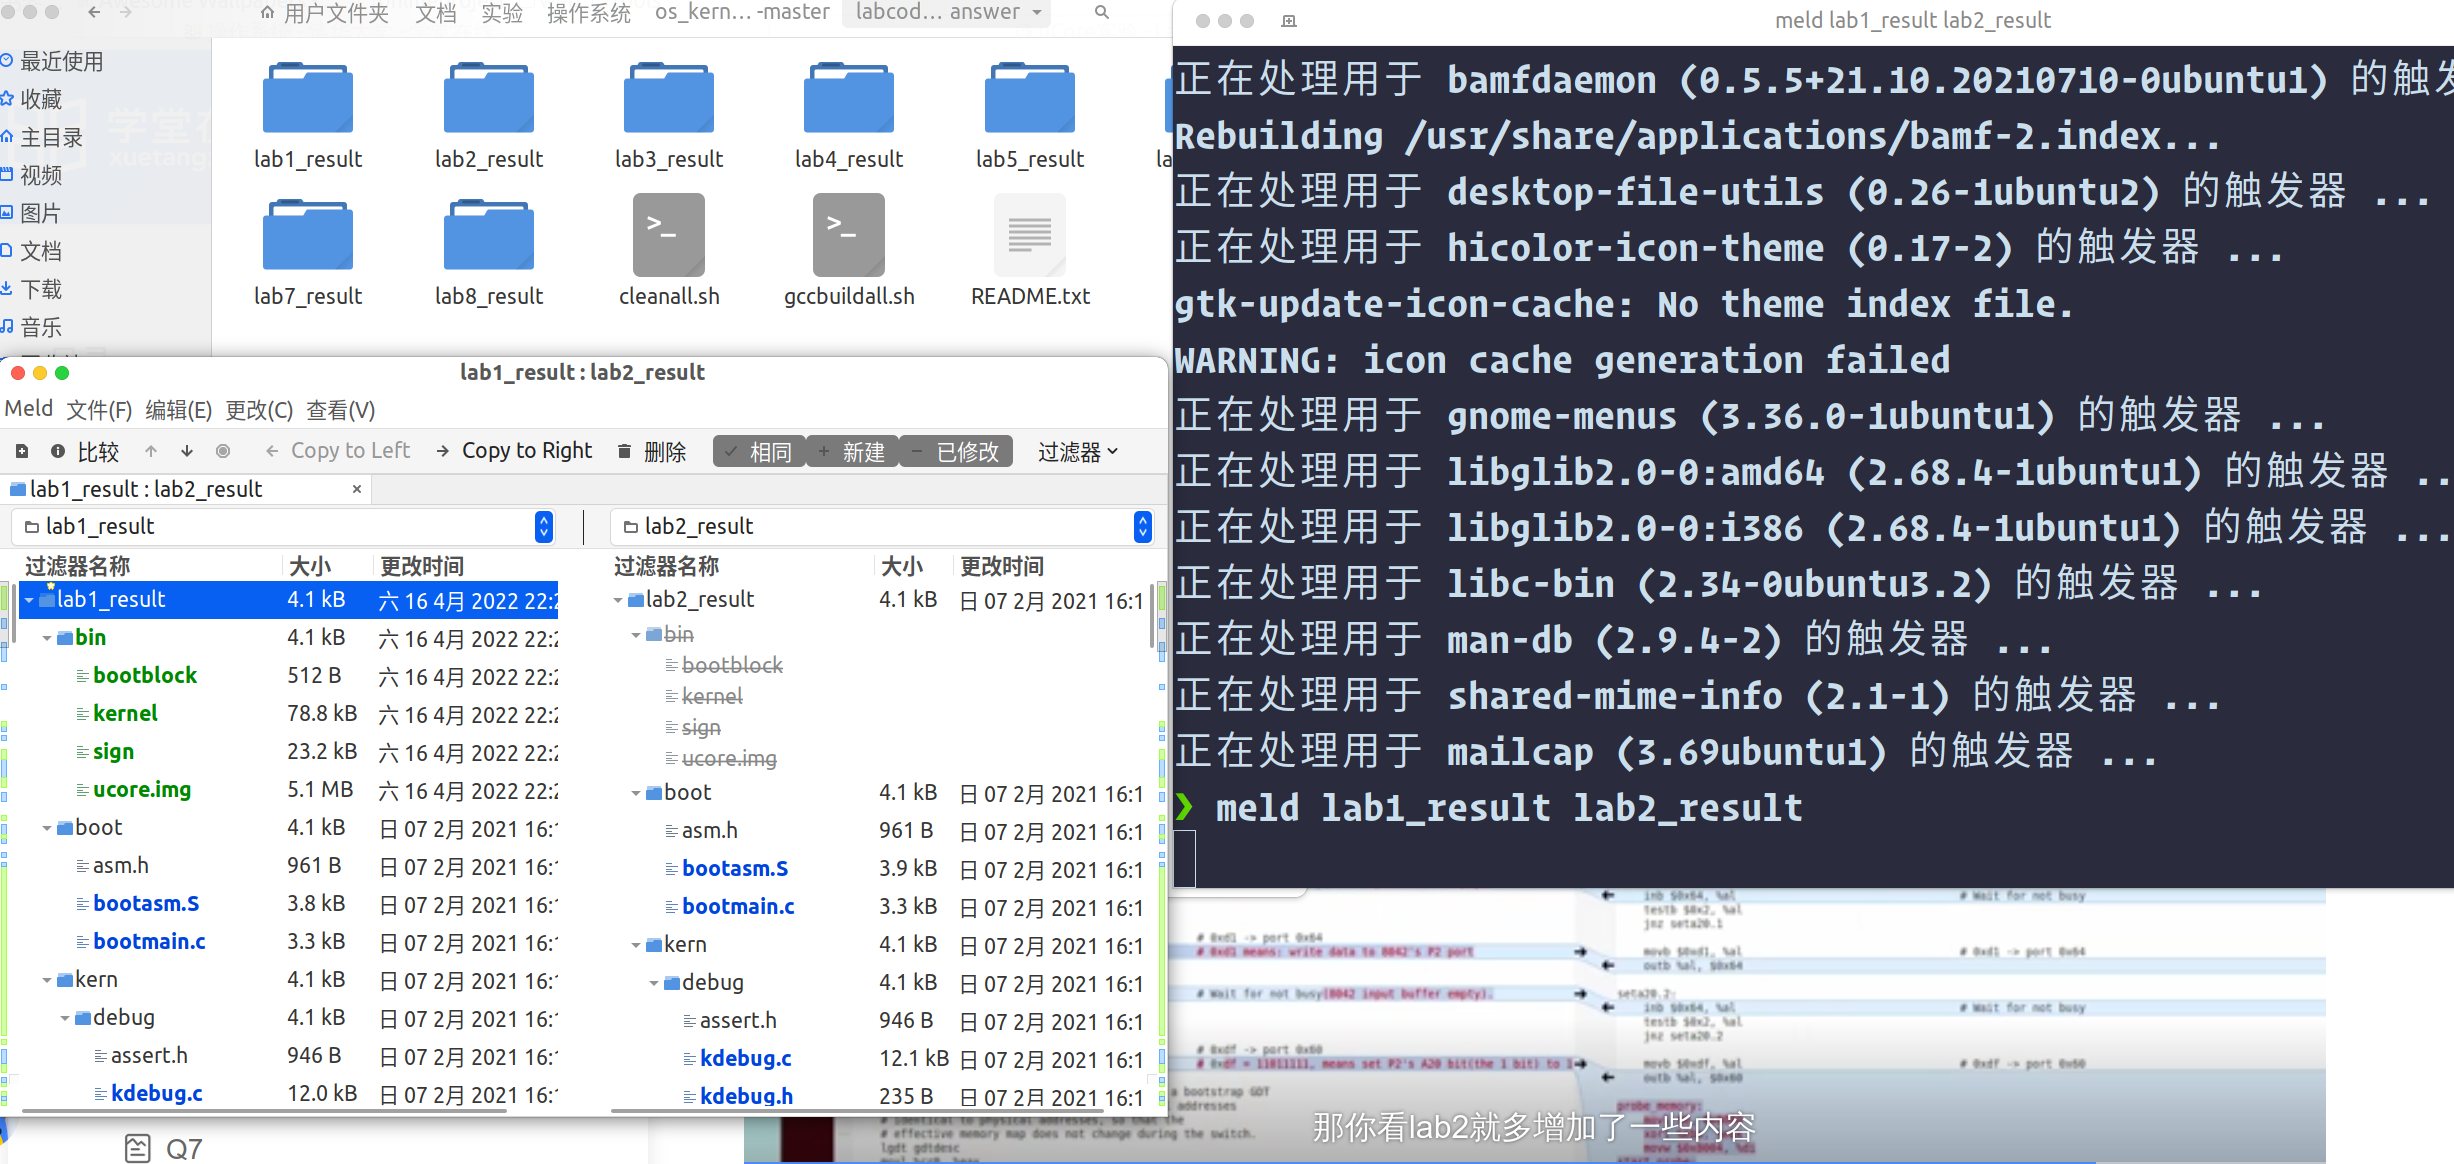
这是meld官网:usage
doxygen
参考博客
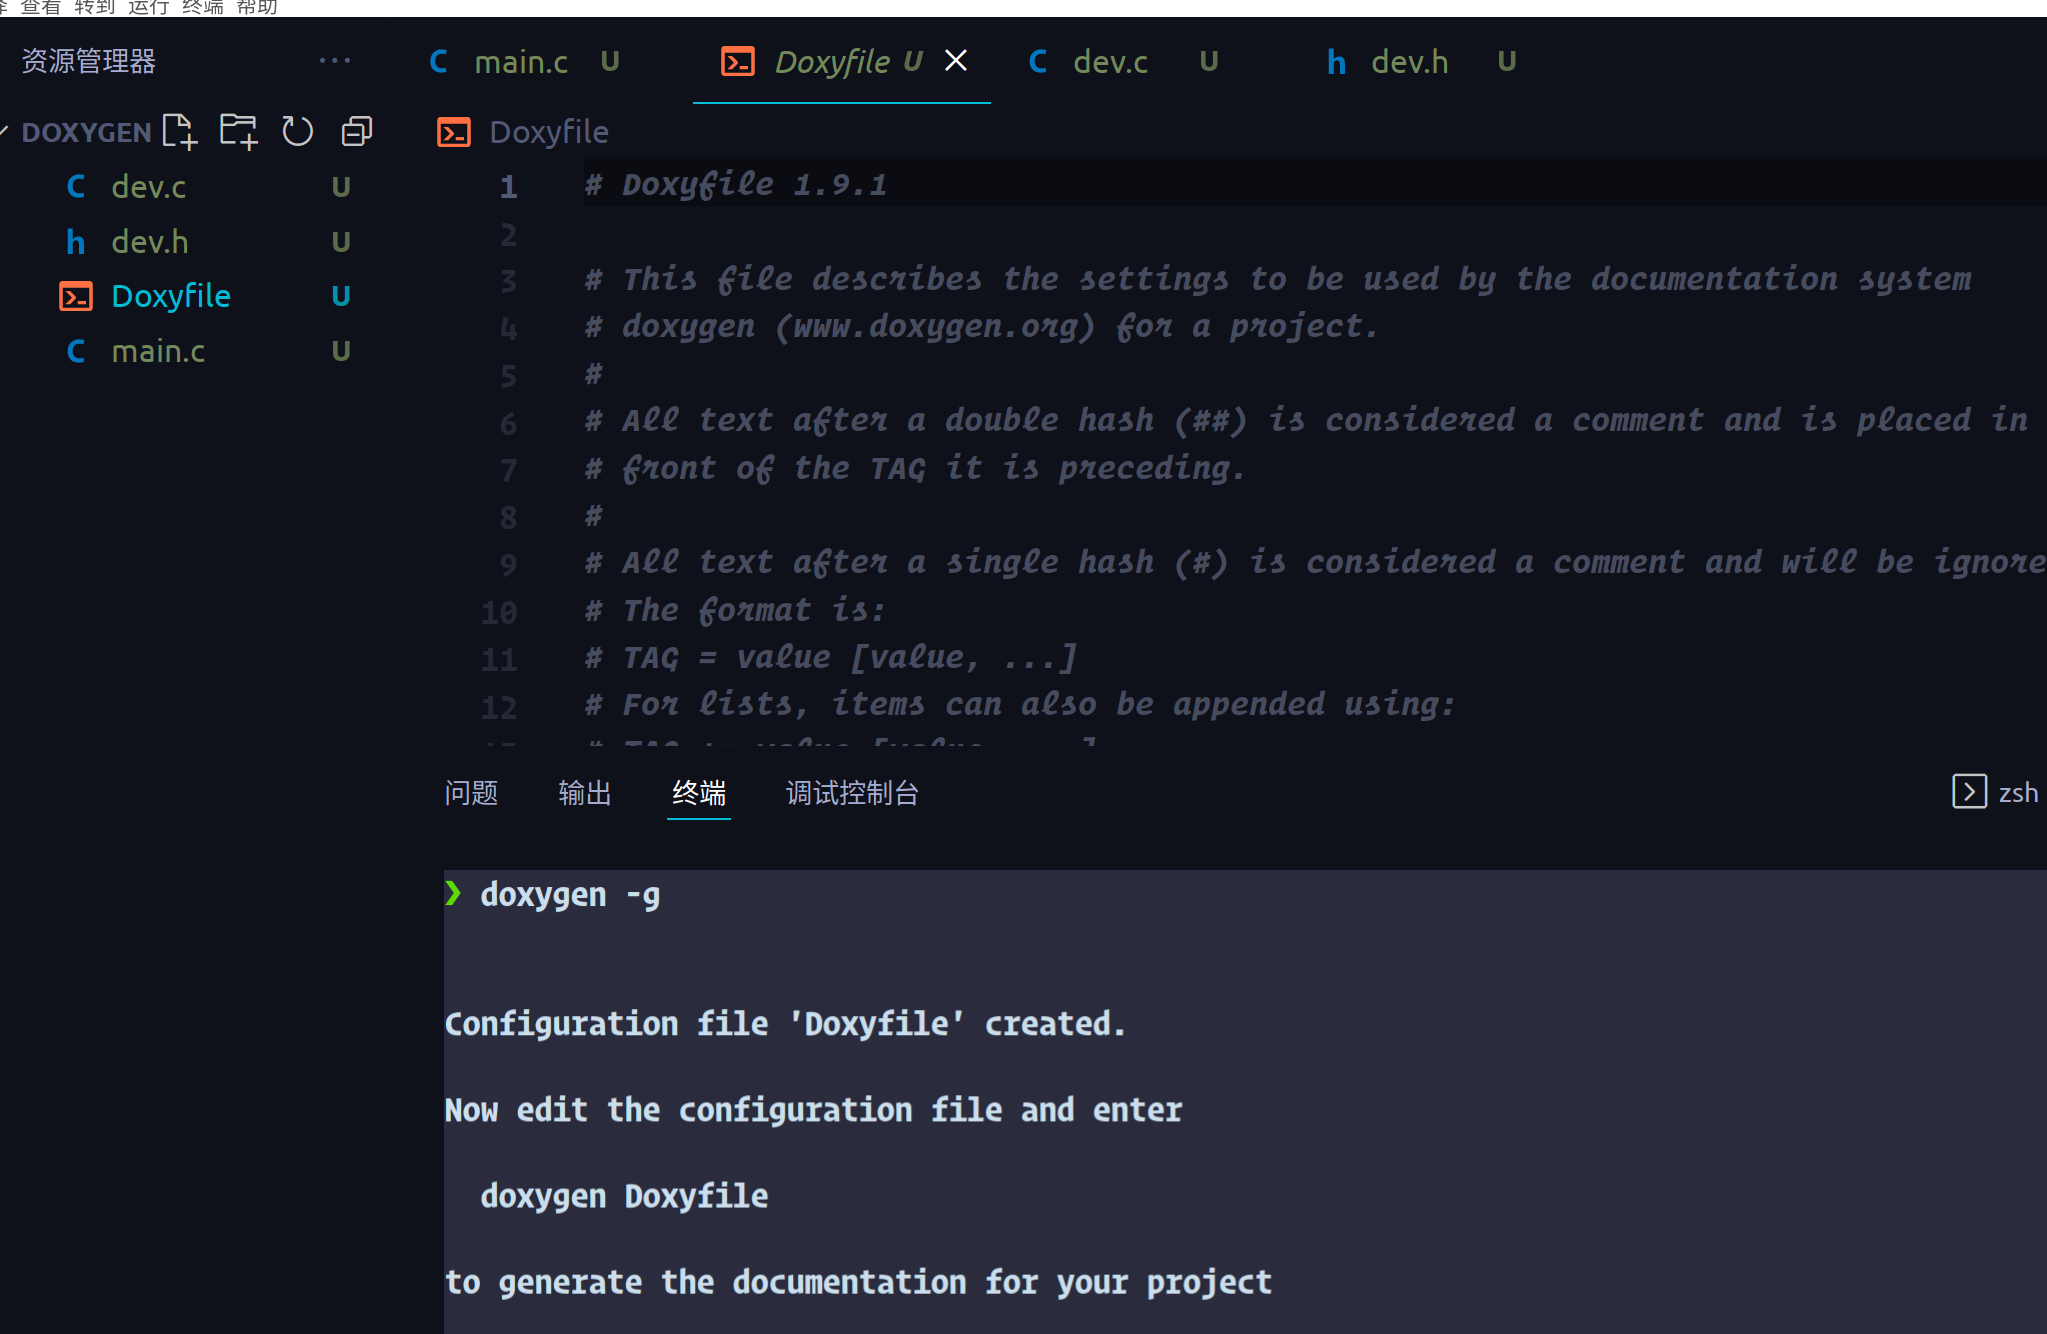
doxygen能生成latex,通过规范注释来解释项目结构。
常用命令:
doxygen ./Doxyfile #生成文档
doxygen ./Doxyfile #生成文档
注释规范:
/*
 * 正常注释
 */
/**
 * 要输出成文档的注释
 */

 或者

/*!
 * 要输出成文档的注释
 */
或者是:
//***************************************************************************************
//
//! \brief  Print Int number to terimal device.
//!
//! \param  [in] number is the data you want to print.
//! \retval the number of print information, in bytes. return zero indicate print error !.
//!
//! \note
//! * Be sure you have called \ref Dev_Init function before call this fuction.
//! * Remember to check return value.
//
//***************************************************************************************
extern int Dev_PrintInt(int number);
binutils
binutils包含很多命令,不详细介绍了,列举一下:
- ld - the GNU linker.
- as - the GNU assembler.
- addr2line - Converts addresses into filenames and line numbers.
- ar - A utility for creating, modifying and extracting from archives.
- c++filt - Filter to demangle encoded C++ symbols.
- dlltool - Creates files for building and using DLLs.
- gold - A new, faster, ELF only linker, still in beta test.
- gprof - Displays profiling information.
- nlmconv - Converts object code into an NLM.
- nm - Lists symbols from object files.
- objcopy - Copies and translates object files.
- objdump - Displays information from object files.
- ranlib - Generates an index to the contents of an archive.
- readelf - Displays information from any ELF format object file.
- size - Lists the section sizes of an object or archive file.
- strings - Lists printable strings from files.
- strip - Discards symbols.
- windmc - A Windows compatible message compiler.
- windres - A compiler for Windows resource files.
系统启动及中断
bios提供了基本的i/o功能
cpu加电后执行ROM里的初始化代码:

从硬盘/网络启动是由bios决定,bios加载程序到磁盘的引导扇区,跳转到cs:ip=0000:7c00,读取加载程序,用加载程序识别文件系统,识别文件系统之后就可以读取os的内核代码,在把控制权转给os:
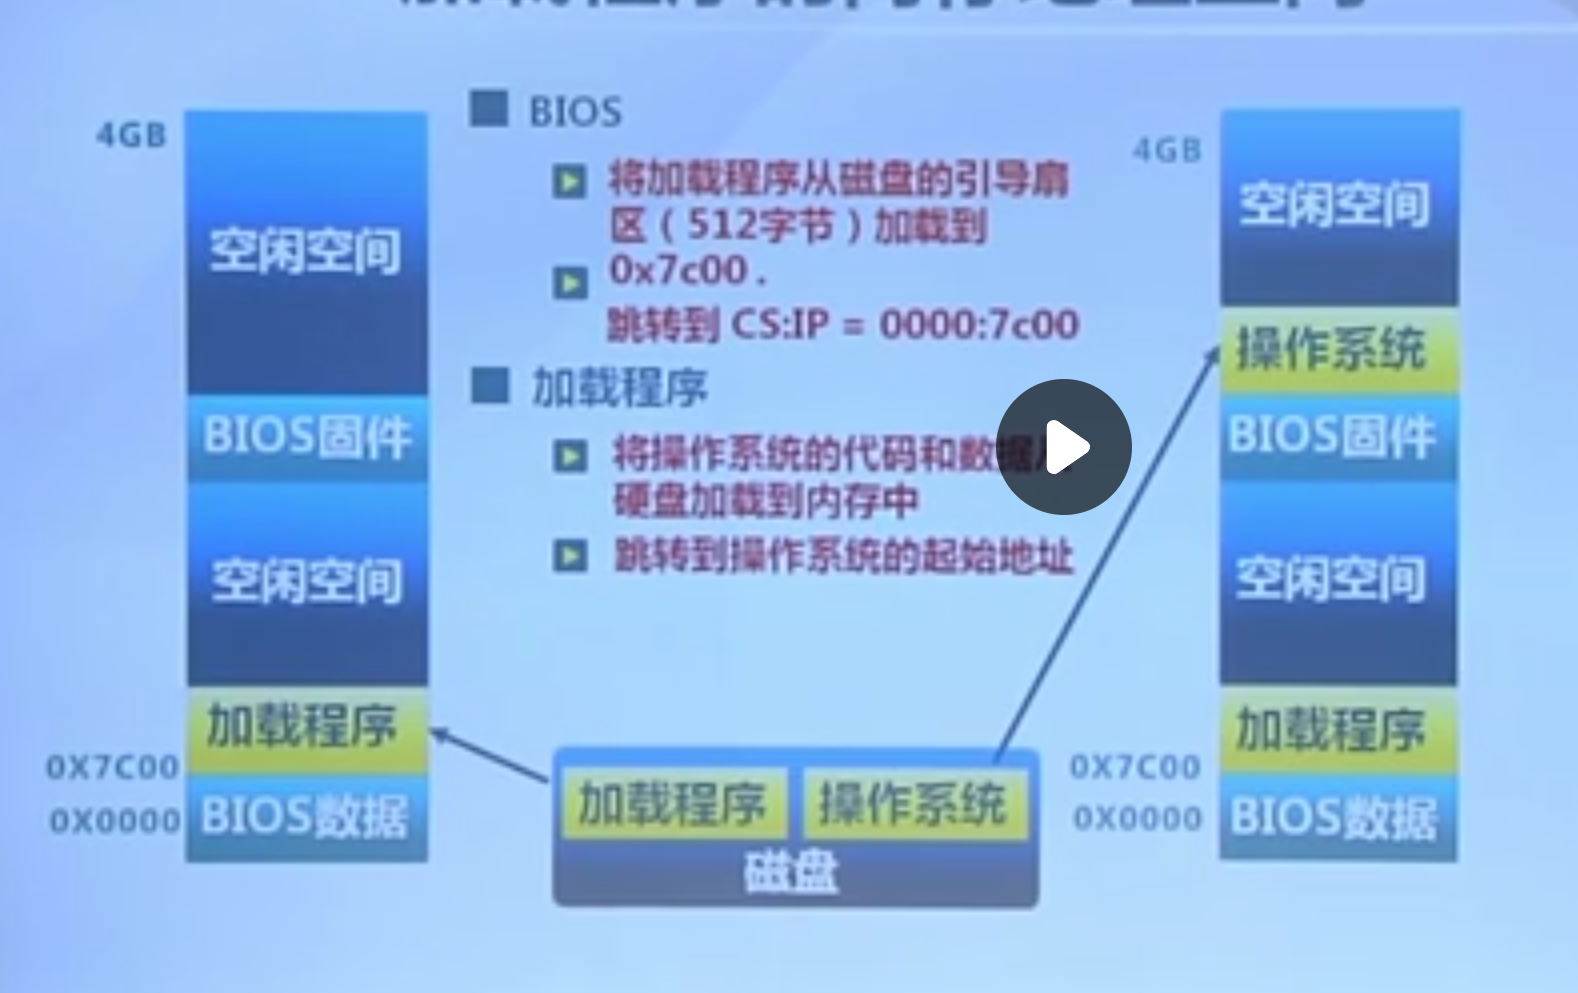
bios和uefi的区别:

中断(来自硬件)、异常(非法指令等)、系统调用(应用程序主动向os发的请求):
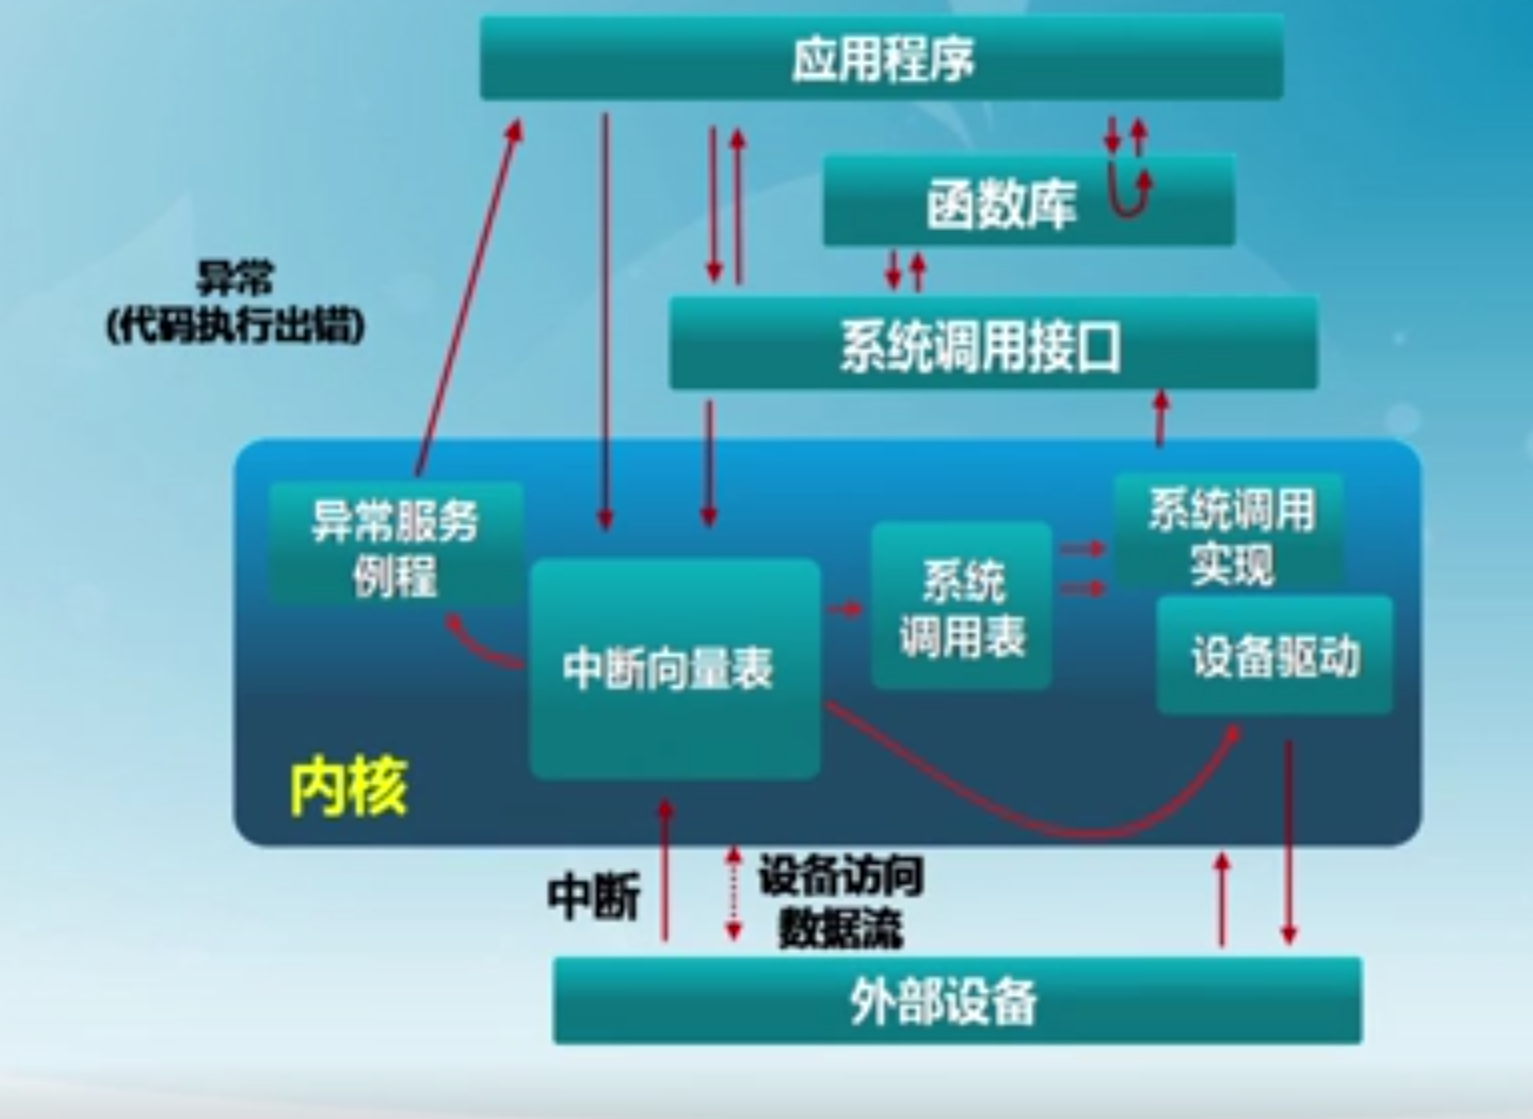
计算机对上述三种情况采用的中断处理机制:
- cpu初始化时设置中断使能,设置中断标志,根据中断向量调用相关中断服务例程
- 软件处理:

中断是可以嵌套的,也就是异常里可以出现异常
系统调用采用int和iret指令,可以进行堆栈切换以及特权级的转换,函数调用采用call和ret指令,一般情况下没有堆栈切换
遗漏的知识点参考kiprey,仅记录本人不熟悉的知识点
bios/linux/dos中断的区别
bios/dos建立在实模式下,他们建立的中断调用都采用中断向量表,linux则是在进入保护模式后才建立中断例程,通过中断描述符表idt实现中断
文件
os通过文件系统的magic number得知文件系统类型,一般在分区的第二个扇区
实模式
实模式的主要特性是:程序用到的地址都是真实的物理地址。同时,实模式下的地址寻址空间只有1MB(20bit)
从intel 80386开始的CPU,只要进入实模式,地址寻址空间就限制在1MB。
实模式下的地址计算方式为16*段寄存器值+段内偏移地址,其CPU寻址方式为
- 寄存器寻址
- 立即数寻址
- 内存寻址
- 直接寻址。
- 基址寻址
- 变址寻址
- 基址变址寻址
在分段存储管理机制的保护模式下,每个段由如下三个参数进行定义:段基地址(Base Address)、段界限(Limit)和段属性(Attributes)
- 段基地址:规定线性地址空间中段的起始地址。任何一个段都可以从32位线性地址空间中的任何一个字节开始,不用像实模式下规定边界必须被16整除。
- 段界限:规定段的大小。可以以字节为单位或以4K字节为单位。
- 段属性:确定段的各种性质。
全局描述符表(GDT)是一个保存多个段描述符的“数组”,其起始地址保存在全局描述符表寄存器GDTR中。GDTR长48位,其中高32位为基地址,低16位为段界限
线性地址部分的选择子是用来选择哪个描述符表和在该表中索引哪个描述符的。选择子可以做为指针变量的一部分,从而对应用程序员是可见的,但是一般是由连接加载器来设置的。
段选择子结构
- 索引(Index):在描述符表中从8192个描述符中选择一个描述符。处理器自动将这个索引值乘以8(描述符的长度),再加上描述符表的基址来索引描述符表,从而选出一个合适的描述符。
- 表指示位(Table Indicator,TI):选择应该访问哪一个描述符表。0代表应该访问全局描述符表(GDT),1代表应该访问局部描述符表(LDT)。
- 请求特权级(Requested Privilege Level,RPL):保护机制
中断与异常
在操作系统中,有三种特殊的中断事件:
- 异步中断(asynchronous interrupt)。这是由CPU外部设备引起的外部事件中断,例如I/O中断、时钟中断、控制台中断等。
- 同步中断(synchronous interrupt)。这是CPU执行指令期间检测到不正常的或非法的条件(如除零错、地址访问越界)所引起的内部事件。
- 陷入中断(trap interrupt)。这是在程序中使用请求系统服务的系统调用而引发的事件。
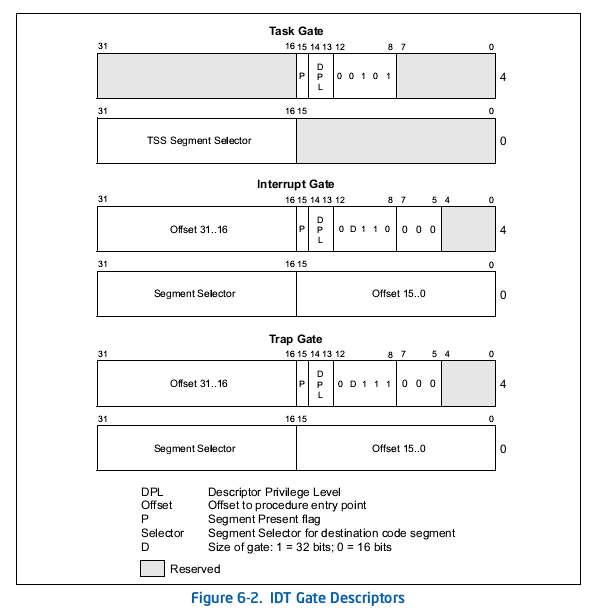
IDT中包含了3种类型的Descriptor
- Task-gate descriptor
- Interrupt-gate descriptor (中断方式用到)
- Trap-gate descriptor(系统调用用到)
特权
特权级共分为四档,分别为0-3,其中Kernel为第0特权级(ring 0),用户程序为第3特权级(ring 3),操作系统保护分别为第1和第2特权级。
- DPL存储于段描述符中,规定访问该段的权限级别(Descriptor Privilege Level),每个段的DPL固定。 当进程访问一个段时,需要进程特权级检查。
- CPL存在于CS寄存器的低两位,即CPL是CS段描述符的DPL,是当前代码的权限级别(Current Privilege Level)。
- RPL存在于段选择子中,说明的是进程对段访问的请求权限(Request Privilege Level),是对于段选择子而言的,每个段选择子有自己的RPL。而且RPL对每个段来说不是固定的,两次访问同一段时的RPL可以不同。RPL可能会削弱CPL的作用,例如当前CPL=0的进程要访问一个数据段,它把段选择符中的RPL设为3,这样虽然它对该段仍然只有特权为3的访问权限。
- IOPL(I/O Privilege Level)即I/O特权标志,位于eflag寄存器中,用两位二进制位来表示,也称为I/O特权级字段。该字段指定了要求执行I/O指令的特权级。如 果当前的特权级别在数值上小于等于IOPL的值,那么,该I/O指令可执行,否则将发生一个保护异常。 只有当CPL=0时,可以改变IOPL的值,当CPL<=IOPL时,可以改变IF标志位。
- 访问门时(中断、陷入、异常),要求DPL段 <= CPL <= DPL门 访问门的代码权限比门的特权级要高,因为这样才能访问门。 但访问门的代码权限比被访问的段的权限要低,因为通过门的目的是访问特权级更高的段,这样就可以达到低权限应用程序使用高权限内核服务的目的。
- 访问段时,要求DPL段 >= max {CPL, RPL} 只能使用最低的权限来访问段数据。
TSS(Task State Segment) 是操作系统在进行进程切换时保存进程现场信息的段
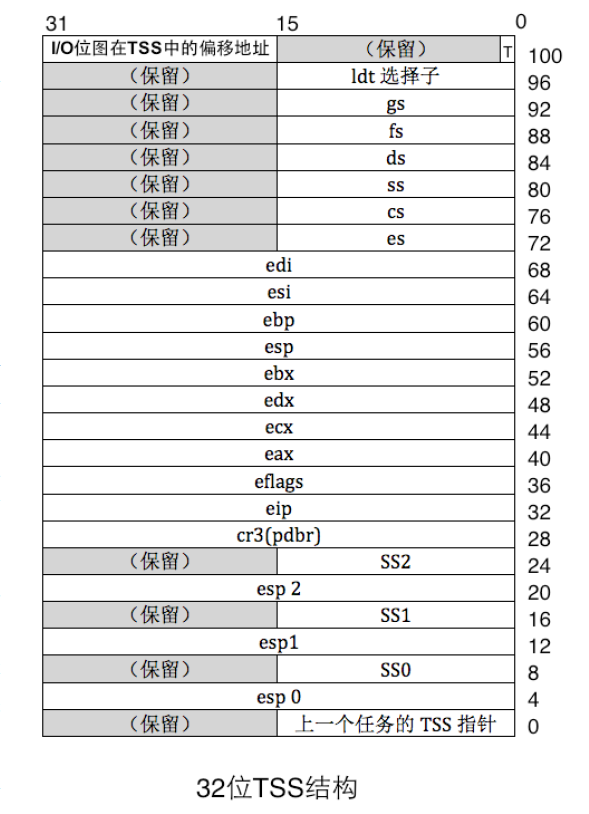
trapframe结构是进入中断门所必须的结构,其结构如下
struct trapframe {
    // tf_regs保存了基本寄存器的值,包括eax,ebx,esi,edi寄存器等等
    struct pushregs tf_regs;
    uint16_t tf_gs;
    uint16_t tf_padding0;
    uint16_t tf_fs;
    uint16_t tf_padding1;
    uint16_t tf_es;
    uint16_t tf_padding2;
    uint16_t tf_ds;
    uint16_t tf_padding3;
    uint32_t tf_trapno;
    // 以下这些信息会被CPU硬件自动压入切换后的栈。包括下面切换特权级所使用的esp、ss等数据
    uint32_t tf_err;
    uintptr_t tf_eip;
    uint16_t tf_cs;
    uint16_t tf_padding4;
    uint32_t tf_eflags;
    // 以下这些信息会在切换特权级时被使用
    uintptr_t tf_esp;
    uint16_t tf_ss;
    uint16_t tf_padding5;
} __attribute__((packed));
以上内容大部分复制自kiprey,不知道kiprey佬是在那里学的
ucore_lab1
没什么需要做的,主要是为了后面的内容,需要点一下相关知识点。
练习1
- 理解通过make生成执行文件的过程。
在os_kernel_lab-master/labcodes/lab1/Makefile中,可以找到要分析的makefile。
makefile的结构如下:
target...:prerequisites...
   command
   ...
   ...
我们通过:
❯ make V= >> result.txt
来查看make到底执行了那些命令。
直接看,查询关键字ucore.img,可以发现这样一段代码:
# create ucore.img
UCOREIMG	:= $(call totarget,ucore.img)

$(UCOREIMG): $(kernel) $(bootblock)
	$(V)dd if=/dev/zero of=$@ count=10000
	$(V)dd if=$(bootblock) of=$@ conv=notrunc
	$(V)dd if=$(kernel) of=$@ seek=1 conv=notrunc

$(call create_target,ucore.img)
也就是说要生成ucore.img,会先生成bootblock,kernel这两个target,我们依次找寻生成bootblock、kernel所需要的文件,得到这样一个文件树:

对于ucore:
UCOREIMG	:= $(call totarget,ucore.img)

$(UCOREIMG): $(kernel) $(bootblock)
	$(V)dd if=/dev/zero of=$@ count=10000
	$(V)dd if=$(bootblock) of=$@ conv=notrunc
	$(V)dd if=$(kernel) of=$@ seek=1 conv=notrunc

$(call create_target,ucore.img)
其中dd命令和cp差不多,但dd更多的针对底层文件的复制.
if和ifeq差不多,仍是实现条件判断的语句,实际上是判断后面的文件是否存在,比如/dev/zero就存在于linux的/dev/目录下
of以及后面的语句则是对参数进行赋值,count指定是10000个块的字节,之后从第一个块写入bootblock的内容,seek则是指定从第二个块开始写入kernel的内容,有点类似于sg_read
生成bootasm.o时的实际命令为:
gcc -Iboot/ -fno-builtin -Wall -ggdb -m32 -gstabs \
-nostdinc  -fno-stack-protector -Ilibs/ -Os -nostdinc \
-c boot/bootasm.S -o obj/boot/bootasm.o
解释一下参数:
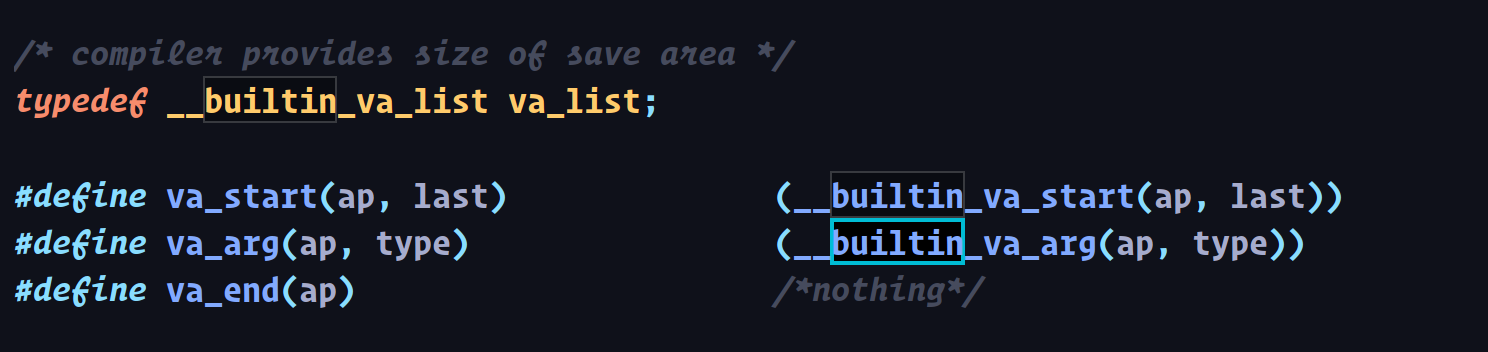
-fno-builtin指若函数前没有builtin则不进行内部函数的优化(如下图),-Wall就是生成警告信息,-ggdb生成gdb调试信息,-m32就是按照32位机器生成代码,-gstabs生成stabs格式的调试信息,-nostdinc不是用标准库,-fno-stack-protector关闭栈保护,-Os是优化选项,-Iboot/指在boot下生成文件。
生成sign的实际命令:
gcc -Itools/ -g -Wall -O2 -c tools/sign.c \
-o obj/sign/tools/sign.o
gcc -g -Wall -O2 obj/sign/tools/sign.o -o bin/sign
在有了sing,bootasm.o,bootmain.o后,makefile生成bootblock.o:
ld -m    elf_i386 -nostdlib -N -e start -Ttext 0x7C00 \
obj/boot/bootasm.o obj/boot/bootmain.o -o obj/bootblock.o
ld是连接器,详细用法我参考的是computerhope
上面的代码实际上是模拟了i386的连接器(-m elf_i386),-nostdlib即不准使用标准库,-N设置代码段以及数据段均可读写,-e指定了入口是start,-Text指定了代码段的开始位置。
最后就是使用sign处理bootblock.o,首先objcopy -S -O binary obj/bootblock.o obj/bootblock.out,实际上-S移除了所有符号和重定位信息,-O指定输出格式,sign在处理bootblock.out生成bootblock
对于kernel,实际上没有用到多少新的参数。只需要注意ld的参数-T < script > 是让ld使用指定的script即可。
$(kernel): tools/kernel.ld
$(kernel): $(KOBJS)
@echo + ld $@
$(V)$(LD) $(LDFLAGS) -T tools/kernel.ld -o $@ $(KOBJS)
@$(OBJDUMP) -S $@ > $(call asmfile,kernel)
@$(OBJDUMP) -t $@ | $(SED) '1,/SYMBOL TABLE/d; s/ .* / /; \
/^$$/d' > $(call symfile,kernel)
- 一个被系统认为是符合规范的硬盘主引导扇区的特征是什么?
我们可以看sign.c,一个磁盘主引导扇区只有512字节,且第510个是0x55,第511个是0xAA
练习2
参考真正の佬kiprey
修改tools/gdbinit:
file obj/bootblock.o
set architecture i8086
target remote :1234
b* 0x7c00

define hook-stop
x/i $eip
end
continue
其中define hook-step ... end告诉gdb在每一次断点时自动输出下一条指令。
之后make debug:
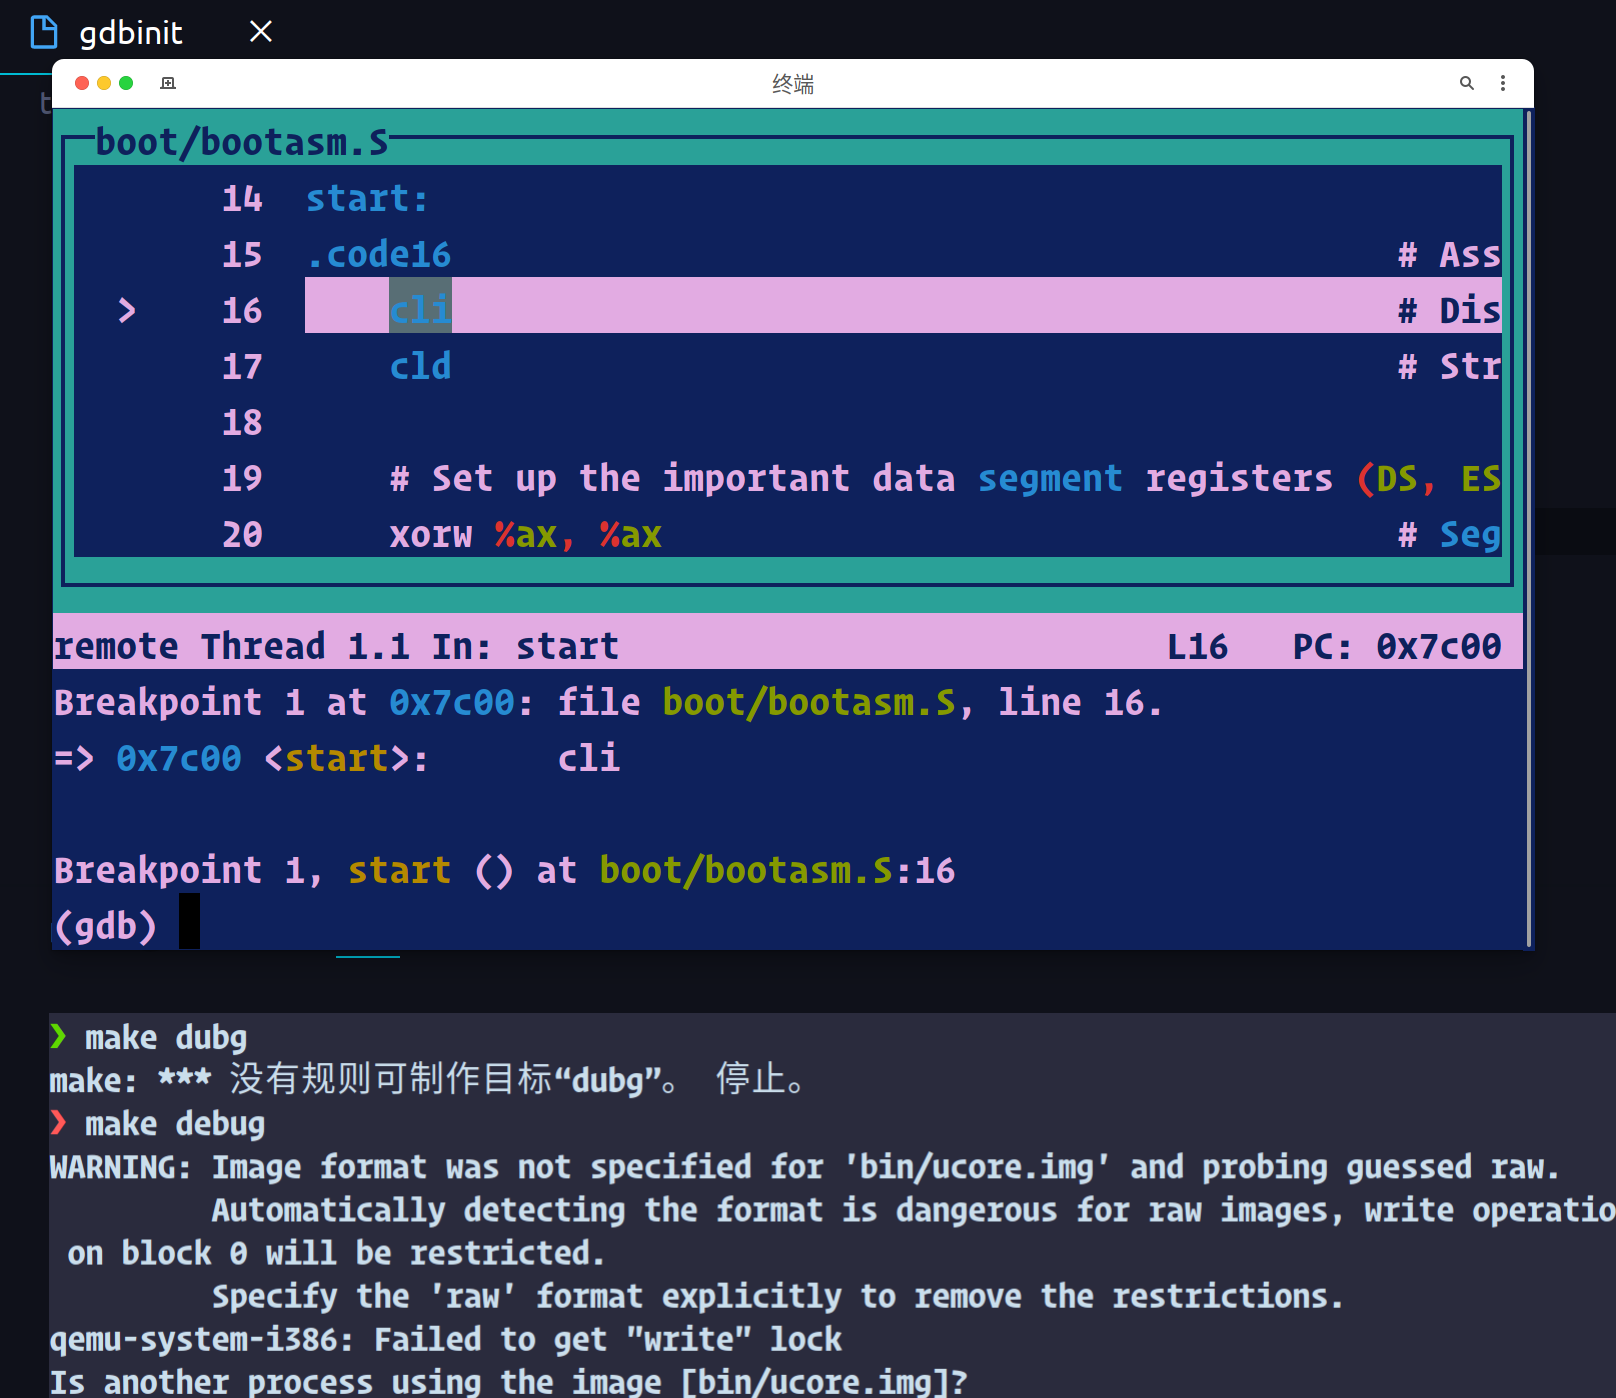
单步跟踪使用si即可,这是continue的结果:
设置断点:
修改gdbinit为:
file obj/bootblock.o
set architecture i8086
target remote :1234
b* 0x7c00

define hook-stop
x/i $eip
end
之后make debug,输入x/5i ((cs <<4)+

修改为:
file obj/bootblock.o
set architecture i8086
target remote :1234
b* 0x7c00

define hook-stop
c
x /10i $pc
end
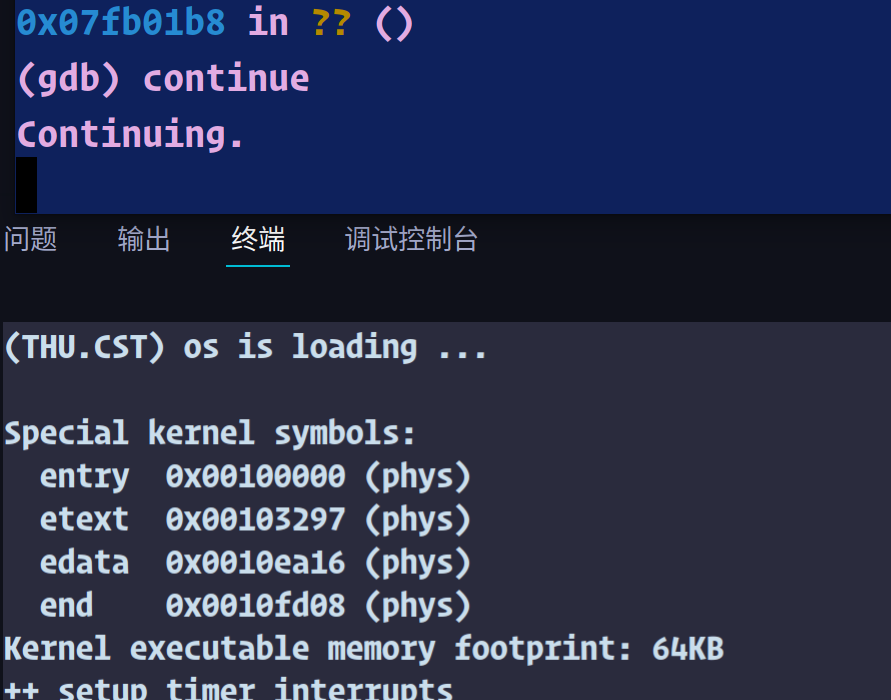
输入qemu-system-i386 -hda yourpath/os_kernel_lab-master/labcodes/lab1/bin/ucore.img -s -S -d in_asm -D q.log 打开ucore,打开gdb,输入target remote localhost:1234 ,之后单步调试si得到:
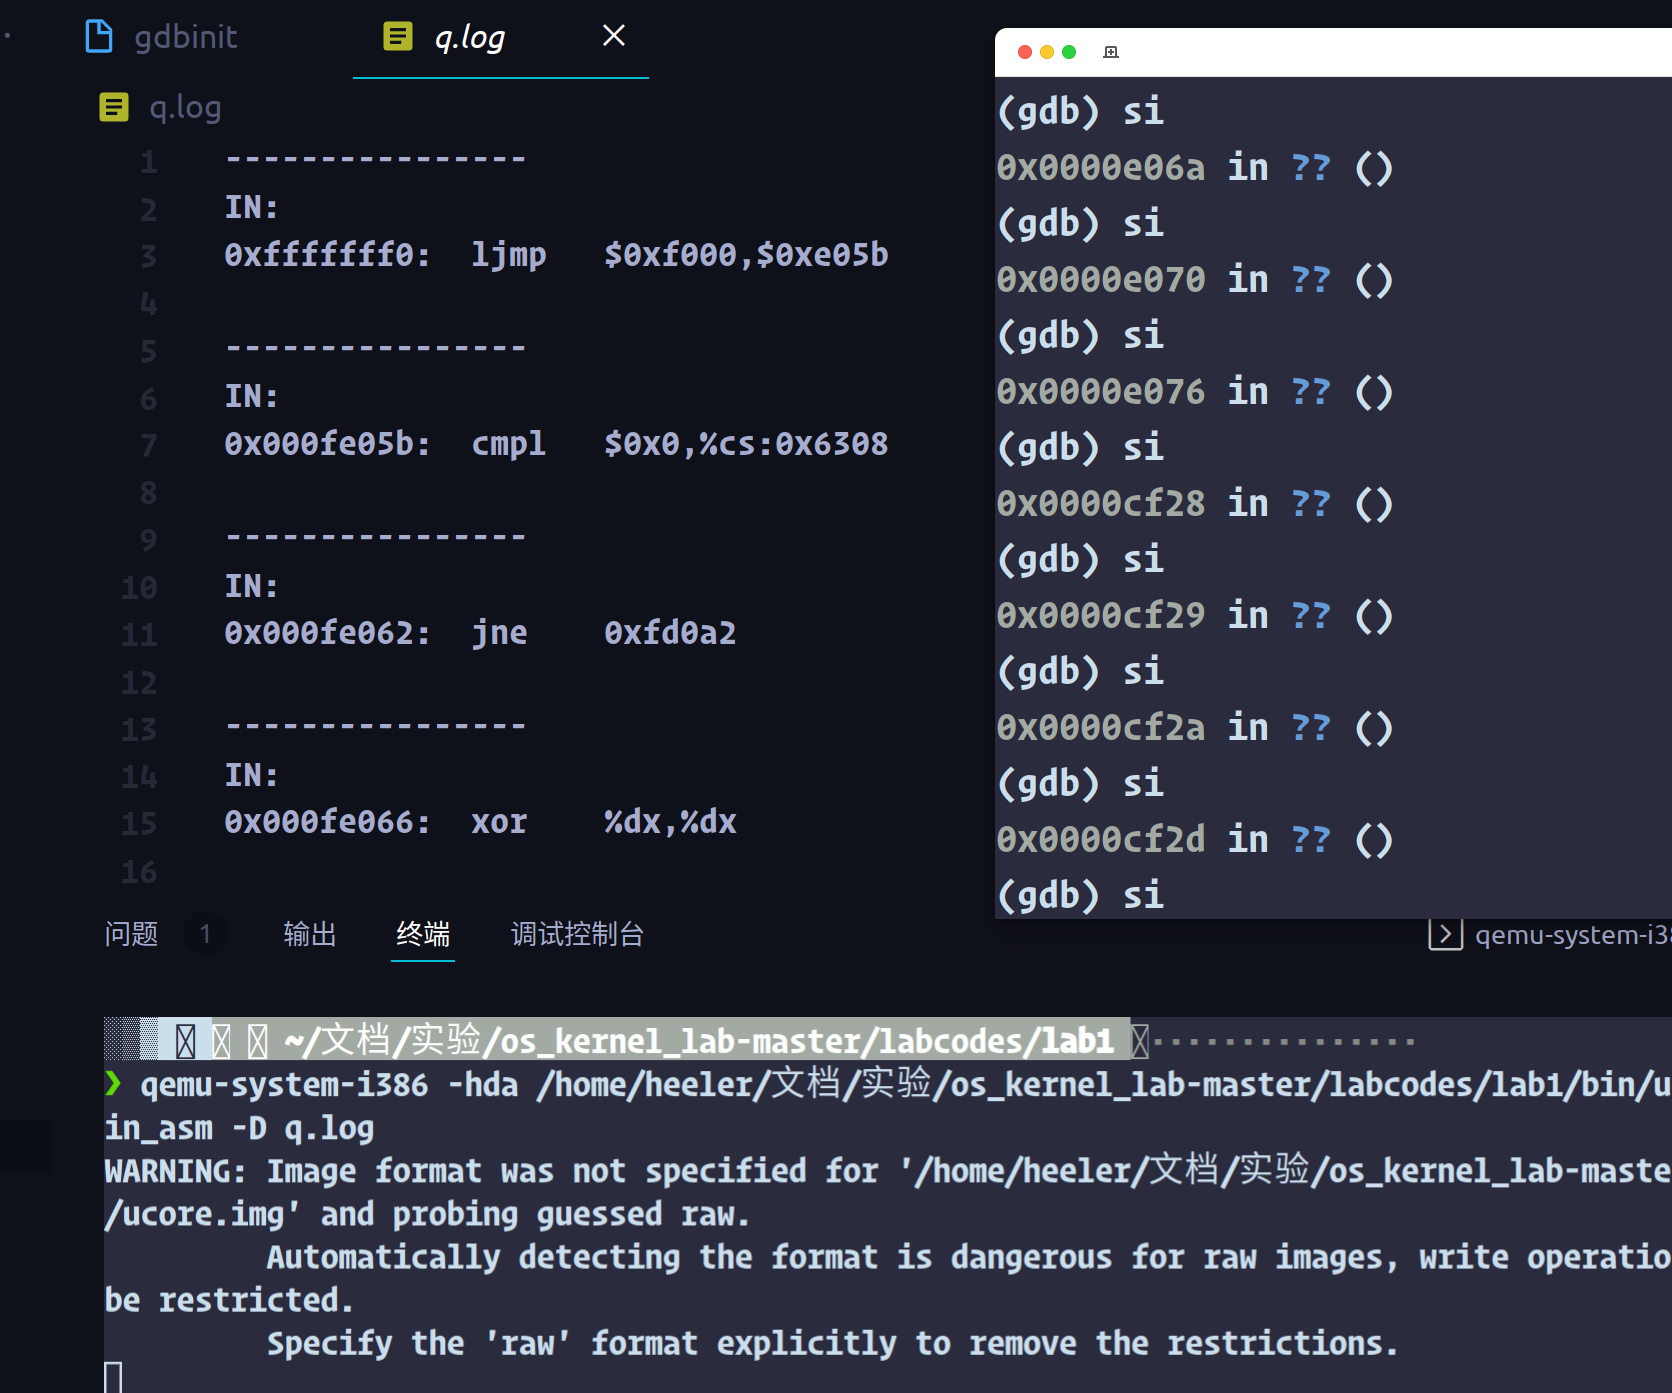
可以看到0x7c00处的代码和bootasm.S处的代码一致
练习3
在bootblock.asm中,通过注释不难发现,disable interrupts禁用了中断,之后初始化了DS,ES,SS这三个寄存器的值,都先置0,之后enable A20,开启原因在注释里面也有:
physical address line 20 is tied low ,that addresses higher than 1MB.因此我们需要开启A20去兼容早期的回绕特征。kipery这样解释:
- Intel早期的8086 CPU提供了20根地址线,但寄存器只有16位,所以使用段寄存器值 << 4 + 段内偏移值的方法来访问到所有内存,但按这种方式来计算出的地址的最大值为1088KB,超过20根地址线所能表示的范围,会发生“回卷”(和整数溢出有点类似)。但下一代的基于Intel 80286 CPU的计算机系统提供了24根地址线,当CPU计算出的地址超过1MB时便不会发生回卷,而这就造成了向下不兼容。为了保持完全的向下兼容性,IBM在计算机系统上加个硬件逻辑来模仿早期的回绕特征,而这就是A20 Gate。
- A20 Gate的方法是把A20地址线控制和键盘控制器的一个输出进行AND操作,这样来控制A20地址线的打开(使能)和关闭(屏蔽)。一开始时A20地址线控制是被屏蔽的(总为0),直到系统软件通过一定的IO操作去打开它。当A20 地址线控制禁止时,则程序就像在8086中运行,1MB以上的地址不可访问;保护模式下A20地址线控制必须打开。A20控制打开后,内存寻址将不会发生回卷。
- 在当前环境中,所用到的键盘控制器8042的IO端口只有0x60和0x64两个端口。8042通过这些端口给键盘控制器或键盘发送命令或读取状态。输出端口P2用于特定目的。位0(P20引脚)用于实现CPU复位操作,位1(P21引脚)用于控制A20信号线的开启与否。
接下来就是加载gdt这个全局描述符表,最后重新使用32位模式,重新切回到保护模式。
在bootasm.S中,
初始化了gdt:
# Bootstrap GDT
.p2align 2                                          # force 4 byte alignment
gdt:
    SEG_NULLASM                                     # null seg
    SEG_ASM(STA_X|STA_R, 0x0, 0xffffffff)           # code seg for bootloader and kernel
    SEG_ASM(STA_W, 0x0, 0xffffffff)                 # data seg for bootloader and kernel

gdtdesc:
    .word 0x17                                      # sizeof(gdt) - 1
    .long gdt
看注释即可理解。bootasm.s中的代码设置了CR0_PE_ON来返回保护模式:
.set CR0_PE_ON,             0x1                     # protected mode enable flag
.........
lgdt gdtdesc
 movl %cr0, %eax
 orl $CR0_PE_ON, %eax
 movl %eax, %cr0
练习4
ELF文件结构:

在bootmain.c中,bootloader为了读取扇区,采用了下面的代码:
/* waitdisk - wait for disk ready */
static void
waitdisk(void) {
    while ((inb(0x1F7) & 0xC0) != 0x40)
        /* do nothing */;
}

/* readsect - read a single sector at @secno into @dst */
static void
readsect(void *dst, uint32_t secno) {
    // wait for disk to be ready
    waitdisk();

    outb(0x1F2, 1);                         // count = 1
    outb(0x1F3, secno & 0xFF);
    outb(0x1F4, (secno >> 8) & 0xFF);
    outb(0x1F5, (secno >> 16) & 0xFF);
    outb(0x1F6, ((secno >> 24) & 0xF) | 0xE0);
    outb(0x1F7, 0x20);                      // cmd 0x20 - read sectors

    // wait for disk to be ready
    waitdisk();

    // read a sector
    insl(0x1F0, dst, SECTSIZE / 4);
}
即先waitdisk,等待磁盘,然后写入0x1f2~0x1f5,0x1f7,准备读取磁盘,磁盘准备好时再调用insl读取到内存。
bootloader先将os加载到:
#define ELFHDR          ((struct elfhdr *)0x10000)
...........
readseg((uintptr_t)ELFHDR, SECTSIZE * 8, 0);
在比对elf文件的magic number来判断elf文件的正确性,最后在加载elf的每一个段,
ph = (struct proghdr *)((uintptr_t)ELFHDR + ELFHDR->e_phoff);
eph = ph + ELFHDR->e_phnum;
for (; ph < eph; ph ++) {
    readseg(ph->p_va & 0xFFFFFF, ph->p_memsz, ph->p_offset);
}
练习5
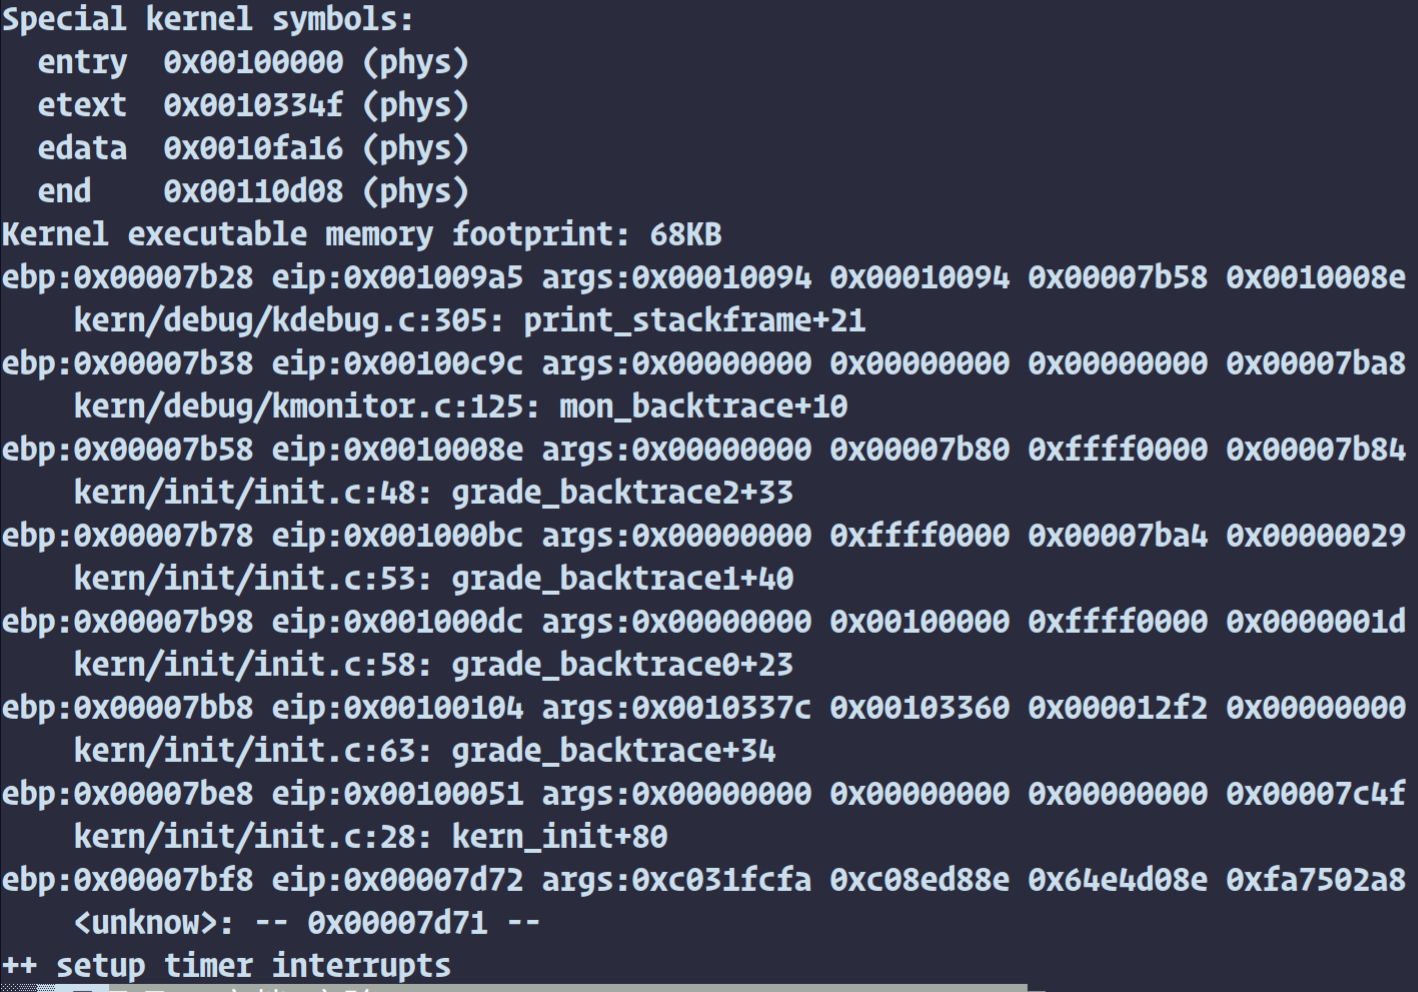
在kern/debug/kdebug.c的最后有我们要完成的代码,不难写出:
void print_stackframe(void) {
        uint32_t ebp=read_ebp();        //(1) call read_ebp() to get the value of ebp. the type is (uint32_t)
        uint32_t eip=read_eip();        //(2) call read_eip() to get the value of eip. the type is (uint32_t)
        for(int i=0;i<STACKFRAME_DEPTH&&ebp!=0;i++){    //(3) from 0 .. STACKFRAME_DEPTH
              cprintf("ebp:0x%08x   eip:0x%08x ",ebp,eip);    //(3.1)printf value of ebp, eip
              uint32_t *tmp=(uint32_t *)ebp+2;
              cprintf("arg :0x%08x 0x%08x 0x%08x 0x%08x",*(tmp+0),*(tmp+1),*(tmp+2),*(tmp+3));    //(3.2)(uint32_t)calling

arguments [0..4] = the contents in address (unit32_t)ebp +2 [0..4]
              cprintf("\n");            //(3.3) cprintf("\n");
              print_debuginfo(eip-1);    //(3.4) call print_debuginfo(eip-1) to print the C calling function name and line

number, etc.
              eip=((uint32_t *)ebp)[1];
              ebp=((uint32_t *)ebp)[0];    //(3.5) popup a calling stackframe
          }
    }
注意先切换eip,在切换ebp
结果:
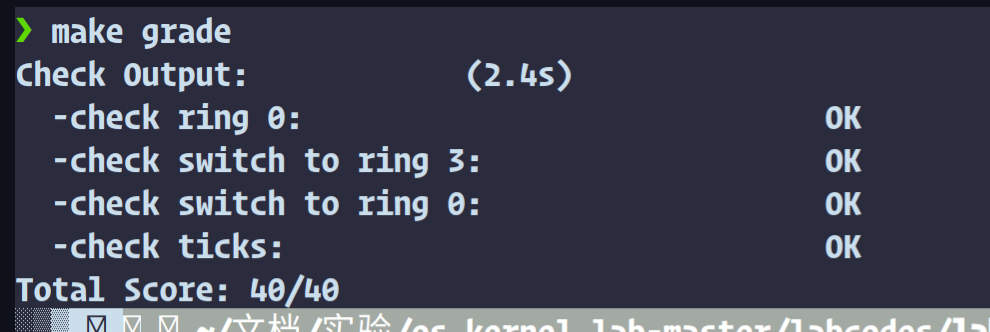
练习6
直接上图和代码:
int i = 0;
   extern uintptr_t __vectors[];
   for(i = 0; i < 255; ++i)
   {
	//  vectors 中存储了中断处理程序的入口地址。vectors 定义在 vector.S 文件中,通过一个工具程序 vector.c 生成
       SETGATE(idt[i], 0, GD_KTEXT, __vectors[i], 0);
       //在os中,特权级别通常用数字表示,这里的0就是kernel模式
   }
// setgate切换用户模式到内核模式
   SETGATE(idt[T_SWITCH_TOK], 1, GD_KTEXT, __vectors[T_SWITCH_TOK], 3);
   //加载idt
   lidt(&idt_pd);
case IRQ_OFFSET + IRQ_TIMER:

 ticks ++;
 if (ticks % TICK_NUM == 0) {
 print_ticks();
 }

    break;
    //这个没什么意思
扩展练习
challenge 1
修改:
struct trapframe *switchu2k;
struct trapframe switchk2u;
........
// 全局变量
struct trapframe switchk2u;
// ......
case T_SWITCH_TOK:
    if (tf->tf_cs != KERNEL_CS) {
    // 修改相应段以提升特权级
    tf->tf_cs = KERNEL_CS;
    tf->tf_ds = tf->tf_es = KERNEL_DS;
    tf->tf_eflags &= ~FL_IOPL_MASK;

    // 计算将要保存新trapFrame的用户栈地址
    //    数值减8是因为内核调用中断时CPU没有压入ss和esp
    switchu2k = (struct trapframe *)(tf->tf_esp - (sizeof(struct trapframe) - 8));
    // 将修改后的trapFrame写入用户栈(注意当前是内核栈)。注意trapFrame中ss和esp的值不需要写入。
    memmove(switchu2k, tf, sizeof(struct trapframe) - 8);
    // 设置弹出esp的值为用户栈的新地址
    *((uint32_t *)tf - 1) = (uint32_t)switchu2k;
}
break;
// 全局变量
struct trapframe *switchu2k;
// ......
case T_SWITCH_TOU:
    if (tf->tf_cs != USER_CS) {
    // switchk2u是之前定义的trapframe,将中断的栈帧赋给临时中断帧
    switchk2u = *tf;

    switchk2u.tf_cs = USER_CS;

    switchk2u.tf_ds = switchk2u.tf_es = switchk2u.tf_ss = USER_DS;
    //上面是修改对应的段为user段

    //    数值减8是因为iret不会弹出ss和esp,所以不需要这8个字节
    switchk2u.tf_esp = (uint32_t)tf + sizeof(struct trapframe) - 8;

    // 将eflags中对应的IOPL位置成表示用户态的3
    switchk2u.tf_eflags |= FL_IOPL_MASK;
    // 设置中断处理例程结束时pop出的%esp,这样可以用修改后的数据来恢复上下文。
    *((uint32_t *)tf - 1) = (uint32_t)&switchk2u;
    }
    //实质只是通过改变段来改变权级
break;
以及:
static void lab1_switch_to_user(void) {

	asm volatile (
	    "sub $0x8, %%esp \n"
	    "int %0 \n"
	    "movl %%ebp, %%esp"
	    :
	    : "i"(T_SWITCH_TOU)
	);
}

static void lab1_switch_to_kernel(void) {

	asm volatile (
	    "int %0 \n"
	    "movl %%ebp, %%esp \n"
	    :
	    : "i"(T_SWITCH_TOK)
	);
}
inti.c里有坑,第一个函数需要是void类型
chanllenge 2
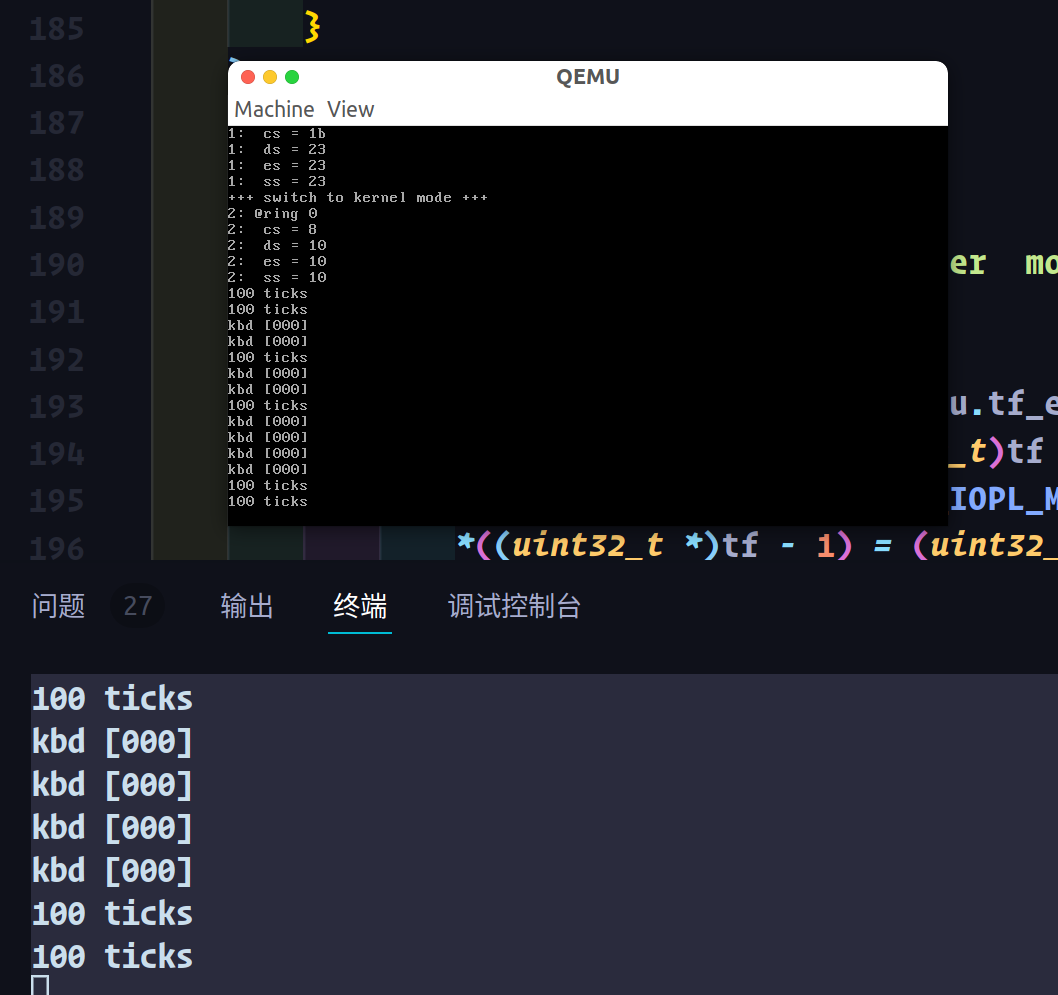
case IRQ_OFFSET + IRQ_KBD:
        c = cons_getc();
        cprintf("kbd [%03d] %c\n", c, c);
//和chanllenge1代码基本相同
        if(c == '0')
        {
             if (tf->tf_cs != KERNEL_CS) {
                 cprintf("+++ switch to  kernel  mode +++\n");
                tf->tf_cs = KERNEL_CS;
                tf->tf_ds = tf->tf_es = KERNEL_DS;
                tf->tf_eflags &= ~FL_IOPL_MASK;
                switchu2k = (struct trapframe *)(tf->tf_esp - (sizeof(struct trapframe) - 8));
                memmove(switchu2k, tf, sizeof(struct trapframe) - 8);
                *((uint32_t *)tf - 1) = (uint32_t)switchu2k;
        }
    }
        else if(c == '3')
        {
            if (tf->tf_cs != USER_CS) {
                cprintf("+++ switch to  user  mode +++\n");
                switchk2u = *tf;
                switchk2u.tf_cs = USER_CS;
                switchk2u.tf_ds = switchk2u.tf_es = switchk2u.tf_ss = USER_DS;
                switchk2u.tf_esp = (uint32_t)tf + sizeof(struct trapframe) - 8;
                switchk2u.tf_eflags |= FL_IOPL_MASK;
                *((uint32_t *)tf - 1) = (uint32_t)&switchk2u;
        }
    }


        /* do nothing */
        break;

参考博客
本文参与 腾讯云自媒体同步曝光计划,分享自作者个人站点/博客。
原始发表:2022年4月16日,如有侵权请联系 cloudcommunity@tencent.com 删除
评论
登录后参与评论
推荐阅读
目录
腾讯云开发者

Copyright © 2013 - 2026 Tencent Cloud. All Rights Reserved. 腾讯云 版权所有
深圳市腾讯计算机系统有限公司 ICP备案/许可证号:粤B2-20090059 ![]() 粤公网安备44030502008569号
粤公网安备44030502008569号
腾讯云计算(北京)有限责任公司 京ICP证150476号 | 京ICP备11018762号