JDBC和连接池原理
原创

JDBC
一、JDBC
1 作用
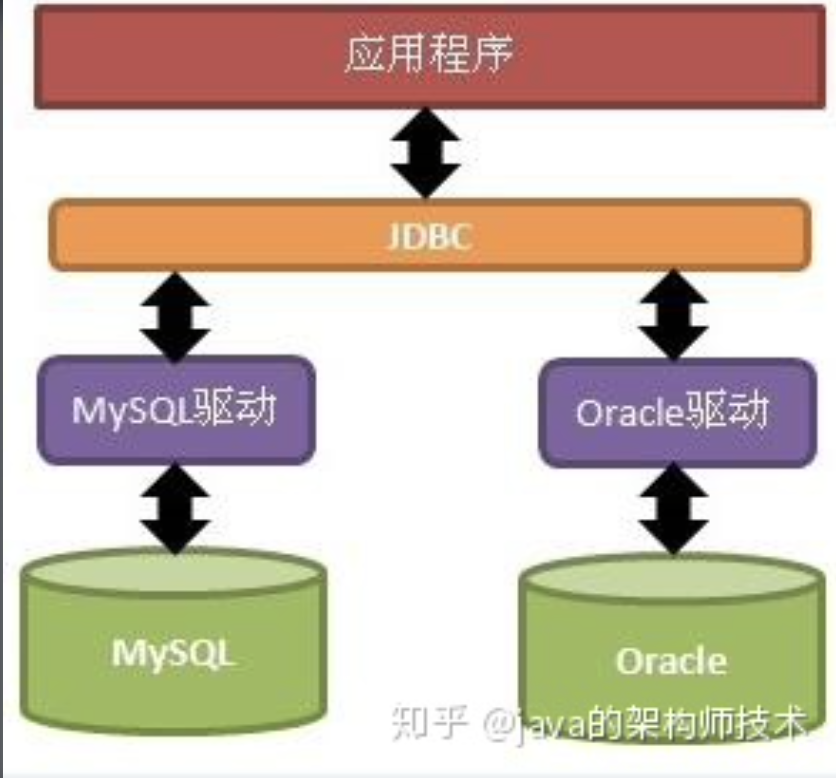
JDBC是Java提供的一组操作数据库的API,可以屏蔽各种各样的数据库差异,向上提供统一的服务接口,数据库驱动程序会实现这些接口。
2 原理
2.1、示例
除了驱动类,其他的类都是Java官方API,也就是说,如果换数据库的话,只需要换驱动类,不需要改代码。
package com.tomyu;

import java.sql.*;


public class APP {

    private final static String url = "jdbc:mysql://localhost/test_all";
    private final static String username = "root";
    private final static String password = "66666666";

    public static void main(String[] args) {

        try {
            Class.forName("com.mysql.cj.jdbc.Driver");
            //建立连接
            Connection connection = DriverManager.getConnection(url, username, password);
            System.out.println("连接成功");
            Statement statement = connection.createStatement();
            //进行查询
            ResultSet resultSet = statement.executeQuery("select * from person");
            while (resultSet.next()) {
                String loginname = resultSet.getString("id");
                String password = resultSet.getString("name");
                System.out.println("id = " + loginname + " name = " + password);
            }
        } catch (ClassNotFoundException e) {
            e.printStackTrace();
        } catch (SQLException e2) {
            e2.printStackTrace();
        }
    }
}
2.2、注册驱动
Class.forName("com.mysql.jdbc.Driver");它的作用就是将驱动类加载进JVM,并且执行驱动类中的static代码块。
public class Driver extends NonRegisteringDriver implements java.sql.Driver {
    //
    // Register ourselves with the DriverManager
    // static块,执行这行Class.forName("com.mysql.jdbc.Driver");的时候,会调用static块
    static {
        try {
            //mysql驱动类自动向DriverManager中注册驱动类实例
            java.sql.DriverManager.registerDriver(new Driver());
        } catch (SQLException E) {
            throw new RuntimeException("Can't register driver!");
        }
    }

    /**
     * Construct a new driver and register it with DriverManager
     *
     * @throws SQLException
     *             if a database error occurs.
     */
    public Driver() throws SQLException {
        // Required for Class.forName().newInstance()
    }
}
DriverManager使用线程安全的CopyOnWriteArrayList来存放每个驱动程序的类。
//java.sql.DriverManager
private final static CopyOnWriteArrayList<DriverInfo> registeredDrivers = new CopyOnWriteArrayList<>();
public static synchronized void registerDriver(java.sql.Driver driver,
                                               DriverAction da)
  throws SQLException {

  /* Register the driver if it has not already been added to our list */
  if(driver != null) {
    //registeredDrivers是一个List,将驱动信息保存到List中
    registeredDrivers.addIfAbsent(new DriverInfo(driver, da));
  } else {
    // This is for compatibility with the original DriverManager
    throw new NullPointerException();
  }

  println("registerDriver: " + driver);

}
2.3、数据库连接
从DriverManager拿到具体的数据库连接
Connection connection = (Connection) DriverManager.getConnection(url, username, password);

public static Connection getConnection(String url,
    String user, String password) throws SQLException {
    java.util.Properties info = new java.util.Properties();

    if (user != null) {
        info.put("user", user);
    }
    if (password != null) {
        info.put("password", password);
    }
    //getConnection()才是真正连接的,所以往下看
    return (getConnection(url, info, Reflection.getCallerClass()));
}

private static Connection getConnection(
  String url, java.util.Properties info, Class<?> caller) throws SQLException {
  /*
         * When callerCl is null, we should check the application's
         * (which is invoking this class indirectly)
         * classloader, so that the JDBC driver class outside rt.jar
         * can be loaded from here.
         */
  ClassLoader callerCL = caller != null ? caller.getClassLoader() : null;
  synchronized(DriverManager.class) {
    // synchronize loading of the correct classloader.
    if (callerCL == null) {
      callerCL = Thread.currentThread().getContextClassLoader();
    }
  }

  if(url == null) {
    throw new SQLException("The url cannot be null", "08001");
  }

  println("DriverManager.getConnection(\"" + url + "\")");

  // Walk through the loaded registeredDrivers attempting to make a connection.
  // Remember the first exception that gets raised so we can reraise it.
  SQLException reason = null;
  //重点
  //遍历所有驱动,使用合适的驱动进行连接
  for(DriverInfo aDriver : registeredDrivers) {
    // If the caller does not have permission to load the driver then
    // skip it.
    if(isDriverAllowed(aDriver.driver, callerCL)) {
      try {
        println("    trying " + aDriver.driver.getClass().getName());
        //重点中的重点,connect()才是真正与数据库服务器建立连接的
        Connection con = aDriver.driver.connect(url, info);
        if (con != null) {
          // Success!
          println("getConnection returning " + aDriver.driver.getClass().getName());
          return (con);
        }
      } catch (SQLException ex) {
        if (reason == null) {
          reason = ex;
        }
      }

    } else {
      println("    skipping: " + aDriver.getClass().getName());
    }

  }

  // if we got here nobody could connect.
  if (reason != null)    {
    println("getConnection failed: " + reason);
    throw reason;
  }

  println("getConnection: no suitable driver found for "+ url);
  throw new SQLException("No suitable driver found for "+ url, "08001");
}
4 SPI
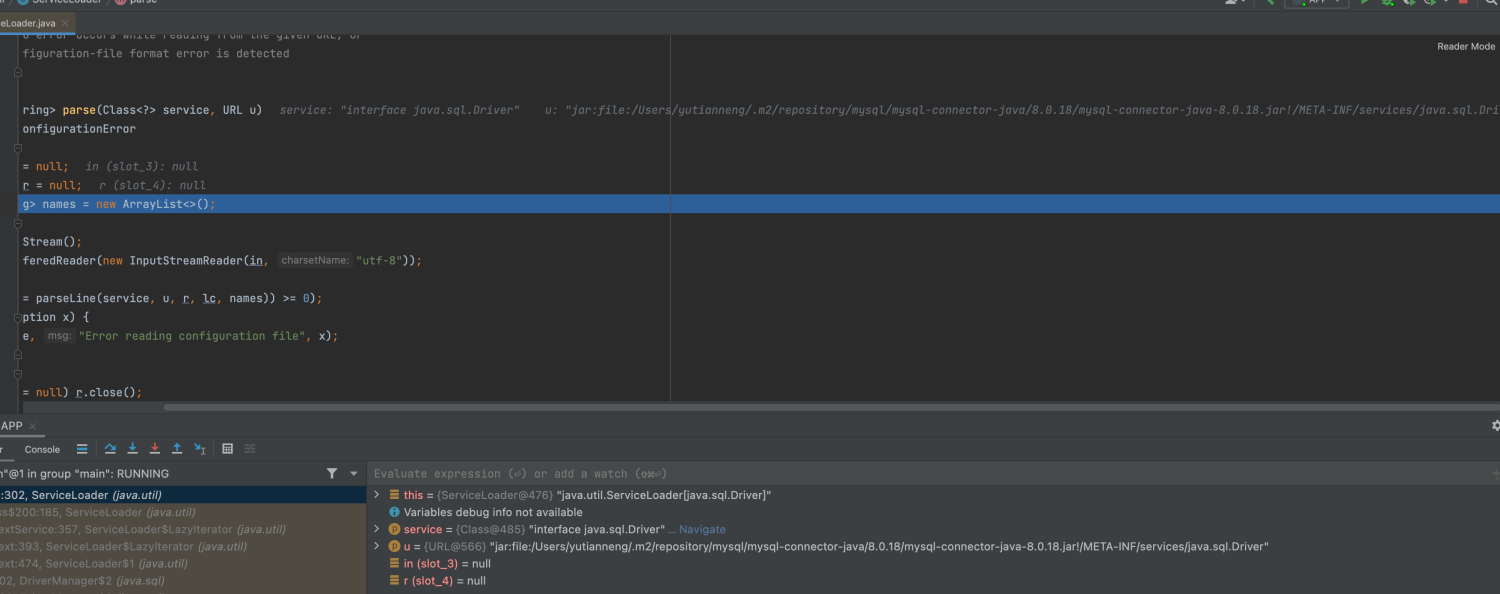
JDBC可以不用显示加载Driver,当加载DriverManager时,会调用ServiceLoader自动从系统属性"jdbc.drivers�"拿到驱动类名,
- DriverManager中有静态代码块,会自动注册数据库驱动;
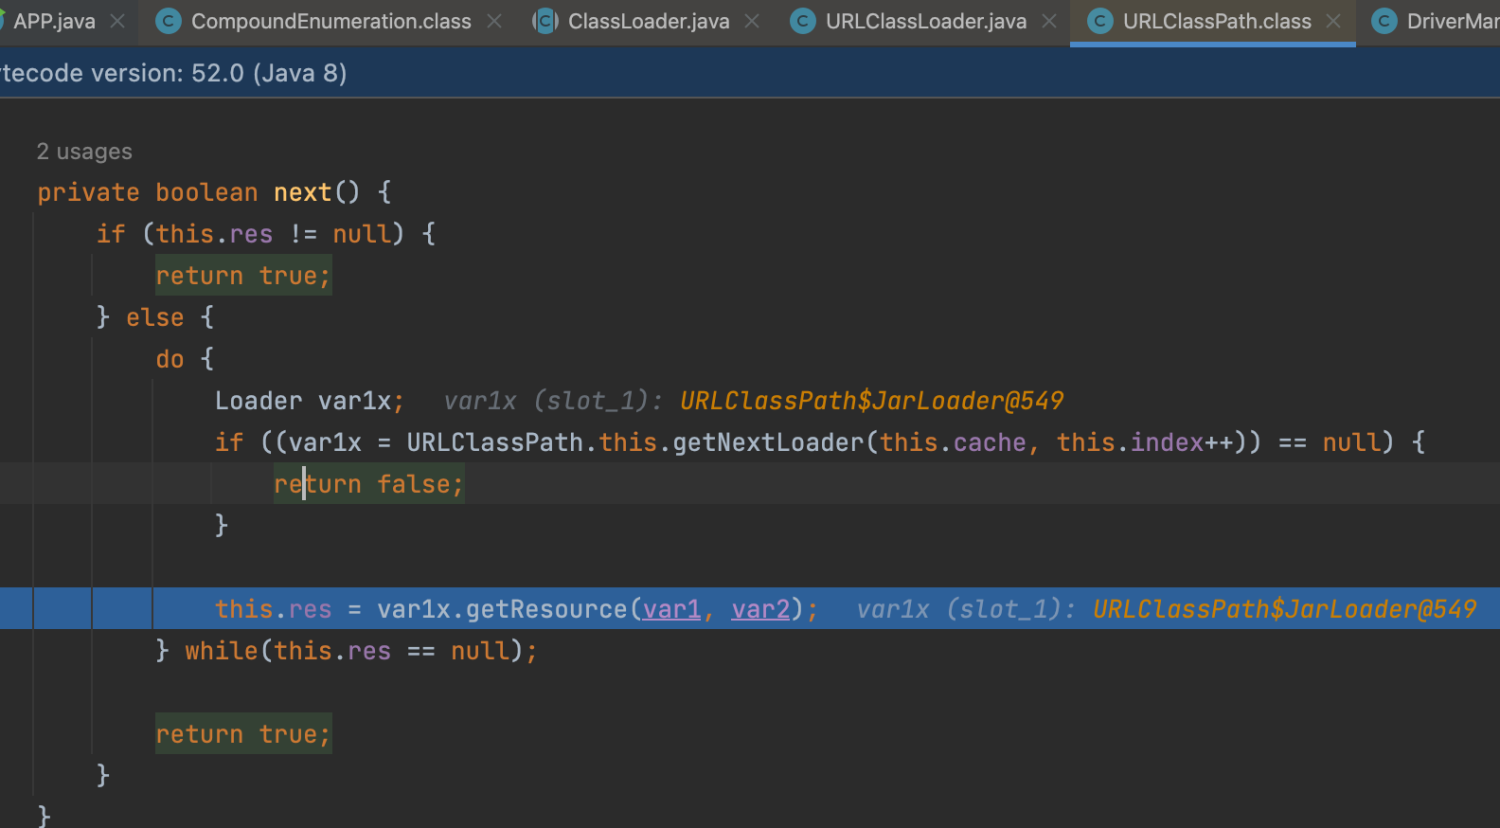
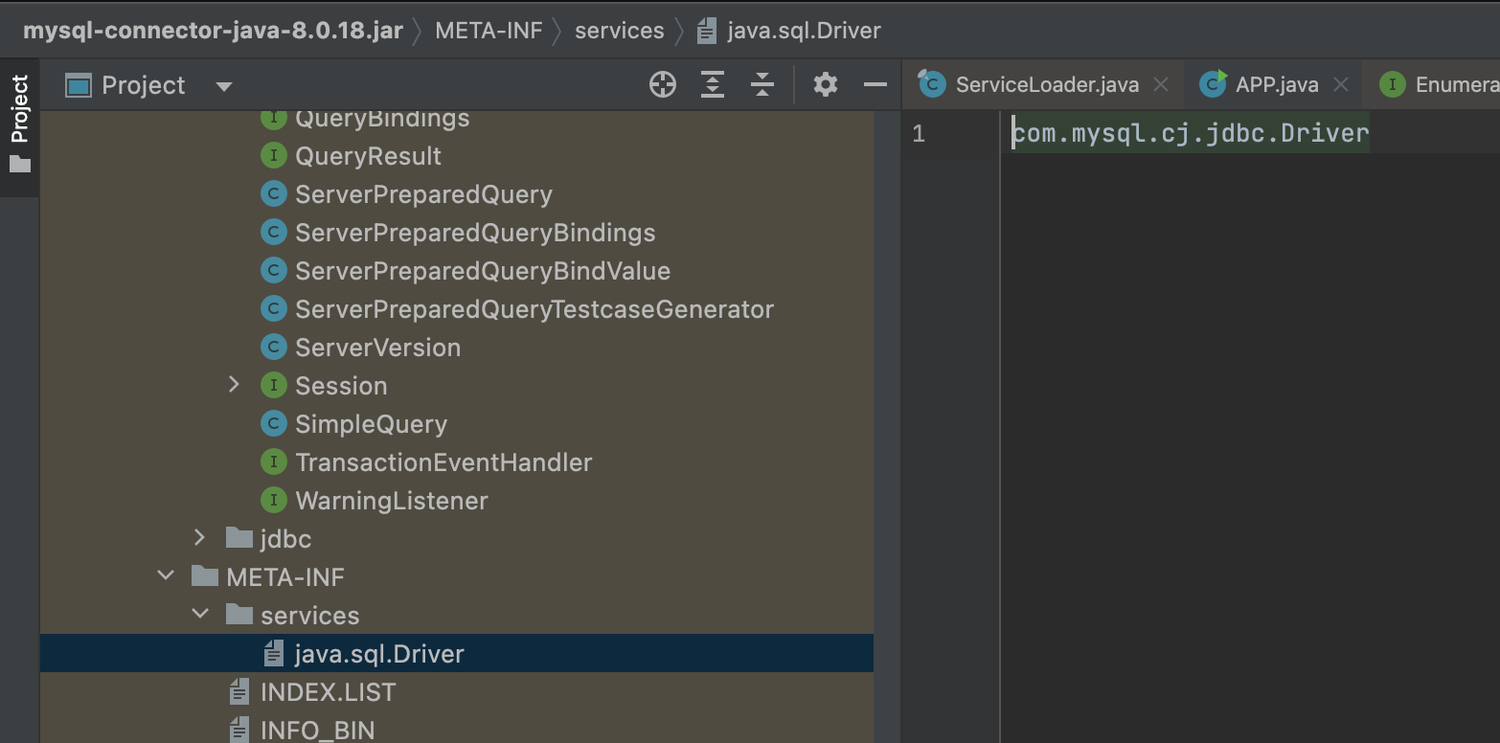
- driversIterator.hasNext()-->hasNextService,最终调用URLClassPath$JarLoader扫描本地仓库,找到
jar:file:/Users/share/.m2/repository/mysql/mysql-connector-java/8.0.18/mysql-connector-java-8.0.18.jar!/META-INF/services/java.sql.Driver,拿到驱动类名; - driversIterator.next()会调用Class.forName加载驱动类,然后添加到providers中。
//DriverManager
static {
    loadInitialDrivers();
    println("JDBC DriverManager initialized");
}
private static void loadInitialDrivers() {
    String drivers;
    try {
        //从系统属性中拿取驱动类名,没配置就没有
        drivers = AccessController.doPrivileged(new PrivilegedAction<String>() {
            public String run() {
                return System.getProperty("jdbc.drivers");
            }
        });
    } catch (Exception ex) {
        drivers = null;
    }

    AccessController.doPrivileged(new PrivilegedAction<Void>() {
        public Void run() {
        	//
            ServiceLoader<Driver> loadedDrivers = ServiceLoader.load(Driver.class);
            Iterator<Driver> driversIterator = loadedDrivers.iterator();

            try{
                //driversIterator.hasNext()会遍历本地仓库中的依赖包
                while(driversIterator.hasNext()) {
                    driversIterator.next();//Class.forName加载驱动类,然后添加到providers中
                }
            } catch(Throwable t) {
            // Do nothing
            }
            return null;
        }
    });

    println("DriverManager.initialize: jdbc.drivers = " + drivers);

    if (drivers == null || drivers.equals("")) {
        return;
    }
    String[] driversList = drivers.split(":");
    println("number of Drivers:" + driversList.length);
    for (String aDriver : driversList) {
        try {
            println("DriverManager.Initialize: loading " + aDriver);

            Class.forName(aDriver, true,
                    ClassLoader.getSystemClassLoader());
        } catch (Exception ex) {
            println("DriverManager.Initialize: load failed: " + ex);
        }
    }
}
//ServiceLoader::Iterator方法
public boolean hasNext() {
    if (knownProviders.hasNext())//已知的服务提供者
        return true;
    return lookupIterator.hasNext();//遍历本地仓库
}
public boolean hasNext() {
    if (acc == null) {
        return hasNextService();
    } else {
        PrivilegedAction<Boolean> action = new PrivilegedAction<Boolean>() {
            public Boolean run() { return hasNextService(); }//继续往下
        };
        return AccessController.doPrivileged(action, acc);
    }
}
private boolean hasNextService() {
    if (nextName != null) {
        return true;
    }
    if (configs == null) {
        try {
            // META-INF/services/java.sql.Driver
            String fullName = PREFIX + service.getName();
            if (loader == null)
                configs = ClassLoader.getSystemResources(fullName);
            else
                configs = loader.getResources(fullName);
        } catch (IOException x) {
            fail(service, "Error locating configuration files", x);
        }
    }
    while ((pending == null) || !pending.hasNext()) {
        if (!configs.hasMoreElements()) {//从本地仓库查找META-INF/services/java.sql.Driver
            return false;
        }
        pending = parse(service, configs.nextElement());
    }
    nextName = pending.next();
    return true;
}
三、连接池
池化技术,一方面是为了复用资源,减少连接的创建和销毁的开销,另一方面可以控制资源的数量,避免消耗过多的系统资源。
这里以MyBatis内置的连接池为例。
1、连接池信息
<dataSource type="POOLED">
    <property name="driver" value="${driver}"/>
    <property name="url" value="${url}"/>
    <property name="username" value="${username}"/>
    <property name="password" value="${password}"/>
</dataSource>其中dataSource的type配置为POOLED,则MyBatis会使用org.apache.ibatis.datasource.pooled.PooledDataSource作为数据源。下面是PooledDataSource的类变量:
// PooledDataSource
public class PooledDataSource implements DataSource {
    // 用来维护连接池的状态
    private final PoolState state = new PoolState(this);
    // driver,url,username,password
    // 之类的配置变量信息存在UnpooledDataSource中
    private final UnpooledDataSource dataSource;
    // 连接池的信息,可定制化配置
    protected int poolMaximumActiveConnections = 10;
    protected int poolMaximumIdleConnections = 5;
    protected int poolMaximumCheckoutTime = 20000;
    protected int poolTimeToWait = 20000;
    protected String poolPingQuery = "NO PING QUERY SET";
    protected boolean poolPingEnabled = false;
    protected int poolPingConnectionsNotUsedFor = 0;
    private int expectedConnectionTypeCode;
}注意,PooledDataSource将一部分配置信息放在了UnpooledDataSource中,并用了一个PoolState来维护连接池的状态。
// UnpooledDataSource
// PooledDataSource可以看成是由UnpooledDataSource扩展而来的,所以复用了一些变量
public class UnpooledDataSource implements DataSource {
// 包含了如username,password的】等配置信息
private ClassLoader driverClassLoader;
private Properties driverProperties;
private boolean driverInitialized;
private String driver;
private String url;
private String username;
private String password;
private boolean autoCommit;
private Integer defaultTransactionIsolationLevel;
}
// PoolState
public class PoolState {
protected PooledDataSource dataSource;
// 空闲连接列表
protected final List<PooledConnection> idleConnections = new ArrayList<PooledConnection>();
// 活跃连接列表
protected final List<PooledConnection> activeConnections = new ArrayList<PooledConnection>();
// 从连接池中获取连接的次数
protected long requestCount = 0;
// 请求连接总耗时(ms)
protected long accumulatedRequestTime = 0;
// 连接执行时间总耗时
protected long accumulatedCheckoutTime = 0;
// 执行时间超时的连接数
protected long claimedOverdueConnectionCount = 0;
// 总共超时时间
protected long accumulatedCheckoutTimeOfOverdueConnections = 0;
// 总共等待时间
protected long accumulatedWaitTime = 0;
// 等待次数
protected long hadToWaitCount = 0;
// 无效连接数
protected long badConnectionCount = 0;
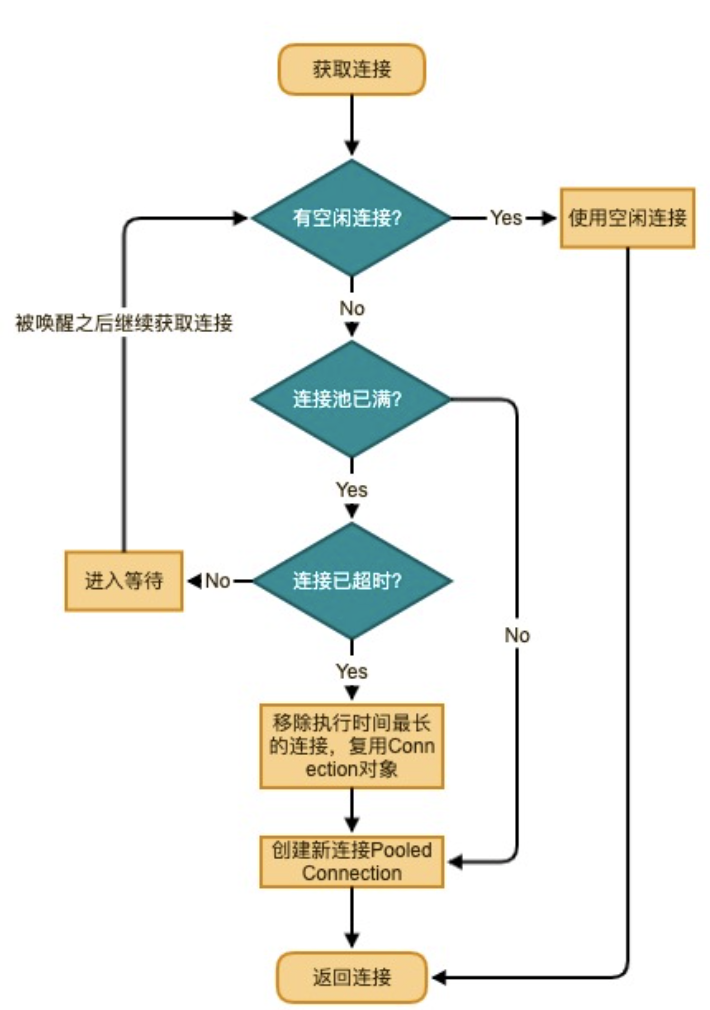
}2、获取连接
// PooledDataSource
private PooledConnection popConnection(String username, String password) throws SQLException {
  boolean countedWait = false;
  PooledConnection conn = null;
  long t = System.currentTimeMillis();
  int localBadConnectionCount = 0;

  // 需要不断尝试获取连接,所以放在循环里
  while (conn == null) {
    // 为线程安全,加synchronized锁
    synchronized (state) {
      // 检查空间连接列表是不是为空
      if (!state.idleConnections.isEmpty()) {
        // 如果有空闲连接可用,那么直接获取列表第一个连接并将之从列表中删除
        conn = state.idleConnections.remove(0);
      } else {
        // 无空闲连接可用时,走到这里
        if (state.activeConnections.size() < poolMaximumActiveConnections) {
          // 如果活跃连接数未超出限制,则新建连接
          // dataSource.getConnection()的逻辑是初始化driver,从DriverManager获取连接,
          // 设置autoCommit和IsolationLevel,比较简单,就不分析了
          conn = new PooledConnection(dataSource.getConnection(), this);
        } else {
          // 连接池已满,取出运行时间最长的连接
          // 列表中的连接是按照运行时间排序的,所以第一个元素就是运行时间最长的
          PooledConnection oldestActiveConnection = state.activeConnections.get(0);
          long longestCheckoutTime = oldestActiveConnection.getCheckoutTime();
          // 如果运行时间超过超时时间
          if (longestCheckoutTime > poolMaximumCheckoutTime) {
            // 更新一些统计字段
            state.claimedOverdueConnectionCount++;
            state.accumulatedCheckoutTimeOfOverdueConnections += longestCheckoutTime;
            state.accumulatedCheckoutTime += longestCheckoutTime;
            // 将超时连接移出 活跃连接列表
            state.activeConnections.remove(oldestActiveConnection);
            // 如果未设置自动提交,则进行回滚操作
            if (!oldestActiveConnection.getRealConnection().getAutoCommit()) {
              oldestActiveConnection.getRealConnection().rollback();
            }
            // 创建一个新的连接,不过需要复用oldestActiveConnection的realConnection,
            // 实际上并没有创建新的数据库连接
            conn = new PooledConnection(oldestActiveConnection.getRealConnection(), this);
            // 复用oldestActiveConnection 的一些信息,将oldestActiveConnection设置为无效
            conn.setCreatedTimestamp(oldestActiveConnection.getCreatedTimestamp());
            conn.setLastUsedTimestamp(oldestActiveConnection.getLastUsedTimestamp());
            oldestActiveConnection.invalidate();//置为无效连接
          } else {
            // 未超时
            try {
              // 记录统计信息
              if (!countedWait) {
                state.hadToWaitCount++;
                countedWait = true;
              }
              long wt = System.currentTimeMillis();
              // 调用Object.wait()方法进入等待状态
              state.wait(poolTimeToWait);
              // 记录统计信息
              state.accumulatedWaitTime += System.currentTimeMillis() - wt;
            } catch (InterruptedException e) {
              break;
            }
          }
        }
      }
      if (conn != null) {
        // 检测连接是否有效,主要会检测PooledConnection.valid字段,
        // 以及执行SQL ping的语句查看数据库状态,这里不做分析
        if (conn.isValid()) {
          // 如果没有设置自动回滚,执行回滚操作
          if (!conn.getRealConnection().getAutoCommit()) {
            conn.getRealConnection().rollback();
          }
          // 更新一些统计字段
          conn.setConnectionTypeCode(assembleConnectionTypeCode(dataSource.getUrl(), username, password));
          conn.setCheckoutTimestamp(System.currentTimeMillis());
          conn.setLastUsedTimestamp(System.currentTimeMillis());
          //将连接加入到活跃连接集合
          state.activeConnections.add(conn);
          state.requestCount++;
          state.accumulatedRequestTime += System.currentTimeMillis() - t;
        } else {
          // 更新无效连接相关的统计字段
          state.badConnectionCount++;
          localBadConnectionCount++;
          conn = null;
          if (localBadConnectionCount > (poolMaximumIdleConnections + 3)) {
            throw new SQLException("PooledDataSource: Could not get a good connection to the database.");
          }
        }
      }
    }
  }
  // 如果没有获取到连接,直接抛出异常
  if (conn == null) {
    throw new SQLException("PooledDataSource: Unknown severe error condition.  The connection pool returned a null connection.");
  }
  return conn;
}


@Override
public Connection getConnection() throws SQLException {
  return popConnection(dataSource.getUsername(), dataSource.getPassword()).getProxyConnection();
}
除了调用popConnection()方法之外,还调用了getProxyConnection(),看名字是包装了一层代理。为什么要这样做呢?这就需要看释放连接的逻辑了。
3、释放连接
MyBatis用代理模式,将数据库连接包装在PooledConnection对象之中:
// PooledConnection
class PooledConnection implements InvocationHandler {
    // 关闭连接的方法close(),在代理中拦截此方法来做释放连接的操作
    private static final String CLOSE = "close";
    private static final Class<?>[] IFACES = new Class<?>[] { Connection.class };
    private final int hashCode;
    // 数据源对象,这里即PooledDataSource
    private final PooledDataSource dataSource;
    // 真正的从DriverManager中获取出来的连接
    private final Connection realConnection;
    // realConnection的代理对象
    private final Connection proxyConnection;
    // 一些参数
    private long checkoutTimestamp;
    private long createdTimestamp;
    private long lastUsedTimestamp;
    private int connectionTypeCode;
    private boolean valid;

    // 构造方法
    public PooledConnection(Connection connection, PooledDataSource dataSource) {
        this.hashCode = connection.hashCode();
        this.realConnection = connection;
        this.dataSource = dataSource;
        this.createdTimestamp = System.currentTimeMillis();
        this.lastUsedTimestamp = System.currentTimeMillis();
        this.valid = true;
        // proxyConnection使用了JDK的动态代理,并将自己(this)作为了InvocationHandler
        this.proxyConnection = (Connection) Proxy.newProxyInstance(Connection.class.getClassLoader(), IFACES, this);
    }

    public Connection getProxyConnection() {
        return proxyConnection;
    }
}同时,由于PooledConnection实现了InvocationHandler接口,当外部调用代理对象方法时,都会转为调用InvocationHandler.invoke()方法。于是下面主要看invoke()方法是如何实现的:
// PooledConnection
public Object invoke(Object proxy, Method method, Object[] args) throws Throwable {
    String methodName = method.getName();
  //当用户关闭连接时,拦截下来,将连接放入空闲链表
    // 如果调用了close()方法,即调用方需要关闭连接
    if (CLOSE.hashCode() == methodName.hashCode() && CLOSE.equals(methodName)) {
        // 转为调用pushConnection()方法
        dataSource.pushConnection(this);
        return null;
    } else {
        try {
            // 如果不是调用的close()方法,则调用realConnection的同名方法
            return method.invoke(realConnection, args);
        } catch (Throwable t) {
            throw ExceptionUtil.unwrapThrowable(t);
        }
    }
}看到这里,出现了闭环。调用方使用完连接之后,如果调用了close()方法,会被上述方法拦截,转为调用dataSource.pushConnection(this)方法,猜测这个方法是用来将连接放回连接池中的。我们来一探究竟:
// PooledDataSource
protected void pushConnection(PooledConnection conn) throws SQLException {
    // 与popConnection方法一样,同样也在state上加锁,用来做线程间协作
    synchronized (state) {
        // 从活跃连接中移除此连接
        state.activeConnections.remove(conn);
        if (conn.isValid()) {
            // 空闲连接未满
            if (state.idleConnections.size() < poolMaximumIdleConnections && conn.getConnectionTypeCode() == expectedConnectionTypeCode) {
                state.accumulatedCheckoutTime += conn.getCheckoutTime();
                // 若未设置autoCommit,执行回滚
                if (!conn.getRealConnection().getAutoCommit()) {
                    conn.getRealConnection().rollback();
                }
                // 创建新的PooledConnection,并加入到idleConnections列表的末尾
                PooledConnection newConn = new PooledConnection(conn.getRealConnection(), this);
                state.idleConnections.add(newConn);
                // 复用原连接的时间信息
                newConn.setCreatedTimestamp(conn.getCreatedTimestamp());
                newConn.setLastUsedTimestamp(conn.getLastUsedTimestamp());
                // 将原连接置为无效状态
                conn.invalidate();
                // 唤醒等待连接的线程
                state.notifyAll();
            } else {
                // 空闲连接集合已满
                state.accumulatedCheckoutTime += conn.getCheckoutTime();
                // 回滚未提交的事务
                if (!conn.getRealConnection().getAutoCommit()) {
                    conn.getRealConnection().rollback();
                }
                // 直接将数据库连接关闭
                conn.getRealConnection().close();
                conn.invalidate();
            }
        } else {
            state.badConnectionCount++;
        }
    }
}pushConnection()逻辑比较简单,主要做了两件事情:
- 将连接从活跃连接列表移除;
- 如果空闲列表已满,则直接将此连接关闭;如果空闲列表未满,则新建
PooledConnection并复用Connection对象(所以并没有新的TCP握手挥手的开销),并将此连接放入空闲列表。
到此,PooledDataSource的获取连接与释放连接的操作,在连接池中形成了一个闭环。
四、JdbcTemplate
Spring将数据访问过程中固定部分和变化部分划分为两个类,固定部分放在模板类(Template),可变部分放在回调类(Callback)。
public class JdbcTemplate extends JdbcAccessor implements JdbcOperations {
  //查询前缀
  private static final String RETURN_RESULT_SET_PREFIX = "#result-set-";
  //计数前缀
  private static final String RETURN_UPDATE_COUNT_PREFIX = "#update-count-";
  //是否跳过警告
  private boolean ignoreWarnings = true;
  //查询大小
  private int fetchSize = -1;
  //最大行
  private int maxRows = -1;
  //查询超时
  private int queryTimeout = -1;
  //是否跳过结果集处理
  private boolean skipResultsProcessing = false;
  //是否跳过非公共结果集处理
  private boolean skipUndeclaredResults = false;
  //map结果集是否大小写敏感
  private boolean resultsMapCaseInsensitive = false;

  public JdbcTemplate() {
  }
  //调用父类方法设置数据源和其他参数
  public JdbcTemplate(DataSource dataSource) {
    this.setDataSource(dataSource);
    this.afterPropertiesSet();
  }
  //调用父类方法设置数据源,懒加载策略和其他参数
  public JdbcTemplate(DataSource dataSource, boolean lazyInit) {
    this.setDataSource(dataSource);
    this.setLazyInit(lazyInit);
    this.afterPropertiesSet();
  }
}
JdbcTemplate 继承了JdbcAccessor实现了JdbcOperations,JdbcAccessor主要封装了数据源的操作,JdbcOperations主要定义了一些操作接口。
public abstract class JdbcAccessor implements InitializingBean {
  protected final Log logger = LogFactory.getLog(this.getClass());
  //数据源
  @Nullable
  private DataSource dataSource;
  //异常翻译
  @Nullable
  private volatile SQLExceptionTranslator exceptionTranslator;
  //懒加载策略
  private boolean lazyInit = true;
  public JdbcAccessor() {
  }
  public void setDataSource(@Nullable DataSource dataSource) {
    this.dataSource = dataSource;
  }
  @Nullable
  public DataSource getDataSource() {
    return this.dataSource;
  }
  protected DataSource obtainDataSource() {
    DataSource dataSource = this.getDataSource();
    Assert.state(dataSource != null, "No DataSource set");
    return dataSource;
  }
  public void setDatabaseProductName(String dbName) {
    this.exceptionTranslator = new SQLErrorCodeSQLExceptionTranslator(dbName);
  }
  public void setExceptionTranslator(SQLExceptionTranslator exceptionTranslator) {
    this.exceptionTranslator = exceptionTranslator;
  }
}
接下来看JdbcOperations类,拿其中一个接口进行解析:
@Nullable
<T> T execute(StatementCallback<T> var1) throws DataAccessException;@FunctionalInterface
public interface StatementCallback<T> {
@Nullable
T doInStatement(Statement var1) throws SQLException, DataAccessException;
}JdbcTemplate对execute方法的实现:
@Nullable
public <T> T execute(StatementCallback<T> action) throws DataAccessException {
  //参数检查
  Assert.notNull(action, "Callback object must not be null");
  //获取连接
  Connection con = DataSourceUtils.getConnection(this.obtainDataSource());
  Statement stmt = null;
  Object var11;
  try {
    //创建一个Statement
    stmt = con.createStatement();
    //设置查询超时时间,最大行等参数(就是一开始那些成员变量)
    this.applyStatementSettings(stmt);
    //执行回调方法获取结果集
    T result = action.doInStatement(stmt);
    //处理警告
    this.handleWarnings(stmt);
    var11 = result;
  } catch (SQLException var9) {
    //出现错误优雅退出
    String sql = getSql(action);
    JdbcUtils.closeStatement(stmt);
    stmt = null;
    DataSourceUtils.releaseConnection(con, this.getDataSource());
    con = null;
    throw this.translateException("StatementCallback", sql, var9);
  } finally {
    JdbcUtils.closeStatement(stmt);
    DataSourceUtils.releaseConnection(con, this.getDataSource());
  }
  return var11;
}
调用者调用execute方法,execute中又反过来调用回调方法action获取
回调机制:类A中的a方法调用了类B中的b方法,b执行完后反过来调用类A中的回调方法,这是一种双向的调用方式。
下面以查询方法示例:
public List<Users> findAll() {
  JdbcTemplate jdbcTemplate = DataSourceConfig.getTemplate();
  String sql = "select nickname,comment,age from users";
  return jdbcTemplate.query(sql, new BeanPropertyRowMapper<Users>(Users.class));
}
query的实现:
public <T> List<T> query(String sql, RowMapper<T> rowMapper) throws DataAccessException {
  return (List)result(this.query((String)sql, (ResultSetExtractor)(new RowMapperResultSetExtractor(rowMapper))));
}

@Nullable
public <T> T query(final String sql, final ResultSetExtractor<T> rse) throws DataAccessException {
  Assert.notNull(sql, "SQL must not be null");
  Assert.notNull(rse, "ResultSetExtractor must not be null");
  if (this.logger.isDebugEnabled()) {
    this.logger.debug("Executing SQL query [" + sql + "]");
  }
  //实现回调接口
  class QueryStatementCallback implements StatementCallback<T>, SqlProvider {
    QueryStatementCallback() {
    }
    @Nullable
    public T doInStatement(Statement stmt) throws SQLException {
      ResultSet rs = null;
      Object var3;
      try {
        //这里真正的执行我们的sql语句
        rs = stmt.executeQuery(sql);
        //处理对象映射
        var3 = rse.extractData(rs);
      } finally {
        JdbcUtils.closeResultSet(rs);
      }
      return var3;
    }
    public String getSql() {
      return sql;
    }
  }
  //调用execute接口
  return this.execute((StatementCallback)(new QueryStatementCallback()));
}
原创声明:本文系作者授权腾讯云开发者社区发表,未经许可,不得转载。
如有侵权,请联系 cloudcommunity@tencent.com 删除。
原创声明:本文系作者授权腾讯云开发者社区发表,未经许可,不得转载。
如有侵权,请联系 cloudcommunity@tencent.com 删除。
评论
登录后参与评论
推荐阅读
目录
腾讯云开发者

Copyright © 2013 - 2026 Tencent Cloud. All Rights Reserved. 腾讯云 版权所有
深圳市腾讯计算机系统有限公司 ICP备案/许可证号:粤B2-20090059 ![]() 粤公网安备44030502008569号
粤公网安备44030502008569号
腾讯云计算(北京)有限责任公司 京ICP证150476号 | 京ICP备11018762号