SpringCloudAlibaba入门(2023版)
原创
SpringCloudAlibaba入门(2023版)
原创
用户9744129
发布于 2023-01-12 22:13:56
发布于 2023-01-12 22:13:56
先知
架构图一览
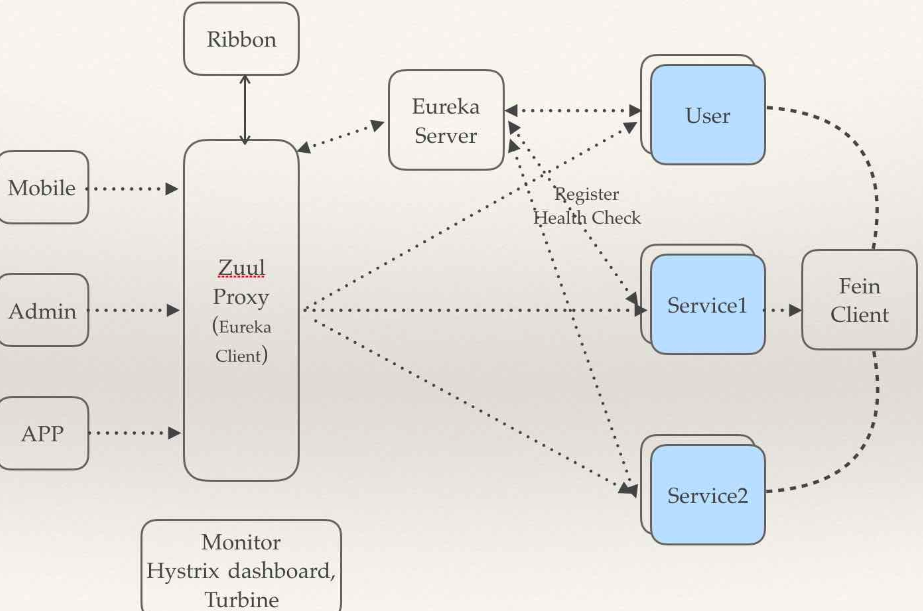
在这里插入图片描述
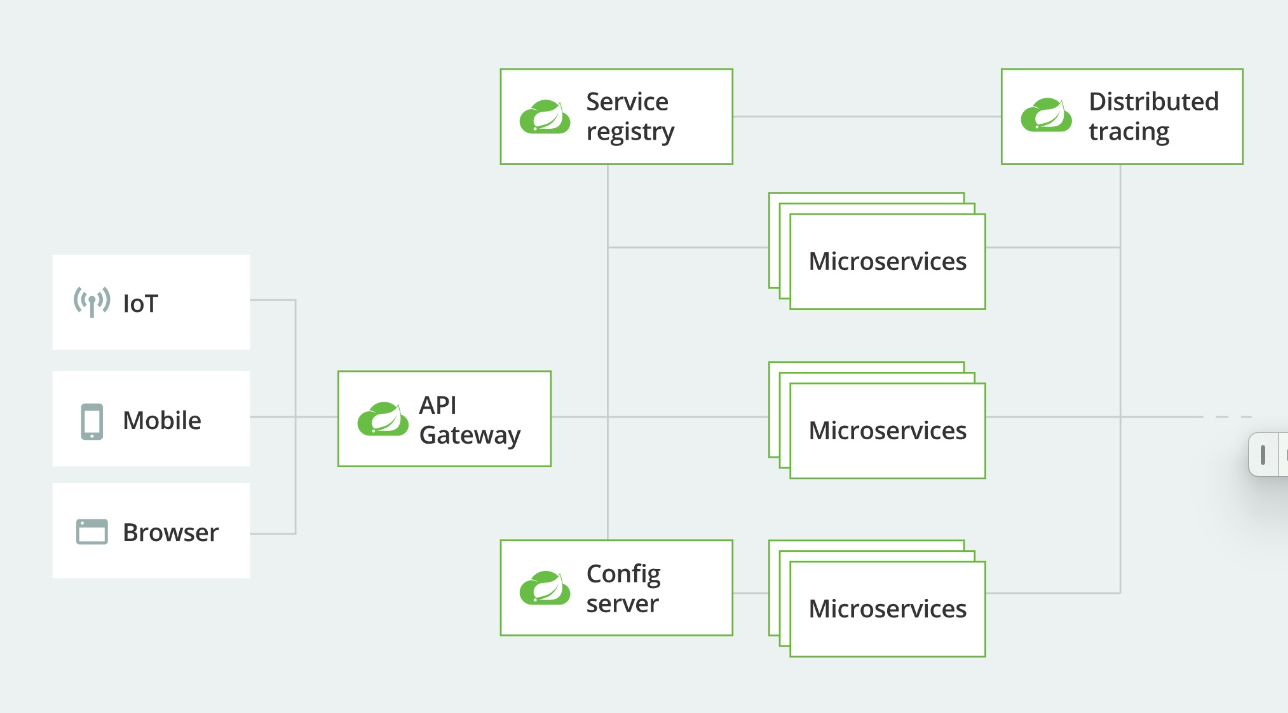
在这里插入图片描述
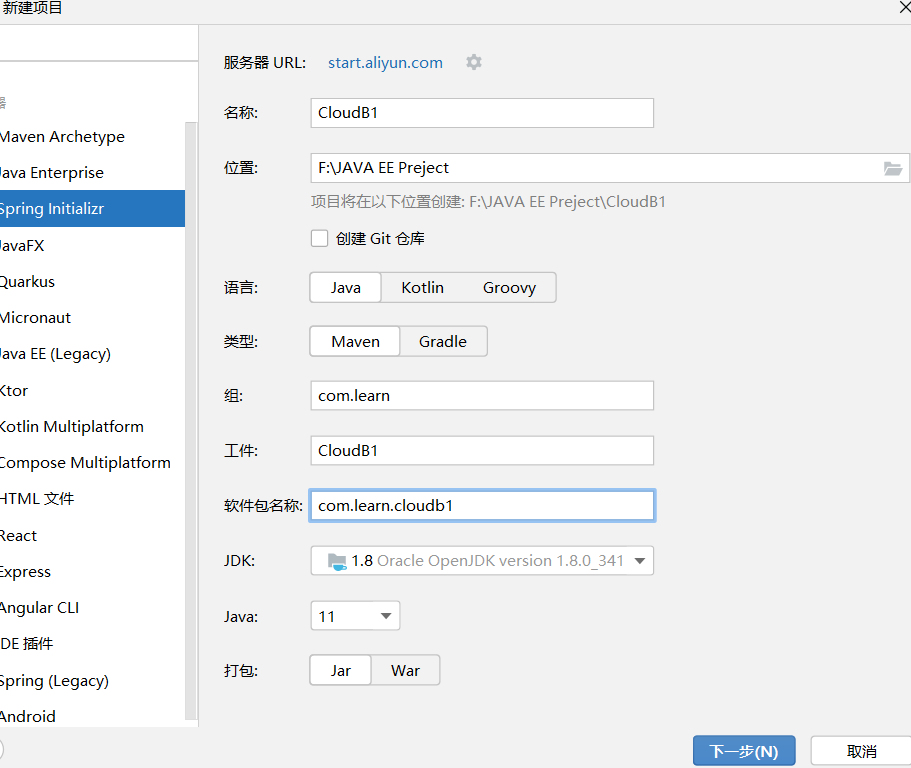
创建Serve端
新建项目
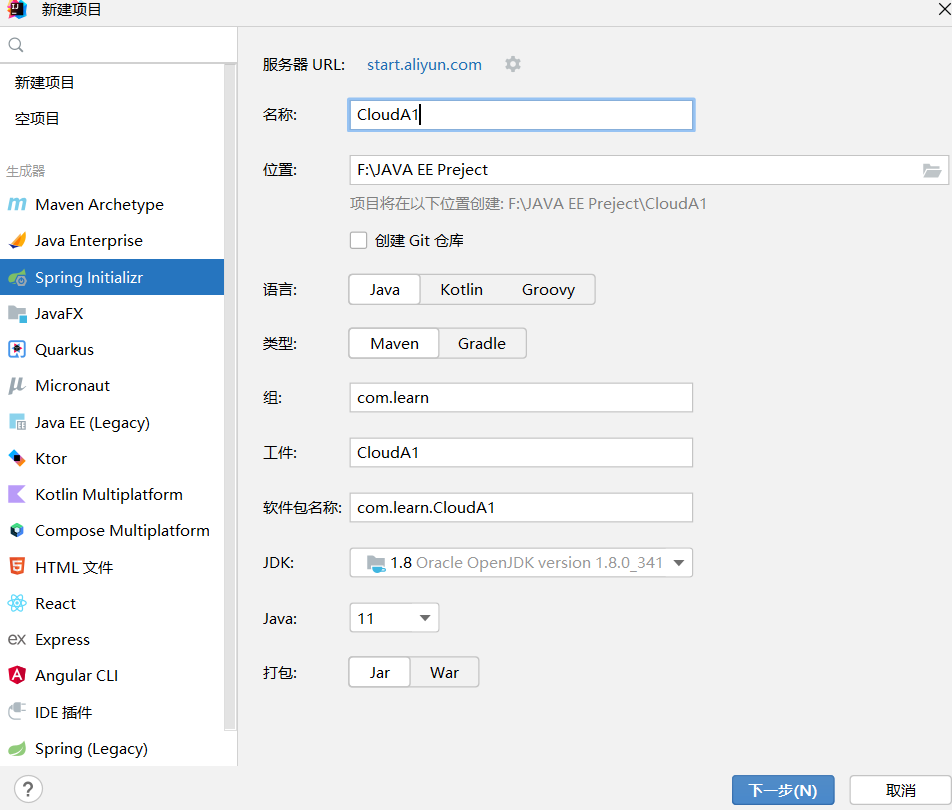
在这里插入图片描述
在这里插入图片描述
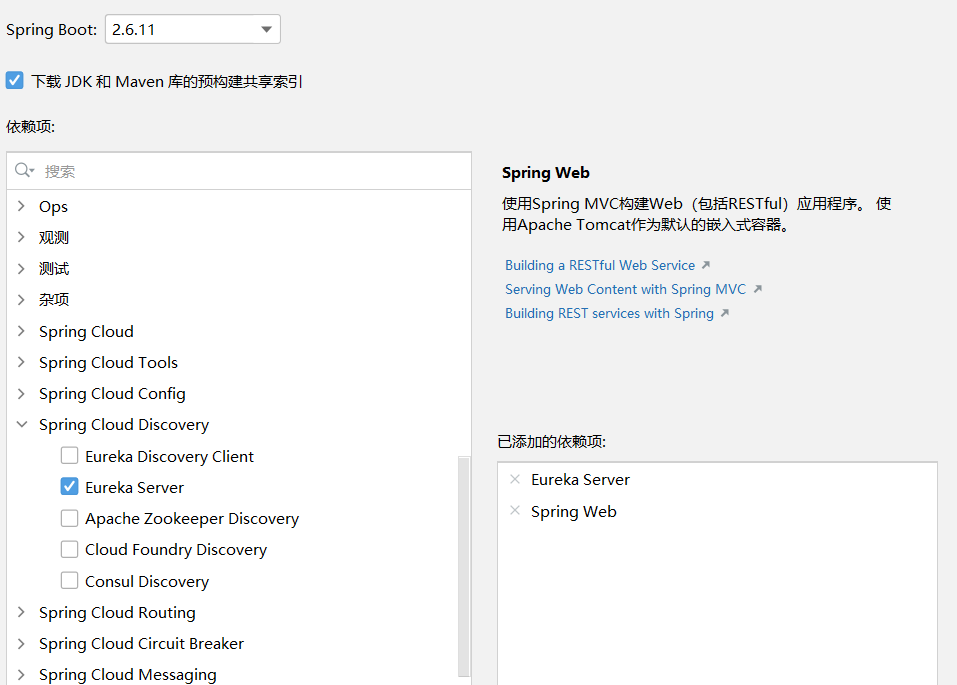
配置文件
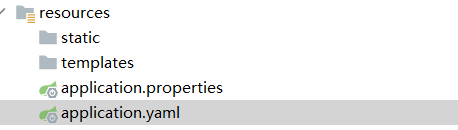
在这里插入图片描述
application.yaml
server:
  port: 8080

# Eureka配置
eureka:
  instance:
    ## Eureka实例的名称
    hostname: localhostA
  client:
    # false表示自己端就是注册中心,职责就是维护服务实例,并不需要去检查服务
    fetch-registry: false
    # false表示不向注册中心注册自己
    register-with-eureka: false
    # 设置与Eureka Server交互的地址查询服务和注册服务都需要依赖这个地址
    serviceUrl:
      defaultZone: http://${eureka.instance.hostname}:${server.port}/eureka/
启动类配置
// 表示当前类为服务端Eureka服务端
@EnableEurekaServer
@SpringBootApplication
public class CloudA1Application {

    public static void main(String[] args) {
        SpringApplication.run(CloudA1Application.class, args);
    }

}
启动测试一下
访问自己的
localhost:端口号

在这里插入图片描述
一切正常再继续
Eureka Client包括两个服务模块:Service Provider(服务提供方)和Service Consumer(服务消费方)。
创建Client端的服务提供端
新建项目
新增依赖
<!--        lombok-->
        <dependency>
             <groupId>org.projectlombok</groupId>
             <artifactId>lombok</artifactId>
             <optional>true</optional>
         </dependency>
<!--        数据库池-->
        <dependency>
            <groupId>com.alibaba</groupId>
            <artifactId>druid</artifactId>
            <version>1.1.16</version>
        </dependency>
<!--        MP-->
        <dependency>
            <groupId>com.baomidou</groupId>
            <artifactId>mybatis-plus-boot-starter</artifactId>
            <version>3.4.2</version>
        </dependency>
         <!-- mysql -->
        <dependency>
            <groupId>mysql</groupId>
            <artifactId>mysql-connector-java</artifactId>
            <scope>runtime</scope>
        </dependency>
         <!-- druid -->
        <dependency>
            <groupId>org.springframework.boot</groupId>
            <artifactId>spring-boot-starter-web</artifactId>
        </dependency>配置文件
server:
port: 8081
Eureka配置
eureka:
client:
# 表示将自己注册进Eureka Server默认为true register-with-eureka: true # 是否从Eureka Server抓去已有的注册信息,默认是true fetch-registry: true # 设置与Eureka Server交互的地址查询服务和注册服务都需要依赖这个地址 service-url: defaultZone: http://localhost:8080/eureka#数据库配置
spring:
datasource:
driver-class-name: com.mysql.cj.jdbc.Driverurl: jdbc:mysql://127.0.0.1:3306/blog?useSSL=false&serverTimezone=UTC&useUnicode=true&characterEncoding=UTF-8username: rootpassword: xxxtype: com.alibaba.druid.pool.DruidDataSource当前服务注册在Eureka Server的名称
application:
name: server-provider1#MP配置
mybatis-plus:
配置外部xml映射
configuration:
# 开启SQL日志输出log-impl: org.apache.ibatis.logging.stdout.StdOutImpl# 开启驼峰映射map-underscore-to-camel-case: truemapper-locations: classpath:mapper/*.xml
#### 启动类配置


```java
// 表示当前类客户端Eureka
@EnableDiscoveryClient
@SpringBootApplication
public class CloudB1Application {
public static void main(String[] args) { SpringApplication.run(CloudB1Application.class, args);}}
#### 编写控制器类
```java
package com.learn.cloudb1.controller;
import org.springframework.web.bind.annotation.GetMapping;
import org.springframework.web.bind.annotation.RestController;
@RestController
@RequestMapping("/hello")
public class HelloController {
@GetMapping("/get1")public String hello(){ return "hello world!";}}
#### 启动测试
***访问自己的 localhost:端口号(就是服务注册中心)
可以发现多了些东西,一个报错和刚刚注册好的服务提供者***

### 创建Client端的服务消费端
创建方法和创建Client端的服务服务端一样
#### 配置文件
```javaserver:
port: 8083
spring:
application:
name: service-customer1eureka:
client:
service-url: defaultZone: http://localhost:8080/eureka#### 启动类
```java@EnableDiscoveryClient
@SpringBootApplication
public class CloudB1Customer1Application {
public static void main(String[] args) { SpringApplication.run(CloudB1Customer1Application.class, args);}}
#### 控制器
```java
package com.learn.cloudb1_customer1.controller;
import org.springframework.cloud.client.ServiceInstance;
import org.springframework.cloud.client.discovery.DiscoveryClient;
import org.springframework.web.bind.annotation.GetMapping;
import org.springframework.web.bind.annotation.RestController;
import java.util.List;
@RestController
@RequestMapping("/getMes")
public class GetMesController {
//从Euraka Server中获取服务提供方的服务地址信息 @Autowiredprivate DiscoveryClient ds;;@GetMapping()public String getMes(){ //服务提供者的名字 List<ServiceInstance> instanceList = ds.getInstances("server-provider1"); int port=0; String host=""; //打印服务机器的信息 for (ServiceInstance instance : instanceList) { //服务主机端口号 port = instance.getPort(); System.out.println("服务主机端口号:"+ port); //服务主机名字 host = instance.getHost(); System.out.println("服务主机名字:"+host); } return host+"++++"+port;}}
启动测试
发现又多了一个
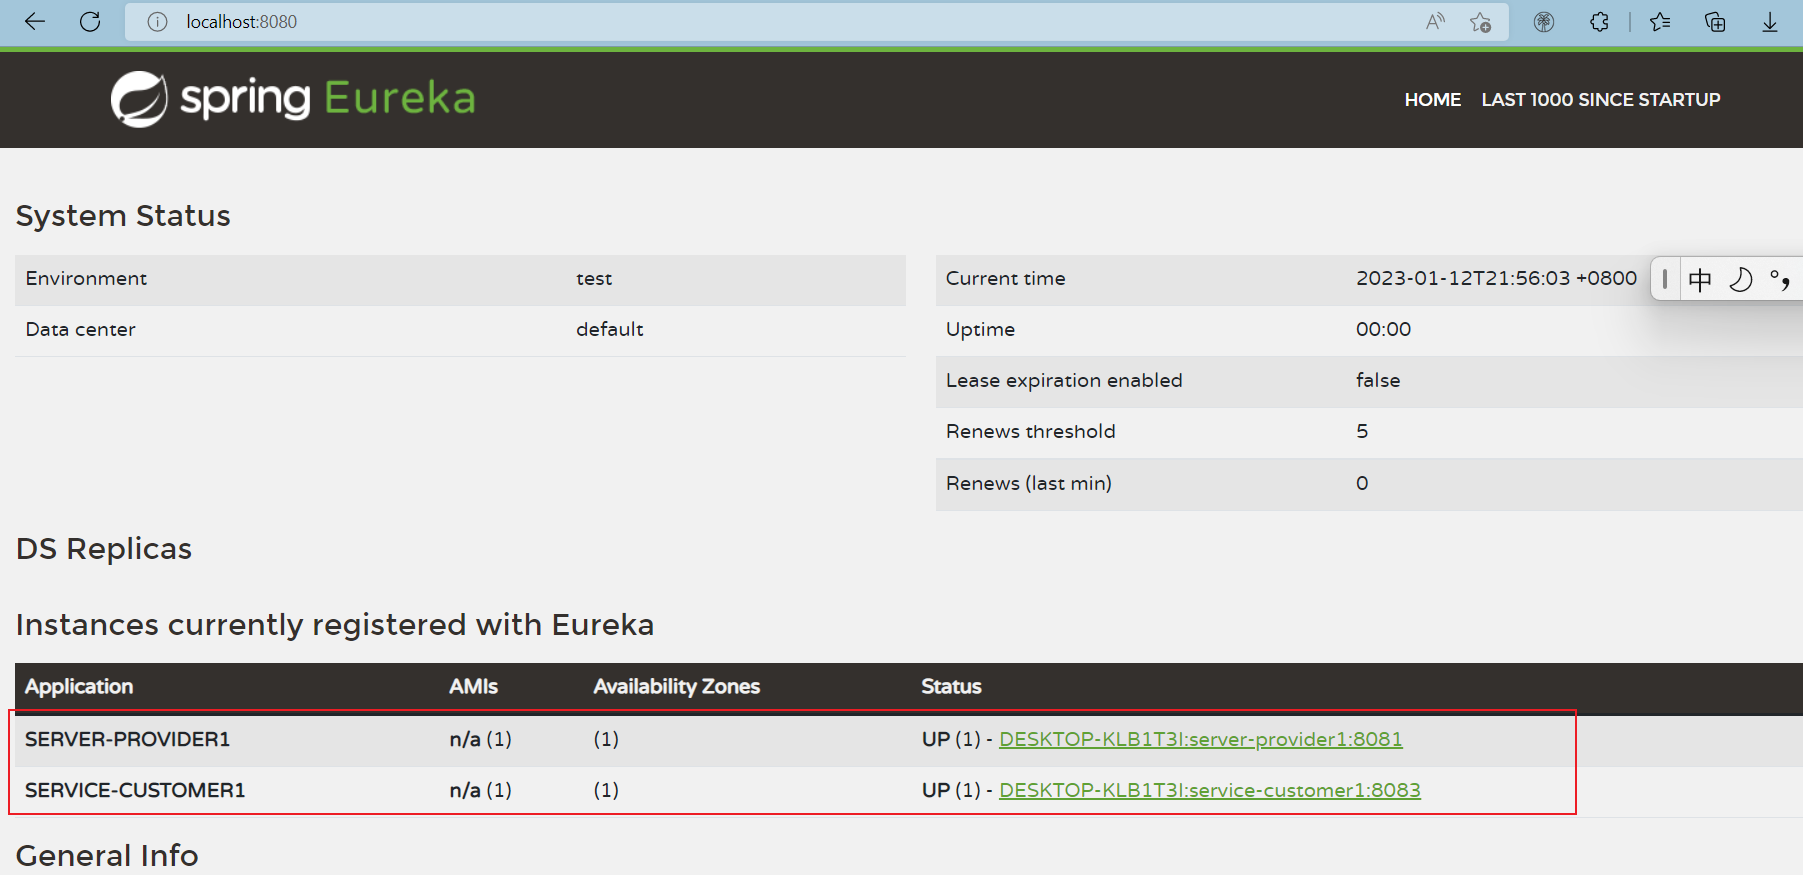
在这里插入图片描述
点击这里再输入自己定义的接口发现也可正常访问

在这里插入图片描述

在这里插入图片描述
OK!入门结束
其他更详细的适合入门的文章
https://www.cnblogs.com/h--d/p/12635204.html
https://blog.csdn.net/jc_hook/article/details/122413858
报错解决方法
原创声明:本文系作者授权腾讯云开发者社区发表,未经许可,不得转载。
如有侵权,请联系 cloudcommunity@tencent.com 删除。
原创声明:本文系作者授权腾讯云开发者社区发表,未经许可,不得转载。
如有侵权,请联系 cloudcommunity@tencent.com 删除。
评论
登录后参与评论
推荐阅读
目录
腾讯云开发者

Copyright © 2013 - 2026 Tencent Cloud. All Rights Reserved. 腾讯云 版权所有
深圳市腾讯计算机系统有限公司 ICP备案/许可证号:粤B2-20090059 ![]() 粤公网安备44030502008569号
粤公网安备44030502008569号
腾讯云计算(北京)有限责任公司 京ICP证150476号 | 京ICP备11018762号